
Swift packages are reusable components of Swift, Objective-C, Objective-C++, C, or C++ code that we can import into any Xcode project.
In this article we will see:
- How to create our Swift package containing reusable SwiftUI code
- How to make it available for other developers
- How to add our new package to an Xcode project
Create our package
In Xcode, go to File > New > Package….
Name the package, select a destination to save the project and click the “create” button. The package is created.
The package contains several default files:
-
README.mdis a markdown file that will serve as documentation for other developers. -
Package.swiftcontains the configuration of the package. -
MyPackage.swiftis the default generated file. We won’t use it as we will create another one. -
MyPackageTests.swiftis also generated by default and is made for unit testing for the package. We will not cover that part today.

Configure the package
We can see that the file contains some information about the package, like its name, its products (the parts that other developers will import into their projects) and the targets for compilation. It also contains a dependencies section if the package needs to import other Swift packages.
As SwiftUI only runs on iOS 13 or later (also macOS but we will not cover that), we need to add this requirement to our package.
Add the following property under the name property:
let package = Package(
//    name: ...
    platforms: [
        .iOS(.v13)
    ],
// ...
)
Adding our code
Create a new file next to MyPackage.swift file to write our SwiftUI code. For this tutorial, we will use this code:
import SwiftUI

public struct MyPackageView: View {
    public init() {}
    public var body: some View {
        Text("Hello world in MyPackage!")
    }
}
Note that all here needs to be marked as public. If not, nothing will be visible for developers that will import your package.
📝 While developing a package, it may be useful to be able to run the code we are writing on a demo app.
Check my article How to create an example app for your SPM package!
Make the package available for other developers
To make this new package available for other developers, we will need to host it somewhere. Here we will use Github.com.
On Github, create a new repository. Add a name and use all the default settings. Just make sure the repository is public.
Now open the terminal at the location of the project directory and enter the following commands:
git init
git add --all
git commit -m "first commit"
git branch -M main
git remote add origin YOUR-PACKAGE-URL
git push -u origin main
→ Here you need to replace the YOUR-PACKAGE-URL by the URL of the Github repository. In my case it’s https://github.com/Kaww/MyPackage.
The package should now be available!
Import the package to an Xcode project
Now we may want to use our new package in an Xcode project. Let’s see how to import it.
Open an Xcode project, go to the main project file then go to Project > Your project > Package Dependencies.
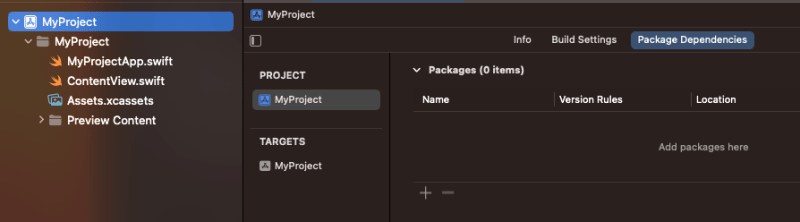
Press the “+” button and enter your package Github URL in the search bar.
We can specify a dependency rule like a minimum version number for the package (if we added a release in the Github repository). Here we will use the code available on the main git branch.
Then press “Add Package”.

We can see that your package appeared on the file explorer under the “Package Dependencies” section.
In a SwiftUI view, we can now import the package and call the view we created:
- Add
import MyPackageon the top of the file. - In the view, add
MyPackageView()to call the package’s view.

And that’s it!
Wrap up
In this article, we learned how to create a Swift package and what are the important files in it.
Then we learned how to push it on Github to make it visible and available for other developers.
Finally, we’ve seen how to import the package as a dependency for another project to use its code.
I hope this article has been helpful to you. If you have any questions or feedback about this article, don’t hesitate to contact me on **Twitter!

Top comments (0)