
A few days ago we released a new nature-themed app — Iceland 3D Live Wallpaper. It has an interactive WebGL demo too, which you can find here.
Terrain is based on this beautiful and detailed 3D model by Sergey Kuydin. Interestingly, this is not a real landscape of some part of Iceland. Even though it looks like a real thing, it actually is generated in World Machine. After analyzing model in Sketchfab we decided to create a live wallpaper with it, adding dynamic time of day. You should check out more of Sergey’s work, he has some high quality models and 3D scans too.
Scene Composition
Scene is created from the purchased 3D model of terrain and other assets, like textures and models for the sky hemisphere, birds and sprites. They were created and tailored to fit the scene by my brother, who also proposed some recommendations on how to optimize certain aspects of the scene, and tweaked shaders when needed. As usual, the web demo was created before the Android app because it is faster to create a web prototype than an Android app and it is way easier for me and my brother to collaborate on the web project.
To analyze scene rendering I will refer to source code. You can clone it from this repository or examine code on GitHub using links to files I will provide below.
Scene is rendered in 35 total draw calls. Order of rendering is carefully chosen to efficiently use z-buffer culling. The nearest objects are drawn first, the most distant ones last. After that we render transparent objects:

All actual draw calls are issued in drawSceneObjects() method of MountainsRenderer.ts. Let’s analyze how they are rendered.
Birds are rendered first because they can occlude both terrain and sky. They are rendered in 12 draw calls.
Next, we render terrain. Original high-poly model is simplified in Blender using the Decimate modifier to ~30k triangles which results in detailed enough geometry.
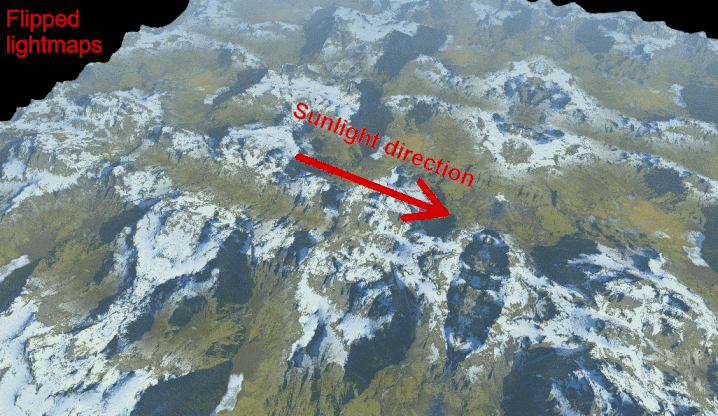
And of course to create a vast, huge mountainous landscape by reusing a single terrain model we use the same terrain skirt technique as in Dunes wallpaper (described in our previous article here, and the original implementation is in Halo Wars). The basic idea of this technique is to draw the same terrain tile mirrored at the every edge of main terrain. However, in Dunes live wallpaper there was one flaw in this. On mirrored tiles shadows from pre-rendered lightmaps were on the wrong slopes — lit by the sun. Because of the overall dunes terrain simplicity and low camera placement it was concealed and virtually unnoticeable. I must give a huge credit to u/icestep from Reddit who have found this and suggested a fix to create 4 different lightmaps for 4 possible tile orientations. But because mountains have deep, sharp shadows this cheap trick becomes clearly visible from almost any place in the scene so we had to implement a fix for this. Luckily, by clever placement of the sun (alongside one of the axes) we have to render just 2 lightmaps — for sunlight in the correct and in the flipped direction. While actual tiles are still mirrored (cameras avoid certain angles where seams are too obvious), proper lighting somewhat conceals this cheap trick with geometry from human’s eyes.
Here you can see that with correct lightmaps shadows appear on correct side of both flipped and regular tiles:
After the terrain we draw a sky hemisphere object with the basic DiffuseShader, and then draw 11 cloud sprites. Then we draw a sun sprite. These transparent objects are rendered without writing to the depth buffer. Clouds and sun have trimmed geometries for less overdraw. You can read about this optimized sprites technique here. We decided not to use soft particles for clouds because scene size allowed us to place them so that they don’t intersect with other geometries while still partially occluding some peaks. Not using soft particles is beneficial for performance because they require additional render pass to render scene depth.
Terrain shaders breakdown
The main object in the scene is obviously the terrain. And it must look good while maintaining acceptable performance. Here I’ll explain some optimizations and tricks used to achieve a balance between these two mutually exclusive goals.
Terrain shader applies the following effects to the base diffuse color:
- Water reflection
- Baked lightmap
- Fog
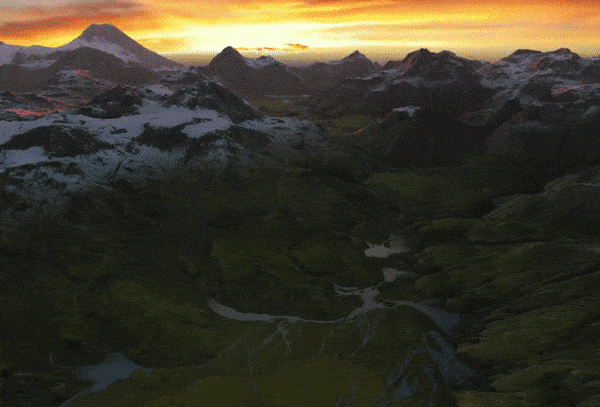
This allows terrain to have crisp shadows, subtle atmospheric fog and the sun reflection in the water creeks and puddles created by thawed snow. The last one is a small detail but really improves overall scene quality when viewed against the sun:
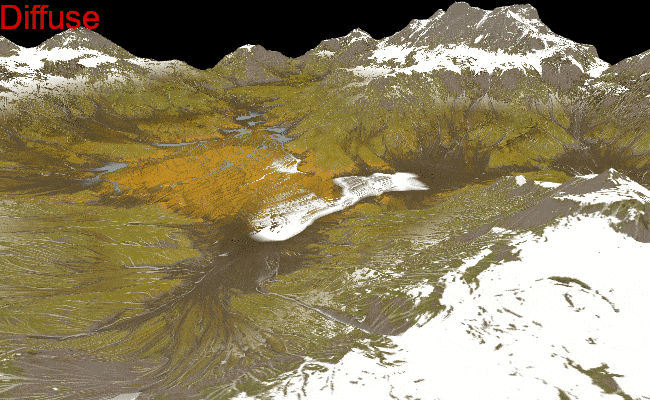
So in addition to diffuse texture and two lightmaps (for regular and flipped tiles), this requires a separate specular channel for water. And these textures are really large ones — 4096x4096 pixels, so that’s quite a lot of data. To optimally store this information, we use only two large textures and one small auxiliary one. First texture is necessarily a diffuse map. The second one is a combined lightmap, which contains two lightmaps for regular and flipped tiles in red and green channels. Blue channel is used to store the water specular reflection map. But wait, you may say, in sunrise and sunset scenes it is clearly seen that lightmaps are colored! How RGB data can be stored in a single channel? That’s why we use that auxiliary texture. It is a small color ramp — a 256x1 gradient for coloring greyscale lightmap.
Assuming that the virtual sun is positioned alongside the same axis of the scene as the flipped skirt tiles, we can optimize this even further. This way we can actually have only two lightmaps rendered — for high and low sun position. We can treat the regular lightmap channel as a sun direction and the flipped one as a “sun is on the opposite side of sky” direction. This allows us to reuse the same “high sun” lightmap for day/night and “low sun” lightmap for sunrise/sunset, by merely swapping regular and flipped channels for different times of day.
Let’s take a look at shader source code. It is in the file TerrainWaterShader.ts. At the very end of fragment shader code you can uncomment one of 6 lines to visualize intermediate passes shown on GIF above. You may notice that shader doesn’t consume normals from any attribute and instead in calculation of specular reflection we use constant normal. This is another optimization to reduce geometry size — geometry indeed doesn’t have normals because water is placed in almost perfectly flat part of terrain and accurate vertex normal can be substituted with constant upward normal.
For skirt terrain we use a simplified version of the shader without water reflection — TerrainShader.ts.
In the MountainsRenderer in initShaders() method you may see that we create a pair of each terrain shader — with water and simplified one, both regular and flipped.
Shader precision
You may notice that the terrain fragment shader for the skirt has reduced floating point precision. For main terrain we need highp precision for correct rendering of water, and since the skirt version doesn’t have these reflections, mediump is enough.
At first this may look like a minor optimization, however it is actually a quite important one because it runs noticeably faster, meaning GPU load is reduced. Even when tested on not state-of-the-art Pixel 3 phone, both precisions result in steady 60 fps. However, reducing load on GPU means it has more free power to draw smoother UI and reduces overall power consumption which is very important for live wallpapers.
In general, highp instructions on modern mobile GPUs are twice as slow as mediump or lowp. Obviously shader has a bunch of other non-math instructions to run, so what impact does reducing precision have? While this value is different for different GPUs, we can use some tools to measure it. For example, an offline PowerVR shader compiler can be used to analyze it for this specific hardware. And targeting PowerVR Series6 GPUs we get 18 cycles for highp and 13 cycles for mediump shaders. This is 28% of performance increase for a shader which is used to draw quite a significant part of a scene’s fragments.
Targeting different OpenGL ES versions for Android
This is our first Android live wallpaper which doesn’t support OpenGL ES 2.0 at all. Only 10% of Android devices are limited to OpenGL ES 2.0 and these must be some really old, outdated devices. So we support only OpenGL ES 3.0 and up — app has two sets of resources for ES 3.0 and ES 3.2. For devices with ES 3.0 we use ETC2 textures which provide acceptable image quality at the same size as ETC1. However, compression is still not enough to keep textures small so we had to downsample them for ES 3.0. On devices with ES 3.2 we use more advanced ASTC compression for textures with better quality and better compression. This allows us to use textures of high resolution on modern devices. Here are some sample texture sizes:
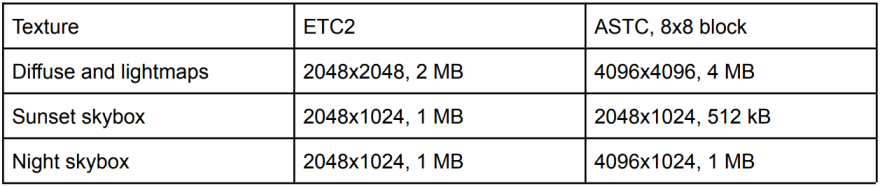
Color ramp textures are uncompressed because color accuracy is critical here, but since they are really tiny they don’t use a lot of memory.
Update: In about a week after releasing app, I've compared diffuse texture compressed with ASTC 8x8 and 10x10 blocks. Higher compression definitely introduces some distortions caused by extreme compression. However, on such fuzzy images as aerial terrain imagery it is really hard to tell the difference between compression artifacts and actual random features of terrain. You can see the very similar results when compressing different images into medium-quality JPEG, which also uses fixed 8x8 pixel blocks to compress images. Images with thin sharp lines (like text and diagrams) will have notorious blocky JPEG artifacts, but you won't tell a difference between compressed and original photos of nature. So I've updated app to use even better compressed diffuse texture.
For geometry, both vertex and texture coordinates use half floats. This precision is enough for vertex coordinates, and because we use textures significantly larger than 256 we can’t use bytes for texture coordinates — 8-bit precision for 4096x4096 diffuse texture will be 16 texels.
Final result
Full source code is available on GitHub here and the live demo page is here. Click on the scene to change time of day (it may take a couple seconds to load textures), and by pressing Enter you can enter free-camera mode. Press and hold the right mouse button to look, and use WASD to move around.
And of course you can get an Android live wallpaper app from Google Play here, it is free.

Top comments (0)