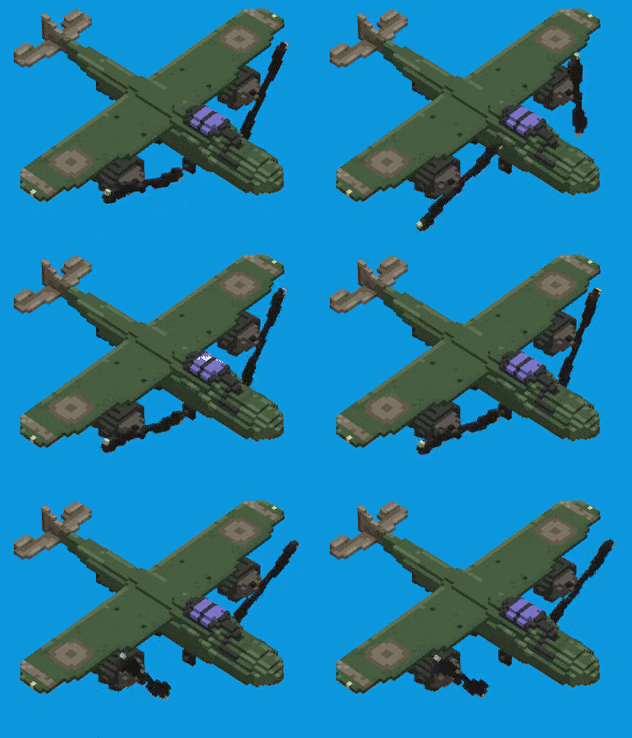
While working on Floating Islands live wallpaper I stumbled upon these cute voxel 3D models of airplanes by Max Parata. I already wanted to bring life to some stylized low-fi 3D art so in my mind I immediately saw how to create a stylized old-skool low-fi scene with these assets. You can watch a live WebGL demo here.
This project was quite fast to implement - the time span between the first commit with rough WIP layout and the final version is about 20 days. Yet it was quite fun to create it because during development I’ve got some fresh ideas on how to improve the scene. All additions were really minor to keep the scene as simple as possible in accordance with its art design. My brother provided valuable feedback on how to improve it and also helped with optimization of some geometries.
Scene composition
Scene is aesthetically simple so it contains just four objects: planes, ground, clouds and wind:
Next, let’s take a look at what shaders are used to render models, and how geometries of these models are optimized.
Planes
Technically planes are rendered not as voxels (each voxel cube individually) but as a ready mesh, exported from MagicaVoxel. They are not simplified using VoxCleaner to use texture atlases and reduce polycount - I decided to use them as is because it will be easier to create alternate palettes, and anyways vertex data for planes have ridiculously small memory footprint.
Each plane consists of 3 parts - plane body, glass cockpit and rotating propellers. Plane is rendered using 2 shaders - a simple directionally lit PlaneBodyLitShader.ts for body and props and its variation GlassShader.ts for glass with stylized reflections.
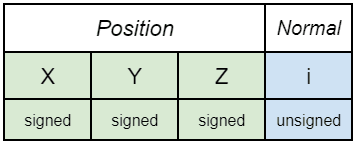
The specifics of plane models allow vertex data to be packed using really small data types. All plane models are small and fit in the -127…+127 bounding box. And since vertices represent voxels they are always snapped to 1x1 grid. So I chose to store vertex positions in signed bytes which have just enough precision for the job.
Also, since the palette textures used by models are of 256x1 size, the V texture coordinate is omitted and hardcoded to the 0.5 - the center of texel. Remaining U coordinate fits in one unsigned byte. One byte of padding is used to align data by 8 bytes. Here is vertex data stride for plane and prop models:
In a separate draw call, a glass with scrolling stylized fake reflection is drawn:
Glass is rendered without palette texture - its color is set via uniform. The texture passed to this shader is a mask for reflection. Its UV coordinates are calculated in the vertex shader based on model-space vertex coordinates. Of course, it is unfiltered for artistic purposes. Stride for glass models is the same but without texture coordinates:
GlassShader samples texture using textureLod with 0 mipmap level. This is done to explicitly tell the OpenGL ES driver that we access the texture without mipmaps and to reduce some overheads. You can read more about this and some other texture sampling optimizations tricks in Pete Harris blog - https://solidpixel.github.io/2022/03/27/texture_sampling_tips.html
Also glass models have small polycount so they use unsigned byte indices which also reduces memory bandwidth.
UPDATE: In the newer version of GlassShader I have found a way to optimize strides for glass models even more. Now they fit in just 4 bytes:
So how is normal stored in single byte? Since voxels can have only 6 variations of normals they can be stored as an index of an array of actual normals which are hard-coded in vertex shader. Updated shader uses this technique to reduce the amount of vertex data.
Wind stripes
For wind stripes I decided to create a shader which doesn’t perform any memory reads at all. Wind stripe has a very simple geometry - a 100x100 units quad, stretched into an appropriately thin line by model matrix. Because of its simplicity, all this geometry can be hardcoded in vertex shader code. And it doesn’t use any textures as well - fragment color is passed via uniform. You can find the implementation in WindStripeShader.ts. It uses gl_VertexID to get position for a given vertex. When this shader is used to draw a wind stripe, no buffers or textures are bound.
Technically it even can be used as a “building block” to draw more complex shapes by issuing draw calls with different rotating/scaling/shearing its base hard-coded quad geometry but this will be too inefficient.
Terrain
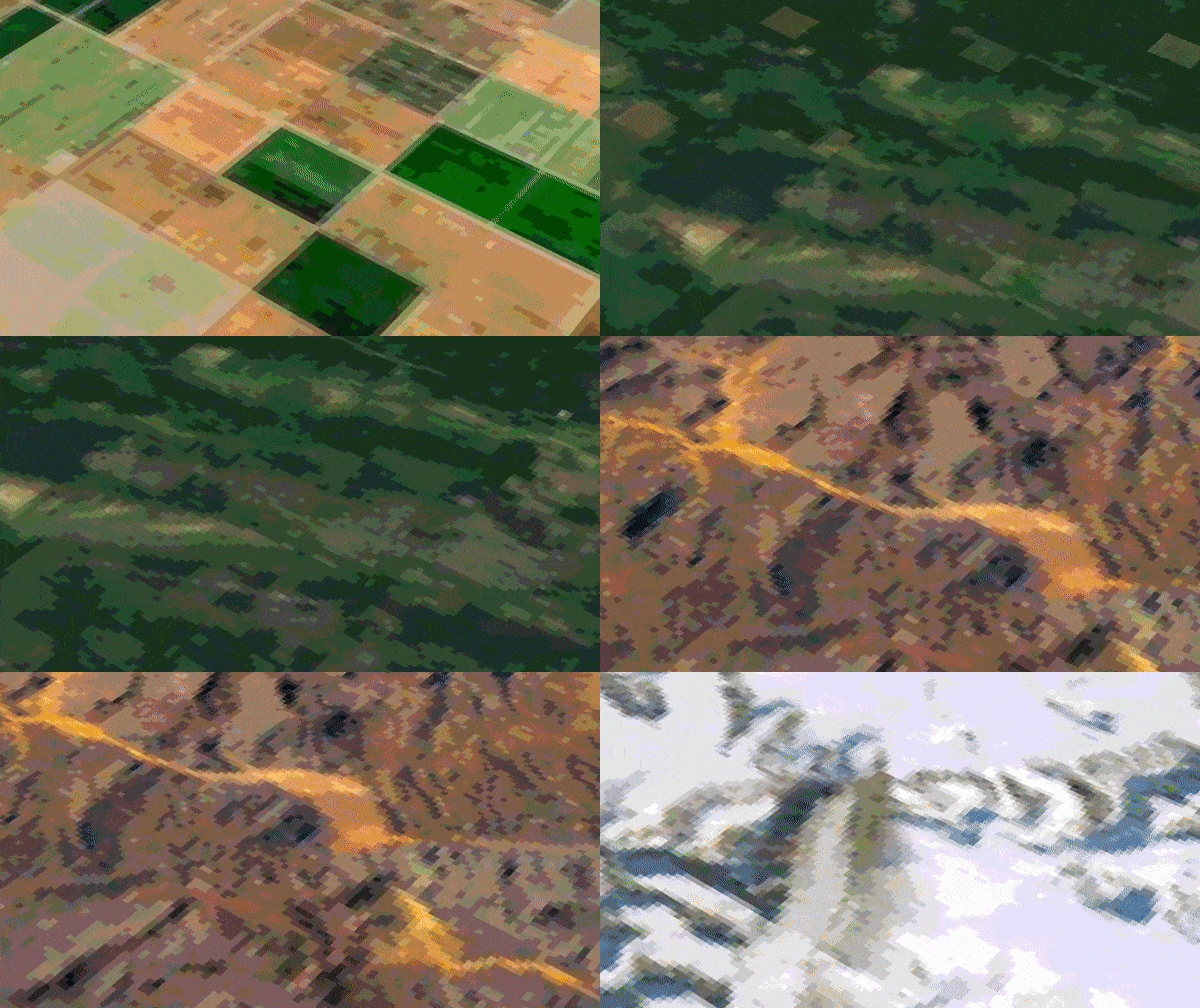
Terrain textures are 256x256 tiling images. They are based on aerial photos with some GIMP magic sprinkled over them - contrast adjustments and colors reduced to just 10-12. This adds a more old-skool look to them and makes each texel more pronounced.
Shader to render terrain is in DiffuseScrollingFilteredShader.ts file. Let’s take a look at it.
It is a rather simple shader which simply pans UV coordinates to create an illusion of moving ground beneath the airplane. However there is one additional thing it does, and it is texture filtering. You may be wondering what filtering is used here, ground clearly is unfiltered, it uses GL_NEAREST sampling! However, there is a custom antialiased blocky filtering used here. The thing is, that regular GL_NEAREST sampling produces a lot of aliasing on the edges of texels. This becomes especially noticeable at certain angles of the continuously rotating camera. The textureBlocky() function alleviates these aliasing artifacts while preserving that extra crispy old-skool look of unfiltered textures. Ground texture actually uses GL_LINEAR filtering and the textureBlocky() calculates sampling point to get either an interpolated filtered value at the edges or an exact unfiltered one from the center of texel for any other area.
The original author of this filtering is Permutator, and code is used under CC0 license from this shader toy - https://www.shadertoy.com/view/ltfXWS (you may find some deeper explanation of math used in this filtering technique there).
Here is a comparison (with 4x zoom) of a regular GL_NEAREST filtering vs custom blocky filtering. As you can see, both are pixelated but the latter one is not aliased.
One of the last additions to the scene is a transition between two different terrain textures. When you switch them, they don’t just toggle but instead a cute pixelated transition effect is used to smoothly switch between textures.
You can find a code for this transition in the DiffuseScrollingFilteredTransitionShader.ts file. Transition uses tiling blue noise texture for uniformly appearing square blocks on the ground. To make transition smoother, smoothstep() is used. However there is a commented out line with step() which makes transition more abrupt if you prefer it.
Clouds
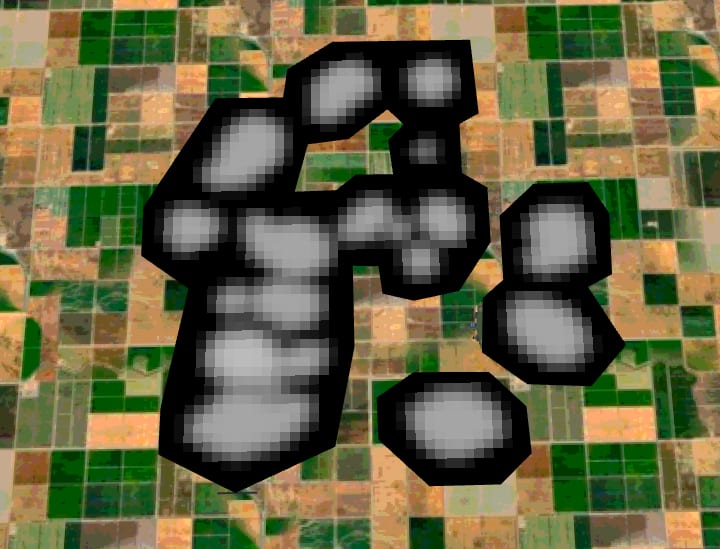
Clouds don’t use this antialiased blocky filtering because they don’t rotate, are quite transparent and move relatively fast. This makes it quite hard to spot aliasing artifacts on them so they use the cheapest option available - GL_NEAREST sampling. Clouds use a custom mesh with cutouts where texture is empty. This significantly reduces overdraw compared to a regular quad mesh. Here it is visualized by disabling blending:
Result
You can see a live web demo here and if you like to have it on the home screen of your Android phone you can get a live wallpaper app on Google Play.
Source code is available on GitHub, feel free to play around with it.
As always, the web demo is heavily optimized for the fastest downloading of resources and Android app for the best efficiency and performance. The size of data transferred during initial loading of the web demo is just 189 kB, and the size of all models and textures is 1.4 MB so you can fit this data on a floppy disk.
P.S.
These WebGL demo and Android app have been made during war in Ukraine despite regular power outages caused by deliberate destruction of country’s electric infrastructure. Please support Ukraine however you can and boycott your local russian aka terrorist businesses.


Top comments (0)