Event Processing is a cloud-native architectural concept that builds on the foundation of Event-driven architecture (EDA).
Event-driven architectures are a very popular way of building and deploying distributed seveless applications in the cloud.
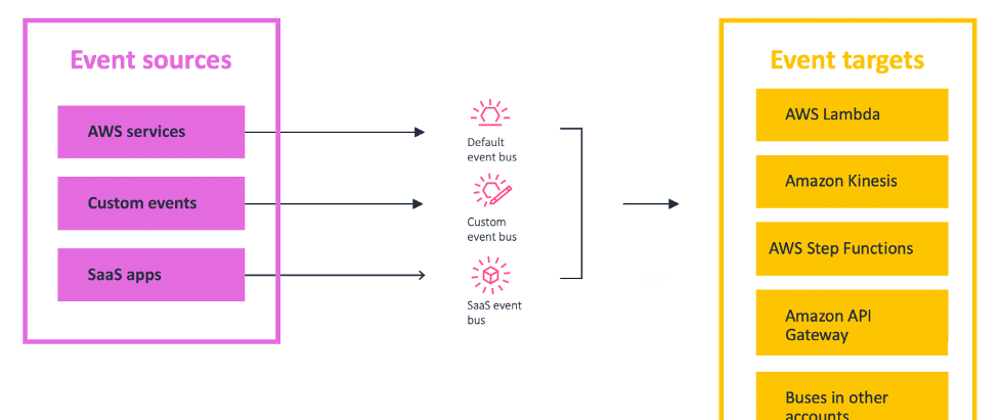
Event-driven architecture accoring to AWS is a modern architecture pattern built from small, decoupled services that publish, consume, or route events. An event represents a change in state, or an update. Unlike traditional request-driven models, EDA promotes loose coupling between producer and consumer services. This makes it easier to scale, update, and independently deploy separate components of a system.
To expatiate on the above explanation, event-driven architecture is a methodology that allows us to asynchronously utilize events in triggering and communicating between distributed services. In essence, we are able to use output from a service as input to another service that is part of our distributed/microservices application. This is very helpful in that it enables us to achieve decoupling. Hence we are able to design and build scalable, resilient and agile applications in the cloud.
The three main components of an event-driven architecture include the event sources, event routers and event destinations.
This achitectural paradigm is especially useful when we are:
- Integrating heterogenous systems from differnet stacks into a single app.
- Communicating between microservices.
- Enabling parallel event processing.
- Replicating data across different regions.
A Case Study
Think of a survey/analysis application that a multi-national comapny uses internally. This application requires employees to enter their workID. The employees will have to connect to the application and input their details through the API Gateway. An SQS queue is integrated with this API Gateway. Once the details pass through the gateway, they end up in the queue. A lambda function will then have to be asynchronously invoked in order to grab the details from this queue, process it and write the results to a dynamodb database.
Our serverless architecture on AWS that makes use of the following services:
- Lambda
- SQS
- DynamoDB
- API gateway
- CDK (For Infrastructure as Code)
The SQS queue is our event source, an event source mapping will invoke the lambda function with the workID as the event.
Step 1: Create A DynamoDB Database
On the Dynamodb console, Create a table. Enter workId as the partition key and secretId as the sort key.

Step 2: Create A Lambda Function
On the Lambda console, Create a function, assign a name to your function and select python as the runtime engine.

Now upload the following code to your function:
import json
import random
import string
import boto3

# Connect to dynamodb
dynamodb = boto3.resource('dynamodb')
table = dynamodb.Table('employee-info')


def lambda_handler(event, context):

    # Log evnt body to Cloudwatch
    workId = event['Records'][0]['body']
    print(workId)

    # Generate secretId
    characters = string.ascii_letters + string.digits + string.punctuation
    secret = ''.join(random.choice(characters) for i in range(8))
    secretId = secret

    # Write to Dynamodb
    table.put_item(
        Item={
            'workId': workId,
            'secretId': secretId
        }
    )

    # return statusCode
    return {
        'statusCode': 200,
        'body': json.dumps('Success')
    }
Our Lambda function will grab the workId from the SQS queue, generate a secretId and write yhem into a dynamodb table.
Step 3: Update IAM Permissions
Our Lambda function will require permissions to pull messages from the SQS queue and write to dynamodb.
On the IAM console, create a policy with the following code:
{
    "Version": "2012-10-17",
    "Statement": [
        {
            "Sid": "VisualEditor0",
            "Effect": "Allow",
            "Action": [
                "dynamodb:PutItem",
                "dynamodb:ListTables",
                "dynamodb:ListBackups",
                "dynamodb:Scan",
                "dynamodb:Query",
                "dynamodb:DescribeStream",
                "dynamodb:UpdateItem",
                "dynamodb:ListContributorInsights",
                "dynamodb:ListGlobalTables",
                "dynamodb:DescribeTable",
                "dynamodb:DescribeGlobalTable",
                "dynamodb:GetItem",
                "dynamodb:ListImports",
                "dynamodb:ListExports",
                "dynamodb:UpdateTable"
            ],
            "Resource": "*"
        },
        {
            "Sid": "Statement1",
            "Effect": "Allow",
            "Action": [
                "sqs:ListQueues",
                "sqs:ReceiveMessage",
                "sqs:DeleteMessage",
                "sqs:GetQueueAttributes"
            ],
            "Resource": "*"
        },
    {
            "Sid": "Statement2",
            "Effect": "Allow",
            "Action": [
                "logs:CreateLogGroup",
                "logs:CreateLogStream",
                "logs:PutLogEvents"
            ],
            "Resource": "*"
        }
    ]
}
Once you are done creating the policy, use the policy to create a role. We will modify our lambda function to use this role.
Please note that this policy is overly permissive, you can choose to streamline the resources to which this should apply to.
On the lambda function, click on Configuration, click on permissions and Edit. Add the new role.

Step 4: Create an SQS Queue
On the SQS console, click on create queue. Give your queue a name and leave every other setting as default.

Back on the Lambda function, click on Add Trigger. Select SQS as the event source and select your sqs queue.

Your lambda function should now look like this:

Step 5: Create An API Gateway And Integrate With SQS

Here, we will use a pattern called "Queue based leveling" whereby a serverless queue is introduced between our API Gateay and our workers - which in this case is our lambda function. This AWS repost blog page outlines the steps we will need to take in order to achieve this.
First, create an AWS Identity and Access Management (IAM) role, and then attach an Amazon SQS policy with a SendMessage permission. Use the JSON code below to create a policy. This policy allows you to publish messages from the API to Amazon SQS. In the policy, replace example-region with your AWS Region, example-account-id with your AWS account ID, and example-sqs-queue-name with your SQS queue name.
{
  "Version": "2012-10-17",
  "Statement": [
    {
      "Effect": "Allow",
      "Resource": [
        "arn:aws:sqs:example-region:example-account-id:example-sqs-queue-name"
      ],
      "Action": [
        "sqs:SendMessage"
      ]
    }
  ]
}
On the IAM console, click on Create Role, select API Gateway as the AWS service and click on create role. When the role has been created, select the role, click on edit and attach the policy you creted earlier to it.
When you are done creating the role, it should look like this:

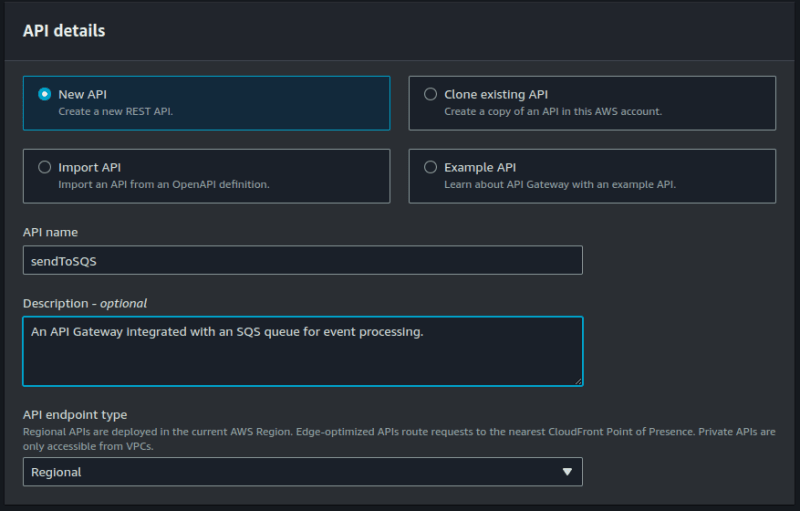
On the API gateway console, click on Create API, select REST API and give your API a name.

Click on "create resource", assign a name to your resource.


Now, we have to create a "POST" method and integrate with our SQS queue.


Notice that I chose "path override" and not "action name".

When you are done, click on "Create method".
It should now look like this:

Now we have to modify the API request.
Click on "Integration Request" > "Edit" > scroll down to the "HTTP headers" section.

For "Request body passthrough", choose Never.
Click on "Add Request header parameter"
For Name, enter Content-Type.
For Mapped from, enter 'application/x-www-form-urlencoded', and then choose Save.
Scroll down to the bottom of the page and click on "Create template".

For Content-Type, enter application/json, and then choose Create.
For the template, enter Action=SendMessage&MessageBody=$input.body

Now, let's deploy the API.
Click on "Deploy API" > "New stage".
Give your stage a name and click on "deploy".

After deploying, your url can be found here:

Step 6: Test Your Serverless Architecture
Test the setup by sending the following request to API Gateway. Replace example-api-id with your API ID, example-region with your AWS Region, example-stage with your testing stage name, and example-resource with your resource name.
curl --location --request POST 'https://example-api-id.execute-api.example-region.amazonaws.com/example-stage/example-resource' \
  --header 'Content-Type: application/json' \
  --data-raw '{
    "message": "Hello World"
  }'
On my terminal, it looks like this:

If the setup is correct and the request succeeds, the response should look like this:

Finally, to confirm that event processing is taking place, we will have to check our dynamodb table to see if the items are being added.

As you can see, the serverless application architecture is working perfectly and asynchronous event processing is taking place.
Before you go
Here is a github repository containing the code and instructions on how to automate this whole setup using AWS CDK.
Connect with me on LinkedIn.


Top comments (2)
An excellent article - well done!!
Thank you