This is a beginner application to create a group of microservices to perform CRUD and filtering on a group of Users. This project is implemented in a MacBook Pro. The source code is available in the GitHub Repository.
The steps we follow to successfully implement this project are below:
Initialize the springboot application.
- Download a Springboot application from the spring initializr website, https://start.spring.io/. Add dependency Spring Web, Spring Data MongoDB, and Mockito.
From the website spring initializr downloading the project:
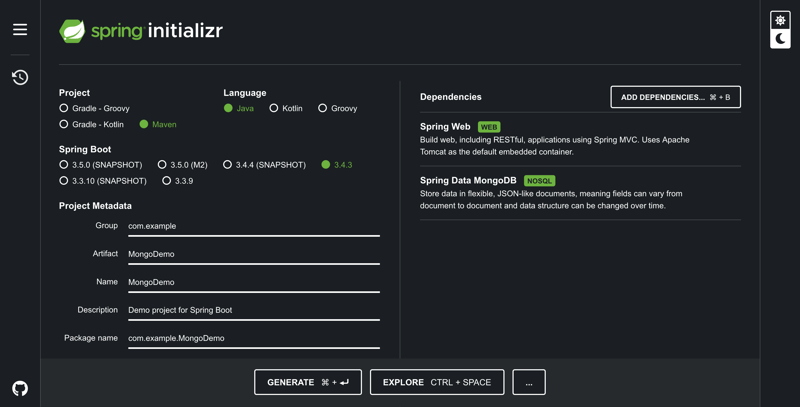
pom.xml dependencies:
<dependencies>
        <dependency>
            <groupId>org.springframework.boot</groupId>
            <artifactId>spring-boot-starter-data-mongodb</artifactId>
        </dependency>
        <dependency>
            <groupId>org.springframework.boot</groupId>
            <artifactId>spring-boot-starter-web</artifactId>
        </dependency>
        <dependency>
            <groupId>org.springframework.boot</groupId>
            <artifactId>spring-boot-starter-test</artifactId>
            <scope>test</scope>
        </dependency>
        <dependency>
            <groupId>org.mockito</groupId>
            <artifactId>mockito-core</artifactId>
        </dependency>
    </dependencies>
Tips: Add the mockito-core dependency explicitly in your pom.xml if you don't find in the dependency directory in the spring initializr website.
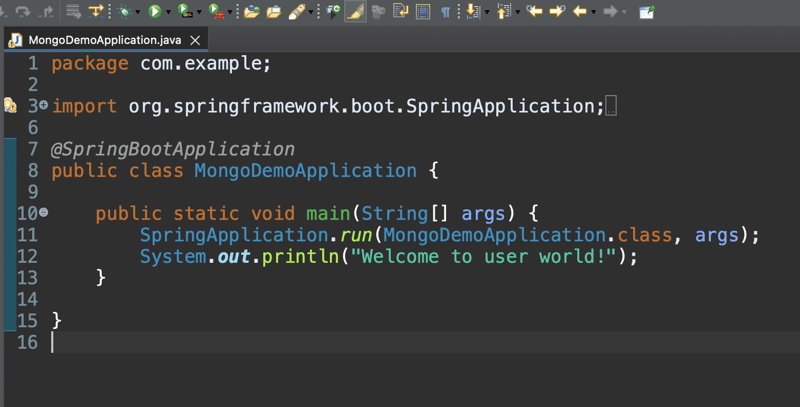
- Now import the project in your IDE. I'm using the eclipse community version. Then run the project from the entry point of the application that is the project name you selected while downloading from spring initializr website. In my example the application name is MongoDemoApplication.
Tips: Remember that the tomcat is embedded with the spring-boot-starter-web dependency. So when we run the application the tomcat server runs on port 8080. If we fail to stop the server before running the spring application again then a Port 8080 was already in use error will fail the application to start again. So we need to stop the underlying tomcat server before we try starting that again. Among many options we can run the below command in the terminal.
kill -9 $(lsof -t -i:8080) This stops any process running on port 8080, which is Tomcat’s default port.)
Now its time to install and configure the MongoDB.
Install and run the MongoDB in the local machine.
Install MongoDB Using Homebrew (this example uses Macbook Pro):
To install HomeBrew (if not already installed):
/bin/bash -c "$(curl -fsSL https://raw.githubusercontent.com/Homebrew/install/HEAD/install.sh)"
check if Homebrew is installed correctly:
brew --version
Add Homebrew to Your Path:
echo 'eval "$(/opt/homebrew/bin/brew shellenv)"' >> ~/.zshrc

source ~/.zshrc
Then follow below steps to install MongoDB:
brew update -- Update Homebrew
brew tap mongodb/brew -- Install MongoDB Community Edition
brew install mongodb-community@7.0
brew services start mongodb-community@7.0 -- Start MongoDB as a background service
brew services stop mongodb-community@7.0 --To stop MongoDB
mongod --version -- Check if MongoDB is running
- To add MongoDB in your application add below properties in the application.properties. The application.properties file is located under src/main/resources directory. In this example the DB name is myFirstDB.
spring.application.name=MongoDemo

spring.data.mongodb.uri=mongodb://localhost:27017/myFirstDB

spring.data.mongodb.database=myFirstDB
Create the MVC layers for User Services.
- Next we create the layers of the User managing microservice application. Controller (RESTApi endpoints) Layer, Service Layer, Repository Layer, and the Entity Layer.
Tips: You can separate java packages or keep them in a single package. However, be sure to keep the main class in the parent package. In this example I'm keeping MongoDemoApplication in the parent package com.example. If your controller, service, repository, entity classes are spread in different packages then be sure to the @ComponentScan() to link the inner package classes.
,
@SpringBootApplication
@ComponentScan(basePackages = "com.example.controller, com.example.Service, com.example.repository")
public class MongoDemoApplication {

    public static void main(String[] args) {
        SpringApplication.run(MongoDemoApplication.class, args);
        System.out.println("Welcome to user world!");
    }

}
- The User entity is defined below:
package com.example.entity;

import org.springframework.data.annotation.Id;
import org.springframework.data.mongodb.core.mapping.Document;

import com.mongodb.lang.NonNull;

@Document (collection = "users")
public class User {

    @Id
    private String id;

    @NonNull
    private String name;

    @NonNull
    private String email;

    public User() {}

    public User(String name, String email) {
        super();
        this.name = name;
        this.email = email;
    }

    public User(String id, String name, String email) {
        super();
        this.id = id;
        this.name = name;
        this.email = email;
    }

    public String getId() {
        return id;
    }

    public void setId(String id) {
        this.id = id;
    }

    public String getName() {
        return name;
    }

    public void setName(String name) {
        this.name = name;
    }

    public String getEmail() {
        return email;
    }

    public void setEmail(String email) {
        this.email = email;
    }
}
- The UserRepository is defined below:
package com.example.repository;

import java.util.List;

import org.springframework.data.mongodb.repository.MongoRepository;
import org.springframework.stereotype.Repository;

import com.example.entity.User;

@Repository
public interface UserRepository extends MongoRepository<User, String>{
    User findByEmail(String email);
    List<User> findByName(String name);
}
- The UserService interface is defined below:
package com.example.service;

import java.util.List;

import com.example.entity.User;

public interface UserService {
    List<User> getAllUsers();

    User getUserById(String id);
    User getUserByEmail(String email);
    List<User> getUsersByName(String name);

    User createUser(User user);
    User updateUser(String id, User user);
    void deleteUser(String Id);
}
- The UserServiceImpl defined below:
package com.example.service;

import java.util.List;

import org.springframework.stereotype.Service;

import com.example.entity.User;
import com.example.repository.UserRepository;

@Service
public class UserServiceImpl implements UserService{

    private final UserRepository userRepo;

    public UserServiceImpl(UserRepository userRepo) {
        super();
        this.userRepo = userRepo;
    }

    public List<User> getAllUsers() {
        return userRepo.findAll();
    }

    public User getUserById(String id) throws RuntimeException{
        return userRepo.findById(id).orElseThrow(() -> new RuntimeException("User not found "+id));
    }

    public User getUserByEmail(String email) {
        return userRepo.findByEmail(email);
    }

    public List<User> getUsersByName(String name) {
        return userRepo.findByName(name);
    }

    public User createUser(User user) {
        return userRepo.save(user);
    }

    public User updateUser(String id, User user) {
        User existing = getUserById(id);
        existing.setEmail(user.getEmail());
        existing.setName(user.getName());
        return userRepo.save(existing);
    }

    public void deleteUser(String id) {
        userRepo.deleteById(id);
    }
}
- Now that, we have all our repository and service code implemented we write our RESTApi endpoints, that is the controller layer.
package com.example.controller;

import org.springframework.beans.factory.annotation.Autowired;
import org.springframework.data.annotation.AccessType;
import org.springframework.http.HttpStatus;
import org.springframework.http.HttpStatusCode;
import org.springframework.http.ResponseEntity;
import org.springframework.stereotype.Controller;
import org.springframework.web.bind.annotation.DeleteMapping;
import org.springframework.web.bind.annotation.GetMapping;
import org.springframework.web.bind.annotation.PathVariable;
import org.springframework.web.bind.annotation.PostMapping;
import org.springframework.web.bind.annotation.RequestBody;
import org.springframework.web.bind.annotation.RequestMapping;
import org.springframework.web.bind.annotation.RestController;

import com.example.service.UserService;
import com.example.entity.User;

import java.util.List;


@RestController
@RequestMapping("/users")
public class UserController {

    private final UserService userService;

    @Autowired
    public UserController(UserService userService) {
        this.userService = userService;
    }

    @GetMapping("/{id}")
    public User getAllUserById(@PathVariable String id){
        return userService.getUserById(id);
    }

    @GetMapping("/name/{name}")
    public List<User> getAllUsersByName(@PathVariable String name){
        return userService.getUsersByName(name);
    }

    @GetMapping("/email/{email}")
    public User getUserByEmail(@PathVariable String email) {
        return userService.getUserByEmail(email);
    }

    @PostMapping("/create")
    public ResponseEntity<User> createUser(@RequestBody User user) {
        userService.createUser(user);
        return ResponseEntity.status(HttpStatusCode.valueOf(HttpStatus.CREATED.value()))
                .body(user);
    }

    @PostMapping("/update/{id}")
    public User updateUser(@PathVariable String id, @RequestBody User user) {
        return userService.updateUser(id, user);
    }

    @DeleteMapping("/delete/{id}")
    public void deleteUserById(@PathVariable String id) {
        userService.deleteUser(id);
    }
}
Testing the service layer and the RESTApi endpoints using Mockito
Now, that we have our DB, and service layer, and REST endpoints we can write our test methods.
Tips: Mockito does not run the entire application. It only mocks the service and controller objects to test their methods. The test results are valid however, since the application is not running and the RESTApis are not called over HTTP, therefore no DB actions are performed. To test the DB interactions we can use Postman, other RESTApi clients. However, these calls will make real and persistent changes in the DB. If we still want to test DB interactions but want to avoid testing in the development DB instance, then we can use Spring TestContainers. In the Testcontainers we can run real DB instances inside a Docker container. For a testing session, Spring-boot spins up a Docker container with as new DB instance. When testing is done the container is stopped. TestContainers are out of scope of this tutorial. We will see Mockito test classes.
Test Service layer with Mockito
- The UserServiceTest is designated to the User @service class.
package com.example.MongoDemo;

// import static org.junit.Assert.assertNotNull;  — incorrect import
import static org.junit.jupiter.api.Assertions.assertNotNull; // -correct import

import static org.junit.jupiter.api.Assertions.assertEquals;
import static org.mockito.Mockito.when;

import java.util.Optional;

import org.junit.jupiter.api.Test;
import org.mockito.InjectMocks;
import org.mockito.Mock;
import org.springframework.boot.test.context.SpringBootTest;

import com.example.entity.User;
import com.example.repository.UserRepository;
import com.example.service.UserServiceImpl;

@SpringBootTest
public class UserServiceTest {

    @Mock
    private UserRepository userRepository;

    @InjectMocks
    private UserServiceImpl userServiceImpl;

    @Test
    void testGetUserById() {
        String id = "1";
        String name = "John Doe";
        String email = "john@gmail.com";
        User user = new User(name, email);
        user.setId(id);

        when(userRepository.findById(id)).thenReturn(Optional.of(user));

        User result = userServiceImpl.getUserById(id);
        assertNotNull(result);
        assertEquals(result.getName(), user.getName());

    }
}
Tips: Be sure to import the right assertNotNull dependency. Importing import static org.junit.Assert.assertNotNull will give a compile error during building your project's .jar file. I'm copying the compilation error for your reference.
src/test/java/com/example/MongoDemo/UserServiceTest.java:[3,24] cannot find symbol

  symbol:   class Assert

  location: package org.junit
- The UserControllerTest is designated to the User @RestController class.
package com.example.MongoDemo;

import static org.mockito.Mockito.when;
import static org.springframework.test.web.servlet.request.MockMvcRequestBuilders.get;
import static org.springframework.test.web.servlet.request.MockMvcRequestBuilders.post;
import static org.springframework.test.web.servlet.result.MockMvcResultHandlers.print;
import static org.springframework.test.web.servlet.result.MockMvcResultHandlers.log;
// Import for status(), jsonPath()
import static org.springframework.test.web.servlet.result.MockMvcResultMatchers.jsonPath;
import static org.springframework.test.web.servlet.result.MockMvcResultMatchers.status;

import org.junit.jupiter.api.Test;
import org.springframework.beans.factory.annotation.Autowired;
import org.springframework.boot.test.autoconfigure.web.servlet.WebMvcTest;
import org.springframework.boot.test.mock.mockito.MockBean;
import org.springframework.http.MediaType;
import org.springframework.test.web.servlet.MockMvc;
import org.springframework.test.web.servlet.ResultActions;

import com.example.controller.UserController;
import com.example.entity.User;
import com.example.service.UserService;

@WebMvcTest(UserController.class)
public class UserControllerTest {

    @Autowired
    private MockMvc mockMvc;

    @MockBean
    private UserService userService;

    @Test
    void testGetUserById() throws Exception {
        when(userService.getUserById("1")).thenReturn(new User("1", "John Doe", "john@gmail.com"));

        mockMvc.perform(get("/users/1"))
               .andExpect(status().isOk())
               .andExpect(jsonPath("$.id").value(1))
               .andExpect(jsonPath("$.name").value("John Doe"))
               .andExpect(jsonPath("$.email").value("john@gmail.com"));
    }

    @Test
    void testCreateUser() throws Exception {
        String userJson = "{\"name\": \"Jane Doe\", \"email\": \"jane@gmail.com\"}";

        ResultActions resultActions = mockMvc.perform(post("/users/create")
                .contentType(MediaType.APPLICATION_JSON)
                .content(userJson))
                .andDo(print())
                .andDo(log())
               .andExpect(status().isCreated())
               .andExpect(jsonPath("$.name").value("Jane Doe"));
    }
}
Tips: In the UserControllerTest file be sure to include the static imports. They are often not recommended by the IDE and you explicitly have to find the dependencies to be able to import them. Below are the static import used in this UserControllerTest class.
import static org.mockito.Mockito.when;
import static org.springframework.test.web.servlet.request.MockMvcRequestBuilders.get;
import static org.springframework.test.web.servlet.request.MockMvcRequestBuilders.post;
import static org.springframework.test.web.servlet.result.MockMvcResultHandlers.print;
import static org.springframework.test.web.servlet.result.MockMvcResultHandlers.log;
// Import for status(), jsonPath()
import static org.springframework.test.web.servlet.result.MockMvcResultMatchers.jsonPath;
import static org.springframework.test.web.servlet.result.MockMvcResultMatchers.status;
To log the HTTP req/res from the test methods add below properties in the application.properties file.
# Enable logging to a file
logging.file.name=logs/app.log  # Creates logs/app.log
# OR (alternative)
logging.file.path=logs  # Creates logs/spring.log

# Set log level (Optional)
logging.level.root=INFO
Tips: To ensure log of the actual HTTP requests and responses use the print() and log() methods in the mockMvc.perform() method.
import static org.springframework.test.web.servlet.result.MockMvcResultHandlers.print;
import static org.springframework.test.web.servlet.result.MockMvcResultHandlers.log;
Run the UserControllerTest.java and UserServiceTest.java separately to test the RESTApi methods and service methods in a mock environment. The actual HTTP req/res will be printed in the log file when you run UserControllerTest.java.
HTTP Request and corresponding response printed by running the RestController UserControllerTest.java.
MockHttpServletRequest:
      HTTP Method = POST
      Request URI = /users/create
       Parameters = {}
          Headers = [Content-Type:"application/json;charset=UTF-8", Content-Length:"47"]
             Body = {"name": "Jane Doe", "email": "jane@gmail.com"}
    Session Attrs = {}

Handler:
             Type = com.example.controller.UserController
           Method = com.example.controller.UserController#createUser(User)

Async:
    Async started = false
     Async result = null

Resolved Exception:
             Type = null

ModelAndView:
        View name = null
             View = null
            Model = null

FlashMap:
       Attributes = null

MockHttpServletResponse:
           Status = 201
    Error message = null
          Headers = [Content-Type:"application/json"]
     Content type = application/json
             Body = {"id":null,"name":"Jane Doe","email":"jane@gmail.com"}
    Forwarded URL = null
   Redirected URL = null
          Cookies = []
Deploy the User-microservice application and the MongoDb in Docker
We will deploy our microservice app and the mongoDB in docker containers. Please install Docker Desktop in your system. This example uses Docker Desktop on Mac (Apple Silicon chip). Follow the link for installation on Mac, https://docs.docker.com/desktop/setup/install/mac-install/
The steps we follow:
Creating a docker image of the springboot microservice application.
Then upload the microservice image that we just created into Docker hub (Docker Hub is a cloud-based registry service provided by Docker for storing, sharing, and managing container images [ref. docker.com])
Write and execute a file named docker-compose.yml. This fill will be responsible to pull both the microservice and mongodb images from the docker hub and also run both the containers. >Tips: We don't need to create a docker image for mongoDB because its already up in the docker hub.
1. Creating a docker image of the springboot microservice application.
Step 1: Build the Spring Boot JAR
Navigate to your Spring Boot project directory and run below command in your terminal.(You can install maven in you system or you can use the IDE integrated maven. This example uses maven outside the IDE eclipse):
mvn clean package -DskipTests
This generates a JAR file inside the target/ directory. My .jar file name is, MongoDemo-0.0.1-SNAPSHOT.jar.
Step 2: Create a Dockerfile: Inside your project root directory, create a file named Dockerfile (without any extension).
# Use an official OpenJDK image as the base image
FROM openjdk:17-jdk-slim

# Set the working directory inside the container
WORKDIR /app

# Copy the JAR file from the host machine to the container
COPY target/MongoDemo-0.0.1-SNAPSHOT.jar app.jar

# Expose the application port
EXPOSE 8080

# Command to run the application
ENTRYPOINT ["java", "-jar", "app.jar"]
Step 3. Build the Docker Image
From the terminal run the following command in the directory where your Dockerfile is located. I've this file right under the application folder, MongoDemo/dockerfile
docker build -t my-user-microservice .
• -t my-microservice → Assigns a name (my-microservice) to the image.
• . → Tells Docker to look for the Dockerfile in the current directory.
You will see below longs in your terminal upon executing the docker build command.

Step 4. Verify the Docker Image
After building, check if the image is created:
docker images --You should see my-user-microservice in the list.
Step 5. Run the Container
docker run -d --name microservice-container -p 8080:8080 my-user-microservice
• -d → Runs in detached mode (background).
• --name microservice-container → Assigns a name to the container.
• -p 8080:8080 → Maps container port 8080 to host port 8080.
After running this command a container Id will be returned similar to this one 695bd664bd94155b1d8640bcc2a74633110e0f11ce830796b72e4fb57bda9e4c
Now, your microservice should be accessible at: http://localhost:8080
Step 6. Check Running Containers
To verify if your container is running: docker ps
If you need logs: docker logs microservice-container
Step 7. Stop & Remove a single Container (Optional)
docker stop microservice-container
Step 8: To remove the container:
docker rm microservice-container
Step 9.Stop & Remove all the Containers
docker-compose down. --This stops and removes all containers.
Step 10. Restart Services
docker-compose restart
Step 11. Rebuild Images (If Needed)
docker-compose up --build -d --If you made changes to the Dockerfile or code and want to rebuild
2. Then upload the microservice image that we just created into Docker hub
Step 1: Login to Docker Hub using command: docker login
Enter your Docker Hub username and password.
Step 2: Tag the Image.
docker tag my-user-microservice <your-dockerhub-username>/my-user-microservice:latest
Example: docker tag my-user-microservice johndoe/my-user-microservice:latest
Step 3: Push the Image.
docker push <your-dockerhub-username>/my-user-microservice:latest

Now, your image is available on Docker Hub and can be pulled from anywhere using: docker pull johndoe/my-user-microservice:latest
You can try this docker pull command just to verify. However, the docker-decompose.yml will pull the microservice image from the docker huband lunch a container for that.
3. Now to write and execute a file names docker-compose.yml.
Step1: Our microservice needs to run alongside a MongoDB so we create create a docker-compose.yml file. We can use docker-compose when we have multiple containers for example for microservices, databases, and more, interacting with each other. docker-compose is used to manage multiple Docker containers as a single service. Follow these steps to run a docker-compose.yml file.
Step2: Run Docker Compose
-
Navigate to the Directory Containing docker-compose.yml, then run the command:
docker-compose up -d-d→ Runs the containers in detached mode (in the background).
Note: In Docker, use container names/services instead of localhost.
Verify the MongoDB activity inside from its Docker Container
We can open the terminal in the docker container from the docker GUI by clicking the Terminal.
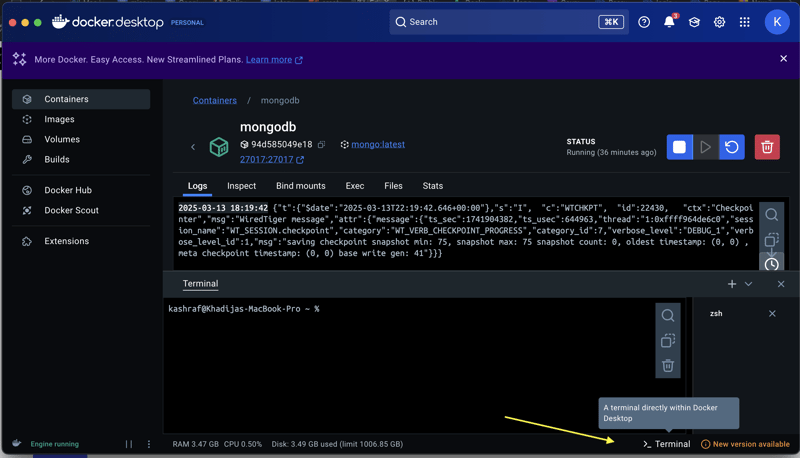
Once the terminal is open run the below commands to see the users entries.
docker exec -it mongodb mongosh-- Run the MongoDB shell inside the container:
-it → Interactive mode.
mongodb → Name of the running container.
mongosh → Starts the MongoDB shell.
Now, you can run MongoDB queries:
show dbs;
use myFirstDB;
db.users.find();
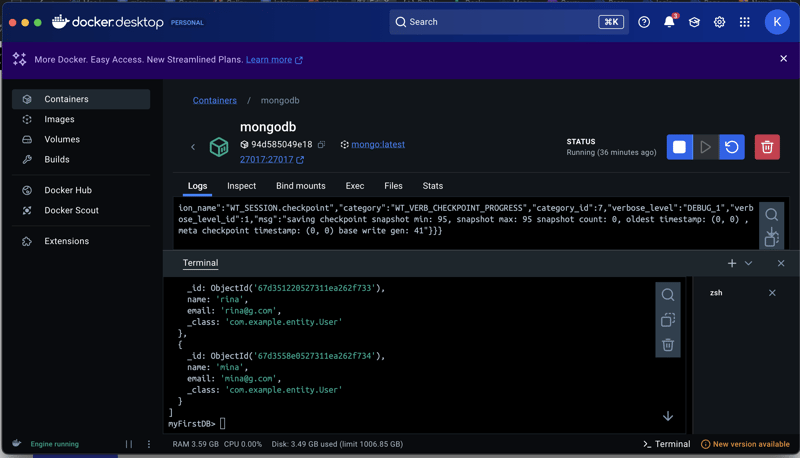
To test the containerized microservice application including the DB interactions use Postman or any other RESTApi client for calling microservices. First make the api call from Postman, then access the Docker container terminal to look into the users collection.
I've copied the "/users/create" API endpoint calling details below.
_POST http://localhost:8080/users/create
Request headers: Content-Type: application/json
Request Body (raw) : {"name": "mina", "email": "mina@g.com"}
Response headers:Content-Type: application/json
Response Body: {"id":"67d351220527311ea262f733","name":"rina","email":"rina@g.com"}_
This concludes the tutorial. I tried to create an entire lifecycle of a microservice based application from development to deployment. Hope this helps!

Top comments (0)