This is a submission for the Gemma 4 Challenge: Write About Gemma 4
Building an industrial-grade SaaS from scratch can feel daunting. As a software engineer, I’ve found that the secret to not getting overwhelmed is architecture. When you break down complex monolithic systems into manageable, robust microservices, that’s where the real fun begins.
Recently, I built Y&Y App (yny)—a comprehensive, microservices-based ERP-lite system. But it doesn't just manage inventory; it integrates a specialized AI Domain-Expert Agent that can read technical manuals and troubleshoot industrial equipment in real-time.
In this masterclass, I am going to walk you through exactly how I built it, step-by-step. By the end of this guide, you will transition from a blank folder to a fully functioning, production-ready SaaS prototype deployed to the cloud.
The Deliverables
- GitHub Repo: kheAI/yny-app
- Video Demo: Watch on YouTube
- Vercel Live Demo: Play
🏗️ The Architecture & Tech Stack (The "Why")
To ensure data integrity, prevent our apps from becoming logically entangled, and allow independent scaling, I chose a strict Microservices Architecture.
Here is what we are using and why:
- Data Tier: Google Cloud SQL (PostgreSQL). We are using the
pgvectorextension so our database can handle both standard relational data (inventory) and mathematical arrays (AI memory/embeddings) in the same place. - Logic Tier (ERP): A type-safe .NET 8 Web API. C# is the industry standard for fast, secure delivery of structured business data.
- Logic Tier (AI): A Python FastAPI service. Python is the undisputed king of AI. This service executes a Retrieval-Augmented Generation (RAG) workflow using the Gemini API (refer Github Repo for Vertex AI version too).
- Presentation Tier: A responsive frontend built with React and Vite.
- Hosting: Serverless, auto-scaling backend deployments via Google Cloud Run (meaning you only pay when people use it), with the frontend hosted on Vercel.
Engineer's Note on AI Models:
- For this tutorial, we are utilizing the Gemini API.
- We'll use the
gemma-4-26b-a4b-itfor interactive apps or agents where low latency is important. A 26B Mixture-of-Experts (MoE) model that offers fast inference by using only ~4B active parameters. It offers nearly the same intelligence as the 31B model but runs significantly faster because it only activates a fraction of its parameters (4B) per token. - For Embeddings, we choose
gemini-embedding-001to turn our text into 768-dimensional mathematical vectors. For multimodal model, can trygemini-embedding-2. - The Gemini API SDK's default to
v1beta, but you can opt to use other versions by setting the API versiongenai.Client(http_options={'api_version': 'v1'}).
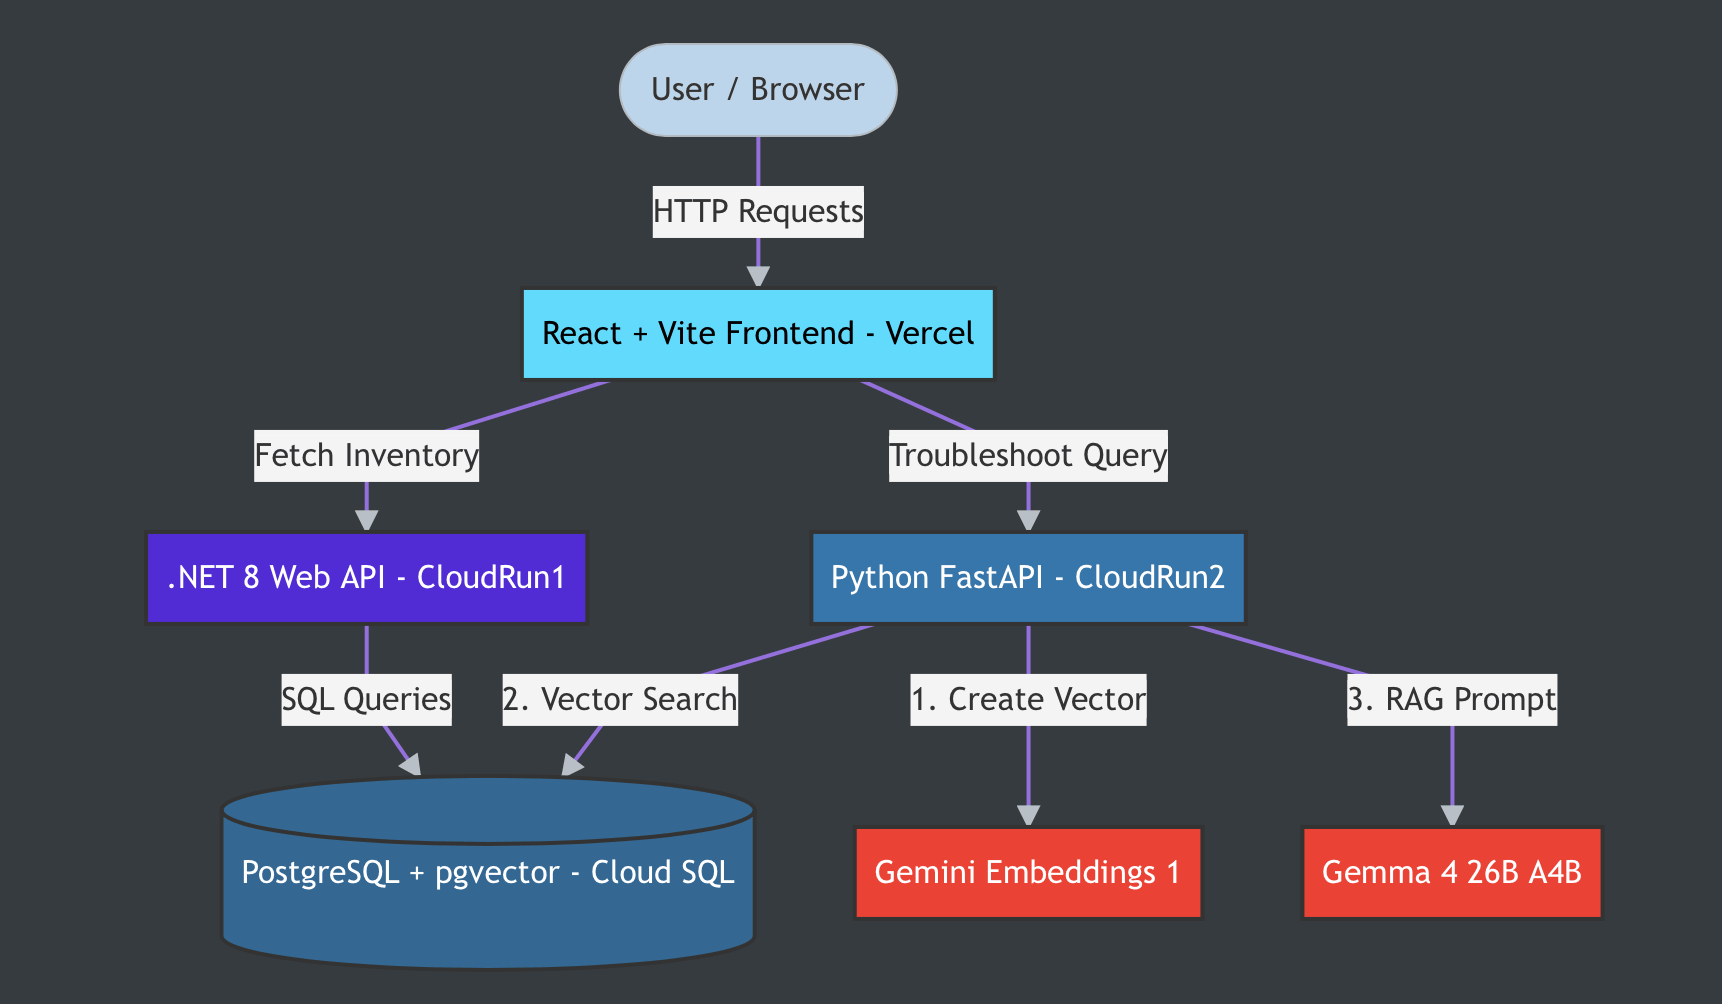
How the System Flows
🛠️ Phase 0: Workspace Setup & Prerequisites
Before writing a single line of code, we need to set up our workbench.
1. The Tools You Need
Ensure you have the following installed on your machine:
- Google Cloud Account: Create a project (e.g.,
yny-saas-2024). Write down your Project ID. - gcloud CLI: Installed and authenticated. Run
gcloud auth login, thengcloud config set project YOUR_PROJECT_ID. - .NET 8 SDK: For our C# backend. Verify with
dotnet --version. - Python 3.10+: For the AI service. Verify with
python3 --version. - Node.js (LTS): For the React frontend. Verify with
node -v. - Gemini API Key: Get one for free from Google AI Studio.
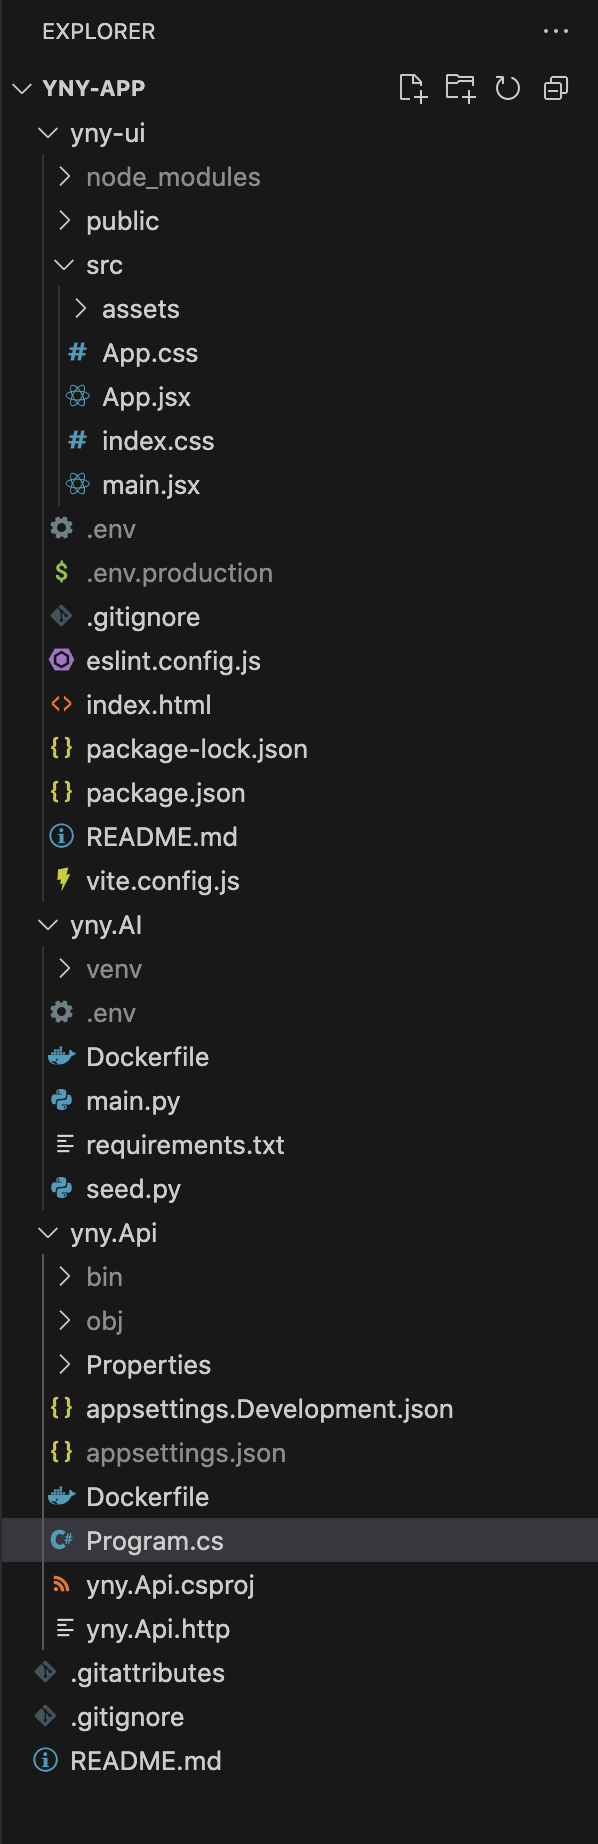
2. The Directory Structure
Create a master folder. This will act as the "monorepo" for our three microservices.
mkdir yny-app
cd yny-app
Crucial Step: Create a .gitignore file in this root folder immediately. This prevents you from accidentally uploading database passwords or API keys to GitHub.
# yny-app/.gitignore
node_modules/
bin/
obj/
venv/
.env
appsettings.json
.DS_Store
🗄️ Phase 1: The Cloud Database (Postgres + pgvector)
We need a database capable of standard SQL (for products) and Vector Math (for the AI).
Step 1: Provision the Database
- Go to the Google Cloud Console -> Cloud SQL -> Create Instance -> PostgreSQL.
-
Instance ID:
yny-db-instance -
Password:
YnySecurePass26(Write this down! Avoid characters like@or#to prevent URL parsing errors). - Edition: Choose Enterprise (Sandbox/Shared Core) to keep costs near zero.
-
Region:
us-central1. Click Create (Takes ~5 minutes).
Step 2: Seed the Schema & Data
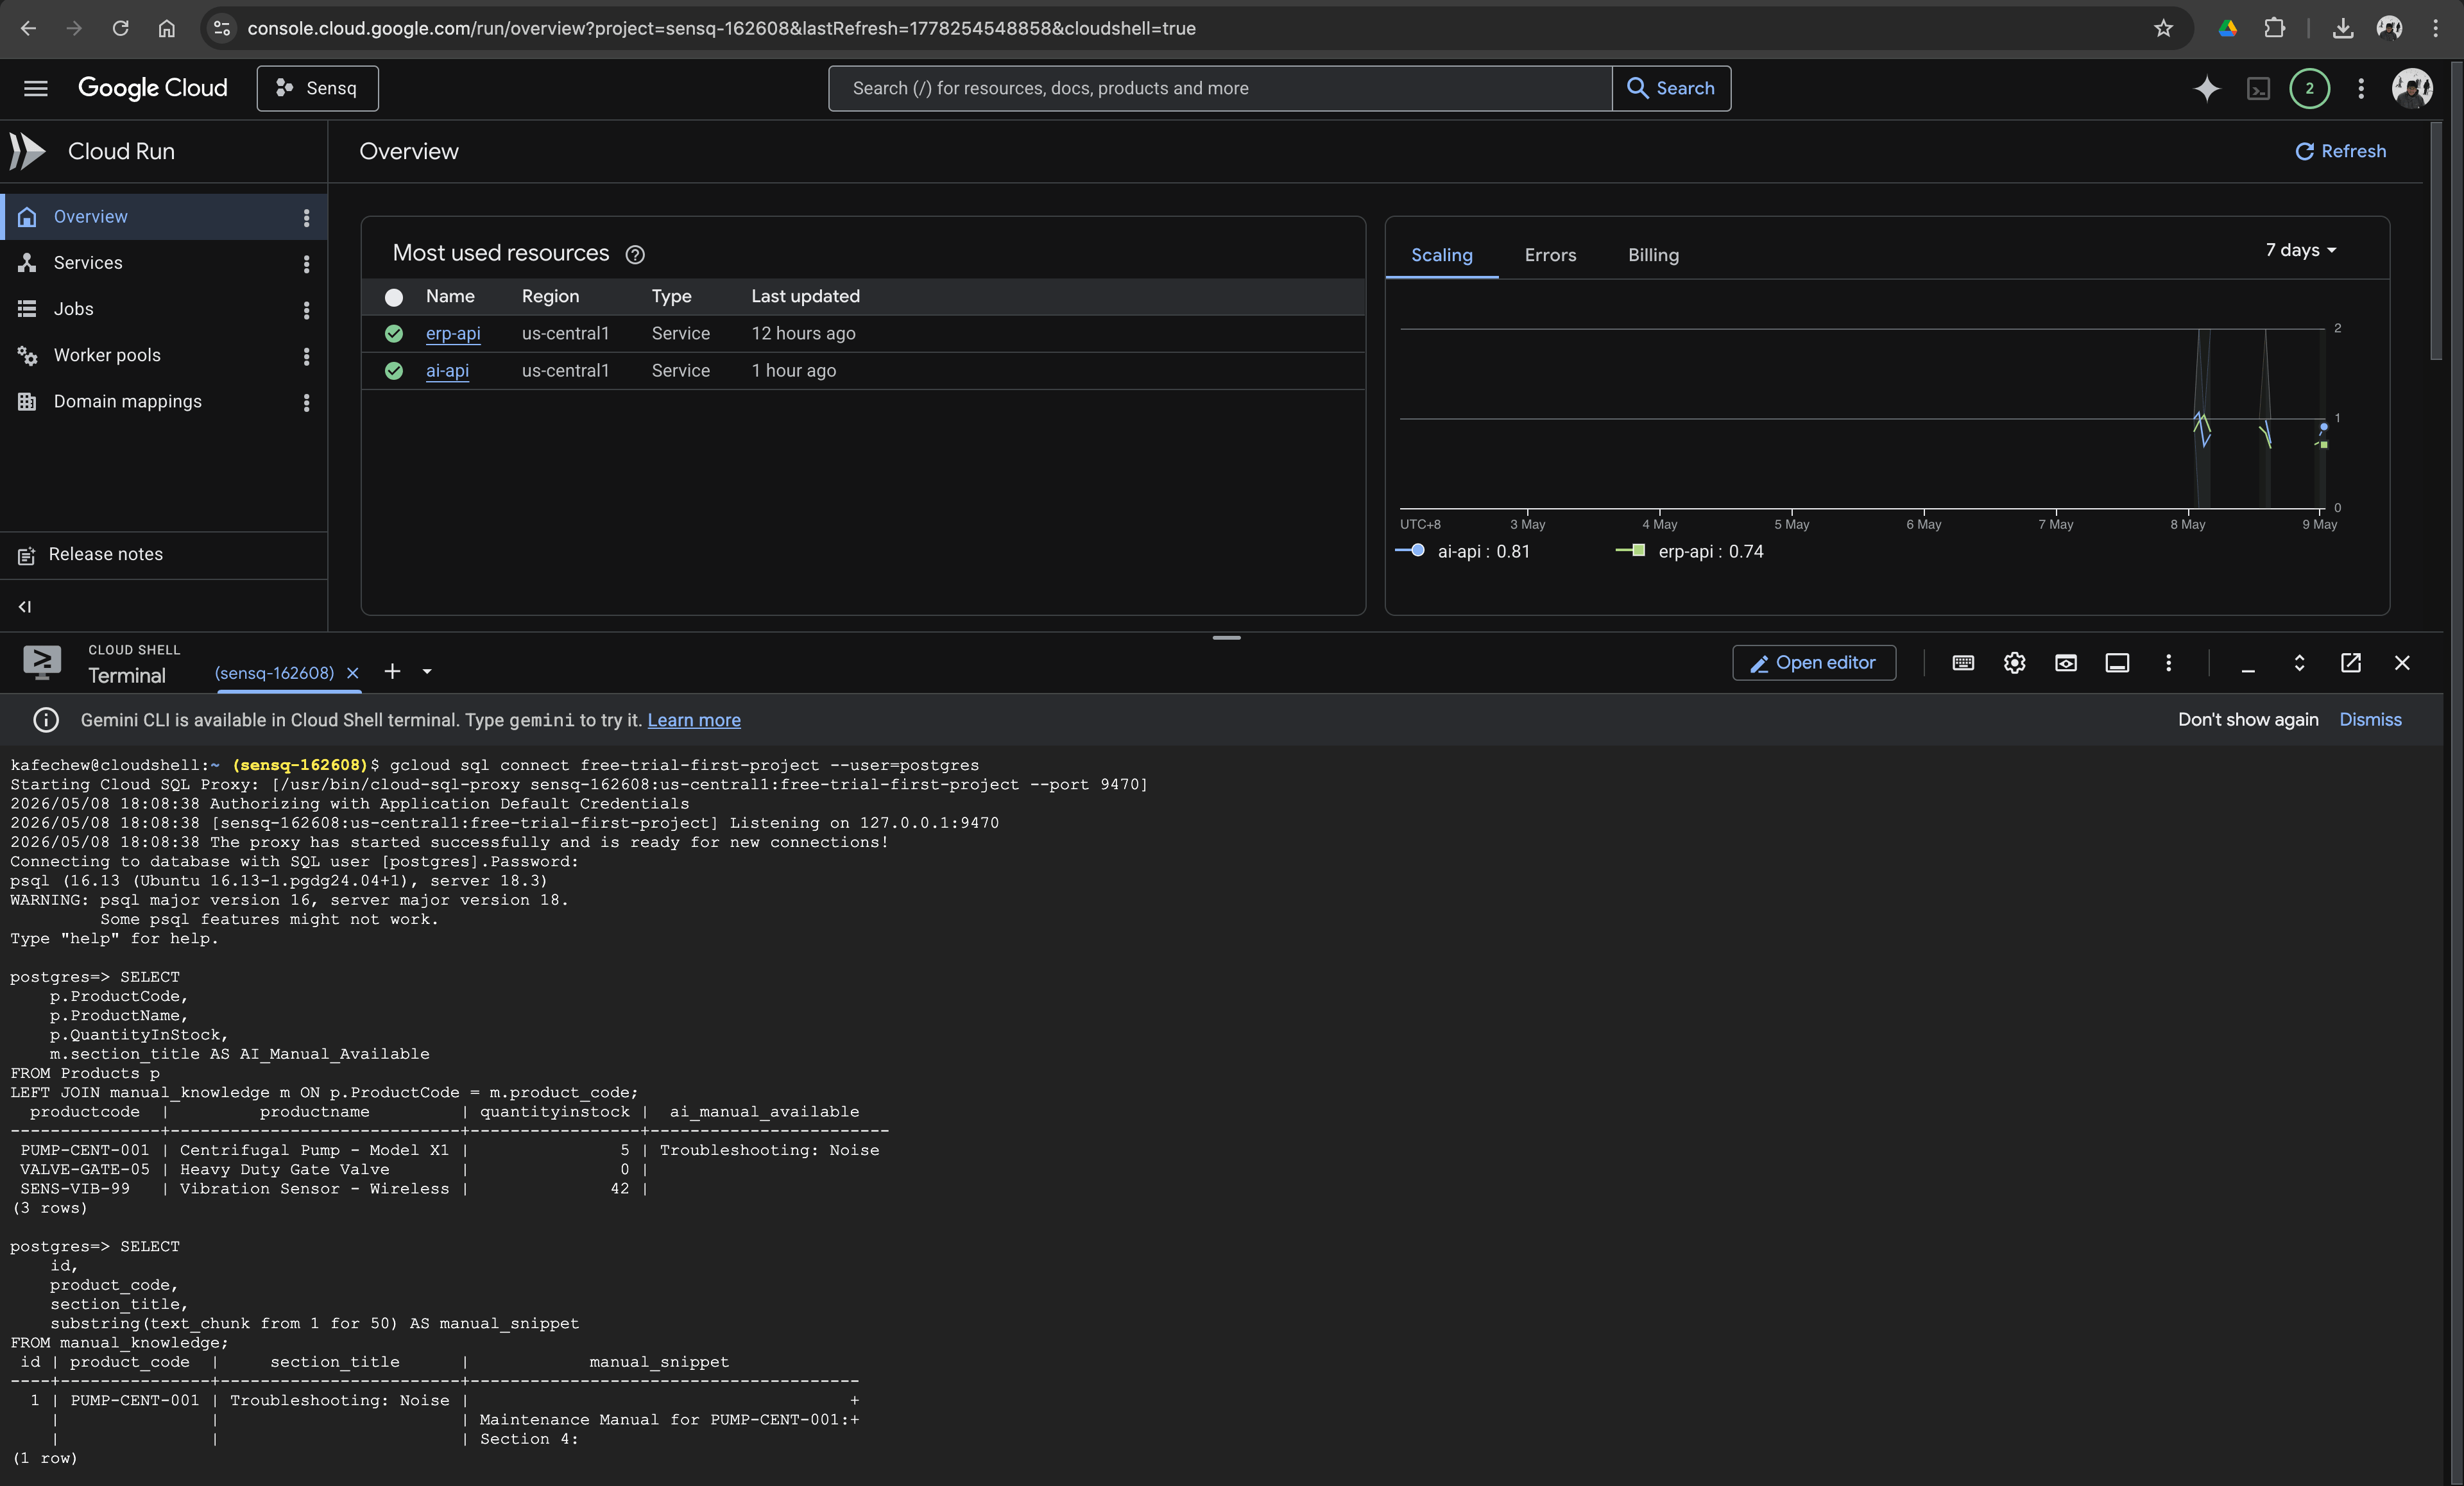
Once running, open the Google Cloud Shell (the terminal icon at the top right of the GCP console) and connect to your database:
gcloud sql connect yny-db-instance --user=postgres
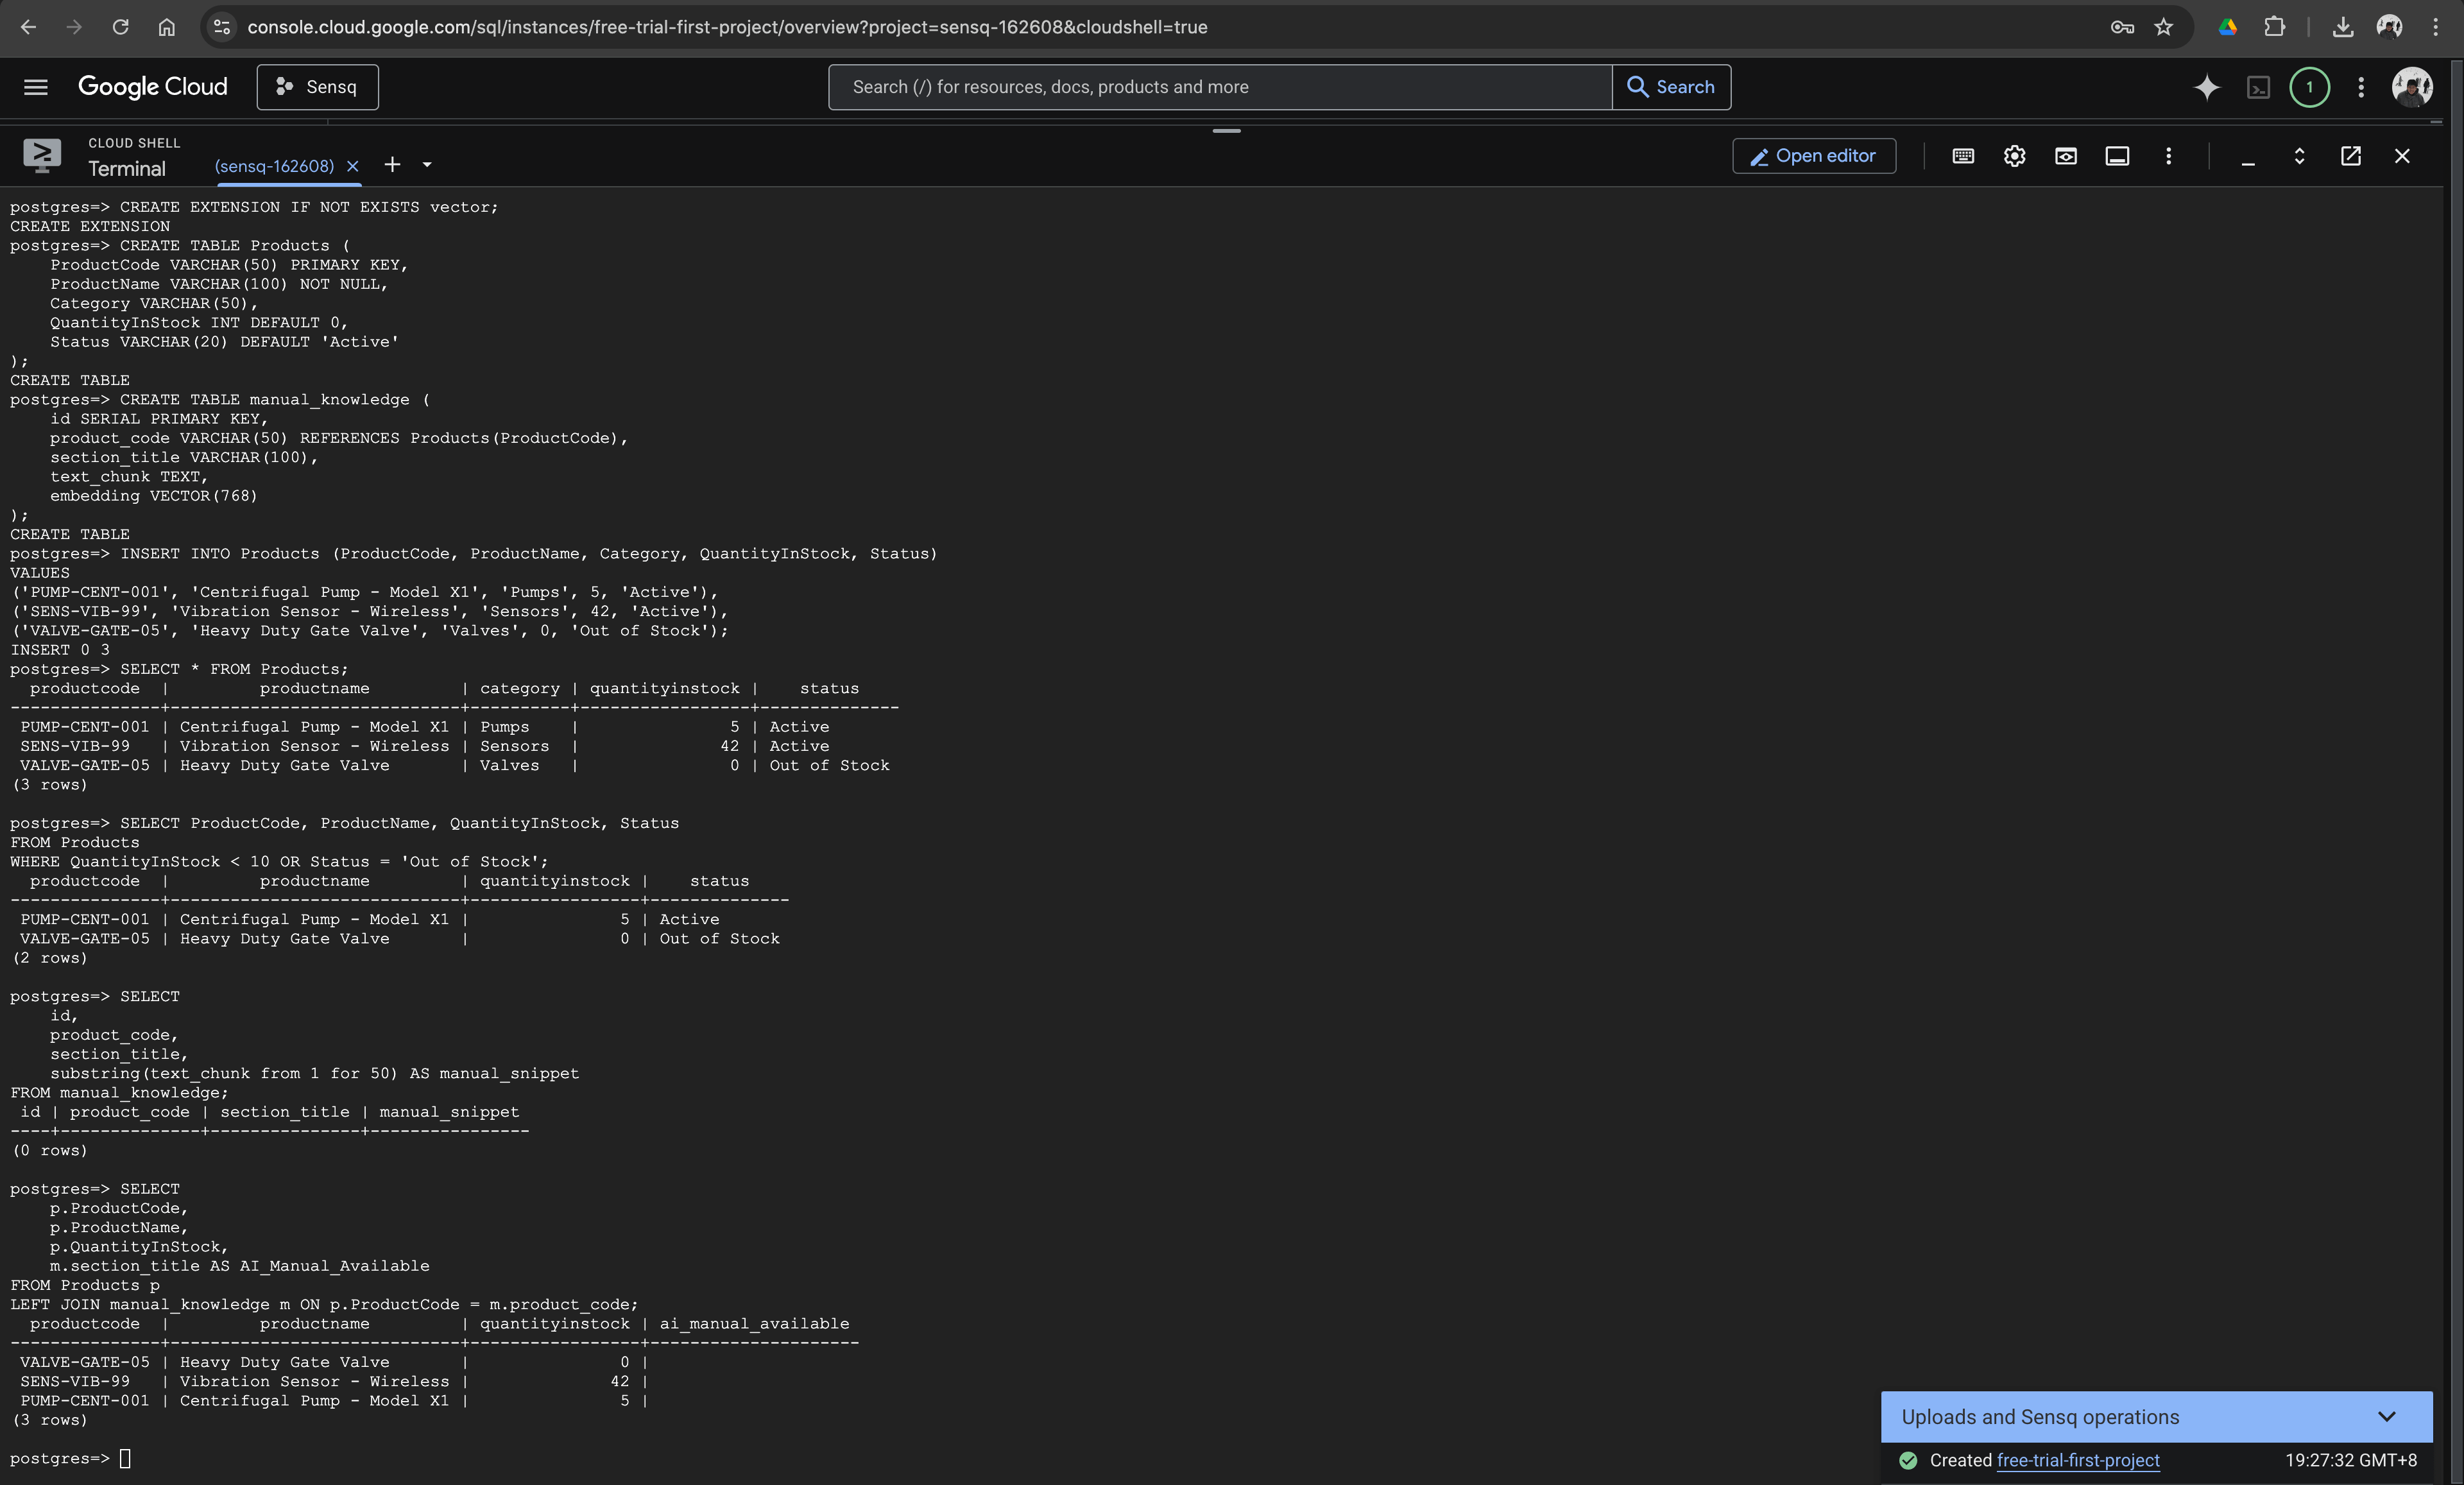
When prompted, paste your password. Then, run this SQL script to build your foundation:
-- 1. Enable pgvector for AI Memory
CREATE EXTENSION IF NOT EXISTS vector;
-- 2. Create the ERP Tables
CREATE TABLE Products (
ProductCode VARCHAR(50) PRIMARY KEY,
ProductName VARCHAR(100) NOT NULL,
Category VARCHAR(50),
QuantityInStock INT DEFAULT 0,
Status VARCHAR(20) DEFAULT 'Active'
);
-- 3. Create the AI Knowledge Base Table
-- Google's embeddings model outputs exactly 768 dimensions
CREATE TABLE manual_knowledge (
id SERIAL PRIMARY KEY,
product_code VARCHAR(50) REFERENCES Products(ProductCode),
section_title VARCHAR(100),
text_chunk TEXT,
embedding VECTOR(768)
);
-- 4. Insert Production-Alike ERP Data
INSERT INTO Products (ProductCode, ProductName, Category, QuantityInStock, Status)
VALUES
('PUMP-CENT-001', 'Centrifugal Pump - Model X1', 'Pumps', 5, 'Active'),
('SENS-VIB-99', 'Vibration Sensor - Wireless', 'Sensors', 42, 'Active'),
('VALVE-GATE-05', 'Heavy Duty Gate Valve', 'Valves', 0, 'Out of Stock');
-- 5. Check
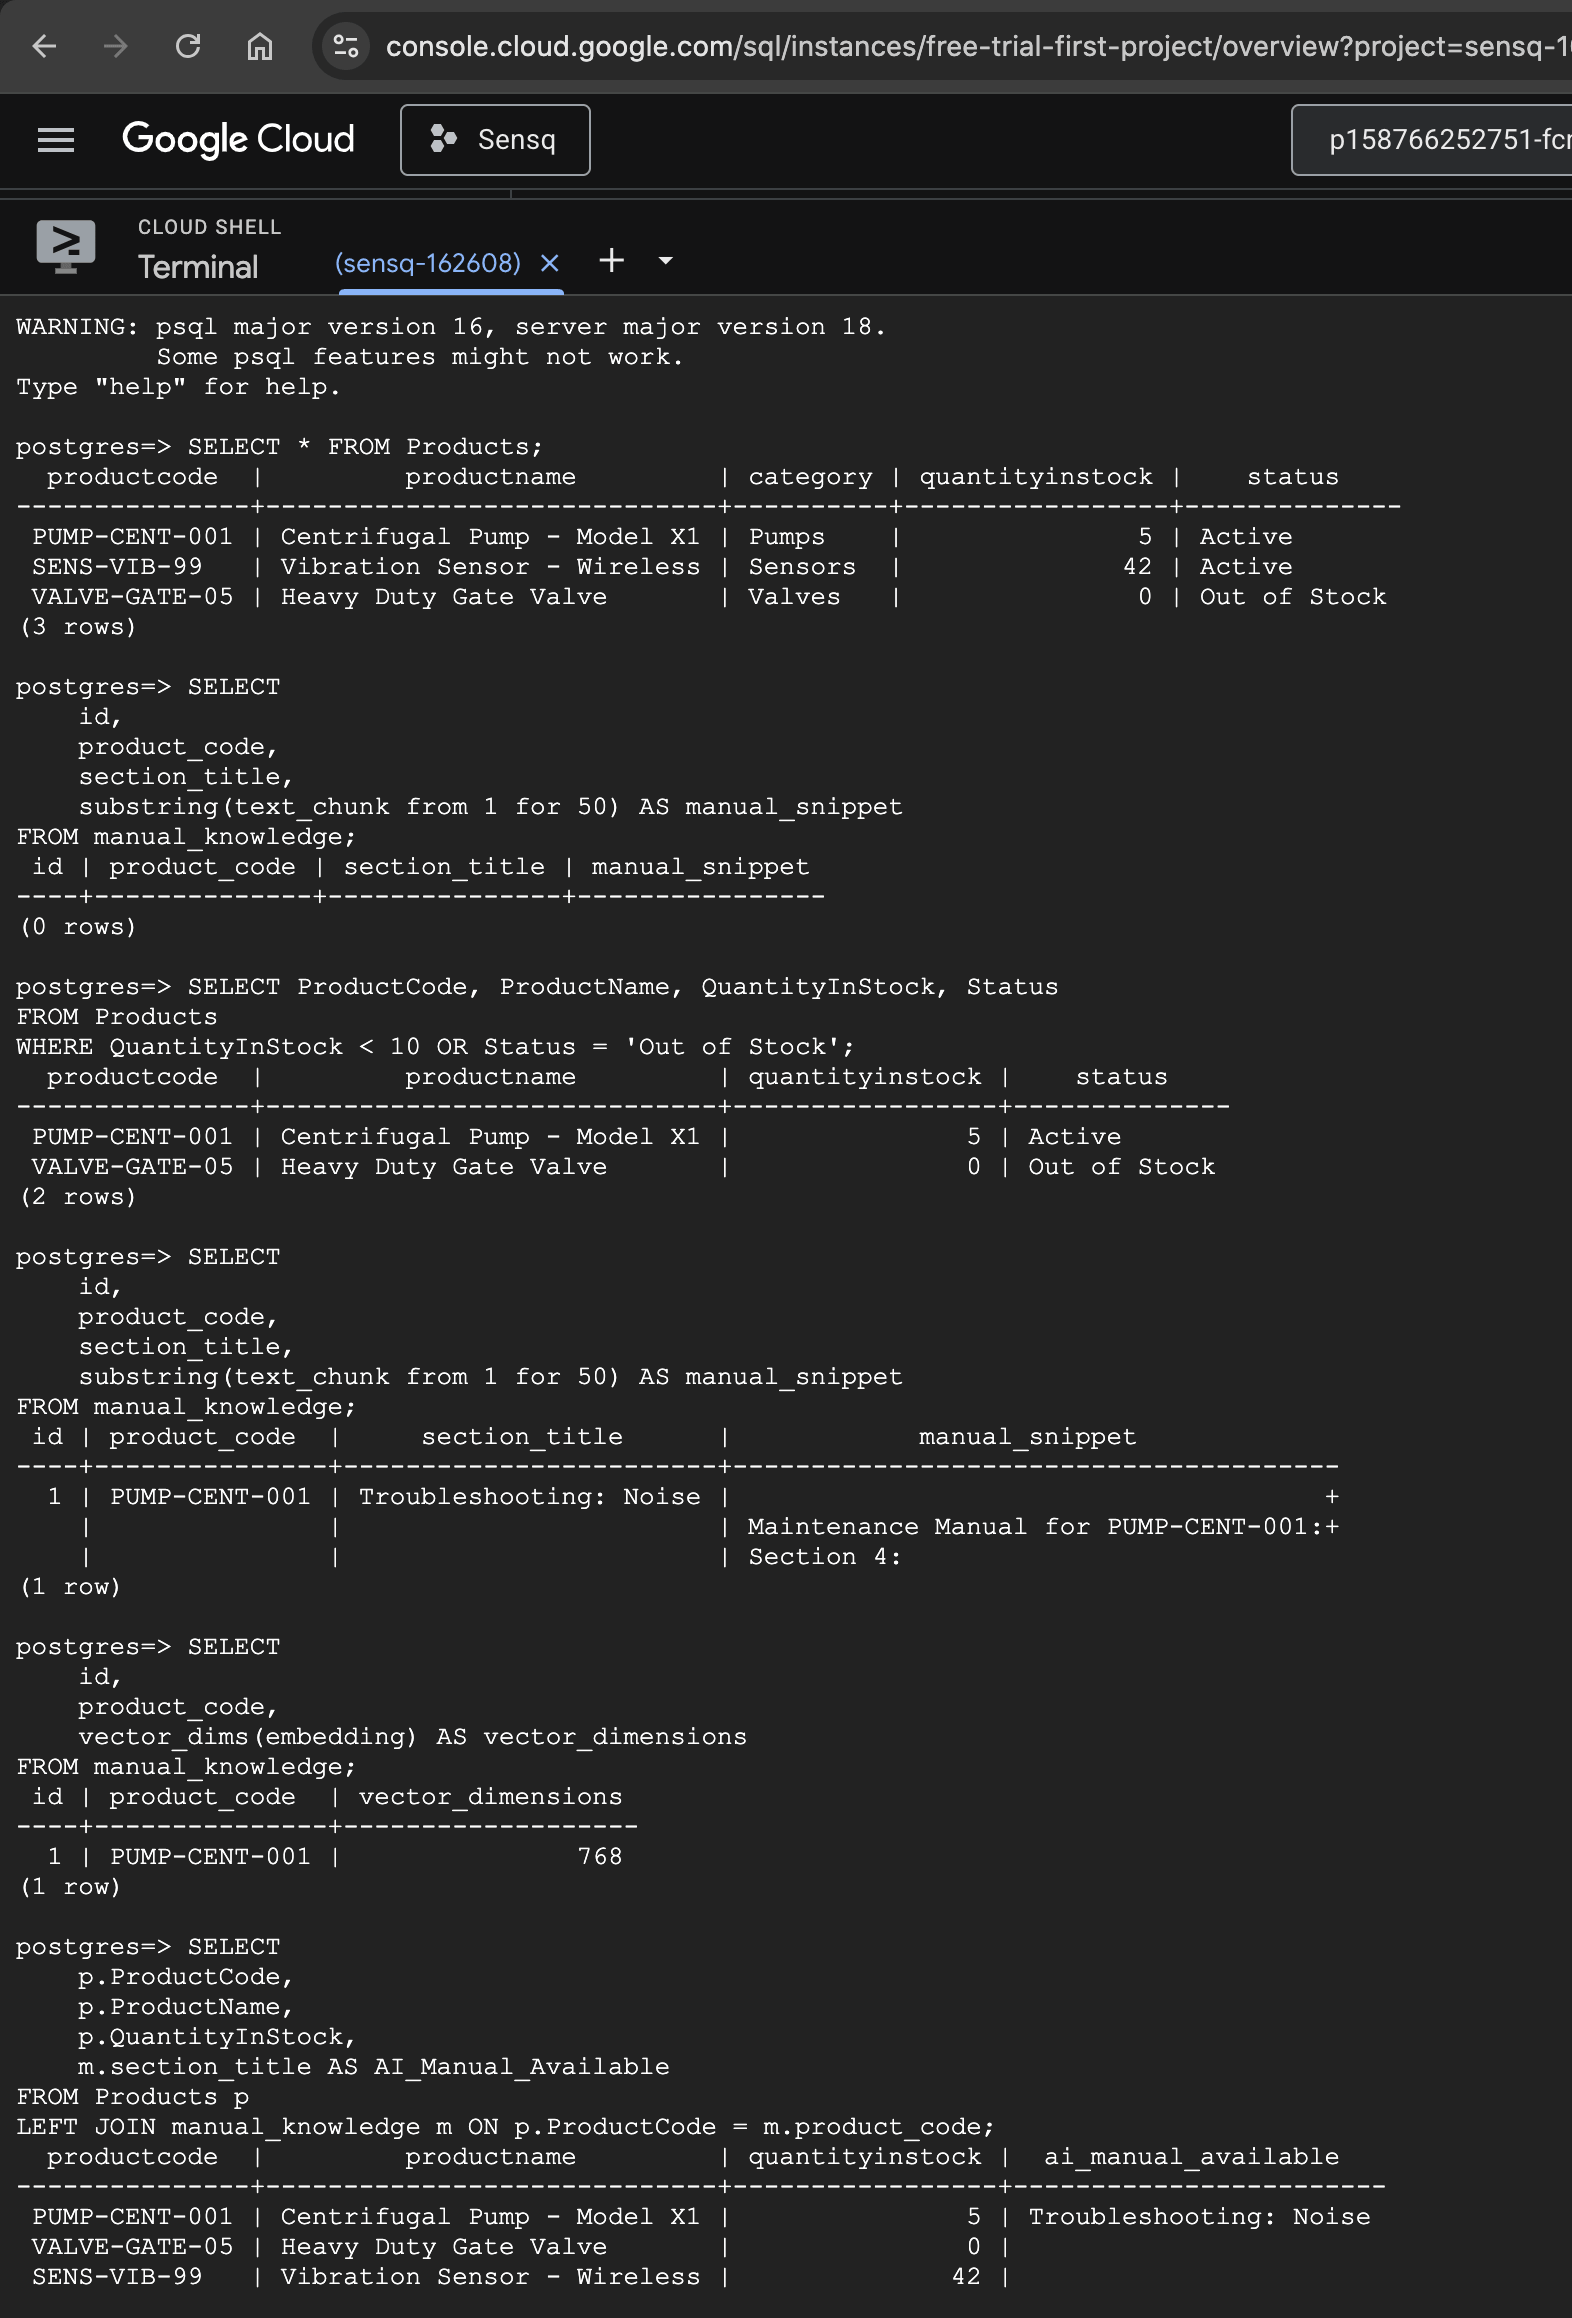
-- Check Your ERP Inventory (Basic)
SELECT * FROM Products;
-- Filter for Critical Items (Low/No Stock)
SELECT ProductCode, ProductName, QuantityInStock, Status
FROM Products
WHERE QuantityInStock < 10 OR Status = 'Out of Stock';
-- Safely Check the AI Knowledge Base
SELECT
id,
product_code,
section_title,
substring(text_chunk from 1 for 50) AS manual_snippet
FROM manual_knowledge;
-- Verify the AI Vector Dimensions
SELECT
id,
product_code,
vector_dims(embedding) AS vector_dimensions
FROM manual_knowledge;
-- The "Big Picture" JOIN Query
SELECT
p.ProductCode,
p.ProductName,
p.QuantityInStock,
m.section_title AS AI_Manual_Available
FROM Products p
LEFT JOIN manual_knowledge m ON p.ProductCode = m.product_code;
Type \q and press Enter to exit.
📌 Take Note: Go to your Cloud SQL dashboard and copy the Public IP of your database. You will need it for the next steps.
⚡ Phase 2: The ERP Backend (.NET 8 Web API)
C# is my go-to for enterprise logic. It is blazingly fast and highly structured. We will build a lightweight API to serve our inventory data.
Step 1: Initialize the Project
In your local terminal (inside the yny-app folder):
dotnet new webapi -n yny.Api
cd yny.Api
dotnet add package Npgsql.EntityFrameworkCore.PostgreSQL
Step 2: Database Connection String
Open yny.Api/appsettings.json. Configure your connection string replacing YOUR_DB_IP with your database's Public IP:
{
  "Logging": {
    "LogLevel": {
      "Default": "Information",
      "Microsoft.AspNetCore": "Warning"
    }
  },
  "AllowedHosts": "*",
  "ConnectionStrings": {
    "DefaultConnection": "Host=YOUR_DB_IP;Database=postgres;Username=postgres;Password=YnySecurePass26"
  }
}
Step 3: Write the API Logic
We are using Minimal APIs to keep our code clean. Open Program.cs and replace everything with this:
using Microsoft.EntityFrameworkCore;
using System.ComponentModel.DataAnnotations;
using System.ComponentModel.DataAnnotations.Schema;

var builder = WebApplication.CreateBuilder(args);

builder.Services.AddCors(options => {
    options.AddPolicy("AllowAll", policy => policy
        .WithOrigins(
            "http://localhost:5173",
            "http://localhost:3000",
            "https://yny-ui.vercel.app",
            "https://yny-ui-158766252751.us-central1.run.app"
        )
        .AllowAnyHeader()
        .AllowAnyMethod());
});

var connString = builder.Configuration.GetConnectionString("DefaultConnection");
builder.Services.AddDbContext<AppDbContext>(opt => opt.UseNpgsql(connString));
//.UseLowerCaseNamingConvention());

var app = builder.Build();

app.UseCors("AllowAll");
app.UseHttpsRedirection();

app.MapGet("/", () => new { status = "ERP API running" });

app.MapGet("/api/products", async (AppDbContext db) => {
    return await db.Products.ToListAsync();
});

app.MapGet("/api/products/{code}", async (string code, AppDbContext db) => {
    var product = await db.Products.FindAsync(code);
    return product is not null ? Results.Ok(product) : Results.NotFound();
});

app.Run();

[Table("products")]
public class Product {
    [Column("productcode")]
    [Key]
    public string ProductCode { get; set; } = string.Empty;

    [Column("productname")]
    public string ProductName { get; set; } = string.Empty;

    [Column("category")]
    public string Category { get; set; } = string.Empty;

    [Column("quantityinstock")]
    public int QuantityInStock { get; set; }

    [Column("status")]
    public string Status { get; set; } = string.Empty;
}

public class AppDbContext : DbContext {
    public AppDbContext(DbContextOptions<AppDbContext> options) : base(options) { }
    public DbSet<Product> Products { get; set; }
}
Test it: Run dotnet run. Open your browser to http://localhost:5000/api/products to see your JSON data!
🧠 Phase 3: The AI Microservice (Python + FastAPI)
This is the "Brain" of our application. We are using a pattern called RAG (Retrieval-Augmented Generation). When a user asks a question, this service turns the question into math, finds similar mathematical concepts in our Postgres database, and feeds that exact manual to the LLM to get a factual answer.
Step 1: Python Setup
Open a new terminal tab. Go back to your yny-app root:
mkdir yny.AI
cd yny.AI
python3 -m venv venv
source venv/bin/activate  # On Windows use: venv\Scripts\activate
Create a requirements.txt:
fastapi
uvicorn
psycopg2-binary
python-dotenv
google-generativeai
Run: pip install -r requirements.txt
Step 2: Configure Secrets
Create a .env file in the yny.AI folder (replace YOUR_DB_IP and YOUR_API_KEY):
DB_URL=postgresql://postgres:YnySecurePass26@YOUR_DB_IP:5432/postgres
GEMINI_API_KEY=YOUR_API_KEY
Step 3: Write the RAG Pipeline (main.py)
Create main.py. Notice the SQL query using <=>. This is the pgvector operator for Cosine Distance—it calculates how closely related the user's question is to our manuals!
from fastapi import FastAPI, HTTPException
from fastapi.middleware.cors import CORSMiddleware
from dotenv import load_dotenv
import google.generativeai as genai
import psycopg2
import os
load_dotenv()
app = FastAPI()
app.add_middleware(CORSMiddleware, allow_origins=["*"], allow_methods=["*"], allow_headers=["*"])
# Initialize Gemini
genai.configure(api_key=os.getenv("GEMINI_API_KEY"))
llm = genai.GenerativeModel("gemma-4-26b-a4b-it"")
@app.get("/")
def root():
return {"status": "AI API running perfectly"}
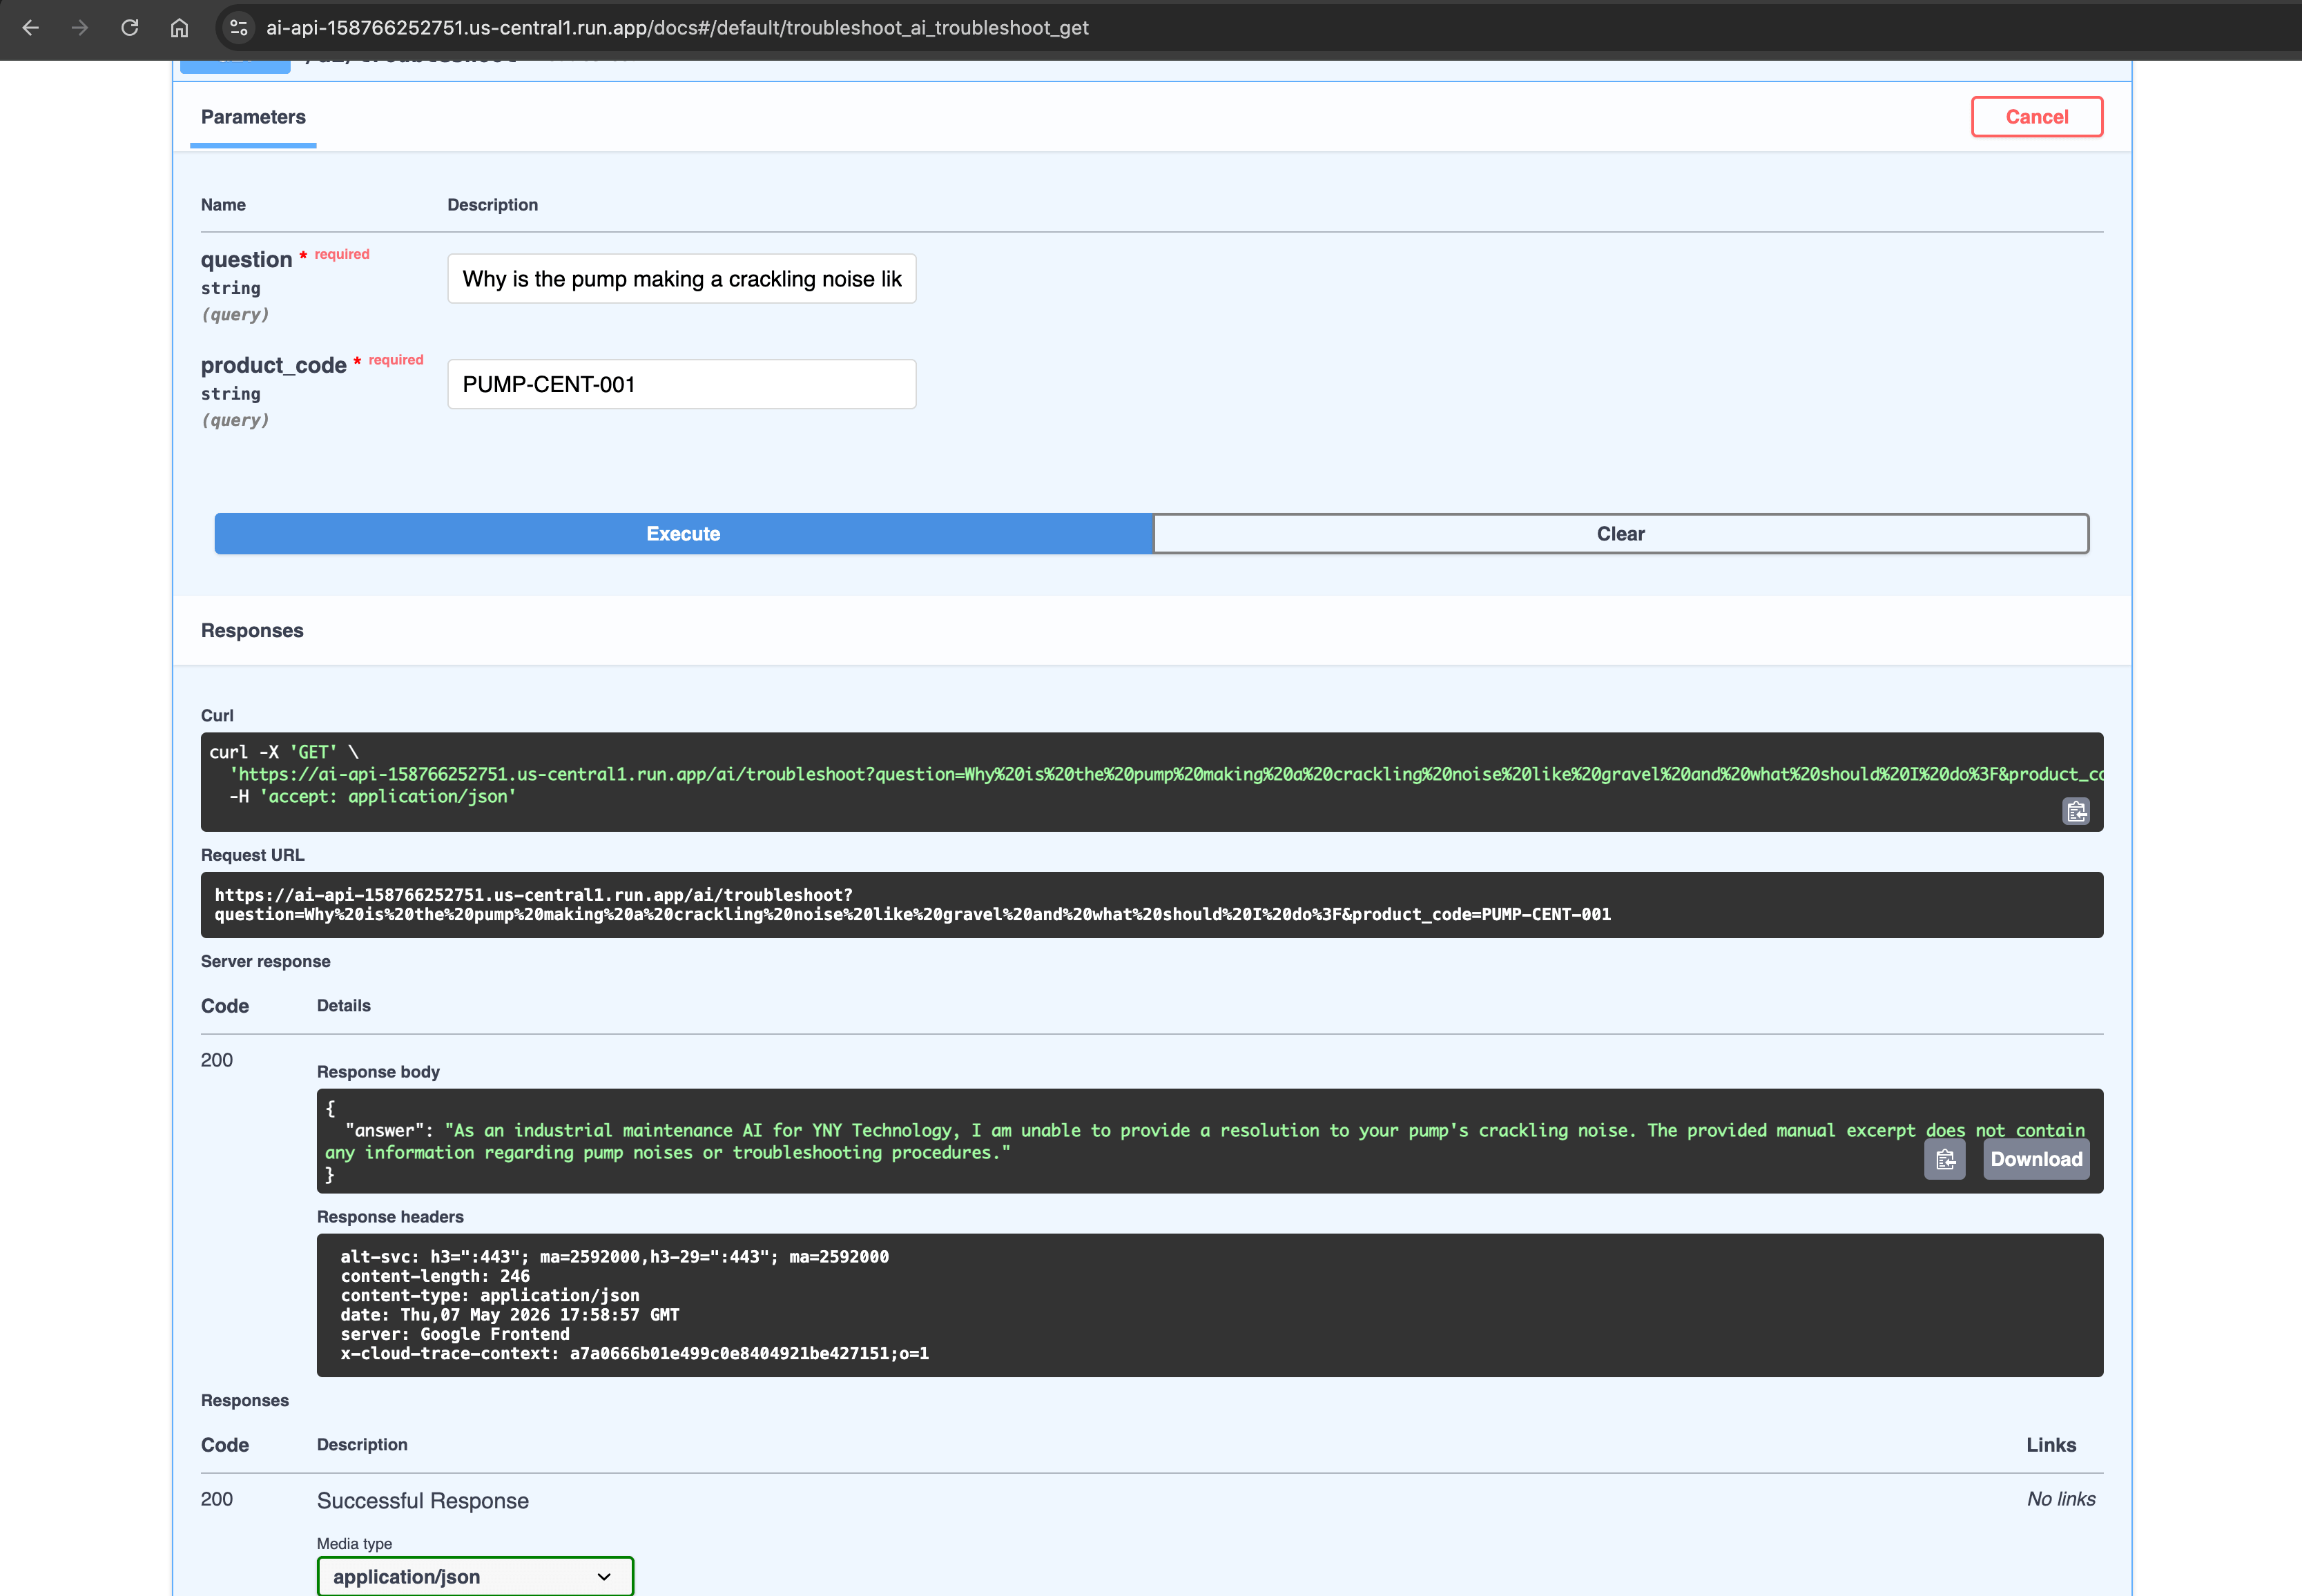
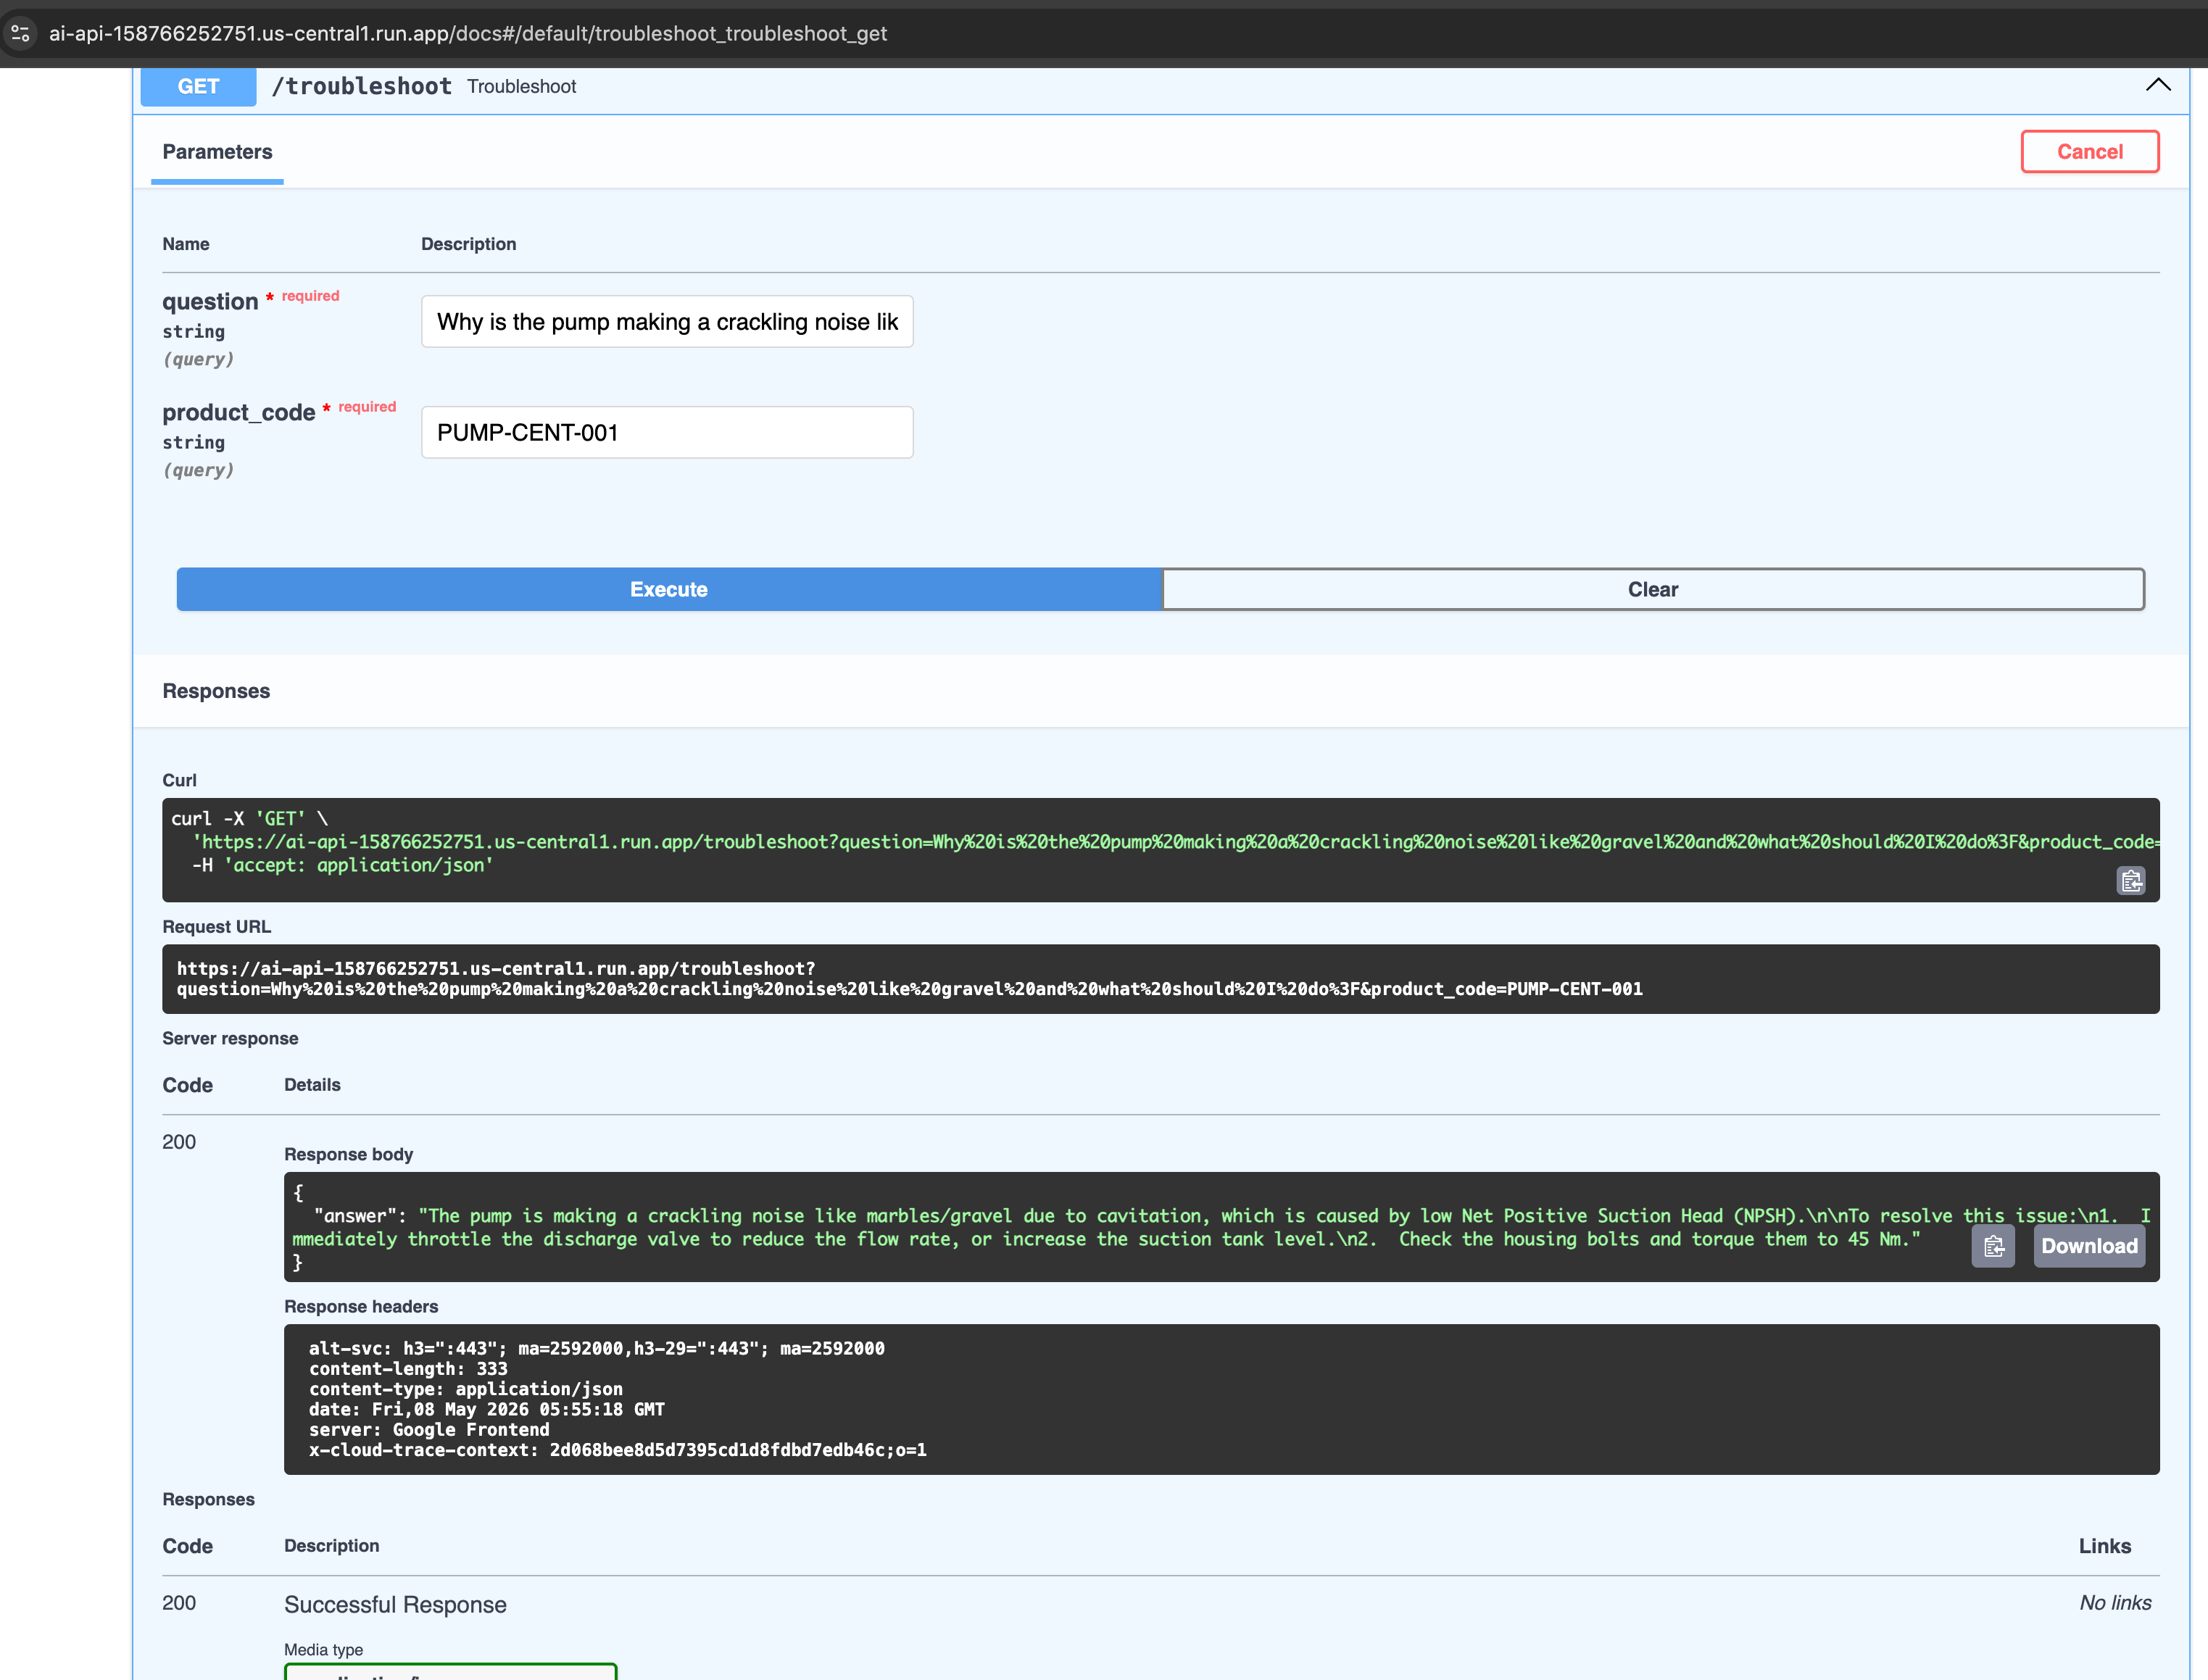
@app.get("/troubleshoot")
async def troubleshoot(question: str, product_code: str):
try:
# Step 1: Convert question to vector
embedding_result = genai.embed_content(
model="gemini-embedding-001",
content=question,
output_dimensionality=768
)
query_vector = embedding_result['embedding']
# Step 2: Search Postgres using pgvector Cosine Distance (<=>)
conn = psycopg2.connect(os.getenv("DB_URL"))
cur = conn.cursor()
query = """
SELECT text_chunk FROM manual_knowledge
WHERE product_code = %s
ORDER BY embedding <=> %s::vector LIMIT 1
"""
cur.execute(query, (product_code, query_vector))
result = cur.fetchone()
conn.close()
context = result[0] if result else "No manual found."
# Step 3: Generate answer with Gemma
prompt = f"""
You are an expert industrial maintenance AI.
Use ONLY the following manual excerpt to answer the user's question.
Manual Excerpt: {context}
User Question: {question}
"""
response = llm.generate_content(prompt)
return {"answer": response.text}
except Exception as e:
raise HTTPException(status_code=500, detail=str(e))
if __name__ == "__main__":
import uvicorn
uvicorn.run(app, host="0.0.0.0", port=8080)
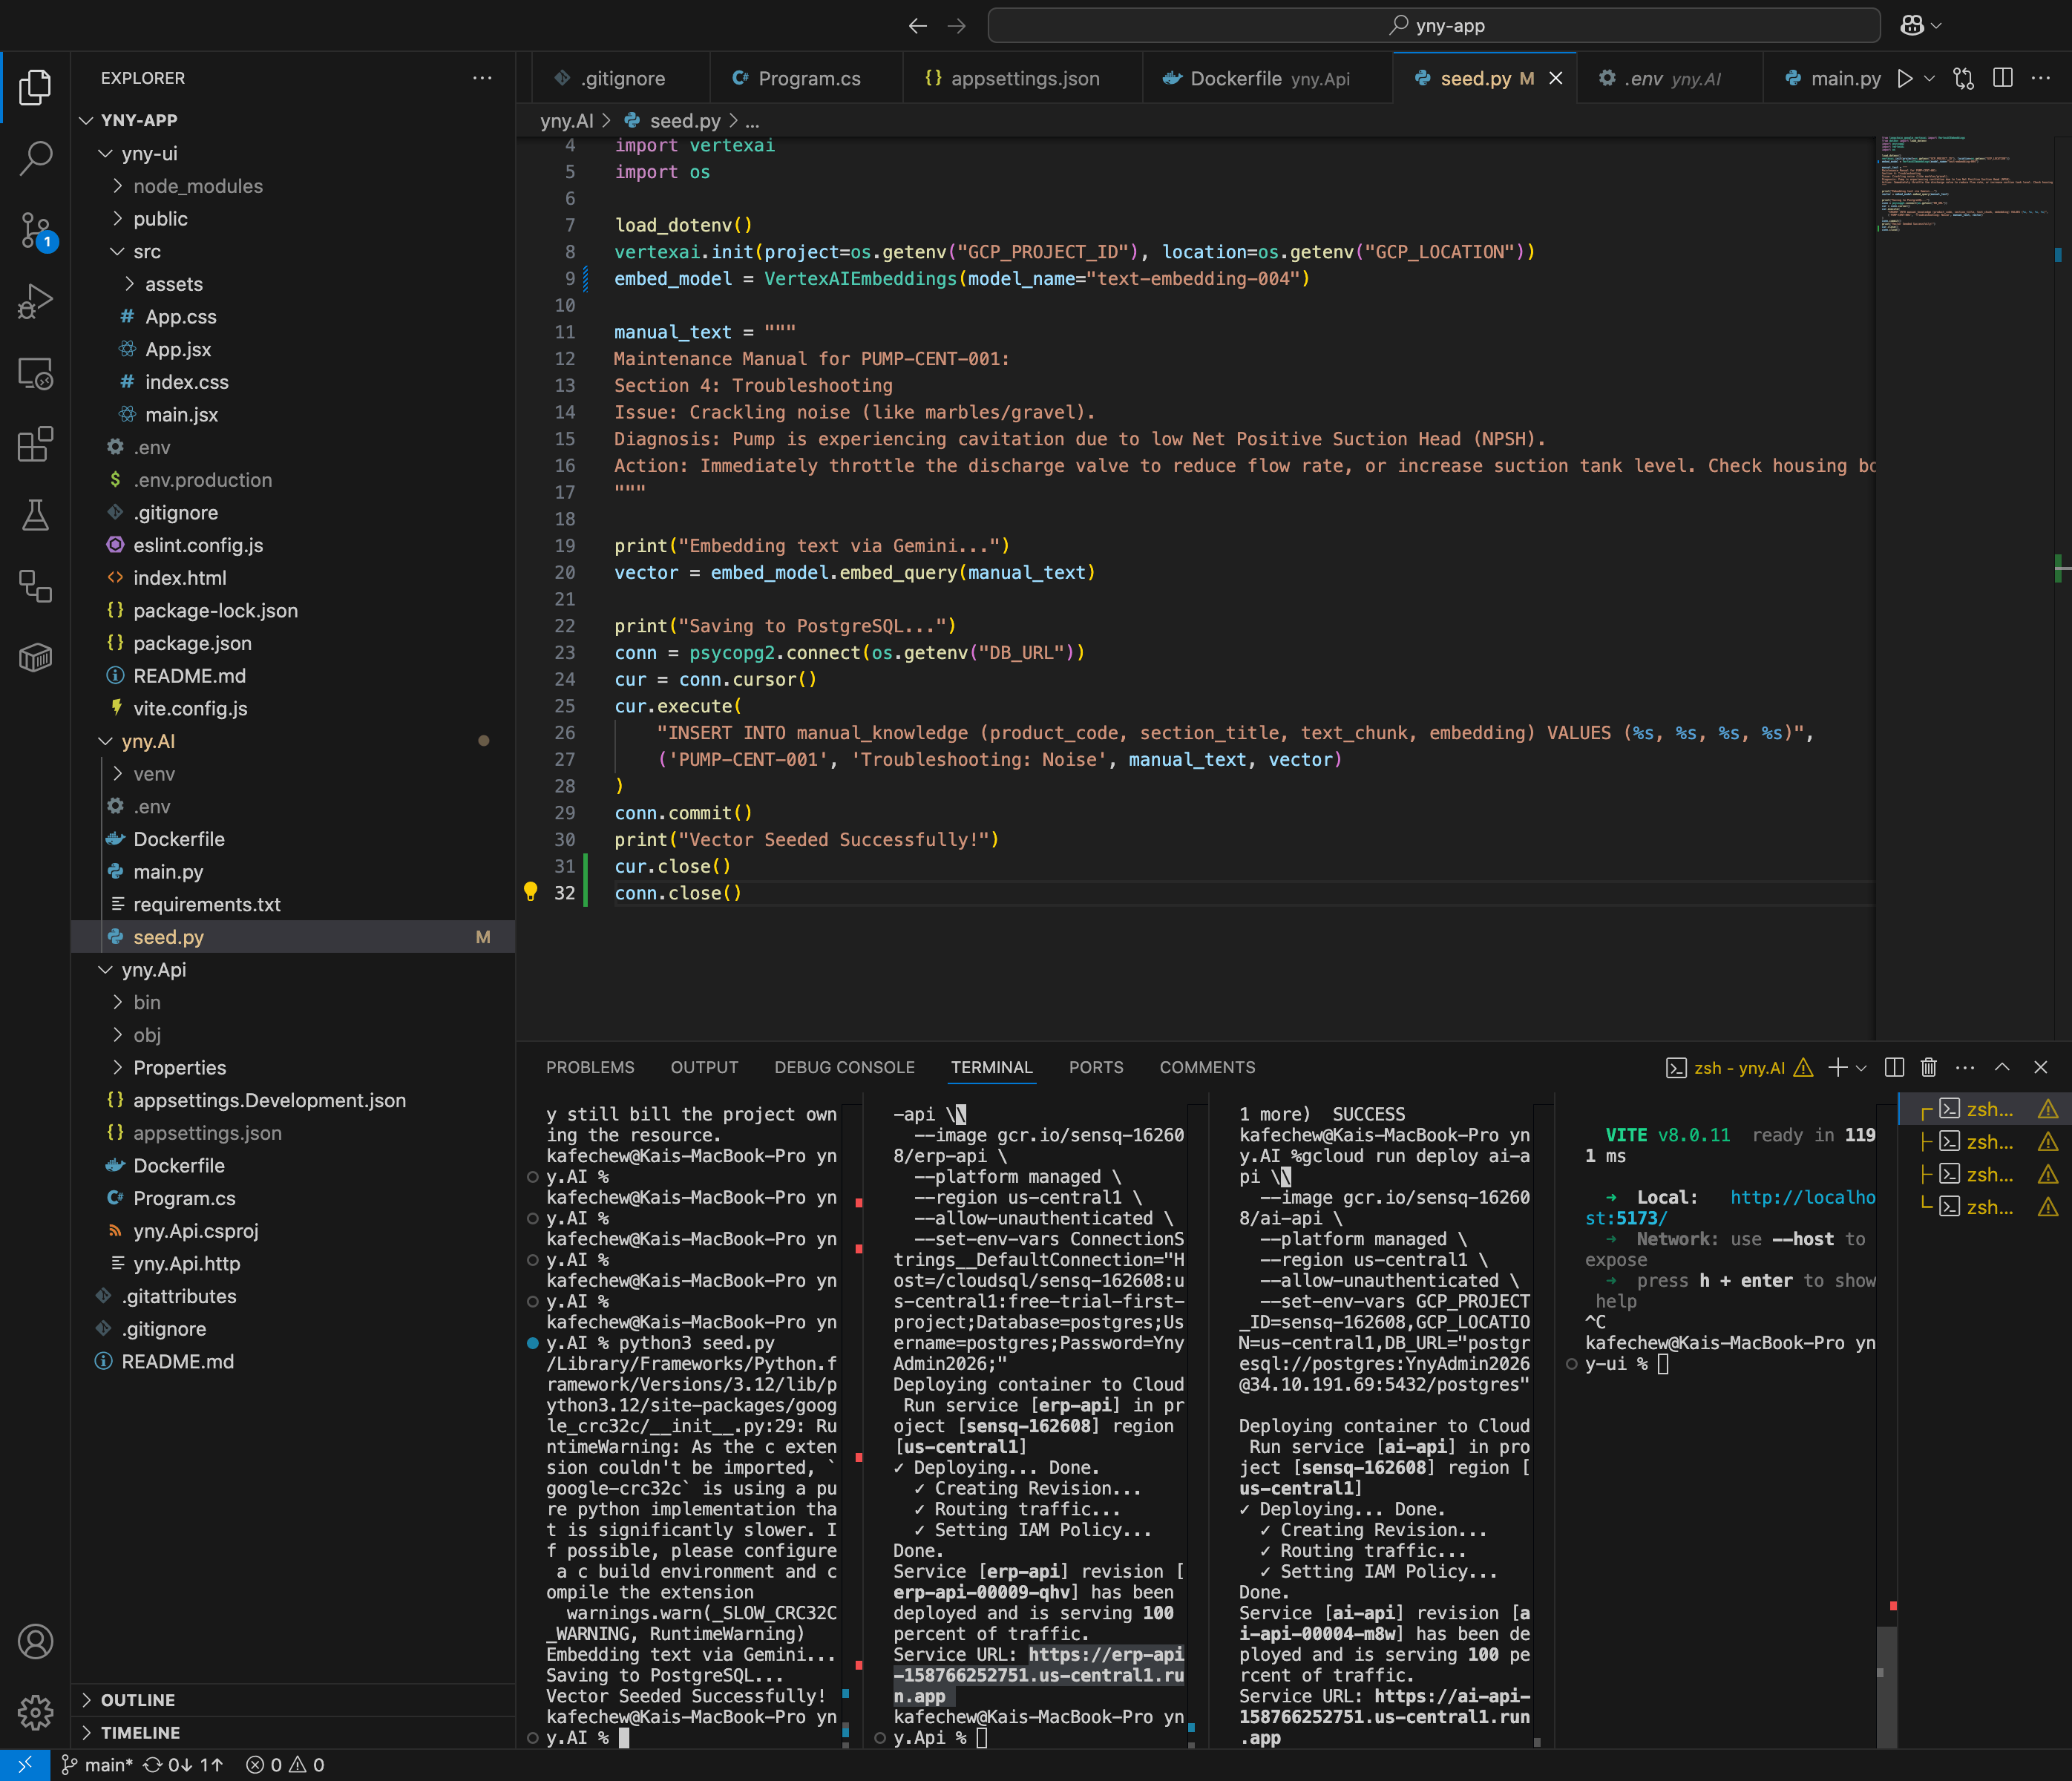
Step 4: Seed the AI "Brain" (seed.py)
To prove this works, we must inject an equipment manual into our database. Create seed.py:
from dotenv import load_dotenv
import google.generativeai as genai
import psycopg2
import os

load_dotenv()
genai.configure(api_key=os.getenv("GEMINI_API_KEY"))

manual_text = """
Maintenance Manual for PUMP-CENT-001:
Issue: Crackling noise (like marbles/gravel).
Diagnosis: Pump is experiencing cavitation due to low Net Positive Suction Head.
Action: Immediately throttle the discharge valve to reduce flow rate. Torque housing bolts to 45 Nm.
"""

print("Embedding text via Gemini...")
embedding_result = genai.embed_content(
    model="gemini-embedding-001",
    content=manual_text,
    output_dimensionality=768
)
vector = embedding_result['embedding']

print("Saving to PostgreSQL...")
conn = psycopg2.connect(os.getenv("DB_URL"))
cur = conn.cursor()
cur.execute(
    "INSERT INTO manual_knowledge (product_code, section_title, text_chunk, embedding) VALUES (%s, %s, %s, %s)",
    ('PUMP-CENT-001', 'Troubleshooting: Noise', manual_text, vector)
)
conn.commit()
conn.close()
print("Vector Seeded Successfully!")
Run python seed.py once. Your database can now "think" about centrifugal pumps! Test your API by running python main.py.
🎨 Phase 4: The Frontend UI (React + Vite)
Step 1: Initialize the App
Go back to the root yny-app:
npm create vite@latest yny-ui -- --template react
cd yny-ui
npm install axios
Step 2: Build the Dashboard (src/App.jsx)
Replace App.jsx entirely. This UI will fetch inventory from .NET and query Python for AI troubleshooting.
import { useState, useEffect } from 'react'
import axios from 'axios'
import ReactMarkdown from 'react-markdown'
import remarkGfm from 'remark-gfm'
function App() {
const [products, setProducts] = useState([])
const [question, setQuestion] = useState("")
const [aiAnswer, setAiAnswer] = useState("")
const [loading, setLoading] = useState(false)
const ERP_API = import.meta.env.VITE_ERP_API || 'https://erp-api-158766252751.us-central1.run.app'
const AI_API = import.meta.env.VITE_AI_API || 'https://ai-api-158766252751.us-central1.run.app'
useEffect(() => {
axios.get(`${ERP_API}/api/products`)
.then(res => setProducts(res.data))
.catch(err => console.error("ERP API not running", err))
}, [])
const askAI = async (productCode) => {
if (!question) return;
setLoading(true)
try {
const res = await axios.get(`${AI_API}/troubleshoot`, {
params: { question, product_code: productCode }
})
setAiAnswer(res.data.answer)
} catch (err) {
setAiAnswer("Error reaching AI service.")
}
setLoading(false)
}
return (
<div style={{ padding: '2rem', fontFamily: 'system-ui', maxWidth: '900px', margin: '0 auto' }}>
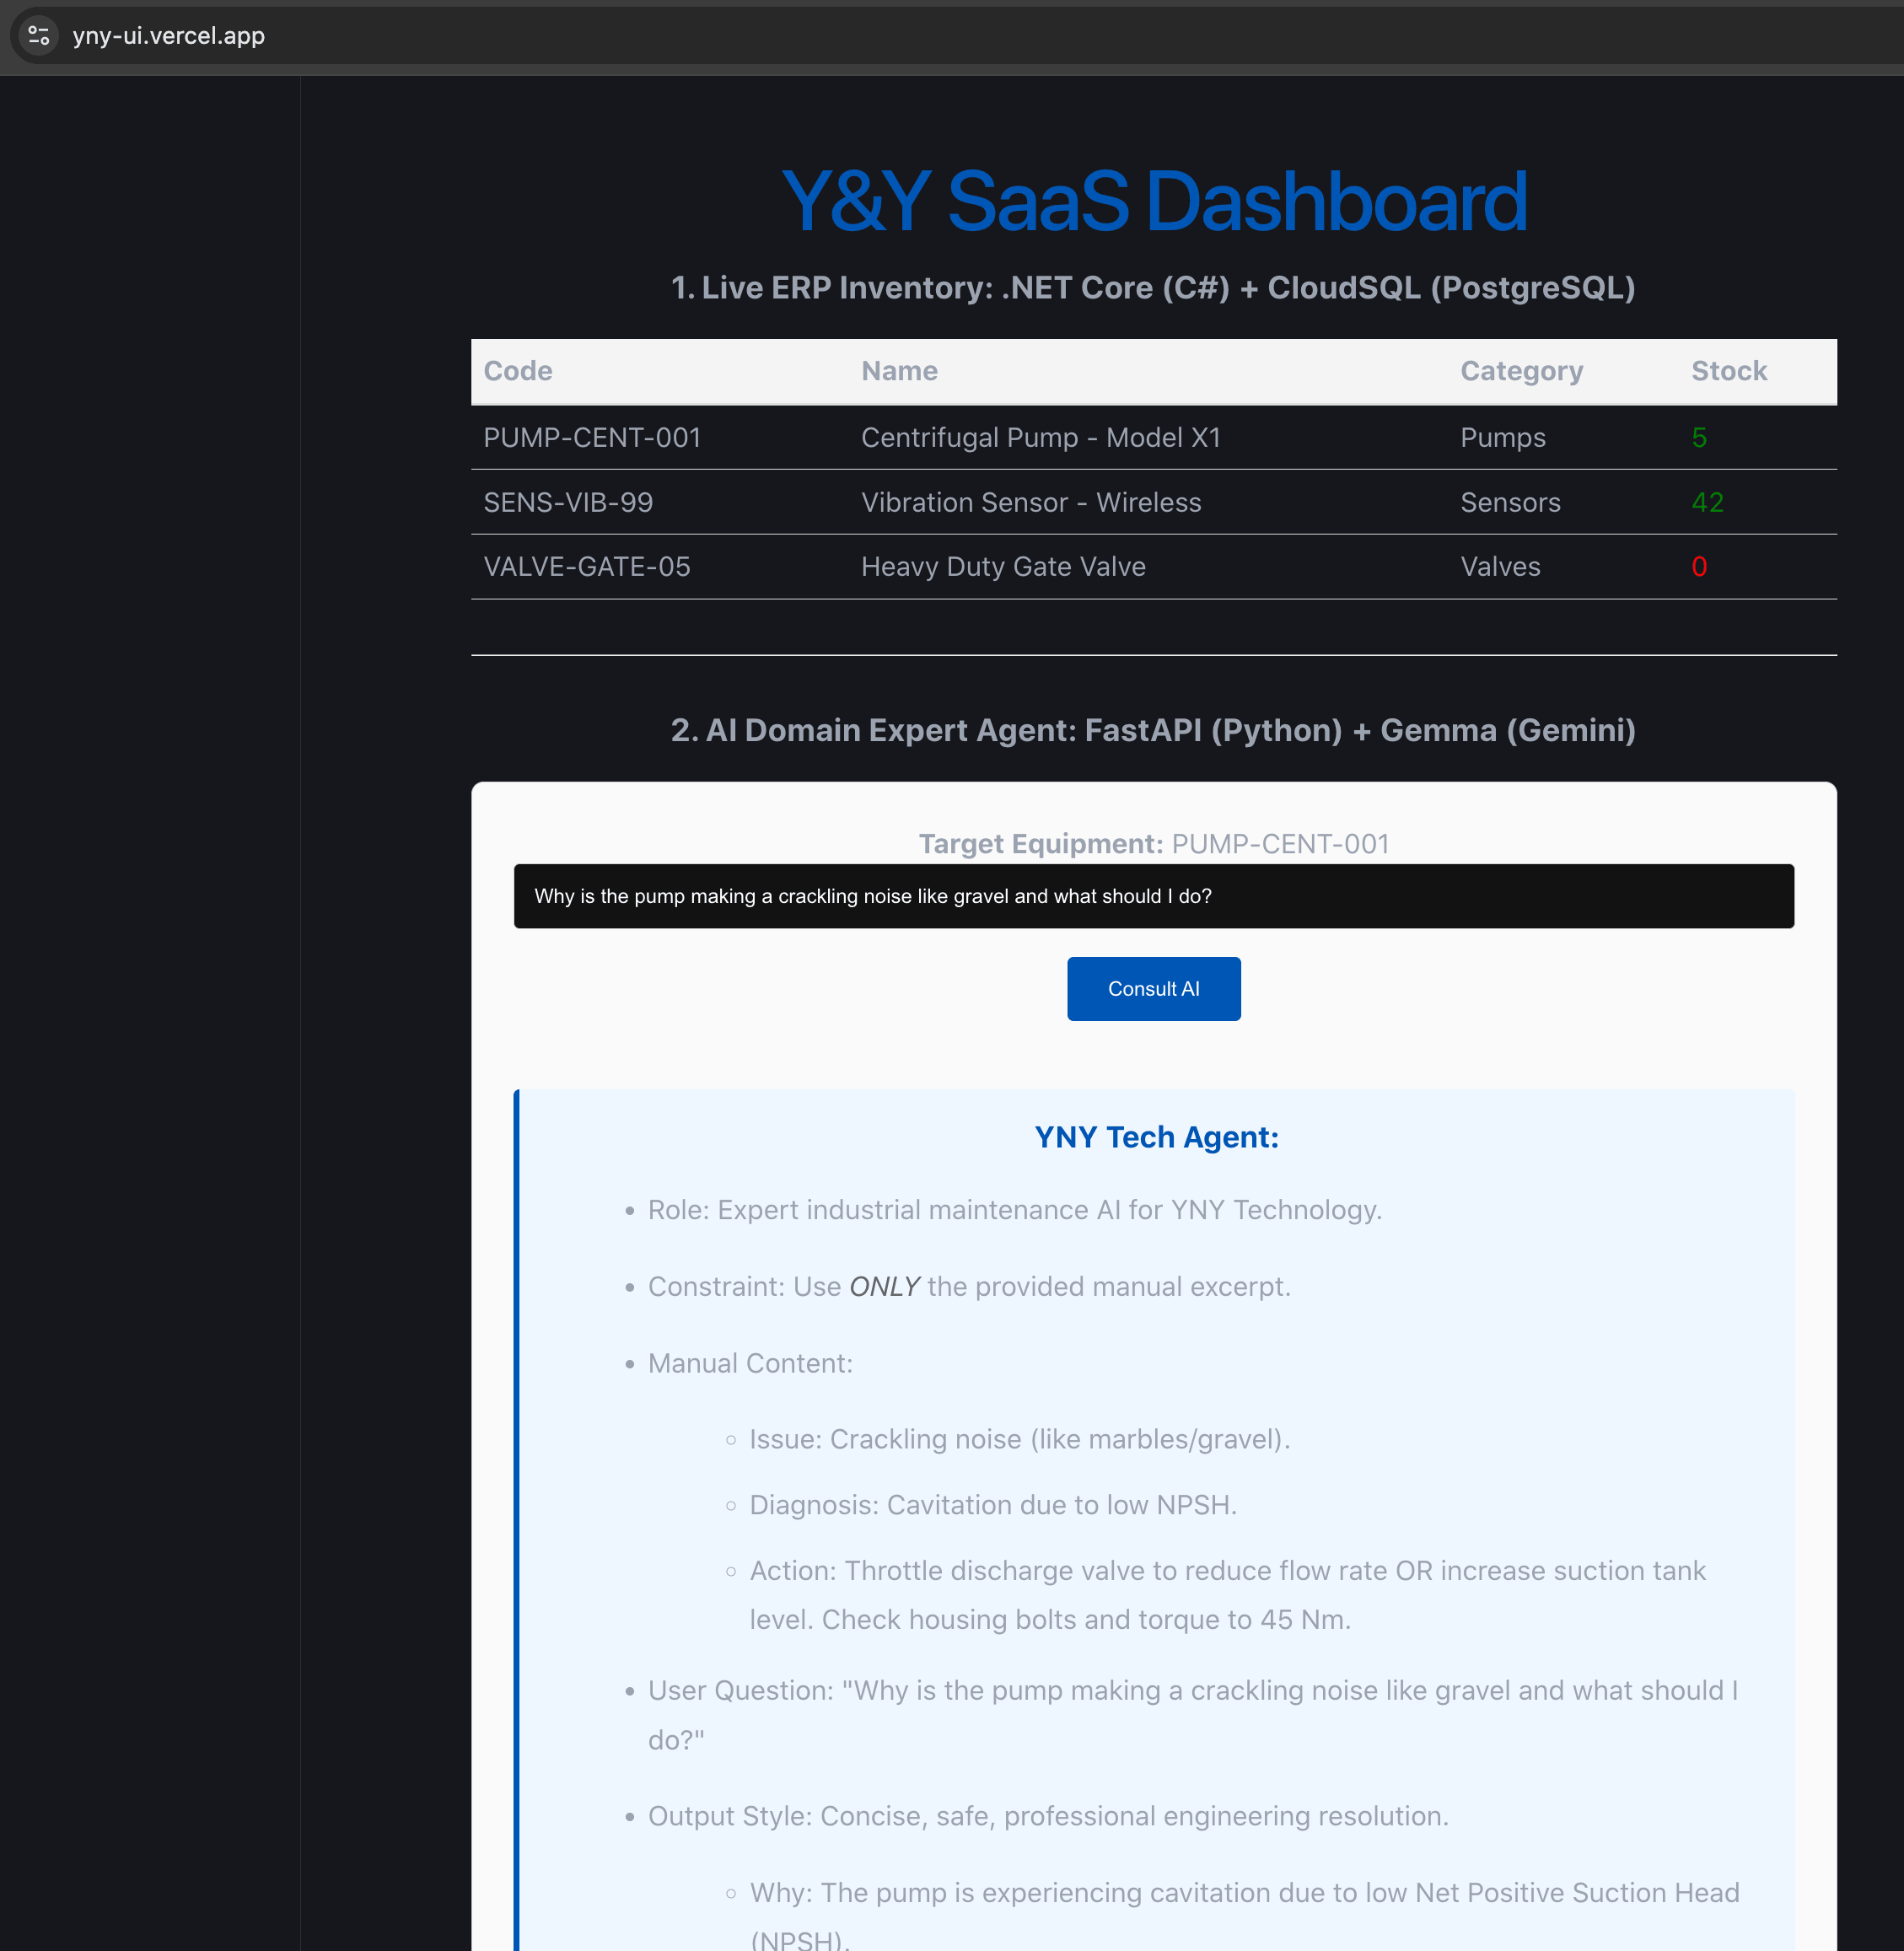
<h1 style={{ color: '#0056b3' }}>Y&Y SaaS Dashboard</h1>
<h3>1. Live ERP Inventory: .NET Core (C#) + CloudSQL (PostgreSQL)</h3>
<table style={{ width: '100%', textAlign: 'left', borderCollapse: 'collapse' }}>
<thead style={{ backgroundColor: '#f4f4f4' }}>
<tr>
<th style={{ padding: '8px', borderBottom: '2px solid #ddd' }}>Code</th>
<th style={{ padding: '8px', borderBottom: '2px solid #ddd' }}>Name</th>
<th style={{ padding: '8px', borderBottom: '2px solid #ddd' }}>Category</th>
<th style={{ padding: '8px', borderBottom: '2px solid #ddd' }}>Stock</th>
</tr>
</thead>
<tbody>
{products.map(p => (
<tr key={p.productCode}>
<td style={{ padding: '8px', borderBottom: '1px solid #ddd' }}>{p.productCode}</td>
<td style={{ padding: '8px', borderBottom: '1px solid #ddd' }}>{p.productName}</td>
<td style={{ padding: '8px', borderBottom: '1px solid #ddd' }}>{p.category}</td>
<td style={{ padding: '8px', borderBottom: '1px solid #ddd', color: p.quantityInStock === 0 ? 'red' : 'green' }}>
{p.quantityInStock}
</td>
</tr>
))}
</tbody>
</table>
<hr style={{ margin: '2rem 0' }} />
<h3>2. AI Domain Expert Agent: FastAPI (Python) + Gemma (Gemini)</h3>
<div style={{ padding: '1.5rem', borderRadius: '8px', border: '1px solid #ccc', backgroundColor: '#fafafa' }}>
<p><strong>Target Equipment:</strong> PUMP-CENT-001</p>
<input
type="text"
value={question}
onChange={e => setQuestion(e.target.value)}
placeholder="e.g., Why is the pump sounding like gravel?"
style={{ width: '100%', padding: '0.75rem', marginBottom: '1rem', borderRadius: '4px', border: '1px solid #ccc', boxSizing: 'border-box' }}
/>
<button
onClick={() => askAI('PUMP-CENT-001')}
disabled={loading}
style={{ padding: '0.75rem 1.5rem', backgroundColor: '#0056b3', color: 'white', border: 'none', borderRadius: '4px', cursor: 'pointer', marginBottom: '1rem' }}>
{loading ? "Analyzing Manuals..." : "Consult AI"}
</button>
{aiAnswer && (
<div style={{ marginTop: '1.5rem', padding: '1rem', backgroundColor: '#eef6ff', borderLeft: '4px solid #0056b3', borderRadius: '4px' }}>
<strong style={{ fontSize: '1.1rem', color: '#0056b3' }}>YNY Tech Agent:</strong>
<div style={{ marginTop: '1rem', lineHeight: '1.8', textAlign: 'left' }}>
<ReactMarkdown
remarkPlugins={[remarkGfm]}
components={{
p: ({ node, ...props }) => <p style={{ marginBottom: '1rem', textAlign: 'left' }} {...props} />,
h1: ({ node, ...props }) => <h2 style={{ marginTop: '1.5rem', marginBottom: '0.5rem', color: '#0056b3' }} {...props} />,
h2: ({ node, ...props }) => <h3 style={{ marginTop: '1.2rem', marginBottom: '0.4rem', color: '#0056b3' }} {...props} />,
h3: ({ node, ...props }) => <h4 style={{ marginTop: '1rem', marginBottom: '0.3rem', color: '#0056b3' }} {...props} />,
strong: ({ node, ...props }) => <strong style={{ color: '#d9534f', fontWeight: 'bold' }} {...props} />,
em: ({ node, ...props }) => <em style={{ fontStyle: 'italic', color: '#666' }} {...props} />,
ul: ({ node, ...props }) => <ul style={{ marginLeft: '1.5rem', marginTop: '0.8rem', marginBottom: '0.8rem', textAlign: 'left' }} {...props} />,
ol: ({ node, ...props }) => <ol style={{ marginLeft: '1.5rem', marginTop: '0.8rem', marginBottom: '0.8rem', textAlign: 'left' }} {...props} />,
li: ({ node, ...props }) => <li style={{ marginBottom: '0.6rem', textAlign: 'left' }} {...props} />,
code: ({ node, ...props }) => <code style={{ backgroundColor: '#f4f4f4', padding: '2px 6px', borderRadius: '3px', fontFamily: 'monospace', color: '#d9534f' }} {...props} />,
blockquote: ({ node, ...props }) => <blockquote style={{ borderLeft: '4px solid #0056b3', paddingLeft: '1rem', marginLeft: 0, marginTop: '0.8rem', marginBottom: '0.8rem', color: '#666' }} {...props} />,
hr: ({ node, ...props }) => <hr style={{ margin: '1.5rem 0', border: 'none', borderTop: '1px solid #ddd' }} {...props} />,
}}
>
{aiAnswer}
</ReactMarkdown>
</div>
</div>
)}
</div>
</div>
)
}
export default App
Run npm run dev and test your local full-stack masterpiece!
🚀 Phase 5: Containerization & Cloud Run Deployment
Now, we take our local code to the cloud. We will wrap our APIs in Docker containers and deploy them via Google Cloud Run (which scales to zero, saving you money!).
⚠️ The Cloud SQL Gotcha (Read This!):
Locally, you connected to Postgres via a TCP port (5432) and an IP address. In Google Cloud Run, best practice dictates you connect securely via a Unix domain socket.
We don't need a clunky proxy inside our Dockerfile. Google Cloud Run does this natively if we pass the right connection string!
If you're the project owner, grant yourself permissions first:
gcloud projects add-iam-policy-binding YOUR_PROJECT_ID \
  --member=user:YourEmail@gmail.com \
  --role=roles/cloudbuild.builds.editor,roles/cloudsql.client
Step 1: Deploying the .NET API
In /yny.Api, create a clean Dockerfile:
FROM mcr.microsoft.com/dotnet/sdk:8.0 AS build
WORKDIR /app
COPY . .
RUN dotnet publish -c Release -o out

FROM mcr.microsoft.com/dotnet/aspnet:8.0
WORKDIR /app
COPY --from=build /app/out .
EXPOSE 8080
ENV ASPNETCORE_URLS=http://+:8080
ENTRYPOINT ["dotnet", "yny.Api.dll"]
Deploy it via your terminal (Replace YOUR_PROJECT_ID):
# 1. Build and push the image to Google Container Registry
gcloud builds submit --tag gcr.io/YOUR_PROJECT_ID/erp-api

# 2. Deploy to Cloud Run (Notice the new Unix Socket Connection String!)
gcloud run deploy erp-api \
  --image gcr.io/YOUR_PROJECT_ID/erp-api \
  --region us-central1 \
  --allow-unauthenticated \
  --add-cloudsql-instances YOUR_PROJECT_ID:us-central1:yny-db-instance \
  --set-env-vars ConnectionStrings__DefaultConnection="Host=/cloudsql/YOUR_PROJECT_ID:us-central1:yny-db-instance;Database=postgres;Username=postgres;Password=YnySecurePass26;"
(Make sure to link your Cloud SQL instance to this Cloud Run service under the "Connections" tab in the GCP Console!)
Step 2: Deploying the Python AI API
In /yny.AI, create a Dockerfile:
FROM python:3.12-slim
WORKDIR /app
COPY requirements.txt .
RUN pip install --no-cache-dir -r requirements.txt
COPY . .
EXPOSE 8080
CMD ["uvicorn", "main:app", "--host", "0.0.0.0", "--port", "8080"]
Deploy it (Remember to use your actual Gemini API key here, or better yet, use GCP Secret Manager in production):
gcloud builds submit --tag gcr.io/YOUR_PROJECT_ID/ai-api

gcloud run deploy ai-api \
  --image gcr.io/YOUR_PROJECT_ID/ai-api \
  --region us-central1 \
  --allow-unauthenticated \
  --add-cloudsql-instances YOUR_PROJECT_ID:us-central1:yny-db-instance \
  --set-env-vars GEMINI_API_KEY="YOUR_API_KEY",DB_URL="postgresql+psycopg2://postgres:YnySecurePass26@/postgres?host=/cloudsql/YOUR_PROJECT_ID:us-central1:yny-db-instance"
Step 3: Deploying the Frontend to Vercel
Take note of the URLs Cloud Run just generated for you (e.g., https://erp-api-xyz.run.app and https://ai-api-xyz.run.app).
- Push your
yny-uicode to GitHub. - Log into Vercel and Import your repository.
- Under Environment Variables, add:
-
VITE_ERP_API=[Your Cloud Run .NET URL] -
VITE_AI_API=[Your Cloud Run Python URL]
-
- Click Deploy. Your UI is now live globally! Your UI will be live at:
https://yny-ui.vercel.app(or custom domain). Auto-deploys on every push tomainbranch!
🔄 Phase 6: Level-Up to CI/CD (Bonus)
Tired of typing gcloud commands manually? Let GitHub deploy it for you. Create .github/workflows/deploy.yml in your repo:
name: Deploy Microservices
on:
  push:
    branches: [ main ]

jobs:
  deploy:
    runs-on: ubuntu-latest
    steps:
      - uses: actions/checkout@v4
      - name: Auth GCP
        uses: google-github-actions/auth@v2
        with:
          credentials_json: '${{ secrets.GCP_SA_KEY }}'
      - name: Set up Cloud SDK
        uses: google-github-actions/setup-gcloud@v2

      - name: Deploy .NET API
        run: |
          cd yny.Api
          gcloud builds submit --tag gcr.io/${{ secrets.GCP_PROJECT_ID }}/erp-api
          gcloud run deploy erp-api --image gcr.io/${{ secrets.GCP_PROJECT_ID }}/erp-api --region us-central1
(You will need to set GCP_PROJECT_ID and a GCP_SA_KEY in your GitHub Repository Settings -> Secrets).
🎤 Phase 7: The Final Demo Script
If you are showcasing this project to stakeholders, here is the exact narrative flow I recommend:
- Show the Live Dashboard: "This is the Y&Y SaaS Dashboard. The top section is our .NET 8 ERP pulling live operational data directly from a PostgreSQL instance." Point out the real-time stock levels, specifically the out-of-stock valve.
-
Setup the Incident: "Imagine a junior engineer is on the factory floor and hears a strange crackling noise coming from
PUMP-CENT-001." - Execute the Prompt: Type: "Why is the pump making a crackling noise like gravel and what should I do?" into the AI input and hit Consult AI.
-
Explain the Magic: "Right now, our Python microservice is converting my question into a mathematical vector. It's querying the
pgvectordatabase via Cosine Distance to retrieve the exact manufacturer maintenance manual excerpt, and passing that strict context to Google's Gemma model to synthesize a safe resolution." - The Resolution: The AI will output a clean, professional answer based strictly on the manual we seeded (diagnosing cavitation and advising them to throttle the valve).
Wrap Up
By completing this build, you've successfully created a modern enterprise system. You separated concerns using microservices, connected to cloud databases, implemented the industry-standard RAG AI pattern, and utilized serverless cloud deployment.
The gap between a "cool script" and an "enterprise system" is architecture. And you just built it.
Happy Coding!

Top comments (2)
@kheai The decision to use the 26B MoE variant here is exactly right and I appreciated that you explained the reasoning — only 4B active parameters during inference means you're getting near-31B quality at a fraction of the compute cost, which matters a lot when you're paying per request on Cloud Run. Most tutorials just grab whatever model is trending without thinking about that tradeoff.
The pgvector + Cosine Distance setup for the RAG pipeline is clean. The <=> operator doing the semantic retrieval work before Gemma even sees the question is the right architecture — the model only answers, it doesn't search, which keeps hallucination risk low. The seed.py approach for injecting the maintenance manual as a vector is a nice, minimal way to demonstrate the concept without overcomplicating it.
One thing I'd flag for anyone following along: the note about the Cloud SQL Unix socket gotcha is genuinely important and easy to miss. I've seen people burn hours on exactly that issue when moving from local TCP connections to Cloud Run deployments — glad you called it out explicitly rather than burying it.
The demo script in Phase 7 is a smart addition. Walking through the centrifugal pump cavitation scenario as a stakeholder narrative rather than just a technical test makes the whole thing feel real rather than academic.
I'm currently building something adjacent to this — using Gemma 4 E4B locally for code review on a Rails codebase — and the RAG pattern you've laid out here is giving me ideas for pulling in project-specific context alongside the diff. Will be reading the Raspberry Pi piece next.
Some comments may only be visible to logged-in visitors. Sign in to view all comments.