We will be creating a Vue.js application for displaying our Products and Categories.

Table of Contents
- Introduction
- Requirements
- Setting up the Project
- Vue Components
- Vue Router
- Our Application
- Why use Vue Router
- Resources
Introduction
We are building a complete E-Commerce application.

So in this series of tutorials, we will now link our products with a category and design the user interface for it using Vue.js 3. In the past tutorial, we had designed the user interface for displaying products. Now, our products will have added information about their category.
If you are new to Vue.js, it is recommended to glance at the above article before moving on. So, our application will list all the products and categories and provide us with the following capabilities :
- Add a product
- Edit a product
- Add a category
- Edit a category
Requirements
In the last tutorial, we used the Vue CDN to create a single widget for displaying the products and injected that into our main HTML file. But now we will move a step ahead and build a complete Vue application, which is more powerful and robust. We will use the Vue CLI tool to set up our project. You also need to have Node.js installed before proceeding with the tutorial. We will not write any Node.js specific code but still, our Vue.js project requires Node. Apart from this, I will also be using Bootstrap, some Google Fonts and VS code as my editor. These things are up to your preferences.
Setting up the Project
The detailed instructions for setting up a Vue project can be found here, but let's quickly go through the process once. First, we will have to install the Vue CLI tool. It can be installed in the system with the following command:
npm install -g @vue/cli
After installing the Vue CLI, the following command is used for creating a new project:
vue create project_name
Next, it will ask for some project configurations. Here is my project configuration:

After confirming all the details, we will have a project folder created for us by Vue CLI.

Folder Structure
Let’s go through the folder structure of our newly created Vue project
- public - contains the main HTML file of our project
- src/assets - stores the media files like images, logos, etc.
- src/components - stores all the reusable components of our project. These components are not unique to some specific route.
- src/router - contains the index.js file which keeps a record of all the routes
- src/views - stores all the router components. These are the components that are rendered as per the current route.
Apart from this, we have some important files too
- App.vue - it is the root component of our project
- main.js - it is the starting point of our project. Here we import our root component App.vue, our router file index.js and createApp method. After this, we mount our root component to the DOM using the following statement:
createApp(App).use(router).mount('#app');
The folder structure is not enforced by Vue, we can customize this as per our requirements.
Vue Components
Almost all frontend frameworks allow us to create components that we can reuse at multiple places on the same or different websites. Some examples include a search bar, login form, product display component etc. In Vue, files with “.vue” extension are known as single file components. These single file components are composed of HTML, JavaScript, and CSS.
<template>

</template><script>
export default {}
</script><style></style>
The template part contains the HTML of the component. The script tag contains the code defining the custom behavior of the component. And style tag houses the CSS of the component. As mentioned earlier, src/components and src/views contain all our components.
Vue Router
The Vue router enables us to link our browser URL and our components. This helps us define paths that get coupled with our components. This way Vue renders components based on the URL. The official page of Vue router lists all its features. The most important of all these is the ease of creating Single page applications (SPAs) using Vue router.
In Single page applications designed using Vue, the very first request sent to the server responds with a single HTML file and the JavaScript bundle. Then in the browser, Vue takes complete control over the application. After this, no further requests are sent to the server for new pages even if we change routes. This means once everything is loaded, navigating through different routes of our web application becomes very smooth. As an example, head over to Vue router guide and disconnect your internet once the page has loaded, even without the internet you will be able to use most of the features available there (even changing the guide language).
The src/router/index.js file contains information about all the router paths. Folder src/views contain the components which we couple with router paths. Because of their usage, these components are also known as router views.
In index.js file, we import all the router components and create an array of objects called routes. Objects of this array represent different routes of our application. Every route has a path, a name associated with it, and the component to be rendered for this path. For our project, I will be keeping the name property same as component name.
const routes = [
  {
    path: '/',
    name: 'Home',
    component: Home
  }
]
After creating this routes array, we use the createRouter method to create and export our router. Vue CLI is kind enough to do this task for us while creating our project.
Our Application
Now after understanding the Vue project structure and the requirement of different Vue features, we can dive into our E-Commerce project. For creating our application, we will be using many Vue components. So, there needs to be a structural hierarchy of components in our project. We can use the component tree to define this structure.
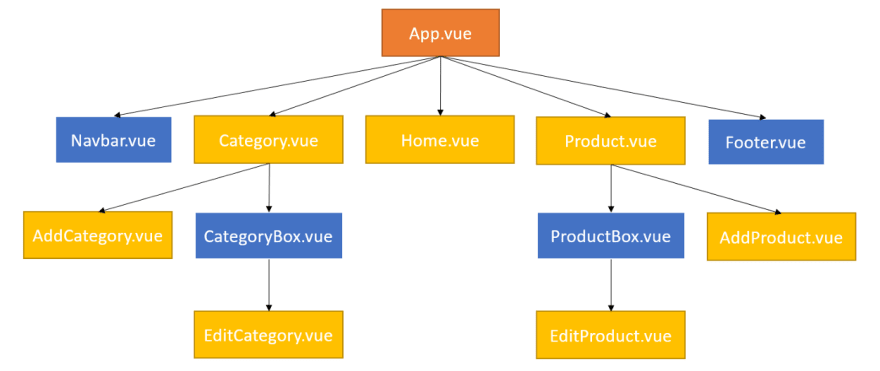
App.vue is the root component of our application. It is the first one to be rendered onto the DOM. Then we have our reusable components (in blue boxes) and router view components (in yellow boxes).
In App.vue, we have the data properties baseURL, products and categories. The baseURL refers to our backend API from where we fetch data and send requests for data addition and modification. The products and categories arrays, as their name suggests, stores our products and categories. We also have the components property which lists all the components which we use in the current component.
API call
In the mounted Lifecycle hook of our root component App.vue, we make the API call to fetch our products and categories. For this, we use JavaScript’s Fetch API.
const res  = await fetch(this.baseURL + "product/");
this.products = await res.json();
Fetching data from backend API is an asynchronous task. Hence the fetch method returns a promise. If our internet connection is stable and the server is up and running, the res variable will store the server response. Now to extract our data from this response, we use the json method. The json method reads the response stream, and since this stream could be very large, it takes time and returns a promise on completion. This promise once resolved returns a JavaScript object. In JavaScript, an array is also an object which can be represented in JSON.
The root component is the best place to fetch data from backend API because from here we can pass on this data as props to our child component. Let’s get this terminology clear. When we use a component inside of some other component, they are referred to as child and parent component respectively. A parent component can pass its data to a child component, this data is known as props. You can think of it as passing arguments to a function.
Router paths
In App.vue, we have used the components Navbar and Footer. Apart from this we also have a Vue tag . This router-view tag renders component based on the URL path. Along with this, we also have the tag. It acts as an anchor tag for a router-enabled app. The target location for this link is specified using the to prop. Let’s have a look at index.js file where we have defined all our routes.
So to summarize the above file, we have set up the routing of our application in the following manner:

Passing props
In App.vue, we have passed props to the router view components. As mentioned earlier, it is the parent component which can pass props to its child component. To send these props, we can either give them some value or bind them with the data properties of the parent component.
<router-view :baseURL="baseURL" ></router-view>
Here baseURL written after the colon (short for v-bind directive) is the name with which this prop will be available in the child component. baseURL inside the double quotes is the parent component’s data field. We can name these props differently also, but I have used the same name to maintain consistency. Now in the child component, it is necessary to register these props in the component object’s props property. A child component may skip some props if it doesn't require them.
In App.vue, we have also used the “v-show” directive to show the Footer component only when we are at some path other than the Home. We can get the current path name from this.$route.name property. So now, let's take a look at our App.vue file:
Navbar
The Navbar component is used for navigating through our web application. We have used the Navbar component inside our App.vue above the router-view tag. Hence, every route of our website will have the Navbar at the top. We have designed our Navbar with three router links to Home, Product and Category route.
Home
The Home component is the landing page of our web application. It is the first impression of our app which plays a crucial role in our advertising campaign.

Footer
The Footer component is present at the bottom of our websites. Here we can place the About Us, Contact and some other important pages link. Along with these, we can also place links to our social media handles. I have used this icons library to use logos of some popular social media platforms.
Products
As the basic structure of our website is in place, we can start working on the core functionality. Let us start with components related to products.
Product.vue: This component lists all the products of our application. In the component template, we first design a button for adding new products inside a router-link to AddProduct router view component. Then we use the v-for directive to loop through all the products inside the products array. For every product, we render the ProductBox component passing the product as a prop. In the component object, we list the required props that we get from our parent component. Along with this, we also mention ProductBox as a child component.
AddProduct.vue: This component presents a form for adding a new product into our backend API database. We define five data fields to track user input. Here, the v-model directive helps us to make a two-way binding between the user input and our component data fields. We also attach a click event to the submit button of our form. Once the user submits the form, we call the addProduct method of our component. This method creates our newProduct and makes a POST request to our backend API to add this product. Once this process completes we redirect to our Product route.

ProductBox.vue: This component displays the details of a product. First, we design a button for editing the product inside a router-link to EditProduct router view component. This router link takes the product id inside the params object. Remember, we defined the path for EditProduct with a dynamic segment denoted by a colon. When the route is matched, the value of the dynamic segments will be exposed as this.$route.params in every component. This is defined in the Vue documentation as Dynamic Route Matching. Then we display the product’s image, name, description and price.

EditProduct.vue: This component displays the form for editing details of an existing product. Remember this.$route.params.id stores the id of product for which this form was invoked. We use this id to find our product and fill the default input values with its current details. Similar to the AddProduct form, once the user submits the form, we create the newProduct and make a POST request to our backend API to update the current product. Then we redirect to the Product route.

Categories
Once we are done with the product’s components, working with categories is not a creative task. The code which goes inside is very similar. The categories also provide us with the same functionality as products.
Why use Vue Router
The Vue router is a very powerful tool, yet easy to learn. Vue router as its landing page says makes building SPAs a breeze. It provides us with a modular, component-based router configuration. Using Vue router improves the responsiveness of our application to a good extent.
You have made it to the end!! 🎉✨
Now we have a fully working Vue.js frontend to display our products and categories. The complete code for the app can be found here.
Resources
- Vue.js 3
- Frontend code
- Backend API Repository
- Swagger-UI for the API
- Node.js
- Google Fonts
- Bootstrap
- Ionicons
Thank You for Reading 📕😊

Top comments (0)