Hello DEV community! In our latest article, we explore how low-code platforms are reshaping perspectives on marketing through the prism of one of our team members' experiences. Therefore, we invite you to read the article.
Hi! It’s Daniel. I am a marketer with a four-year journey across non-profit educational projects, marketing agencies, and different startups. However, one steady challenge in my career has been my allergy to code. In this story, I'm happy to share how, with a bit of artificial intelligence and low-code platforms, I overcame this blocker and unlocked a new world of marketing opportunities. After all, with this new tool in my hands, why not make the most of it?
A little background: being a multifaceted professional has always been my goal. However, there was a clear boundary I never crossed – a piece of code, even if it’s HTML. The roots of such a mental block might be a topic for a psychotherapy session, but here is my story of the tools that helped me overcome this challenge.
1.Generative AI
As mentioned earlier, two elements were crucial in my story: AI and low-code. Come December 2022, the digital world was buzzing with the launch of Chat GPT version 3.5, a game-changing tool in text interaction, which I quickly added to my toolkit and began exploring. Behind the scenes, its code generation feature was emerging, although not very appealing at first.
Fast forward a few months. Now familiar with my digital ally, I encountered a somewhat technical task: extracting usernames from my growing Telegram channel of 4,000 members. GPT suggested creating a Python bot (an eye-opener!). "Indeed, with AI as my guide, it seemed doable," echoed my inner versatile specialist. I eagerly began this project, downloading Python and seeking help from GPT with every obstacle I encountered.
However, the journey hit a hiccup when the need for servers and infrastructure arose, so I gave up. Yet, this experience planted a seed of self-confidence in coding and development, which will begin to unfold four months later.
2. Cloud Low-code
You might already be familiar with cloud no-code examples like Webflow and WIX, where block layouts, server setup, and support are neatly bundled together, and you don't have to worry about it. However, these no-code platforms are designed for specific tasks; a one-size-fits-all solution is hard to find. Yet, creating customizable blocks, ready to be shaped in provided settings seems simple. This is the spirit of today's low-code platforms for business process automation and cloud development. As my journey shows, even a person with a strong humanities background can navigate the low-code route.
My entry point was Latenode, highlighted in a Hackernoon article that caught my eye. Latenode offers an AI assistant and support in their Discord community to tackle technical challenges and automate workflows. The idea was appealing. In a few weeks, I set up my email marketing service, capable of collecting weekly updates via a web form, transforming it into a neat HTML email, and sending it to the product user database I now manage.
Mastering low-code bore two benefits:
- It gave more independence from developers, whose interest dwindled when my system integration questions or data extraction requests interrupted their product-focused work.
- It sped up marketing solution deployment, easing the annoyance coming from developers' well-meaning, yet delayed help due to higher-priority tasks.
Creating a service for email distribution
Reaching users through emails is a low-hanging fruit. Despite the digital advancements, the email world remains a good place for professionals. The ability to send updates or share important information via email is priceless.
My main tasks were:
- Collecting newsletter content via a web form
- Creating HTML from the collected data
- Ensuring smooth delivery to all users
Transitioning to Technical: Your Step-by-Step Guide. If this part doesn't match your current needs, feel free to jump to the conclusion—there's useful advice waiting there for future reference.
Scenario 1: Form for Content Collection
Starting the journey to create a web form accessible via a browser through a specific URL involves launching the first scenario on Latenode. Go to app.latenode.com, click 'create scenario', and put together this structure:

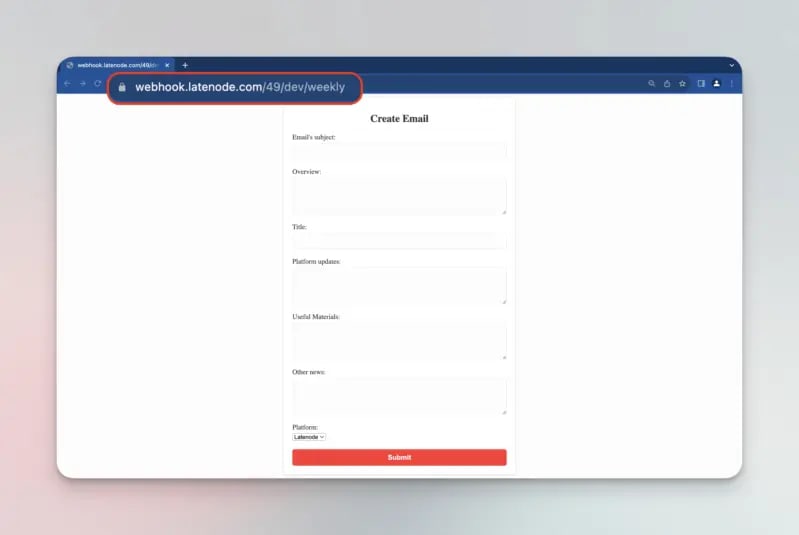
At the heart of it, the first block, Webhook, provides a unique Webhook URL to activate the scenario. Next, the JavaScript block reveals an HTML form aimed at collecting information. The last block, Webhook response, displays this form, making it accessible through the Webhook URL.
JavaScript... This is the first encounter with code, where the fear towards it starts to fade. Inside the block is an AI assistant, taking on the task of coding, debugging, and making further improvements. Your job is to make requests:
"Include a script in my code to create an HTML form with these input fields: Subject of the Letter, Overview, Title, Platform Updates, Useful Materials, Other News. Add a submission button below. Make the HTML look nice."
What happens next is the creation of HTML code, directed by the JavaScript module through the scenario, eventually appearing on our screen. Thus, activating the Webhook URL reveals a data input form:
At this point, the form data is in limbo, but don't worry, a solution is coming...
Step 2: Email Creation and Sending
To craft a new email filled with content from the form, another Latenode scenario is needed. This area also handles the email sending function. Essentially, we're looking at two separate scenarios: content collection and its subsequent use. Here's the reasoning.
Each Webhook URL has the ability to not only start processes but also handle data contributing to these processes. Our goal is to send the form-collected info to the Webhook URL of the second scenario on Latenode, where the responses transform into a well-designed email. Here's how this scenario is structured:

- Webhook: Receives information coming from the form.
- JavaScript: Creates HTML code containing the email text, adding design elements.
- Airtable (List Records): Gets a list of user emails from the database.
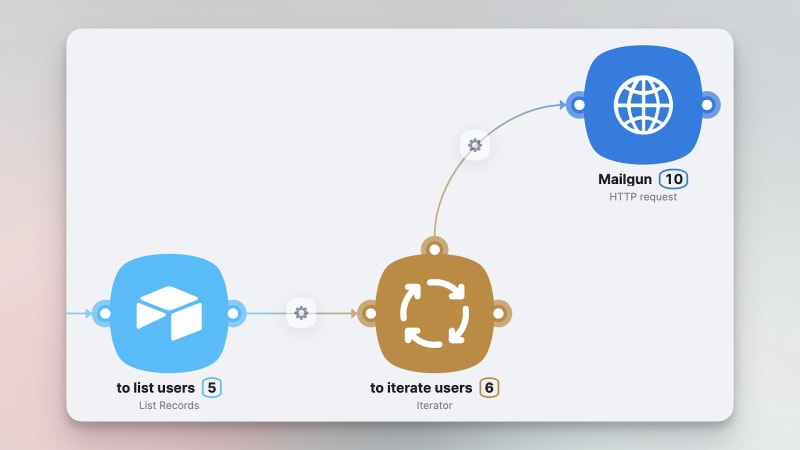
- Iterator + HTTP request: Sends the prepared email to each user through Mailgun
Let's go through this, step by step:
- Connecting Data from Scenario 1 to Scenario 2:
This change is made by adjusting the JavaScript code within the first scenario. With the second scenario now active, it's important to ensure that when the ‘Submit’ button is pressed, the form field data is sent to the new Webhook URL. Our AI assistant helps again as we request:
– Include a script in my code to send the form-collected data to the following webhook url when the 'Submit' button is pressed: https://webhook.latenode.com/49/dev/receive_email_info. After submission, a 'Thank you!' popup should appear on the screen.
Quickly, the AI assistant creates a new script, which we easily replace with ours, save the scenario, and test the data sending to our second scenario.

In the 'Body' tab, we see the sent field variables for content along with the entered values: test, test, test…
Now with these variables available on the platform, creating a custom email becomes possible. Next, we add a JavaScript block and ask the AI assistant with a new request:
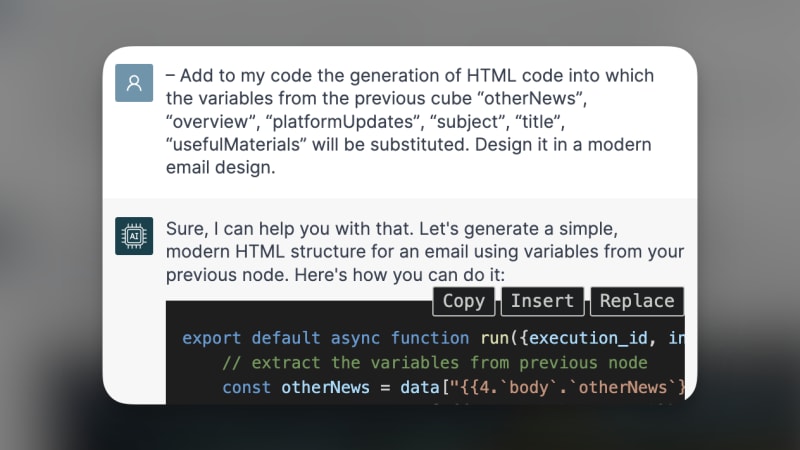
"Include a script to create HTML code where variables from the previous block (Overview, Title, Platform Updates, Useful Materials, Other News) are included. Display this in a modern email style."
Done! As shown, the AI assistant not only carries out the request but explains parts of the created code. For example, the green text after // in the screenshot highlights the code section getting variables from the previous block.
- Next, we need to get the list of recipient emails.
I recommend using Airtable for database management. However, prepare yourself as you might need a developer's help at this point, since we're moving into product interaction territory. The aim is to sync the user database on the product side with our Airtable table, making sure emails smoothly flow in after each new registration. Let's see Airtable as our foundation for low-code automation in email marketing efforts.

Once our Airtable is ready and new registrations are coming in as expected, it's time to connect it to Latenode. We do this by adding a no-code Airtable module into the scenario, a task done in just three clicks.
Now, onto the final part of this scenario with two new modules:
- Iterator: Goes through each user email from the Airtable module in sequence.
-
HTTP module: Holds these emails, one by one, placing them in the needed field for sending a request to the Mailgun service.

Mailgun is great for email automation, especially good for bulk email sending, supported by analytical insights. One issue though - Latenode doesn't have a direct integration with Mailgun. But don't worry, the HTTP request module is fully capable of creating the needed integration quickly. More on this is available in the detailed guide at the end of the article.
Below is a look at our service working on real data, where the HTTP request module ran 288 times, sending 288 emails

Execution History visible on the right
Conclusion
This straightforward approach enables you to build your personalized marketing service from scratch in a few days, without coding skills.
For those eager to enhance your professional knowledge, I've put together a detailed guide explaining my case: Detailed Guide
By following these steps, you'll understand the basics of low-code automation, a skill that's here to stay. The next time MarTech challenges come your way, you'll be more prepared. Whether solving alone or asking for help, you'll be much further ahead, and that's invaluable!
A note, Latenode is currently in beta-testing, offering free access for your exploratory projects. I strongly recommend trying it out, experimenting with webhooks, using the JavaScript AI assistant, and joining their Discord community with your questions.


Top comments (0)