
I found a few posts here and there online that helped fix one error or the other, but didn’t completely walk me through this process. I got errors like this in my logs:

Hope this helps!
1- First things first: Push all your code to your github repo. Once there type:
heroku create
to create your heroku connection in the command-line. Log on to heroku in your browser and head to your new app’s page.
2- Click on the “Resources” tab and find the area under “Add-ons”.

3- Start typing “JawsDB” in the input box and a list of results should appear like below:
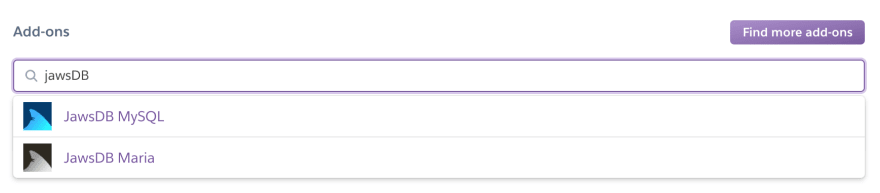
Select “JawsDB MySQL” to connect to your app. A pop-up will be displayed giving you plan options. Select the “Kitefin” (free version) and click “Provision”

Once it’s successfully added on, it’ll be listed on your Resources page. Go ahead and click on it. This will lead you to the settings page of your JawsDB in a separate tab.

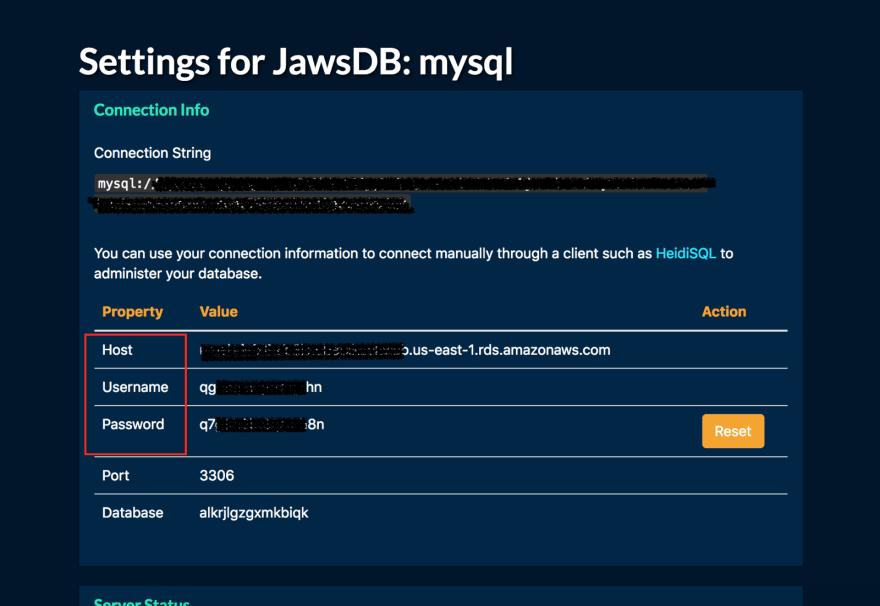
4- Let’s head into Sequel Pro. You will need to create a new connection. Make sure you are creating a “Standard” connection. In this step, you will need to copy and paste “Host”, “Username”, and “Password” values from your JawsDB Settings (image above) EXACTLY into your Sequel Pro Connection values (image below) and click “Connect”.

5- Under your “Choose Database” dropdown menu, select the database listed under random letters.

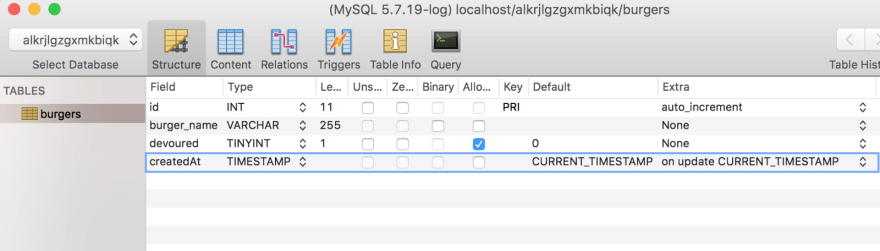
In your “Query” tab, Create your schema. Make sure the id, createdAt, and PRIMARY KEY are listed exactly as below and run it.

6- Under your “Structure” tab, edit the “Default” value to display “CURRENT_TIMESTAMP”. Edit the “Extra” value from the dropdown menu to display “on update CURRENT_TIMESTAMP”. (image below)
7- Let’s head into your ‘connection.js’ file and alter it a little. Make sure to include your “port” in this section. Accidentally leaving this out was a cause of a few of my errors.
// Set up MySQL connection.
var mysql = require("mysql");
var connection;
//make connection
if (process.env.JAWSDB_URL){
  connection = mysql.createConnection(process.env.JAWSDB_URL);
}else{
  connection = mysql.createConnection({
    port: 3306,
    host: "localhost",
    user: "root",
    password: "",
    database: "burgers_db"
  })
}
connection.connect();
// Export connection for our ORM to use.
module.exports = connection;
8- Let’s head into your ‘server.js’ file and alter the port variable. Adding the “process.env.PORT” allows access to the database.
var port = process.env.PORT || 3000;
9- Make sure to push all your changes to your github repo. Once successful and completed, push to heroku.
git push heroku master
That should finalize everything and connect your mySQL Database to your heroku app. If you come across any errors, always make sure to look at your logs.
For a live example of this, you can checkout the github repo of my project: https://github.com/laurengranada/week-14-burger
Good luck!

Top comments (0)