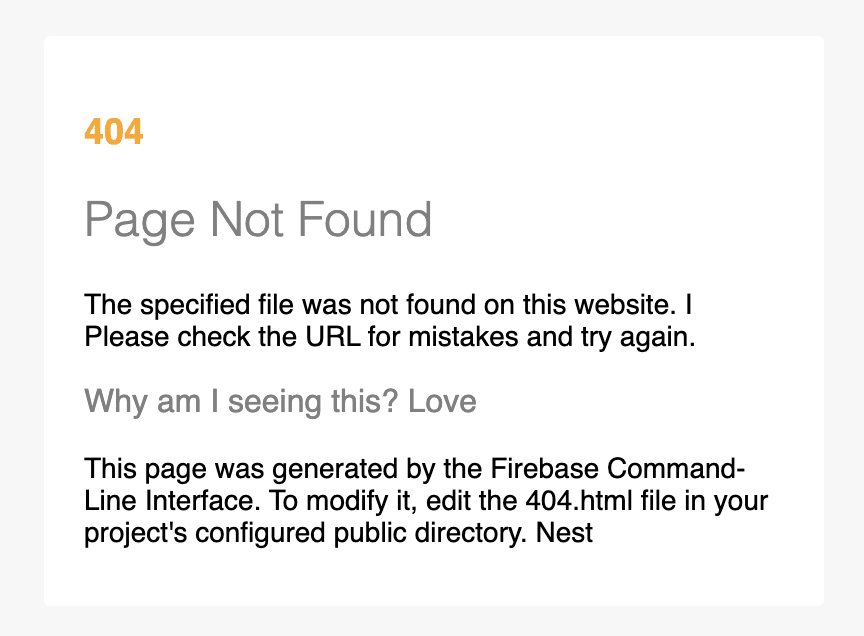
In this lesson, we will be creating a 404 Not Found Page using HTML, CSS, and JS. Also, we will introduce our awesome course which teaches basic programming for teenagers.
Now let me introduce our Level 1 syllabus.
We teach basic programming skills which contain Algorithm, Web system introduction, and OS. During the Algorithm lessons, students can get to know how computers work. In web lessons, we teach you basic web programming technologies such as HTML, CSS, and JS. The following image briefly describes them.
Please pay attention to the real demo.
Let's build a Not Found Page and copy a default 404 page of the firebase (please see the below picture). Firebase is an awesome platform of Google. We teach Firebase in Hop level 1 and level 2. In order to build the web, we need to study HTML, CSS, JS.
Before we deep dive into coding, you need to install a more comfortable editor for programming. We suggest using Visual Studio Code. Otherwise, you can just use Notepad.
First, we need to build our web structure by using HTML. The HyperText Markup Language (HTML) is like the backbone of the Web. Let's create a new folder for the project and add a new file named project/index.html. Please copy the below text to the file.
<!DOCTYPE html>
<html lang="en">
<head>
    <meta charset="UTF-8">
    <meta http-equiv="X-UA-Compatible" content="IE=edge">
    <meta name="viewport" content="width=device-width, initial-scale=1.0">
    <title>Page Title</title>
</head>
<body>
    <h1> Hello World! </h1>
</body>
</html>
If you open the file on the web browser, you'll see the first web which you made.
In the second step, we will add HTML elements (Bones) in the HTML. There are tags you need to know such as Header tag, Paragraph tag, and Image tag.
In order to add headers, subheaders, and paragraphs to the not found page, please replace the following script with <h1> Hello World! </h1> on index.html
    <div>
        <h1>404</h1>
        <h2>Page Not Found</h2>
        <p>The specified file was not found on this website. Please check the URL for mistakes and try again.</p>
        <h3>Why am I seeing this?</h3>
        <p>This page was generated by the Firebase Command-Line Interface. To modify it, edit the 404.html file in your project's configured public directory.</p>
    </div>
After editing the HTML file, reload and the following result will be shown.
Now let's work on the design, it will be our third step. Let's create a named style.css file on the project folder. The picture shown below is adding the style.css file to index.html.
<head>
    ...
    <link rel='stylesheet' type='text/css' media='screen' href='./style.css'>
</head>
After adding the linked CSS file to index.html, add the following script to style.css file. CSS defines the style of elements on HTML such as color, size, spacing, and fonts.
Maybe margin and padding are a little unclear on the below script. They are both help to define spaces on the web.
body {
    margin: 0px;
    background-color: rgb(247,247,247);
    font-family: Roboto, Helvetica, Arial, sans-serif;
}

.box {
    margin-top: 100px;
    max-width: 350px;
    padding: 25px 20px 15px 20px;
    background-color: white;
    margin-left: auto;
    margin-right: auto;
    border-radius: 3px;
}

p {
    font-size: 14px;
}

h1 {
    color: orange;
    font-size: 18px;
}

h2 {
    color: gray;
    font-weight: 200;
    font-size: 24px;
}

h3 {
    font-size: 16px;
    font-weight: 400;
    color: gray;
}
Let's reload on the web page. You see the result on the web.
In the fourth step, We have to add action to our web. By using JavaScript we can easily create action to our web. This action will be completed by clicking on the given text which is "I Love Nest".
When you add the following script on the index.html, "I, Love, Nest" text will be shown on the not found page.
    <div class="box" id="reset">
        <h1>404</h1>
        <h2>Page Not Found</h2>
        <p>The specified file was not found on this website. <span id="i">I</span> Please check the URL for mistakes
            and try again.</p>
        <h3>Why am I seeing this? <span id="love">Love</span</h3>
        <p>This page was generated by the Firebase Command-Line Interface. To modify it, edit the 404.html file in your
            project's configured public directory. <span id="nest">Nest</span></p>
    </div>
Next, we need to add action on the button "I Love Nest" by using Javascript (JS). So, create a file named index.js and add a script link on the index.html.
</body>

<script src='./index.js'></script>

</html>
Afterward, add the below scripts on index.js. This will bring the result to show alert by clicking on the letter "I".
document.getElementById("i").addEventListener("click", functionClickI);

function functionClickI(e) {
    alert("clicked on I")
}
Lastly, You need to replace the "index.js" by the following code. This will result in an opening of Nest website by orderly clicking on the given text "I Love Nest".
document.getElementById("i").addEventListener("click", functionClickI);
document.getElementById("love").addEventListener("click", functionClickLove);
document.getElementById("nest").addEventListener("click", functionClickNest);
document.getElementById("reset").addEventListener("click", functionClickRest);

let step = 0

function functionClickI(e) {
    e.stopPropagation()

    console.log("clicked on I")

    step = 1
}

function functionClickLove(e) {
    console.log('clicked on Love')

    e.stopPropagation()

    if (step == 1) {
        step = 2
    }
}

function functionClickNest(e) {
    console.log('clicked on Nest')

    e.stopPropagation()

    if (step == 2) {
        window.location = 'http://nestacademy.mn/'
    }
}

function functionClickRest(e) {
    console.log('reset')

    e.stopPropagation()

    step = 0
}


Top comments (0)