Hello👋, This is part 2 of my two-part series on Understanding Amazon SQS with Python and Django. This article assumes you have read the first article in the series; You can find that article at Understanding Amazon SQS with Python and Django - Part 1. The corresponding code can be found at this github repo.
Objectives
- Learn how to consume messages from Amazon SQS with Python.
- Create an endpoint to keep track of our File Processing.
How the file processing service (Consumer) interacts with the queue
There are a few things we should know about interacting with a queue when polling messages.
- We can have several consumers polling messages from a single queue at once.
- A Consumer must delete a message immediately after processing, to avoid another consumer from picking the same message up.
- There is something called a
VisibilityTimeout. This is the amount of time a consumer has to process and delete a message it has polled, to prevent other consumers from picking that same message up. When a message is polled by a consumer, that message is hidden from other consumers for the duration set in theVisibilityTimeoutoption. Default is 30 seconds. - You can learn more about the possibilities SQS provides us when polling messages in the Official Docs
Creating service B - The file processing service
Our service B is going to be a simple python script that runs infinitely and continually polls messages from our Queue to be processed. Let's create a new file process_messages_from_queue.py; Since this file is not actually part of our "Django app", we will create it outside our Django app directory to simulate it being on a completely different server. Your File tree should now look something like:
.
 amazon-sqs-and-django
    core
    db.sqlite3
    file
    manage.py
    test_file.txt
    requirements.txt
    venv
 process_messages_from_queue.py
First, let's create a separate environment for our script and install everything it would need. In your terminal, run the following:
amazon-sqs-and-django git:(part-2) python3 -m venv serviceb_venv
amazon-sqs-and-django git:(part-2) source serviceb_venv/bin/activate
(serviceb_venv) amazon-sqs-and-django git:(part-2) pip install boto3
Now, inside the process_messages_from_queue.py file,
import json
import sqlite3
import boto3

session = boto3.Session(
    aws_access_key_id='<AWS_ACCESS_KEY_ID>', # replace with your key
    aws_secret_access_key='<AWS_SECRET_ACCESS_KEY>', # replace with your key
)
sqs = session.resource('sqs', region_name='us-east-1')
connection = sqlite3.connect("path/to/django/app/db.sqlite3")

# Statuses we defined in the File Model of our django app.
PROCESSING_STATUS = 1
PROCESSED_STATUS = 2
FAILED_STATUS = 3

def main():

    # Get the SQS queue we created.
    queue = sqs.get_queue_by_name(QueueName="MyFileProcessingQueue.fifo")

    # This loop runs infinitely since we want to constantly keep checking
    # if new messages have been sent to the queue, and if they have, retrieve them and process them.
    while True:
        cursor = connection.cursor()
        # retrieve some messages from the queue.
        messages = queue.receive_messages()

        for message in messages:
            data = json.loads(message.body)
            file_id = data["file_id"]

            # Update File to indicate that it is now in processing stage.
            cursor.execute("UPDATE file_file SET status = ? WHERE id = ?", (PROCESSING_STATUS, file_id,))
            connection.commit()
We create an sqs resource to interact with our queue. We also create a connection to our django app database; This is because we need to update the DB after processing the file. Then, we create a main function that will hold all of the important code. Inside the main function, we:
- Retrieve the SQS queue and inside an infinite loop, continuously poll messages in the queue.
- For each message, we get the file_id which was sent from the django app.
- We use the file_id to update the
Fileobject in the database, and set its status toPROCESSING. This is to let the user know his file is no longerPENDINGbut rather, that work has started on it.
Things to note:
Right now, the
receive_messagesmethod only retrieves one message at a time, this may help to prevent overloading the server with too many requests at once. You can increase that value to a maximum of10by setting theMaxNumberOfMessagesargument.You can and should optimize the code to update the default of
VisibilityTimeoutif the service is unable to process a particular file fast enough. This is to prevent another queue from picking it up before it is done. You can do this by calling the change_visibility method on a particular message.
Now, let's actually process the file, and update the database with that processed data. And if the processing fails, we update the database to reflect the failure.
import os # <----- NEW
...
def main():
    ...
    while True:
        ...
        for message in messages:
            ...
            # <------- ADD THIS -------->
            # Get the File obj from the database through the file_id we got from the SQS message.
            file_object = cursor.execute("SELECT lines_count, file_size, file_path, status \
                FROM file_file WHERE id = ?", (file_id,)).fetchone()

            # file_object order ------ (lines_count, file_size, file_path, status)
            file_path = file_object[2]

            # Checking the state of the File Object before we start processing...
            print(f"FILE ID: {file_id}, LINES_COUNT: {file_object[0]}, FILE_SIZE in bytes: {file_object[1]}, STATUS: {file_object[3]}")

            try:
                lines = None
                with open(file_path, "r", encoding="utf-8") as file:
                    lines = len(file.readlines())
                file_size = os.path.getsize(file_path)

                cursor.execute("UPDATE file_file SET status = ?, lines_count = ?, file_size = ? WHERE id = ?",
                    (PROCESSED_STATUS, lines, file_size, file_id,))
            except Exception:
                cursor.execute("""UPDATE file_file SET status = ? WHERE id = ?""",
                    (FAILED_STATUS, file_id,),
                )

            connection.commit()
            # Delete the message, to avoid duplicate processing
            message.delete()

            # check updated database
            updated_file_object = cursor.execute("SELECT lines_count, file_size, file_path, status \
                FROM file_file WHERE id = ?", (file_id,)).fetchone()
            print(f"FILE ID: {file_id}, LINES_COUNT: {updated_file_object[0]}, FILE_SIZE in bytes: {updated_file_object[1]}, STATUS: {updated_file_object[3]}")
            # <------- END-------->
A quick brief on what is going on here:
- We retrieve the file_path from the database, and get the number of lines in the file, as well as its size.
- We save this processed data inside the database.
- In the case an error occurs while processing, we update the database object to a
FAILED_STATUS. - Lastly, we delete the message, so no other consumer can pick up the message again.
Note: The file processing action could be a bit more complex. Usually, it would be working on much larger files that take a lot longer to process, but for example purposes, we keep it simple.
Now, all that is left is to call our main function when our script is run.
import os
import json
import sqlite3
import boto3
...
def main():
    ...

if __name__ == " __main__":
    main()
The full code would now be:
import os
import json
import sqlite3
import boto3

session = boto3.Session(
    aws_access_key_id='<AWS_ACCESS_KEY_ID>', # replace with your key
    aws_secret_access_key='<AWS_SECRET_ACCESS_KEY>', # replace with your key
)
sqs = session.resource('sqs', region_name='us-east-1')
connection = sqlite3.connect("path/to/django/app/db.sqlite3")

# Statuses we defined in the File Model of our django app.
PROCESSING_STATUS = 1
PROCESSED_STATUS = 2
FAILED_STATUS = 3

def main():

    # Get the SQS queue we created.
    queue = sqs.get_queue_by_name(QueueName="MyFileProcessingQueue.fifo")

    # This loop runs infinitely since we want to constantly keep checking
    # if new messages have been sent to the queue, and if they have, retrieve them and process them.
    while True:
        cursor = connection.cursor()
        # retrieve some messages from the queue.
        messages = queue.receive_messages()

        for message in messages:
            data = json.loads(message.body)
            file_id = data["file_id"]

            # Update File to indicate that it is now in processing stage.
            cursor.execute("UPDATE file_file SET status = ? WHERE id = ?", (PROCESSING_STATUS, file_id,))
            connection.commit()

            # Get the File obj from the database through the file_id we got from the SQS message.
            file_object = cursor.execute("SELECT lines_count, file_size, file_path, status \
                FROM file_file WHERE id = ?", (file_id,)).fetchone()

            # file_object order ------ (lines_count, file_size, file_path, status)
            file_path = file_object[2]

            # Checking the state of the File Object before we start processing...
            print(f"FILE ID: {file_id}, LINES_COUNT: {file_object[0]}, FILE_SIZE in bytes: {file_object[1]}, STATUS: {file_object[3]}")

            try:
                lines = None
                with open(file_path, "r", encoding="utf-8") as file:
                    lines = len(file.readlines())
                file_size = os.path.getsize(file_path)

                cursor.execute("UPDATE file_file SET status = ?, lines_count = ?, file_size = ? WHERE id = ?",
                    (PROCESSED_STATUS, lines, file_size, file_id,))
            except Exception:
                cursor.execute("""UPDATE file_file SET status = ? WHERE id = ?""",
                    (FAILED_STATUS, file_id,),
                )

            connection.commit()

            # Delete the message, to avoid duplicate processing
            message.delete()

            # check updated database
            updated_file_object = cursor.execute("SELECT lines_count, file_size, file_path, status \
                FROM file_file WHERE id = ?", (file_id,)).fetchone()
            print(f"FILE ID: {file_id}, LINES_COUNT: {updated_file_object[0]}, FILE_SIZE in bytes: {updated_file_object[1]}, STATUS: {updated_file_object[3]}")

if __name__ == " __main__":
    main()
Testing the file processing service
Inside your terminal run the process_messages_from_queue.py script.
(serviceb_venv) amazon-sqs-and-django git:(part-2) python3 process_messages_from_queue.py
Now, open a second terminal, and start up the django app server. Remember, you would need to activate the virtual environment specific to the django app in the second terminal. Now, Let's go to postman and send a new POST request to process our test_file.txt file. What you should see, eventually, in your terminal is something like:

Great! Through the print statements, we can see that the File obj, with ID 8 in my case, which was initially empty and in PROCESSING or 1 state eventually got populated with the processed data and updated to PROCESSED or 2 state. This is what SQS can offer us; it allows us to postpone the actual processing, and we update the database with our results when it is done.
One Producer, Multiple Consumers
At this point, we already know SQS limits the rate at which requests are processed which in turn helps to avoid overloading a server. But, If we needed to process more messages at a quicker rate, we could add more consumer instances to split the load, reducing the total processing time required. It would look something like this:

Creating an endpoint to check file processing result/status
We received the message, processed the file, and saved the data, We still need to be able to let the user view the result of the process; if it failed or not. Update the FileView in the views.py file of our Django app like so:
...
from rest_framework.response import Response
from .models import File
from django.shortcuts import get_object_or_404 # <----- NEW

Class FileView(APIView):
    def post(self, request):
        ....

    # <----- ADD THIS ----->
    def get(self, request, pk: int):
        file = get_object_or_404(File, pk=pk)
        return Response({
                'lines_count': file.lines_count,
                'file_size': file.file_size,
                'status': file.status
            })
    # <-------- END -------->
Next up, update our project urls.py file.
from django.urls import path
from .views import FileView

urlpatterns = [
    path('process', FileView.as_view()),
    path('check-status/<int:pk>', FileView.as_view()), # <---- NEW
]
Now, inside postman, we can query our new check-status endpoint. We will replace pk with our file object id, in my case, that would be 8.
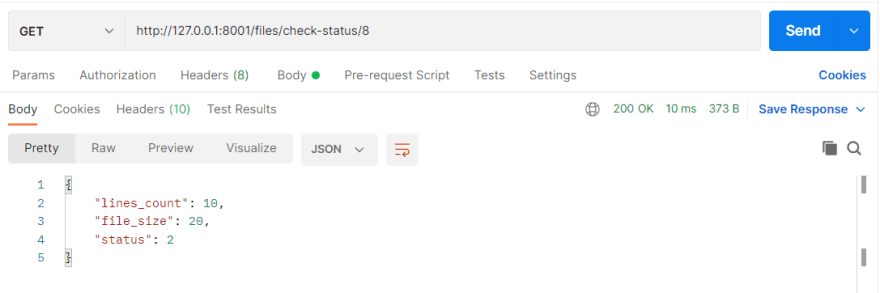
Now, a user can always confirm the status of their file processing request, which could be PENDING, PROCESSING, FAILED, or PROCESSED (In which case, the processed data is also shown).
Conclusion
And there you have it! You now have a fair understanding of SQS and how to integrate it into an application. Thanks for reading and coding along in this 2 part series on Understanding Amazon SQS with Python and Django. If you missed it, heres part 1 Understanding Amazon SQS with Python and Django - Part 1.
If you found this article useful or learned something new, consider leaving a thumbs up and following me to keep up-to-date with any recent postings!
Till next time, happy coding!
Levi

Top comments (1)
Quite insightful