TLDR: Watch the video https://www.youtube.com/watch?v=4b1bKwuQNUs
REST APIs are pretty much everywhere. They are the standard method to expose databases to clients and knowing how to develop a REST API is a necessity at all layers of the stack.
By using one of the many public APIs out there, you can expand the functionality of your application or enrich it with the necessary data.
But what if you have created your own unique functionality that you want to share with the community?
The answer is to create your own API.
I’m going to show you how to do this in Linx, a low-code development tool for IT pros.
Let’s get started
This tutorial will demonstrate how to build a minimally viable REST Web service integrated with a SQL Database using Linx to both build (Linx Designer) and host the web service (Linx Application Server).
The REST web service will involve an operation related to the creation of a ‘user’ record in the database.
Prerequisites
This tutorial assumes:
- Basic understanding of REST Web services
- A database instance and some basic familiarity with SQL
- Linx Application Designer (download here)
- An active Linx Application Server (cloud or on-premise)
- Web service request tool (Postman, Linx Designer)
Linx Solution Specification
The sample application will contain a REST Web service containing a single operation. The operation will execute a custom process flow which results in a submitted ‘user’ being added to a database and the results returned in the response.
API Specification
The REST WebService will contain a single ‘AddUser’ operation. The ‘AddUser’ operation involves a POST request made to the ‘/users’ endpoint.
HTTP Request

A JSON request body is submitted containing a ‘user’ object.

A JSON response body is then returned containing a ‘user’ object.

Database Specification
Here is a SQL database containing a [User] table consisting of the following fields:
- [ID] – Primary Key
- [Username] – Username of user
- [Password]– Password (encrypted)
- [FirstName] – First name of user
- [LastName] – Last name of user
- [email]– email of user
The ‘user’ details that are submitted with the request will be added to this table. The newly generated ID and additional fields of the new record will then be returned.
You can use the sample SQL below to create the table:

Create the Linx Application
Creating a REST Web service and adding custom functionality with Linx involves the following broad stages:
- Creating a new solution
- Adding Plugins (functionality)
- Create custom logic flow
- Configure REST Web service and Operations
- Link custom logic to REST operations
- Debug & deploy
Creating a new solution
To create a new Linx solution is easy – with just a single click, the base skeleton of the application is created for you. Your solution is created with a blank ‘process’ and you can add as many processes and services as you require.
Plugin Configuration
Linx is based upon a plugin architecture. To build the application, I require functionality related to the following areas:
- REST Web Services – to generate a REST API
- Encryption – for the user’s password
- Database integration – executes a query against a database instance and returns any results
Create custom logic flow
The custom logic flow will result in a ‘user’ object being added to a database and the results returned.
To start, create a single process which will take in an input parameter of a ‘user’ object. The ‘user.password’ ‘ will then be encrypted and added to the database along with the rest of the user’s details. The newly created record details will then be returned from the database and will be set as the result of the process.
Once this process has been built, it will then link to the REST endpoint operation.
Building a custom process
- Configure a ‘user’ Custom Type.
- Configure the ‘user’ Custom Type to be an input and output of the process.
- Add an Encrypt function to encrypt the ‘user.password’.
- Connect to the database and execute SQL function that will insert the ‘user’ object and the encrypted password into the database.
Add a SetValue function to return the user’s details as the output of the process.
*Configure a ‘user’ Custom Type *
To create a ‘user’ object to use in the application you can create aCustom Type.
To create a Custom Type, simply select the option from the menu bar. Create a ‘user’ custom type with the following fields to resemble the [user] table in the database.
With the ‘user’ Custom Type, you can
- Set it as the input and output type of the process that adds the user details to the database.
- Set it as the format of the request body and response body of the operation.
- Configure process input and output By default, a single process is created when a new solution is created, The default name of ‘Process’ can be easily changed by editing the ‘name’ property. in this case, it has been renamed ‘AddUserToDatabase’.
Set the ‘user’ Custom Type as the input and the output of the ‘AddUserToDatabase’ process by using the field editor in the properties.

- Encrypt password To encrypt the incoming user’s password using a passphrase, drag on the ‘Encrypt’ function from the cryptography plugin onto the ‘AddUserToDatabase’ process. Linx will automatically validate the properties for errors and indicate that there are required properties that need to be configured.

All the available data objects that are in scope of the process are available for selection. It is important to reference which data object is going to be encrypted and supply a passphrase or key depending on the algorithm chosen.
In this case, it will be the input ‘user’ password. The result of the ‘Encrypt’ function will be a base64 encoded string that can be used when inserting the user details into the database.

4. Configure database connection and SQL
Select the ExecuteSQL function from the Database plugin to connect your database instance. Using the built-in connection editor, you can easily add a ‘connection string’ property which will allow access to your database instance.

Optional: By storing the Database connection string as a setting, you can access the value from anywhere in the solution. The advantage of this is that you can have a single property source and reference this for multiple service or function properties
Once connected, add the SQL that will insert the details passed in from the user object and return the results. Using the SQL editor, you can use the built-in query generator to create an INSERT statement template for the [user] table.
- Set the process output The ‘user’ has been inserted into the database and the new details returned from the query.
You can set the output ‘user’ of the process equal to the ‘user’ returned from the database. To do this, simply use a SetValue function which allows you to assign the output of the ‘AddUserToDatabase’ process.

Configure REST Web Service and Operations
By now, you should have a custom process that:
- Takes in a ‘user’ object
- Inserts the details into a database
- Returns the updated details
Next, you can expose this functionality by linking the relevant custom logic to a specific REST operation which is contained in the REST host service.
To do this;
- Add a SimpleRESTHost service to your Solution
- Configure properties and operation
- Link your custom process to the operation
- Debug and test
Deploy
Add a SimpleRESTHost service to your Solution
To add and initiate a SimpleRESTHost service to your solution, drag the ‘SimpleRESTHost’ service from the REST Plugin. This will create the base skeleton for the REST service.Configure properties and operation.
First configure the Base URI, this is where the REST service will be hosted on.

Next, create the operations needed for the REST service by expanding the ‘Operations’ property wizard. Here you can quickly define operations, endpoints and parameters. In this case I want to:
- Create an ‘AddUser’ operation (Name)
- Configure the endpoint path to be ‘/users’ (Path)
- Configure this operation as a POST method
- For the request body, configure the operation to have a request body of a ‘user’ object that you created earlier
- For the response body, it will also be a ‘user’ object
- For the demo, you can bypass any security

Create the operations needed for the REST service by expanding the ‘Operations’ property wizard. Here you can quickly define operations, endpoints and parameters. In this case I want to:
- Create an ‘AddUser’ operation (Name)
- Configure the endpoint path to be ‘/users’ (Path)
- Configure this operation as a POST method
- For the request body, configure the operation to have a request body of a ‘user’ object that you created earlier
- For the response body, it will also be a ‘user’ object
- For the demo, you can bypass any security
Click save to create your AddUser operation. Linx will provide all the necessary input and output structures in place.
- Linking your custom process to the operation
You now have a
- Custom process
- REST Operation
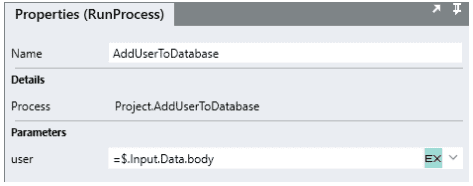
To link the two, in the ‘AddUser’ operation, drag in the ‘AddUserToDatabase’ process. This will mean that when the ‘AddUsers’ operation is executed, it will execute the ‘AddUserToDatabase’ custom sub-process.

However, you first need to configure the inputs for the ‘AddUserToDatabase’ custom process to reference the ‘user’ passed in with the request body. Do so by simply referencing the input request body:
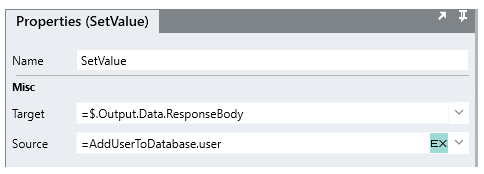
Finally, you can set the response body of the operation equal to the output returned from the ‘AddUserToDatabase’, which is done as follows:
- Debug and test To debug, initialize the debugger on the ‘AddUser’ operation.
In the ‘Debug Values’ panel, input test data for the ‘request body’ property.
By adding a ‘breakpoint’ to the ‘AddUserToDatabase’ operation, you can step through and pause on each function in the logic flow and see their runtime values.
Next, step into the ‘AddUserToDatabase’ process which will where you should see that the request body is then assigned as the input.user to the ‘AddUserToDatabase’. You can see the encrypted string as the output of the ‘Encrypt’ function
The ‘user’ is inserted into the database and the new details are returned from the ExecuteSQL function. If you step over until you return to the parent operation, you can see the ‘AddUserToDatabase’ process has returned a ‘user’. Finally, you can see the operation’s response body being set to the values returned from the ‘AddUserToDatabase’ process.
Deploy
With the functionality of the REST service tested, you are ready for deployment. This is done by simply clicking the ‘deploy’ button, directly from the IDE.
Once deployed, and since it’s the first time the application is uploaded, you will need to ‘start’ the service. Once activated, the SimpleRESTHost service can begin to make requests against the API.

Testing with POSTMAN
To test, make a request to the ‘/users’ endpoint to add some user details to the database.
In the database I currently have a [User] table with no records.

When a request is made to the Linx REST web service, details passed in with the request will be added to the database and an auto-generated ID along with the inserted details will be returned in the response.
Using Postman, you can setup a ‘POST request made to your REST service endpoint.
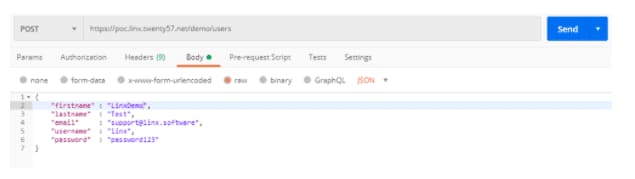
The request is then made. A successful ‘(200) OK’ response has been returned.

In the response body you can see this ID as well as the user details returned with some having text manipulation being performed.

You’re done!
And that’s how simple it is to build an API using Linx.
BONUS See how we did in the video below
The post How to Build a REST API in low-code [a step-by-step guide] appeared first on Linx.

Top comments (0)