
Written by Hussain Arif✏️
Continuous integration (CI) and continuous delivery (CD) pipelines are a set of automated processes that help developer teams deliver software more quickly and reliably. CI pipelines automate the process of building, testing, and deploying code, while CD pipelines automate the process of delivering that code to the end user.
In this article, we will discuss the most popular CI/CD pipelines used by React Native developers.
Here’s what we will discuss today:
- What problems does a CI/CD pipeline solve?
- Expo App Services
- Microsoft App Center
- GitHub Actions
- CodeMagic
- Honorable mentions
- Comparison table
What problems does a CI/CD pipeline solve?
As developers, we know that one of the most crucial steps while programming is to build, deploy and test our code. To make this happen, we can do the following:
- Create a separate branch on our repository called
production - When someone on the team commits to the branch, that team member must run a build script to create an executable file
- Finally, the developer has to download this file on their machine and then upload it to a distribution platform. Through this platform, clients can then download and run the app
Even though this solution works, there are a few issues with this:
- This process is tedious. In the first step, developers must first commit to the branch and then run a build script
- This takes up valuable time because the building process involves compiling the project, testing, and producing an artifact file
- Furthermore, it consumes valuable resources on the local machine, which may lead to serious problems in cases where the project’s codebase is large and complex
This is the problem a CI/CD pipeline comes in to solve. Let’s cover a few different options for React Native development.
Expo App Services
The Expo Application Services (EAS) tool is geared towards React Native and Expo projects from the ground up. As a result, this means that the deployment and building process is a walk in the park — it is the easiest tool on this list to work with because it only requires a few commands to get up and running:  For example, to build and publish, all we need to do is the following:
npm install --global eas-cli
npx eas-login # sign into the service
eas build:configure # this will generate an eas.json file
# this file will allow you to configure your building process.
For more information on deployment and build configuration, navigate to Expo’s documentation.
Pros and cons of EAS
Here are some of the things I like about EAS:
- It’s the easiest option to host and deploy apps, especially if they’re built with Expo
- Developers provide an option to host the Expo Build process on your server, but consequently, it is suited for companies where the project’s code has to be kept private
- Handles the stressful stuff for you, like signing certificates and keystore files, which saves a lot of engineering time and effort
- Provides extensive documentation in case you need help
- Supports both Expo and React Native apps
Here are the cons:
- The free tier is limited if builds are frequent
- During peak hours, you might have to wait a bit for your builds to complete on the free tier, which might be a problem if you’re on a tight deadline
- As of writing this article, running E2E tests is in an early state, though support continues to develop
Microsoft App Center
Microsoft App Center (MAC) is a CI/CD platform dedicated to app development. Unlike Expo Application Services, it supports both React Native and other cross-platform technologies like Unity and Xamarin.
Here’s what it looks like:  Building an app on App Center is a bit involved, but it is still straightforward. First, upload your project on GitHub, Azure, or another code hosting platform:
  Next, specify the project’s location in App Center’s settings:
  Finally, the service will then ask you to configure your build settings. You also might have to generate and upload a keystore file in this step.
That’s it! When that’s done, the pipeline will start building the app for you.
Pros and cons of MAC
Microsoft App Center has some significant strengths that stand out among the competition.
It can run a test to verify whether the app can launch successfully. It is particularly useful in situations where you need to ensure the functionality of a new build.
With this feature, you can verify this without manually running the app on a mobile device:  Here are a few other pros worth mentioning:
- The free tier is generous. In many cases, it is enough for personal and small-scale projects, but the service also provides a 30-day free trial for their paid tier
- Provides clear and exhaustive documentation
- Supports end-to-end tests
- Widely used in enterprise environments, so extensive support is available from the community
However, there were some things that I found unappealing:
- No option to run builds on local infrastructure. As discussed before, this might be a problem in situations where source code privacy is important
- Paid option may be too expensive for small startups
- E2E tests are locked behind a paywall
- As of writing this article, Microsoft doesn’t support Expo apps
GitHub Actions
GitHub Actions is a prominent option among numerous open-source programmers. One reason for its popularity is that this tool integrates with GitHub, so developers can use it to automate their workflows directly from their GitHub repository: 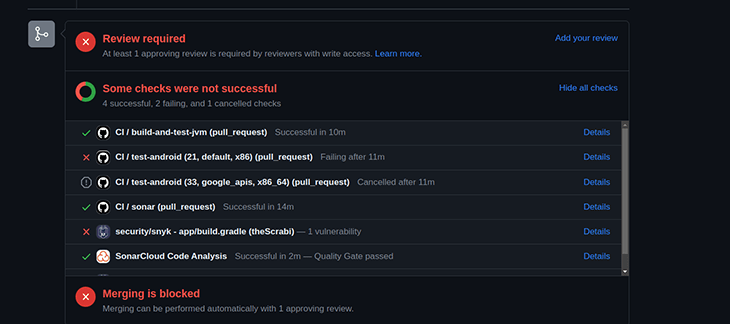 Although building an app on GitHub Actions is tricky, it provides greater control over the building process as compared to other platforms, thus making it a worthwhile trade-off.
To deploy with GitHub Actions, create a folder in your repo called .github/workflows. There, create a new file called ci.yml:  This tells GitHub that our project will use GitHub Actions for deployment. After this step, follow the instructions in this LogRocket article to build a CI/CD pipeline using GitHub Actions in React Native.
Pros and cons of GitHub Actions
Here are some of the reasons why this pipeline service might be suitable for you:
- The service allows for more control, which means that you can add tests and even change your build agent
- Its free tier is more than enough for personal projects. Moreover, GitHub even issues Pro accounts for students, which allows them to upgrade to a paid option for free
- Other than building apps, GitHub Actions can also run automated code quality checks. This is suitable in situations where you want to detect code smells and bugs in your project before deployment
- The self-hosted runners feature allows companies to host their version of Actions on local infrastructure. As discussed before, this is great for private code repositories
- The free tier allows for end-to-end tests
However, as compared to other platforms, here are some things that I didn’t like:
- The process of building a CI/CD pipeline is too involved. In some cases, it might be too complex for beginners who are looking to deploy their app
- GitHub Actions does not have dedicated documentation for React Native apps. Because of this, you might have to rely on the community for help
CodeMagic
CodeMagic is another CI/CD pipeline specifically geared towards mobile app development frameworks, including Flutter, Cordova, Ionic, and others:  Just like Expo and Microsoft’s App Center, deploying and building your React Native app is fairly easy. To get started, create a file called
 codemagic.yml in your React Native app, and write the following code:
workflows:
    sample-workflow:
        name: Codemagic Sample Workflow
        max_build_duration: 120
        instance_type: mac_mini_m1
This tells the pipeline that our build will use Apple’s M1 Mac machine for deployment
After this step, it’s best to head to CodeMagic’s documentation to learn how to build and deploy your project.
Pros and cons of CodeMagic
Here are some of the things I loved about it:
- Their servers use Apple’s M-series machines, which leads to rapid build times
- CodeMagic uses a pay-as-you-go model, which means that you only pay for the resources you use. In some cases, this might be a cheaper option as compared to other services in this list
- Amazing documentation with step-by-step guides
- Supports end-to-end tests on the free tier
However, there were some things that I didn’t like about it:
- Does not have a self-hosted option, which can be a problem for privacy-sensitive code
Honorable mentions
Professional mobile developers also widely use other CI services, such as Bitrise and Jenkins CI. Since these services have compilation steps similar to Microsoft App Center, we won't discuss their building processes here.
Bitrise
Just like CodeMagic, this service is geared towards mobile app development. Furthermore, it supports add-ons to help in development with, for example, debug reports or release management. 
Pros and cons of Bitrise
Here are some aspects of Bitrise that might make it a appealing option:
- Rapid build times: Just like CodeMagic, this also supports Apple’s M series machines to compile and build code
- Pay-as-you-go model: The biggest upside to this service is that you can save money by only paying for the resources you use
- Supports end-to-end tests on the free tier
However, there were some flaws that might be a deal-breaker to some:
- Does not provide a self-hosted option
Jenkins
Jenkins is another pipeline service that is targeted towards enterprises and large businesses. This is because the software is completely self-hosted. As discussed before, this is great for situations where the project’s source code has to be kept private. 
Pros and cons of Jenkins
One major factor that made me like Jenkins was that it is completely self-hosted. Because of this, Jenkins is a popular tool among larger businesses. This is because self hosting allows companies to avoid spending money on expensive tiers and instead use local hardware.
However, this comes at a cost: maintaining and making sure your Jenkins host remains secure might be a hassle for some teams.
Comparison table
Here is a small table that summarizes all pros and cons of all platforms discussed in this article:
| Tool | Key Features | Pros | Cons | Pricing |
|---|---|---|---|---|
| Expo Application Services | Built for React Native and Expo projects | Easiest to deploy, Handles certificates and keystore files, Extensive documentation | Limited free tier, Peak hours may require waiting, Early state of E2E tests | Free tier & Paid tiers |
| Microsoft App Center | Supports multiple platforms, including React Native | Generous free tier, Runs app launch tests, E2E tests support, Extensive documentation | No local infrastructure, Can be costly for startups, E2E tests behind paywall, No support for Expo apps | Free tier & Paid tiers |
| GitHub Actions | Integrates directly with GitHub repository | More control, Pro accounts for students, Automated code quality checks, Self-hosted runners, E2E tests on the free tier | Complex setup, Lacks dedicated documentation for React Native | Free tier & Paid tiers |
| CodeMagic | Specifically geared towards mobile app frameworks | Uses Apple's M-series machines, Pay-as-you-go model, Extensive documentation, E2E tests on the free tier | No self-hosted option | Pay-as-you-go |
| Bitrise | Built for mobile apps, Uses Apple's M-series machines | Rapid build times, Pay-as-you-go model, Great documentation, E2E tests on the free tier | No self-hosted option | Pay-as-you-go |
| Jenkins CI | Completely self-hosted, no online hosting option available | Great for maximum privacy and security, Completely free | Maintaining and hosting of the CI server on local infrastructure can be a pain | Free |
Conclusion
In this article, we briefly discussed some popular CI/CD platforms for React Native and why they are crucial in the programming world. We also included some honorable mentions, Jenkins CI and Bitrise, in our comparison table. It is important to remember that every project is different, and therefore it is important to evaluate each tool’s advantages and disadvantages.
In my projects, I typically use Expo Services because it is incredibly easy to set up and use, and its free tier is more than enough for my needs. Thank you so much for reading!
LogRocket: Instantly recreate issues in your React Native apps.

LogRocket is a React Native monitoring solution that helps you reproduce issues instantly, prioritize bugs, and understand performance in your React Native apps.
LogRocket also helps you increase conversion rates and product usage by showing you exactly how users are interacting with your app. LogRocket's product analytics features surface the reasons why users don't complete a particular flow or don't adopt a new feature.
Start proactively monitoring your React Native apps — try LogRocket for free.

Top comments (0)