
Written by Avneesh Agarwal✏️
What is a DAO?
DAO stands for Decentralized Autonomous Organization. As it says in the name, a DAO is an organization without a single leader; instead, rules are encoded in the blockchain. Because of this, a DAO is completely transparent and everyone who participates has a stake. Large decisions are made via voting amongst those who own non-fungible tokens (NFTs) from the DAO, which grant membership.
Today, we are going to build our very own DAO using Next.js, thirdweb, MetaMask, and Alchemy. It will allow users to mint your DAO’s NFT, receive cryptocurrency via airdrops, and participate in the DAO’s polls. This tutorial will be written with just JavaScript, so you don’t need to know any Solidity.
Prerequisites
To understand and follow along with this tutorial, you should have the following:
- Working knowledge of JavaScript, Next.js, and the blockchain
- A MetaMask wallet
- An account with Alchemy
Contents
- Setup
- Adding sign in functionality using MetaMask
- Adding features to mint an NFT
- Creating and deploying a governance token
- Conclusion
Setup
We will begin by setting up a Next.js app with the following command:
npx create-next-app my-dao
Now, we will create a new project in thirdweb. Go to thirdweb and connect your MetaMask wallet. After you connect your wallet, click on Create Project and choose the Rinkeby network.
Give your project a name and a description, and hit Create. If you don’t have enough ETH to pay for gas, get some from this faucet.
Creating an Alchemy app
Next, head to Alchemy, sign in, click on Create App, and provide the required details. Make sure to use the same chain as the one you used in thirdweb - in our case, it is the Ethereum chain and the Rinkeby network.

After the app is created, copy the HTTP API key.
Getting the wallet's private key
In order to mint NFTs and perform certain scripts, we are going to need the wallet’s private key.
To access it, open the MetaMask browser extension and click on Account Details. You should see your private key here; export it and copy it somewhere safe.
Adding .env variables
Let’s add these variables in a .env file so we can access them later:
PRIVATE_KEY=<wallet_private_key>
ALCHEMY_API_URL=<alchemy_http_key>
WALLET_ADDRESS=<public_wallet_address>
Because we don’t want to push these to GitHub, be sure to add them in .gitignore
Adding sign in functionality using MetaMask
In DApps, MetaMask is the most popular wallet used, so we will add MetaMask sign in with thirdweb.
We are going to need two packages from install:
npm i @3rdweb/sdk @3rdweb/hooks # npm

yarn add @3rdweb/sdk @3rdweb/hooks # yarn
Adding the thirdweb provider
We need to wrap our whole app in a thirdweb provider in order to access the login details and other information required for the components:
import { thirdwebWeb3Provider } from "@3rdweb/hooks";
import "../styles/globals.css";

function MyApp({ Component, pageProps }) {
  return (
    <thirdwebWeb3Provider>
      <Component {...pageProps} />
    </thirdwebWeb3Provider>
  );
}

export default MyApp;
For authentication purposes, we also have to specify the type of authentication and the supported chain IDs. We are using MetaMask and the Rinkeby chain, so add the following as well:
const supportedChainIds = [4];

const connectors = {
  injected: {},
};
Finally, pass these as props in the provider like so:
  <thirdwebWeb3Provider
      connectors={connectors}
      supportedChainIds={supportedChainIds}
    >
      <Component {...pageProps} />
  </thirdwebWeb3Provider>
Adding the sign in component
Create a new folder called components in the root of the project and add a Login.js file to it:
import { useWeb3 } from "@3rdweb/hooks";
const Login = () => {
  const { connectWallet } = useWeb3();
  return (
    <div>
      <button onClick={() => connectWallet("injected")}>
        Sign in using MetaMask
      </button>
    </div>
  );
};
export default Login;
Thankfully, thirdweb provides a connectWallet function which we can use to add authentication!
Rendering the sign in component
Inside index.js, render the login screen if there is no address (if the user is not signed in):
const { address } = useWeb3();
if (!address) {
  return <Login />;
}
This will allow our users to sign in, but afterwards it just shows a blank screen. So, in the other return block, let’s show the user her address:
export default function Home() {
  const { address } = useWeb3();
  if (!address) {
    return <Login />;
  }
  return (
    <div className={styles.container}>
      <h2>You are signed in as {address}</h2>
    </div>
  );
}
The login works but it doesn’t look good right now. So, create a new file Login.module.css in the styles folder and add the following:
.container {
  min-height: 100vh;
  display: flex;
  flex-direction: column;
  justify-content: center;
  align-items: center;
  background-color: #7449bb;
}
.button {
  color: #7449bb;
  background-color: white;
  border: none;
  border-radius: 5px;
  padding: 10px;
  font-size: 16px;
  margin: 4px 2px;
  cursor: pointer;
  font-weight: 500;
}
Next, add the following classes to Login.js:
<div className={styles.container}>
  <button className={styles.button} onClick={() => connectWallet("injected")}>
    Sign in using MetaMask
  </button>
</div>
And finally, import the styles:
import styles from "../styles/Login.module.css";
This will give us a simple, but good-looking login screen.

Initializing the thirdweb SDK
Now we need to initialize the thirdweb SDK for the various scripts we are going to run. Start by creating a new folder called scripts with an initialize-sdk.js file inside of it.
Add the following code to the file:
import { thirdwebSDK } from "@3rdweb/sdk";
import ethers from "ethers";
import dotenv from "dotenv";

dotenv.config();

if (!process.env.PRIVATE_KEY || process.env.PRIVATE_KEY == "") {
  console.log("🛑 Private key not found.");
}
if (!process.env.ALCHEMY_API_URL || process.env.ALCHEMY_API_URL == "") {
  console.log("🛑 Alchemy API URL not found.");
}
if (!process.env.WALLET_ADDRESS || process.env.WALLET_ADDRESS == "") {
  console.log("🛑 Wallet Address not found.");
}
const sdk = new thirdwebSDK(
  new ethers.Wallet(
    process.env.PRIVATE_KEY,
    ethers.getDefaultProvider(process.env.ALCHEMY_API_URL)
  )
);
(async () => {
  try {
    const apps = await sdk.getApps();
    console.log("app address:", apps[0].address);
  } catch (err) {
    console.error("Failed to get apps from the sdk", err);
    process.exit(1);
  }
})();
export default sdk;
This will initialize the thirdweb SDK, and as you can see, we need to install some packages:
npm i ethers dotenv # npm

yarn add ethers dotenv # yarn
We are using modular imports here, so create a new package.json file inside the scripts folder and simply add the following:
{
  "name": "scripts",
  "type": "module"
}
Finally, run the script:
node scripts/initialize-sdk.js
The script may take some time to run, but after some time you will get your app address.

We are going to need this in the next steps, so store it somewhere safe.
Adding features to mint an NFT
For this step, we are going to need some test ETH, so go to a faucet like this and get some.
Creating and configuring an NFT
Create a new file called deploy-drop.js inside the scripts folder. In here, add the following script:
import { ethers } from "ethers";
import sdk from "./initialize-sdk.js";
import { readFileSync } from "fs";

const app = sdk.getAppModule("APP_ADDRESS");

(async () => {
  try {
    const bundleDropModule = await app.deployBundleDropModule({
      name: "LogRocket DAO", // Name of NFT Collection for DAO
      description: "A DAO for all the LogRocket readers.", // Description
      image: readFileSync("scripts/assets/rocket.png"), // Image for NFT collection
      primarySaleRecipientAddress: ethers.constants.AddressZero,
    });

    console.log(
      "✅ Successfully deployed bundleDrop module, address:",
      bundleDropModule.address,
    );
    console.log(
      "✅ bundleDrop metadata:",
      await bundleDropModule.getMetadata(),
    );
  } catch (error) {
    console.log("failed to deploy bundleDrop module", error);
  }
})()
You will need to update a few things here:
- Update the app address with the new app address that you got by running the previous script
- Update the name of the NFT drop for the DAO, and its description
- Add an image for the NFT drop by creating a new folder called
assets, and adding the image for your NFT there
After you have updated the details, run the following script:
node scripts/deploy-drop.js
Wait for the script to run, and you should get an address and the metadata.

You can even check out the transaction on Rinkeby Etherscan
Let’s configure our NFT now! Create a new config-nft.js file inside the scripts folder and add the following:
import sdk from "./initialize-sdk.js";
import { readFileSync } from "fs";
const bundleDrop = sdk.getBundleDropModule(
"BUNDLE_DROP_ADDRESS"
);
(async () => {
try {
await bundleDrop.createBatch([
{
name: "LogRocket DAO", // Name of NFT Collection for DAO
description: "A DAO for all the LogRocket readers.", // Description
image: readFileSync("scripts/assets/rocket.png"), // Image for NFT collection
},
]);
console.log("✅ Successfully created a new NFT in the drop!");
} catch (error) {
console.error("failed to create the new NFT", error);
}
})();
```
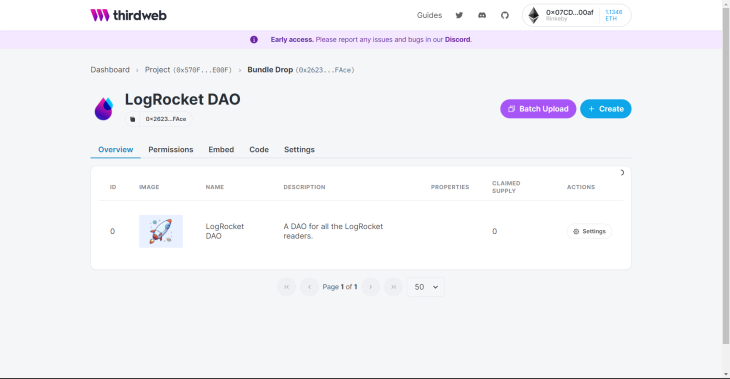
You need to update the bundle drop address and the details in the object inside `createBatch`. These details are going to be used for the NFT!
Once, you have updated all of them, run the following script:
```js
node scripts/config-nft.js
```
It should give you an output like this.

If you see the module in the thirdweb dashboard, you will see that an NFT has been created! 🥳
Finally, let’s add a claim condition to our NFT
Setting a claim condition will allow us to set a limit for the NFTs and allow a specific max limit per transaction. We will set a claim condition from the dashboard itself, so click on the **Settings** button and you can update the data based on your needs.
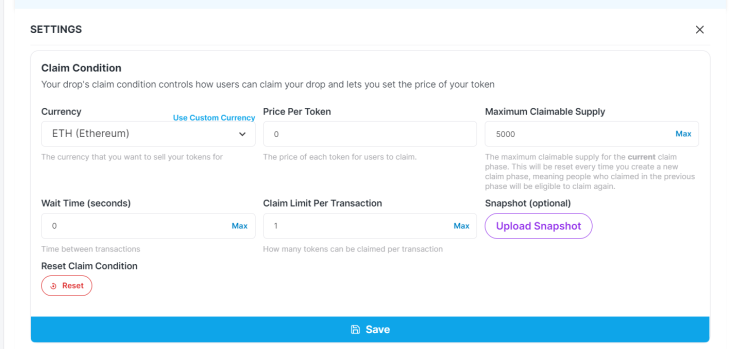
After you are done updating, click **Save** and confirm the small transaction.
### Checking if the user has an NFT
Before creating a mint button that allows the users to mint NFTs, let’s check if the user has an NFT already. We don’t want the users to mint multiple NFTs!
Start by adding two new variables, `sdk` and `bundleDropModule`, like this before our functional component:
```js
const sdk = new thirdwebSDK("rinkeby");
const bundleDropModule = sdk.getBundleDropModule(
"BUNDLE_DROP_ADDRESS"
);
```
You will also need to import `thirdwebSDK`:
```js
import { thirdwebSDK } from "@3rdweb/sdk";
```
Now, let’s create a state for `hasClaimedNFT`:
```js
const [hasClaimedNFT, setHasClaimedNFT] = useState(false);
```
We also need to create a `useEffect` Hook to check if the user has the NFT:
```js
useEffect(() => {
const handler = async () => {
if (!address) {
return;
}
try {
const balance = await bundleDropModule.balanceOf(address, "0");
if (balance.gt(0)) {
setHasClaimedNFT(true);
console.log("🎉 You have an NFT!");
} else {
setHasClaimedNFT(false);
console.log("🤷♂️ You don't have an NFT.");
}
} catch (error) {
setHasClaimedNFT(false);
console.error("failed to nft balance", error);
}
};
handler();
}, [address]);
```
Firstly, it will check if the user is signed in. If the user is not signed in, it will return nothing. Then, this checks if the user has the NFT with the token ID `0` in the drop contract that we imported at the top.
If you, open the console in the website, it should show that you don’t have an NFT.

### Creating a button to mint NFTs
Let’s create the button to mint NFTs! Create a new function called `mintNft` like so:
```js
const mintNft = async () => {
setIsClaiming(true);
try {
await bundleDropModule.claim("0", 1);
setHasClaimedNFT(true);
console.log("🌊 Successfully Minted the NFT!");
} catch (error) {
console.error("failed to claim", error);
} finally {
setIsClaiming(false);
}
};
```
We will call this function when a button is clicked to mint the NFT to the user’s wallet. But first, let’s add the two required states:
```js
const [hasClaimedNFT, setHasClaimedNFT] = useState(false);
const [isClaiming, setIsClaiming] = useState(false);
```
We also need to call the `providerSigner` function, so first get the provider from `useWeb3`:
```js
const { address, provider } = useWeb3();
```
And then call the function:
```js
const signer = provider ? provider.getSigner() : undefined;
useEffect(() => {
sdk.setProviderOrSigner(signer);
}, [signer]);
```
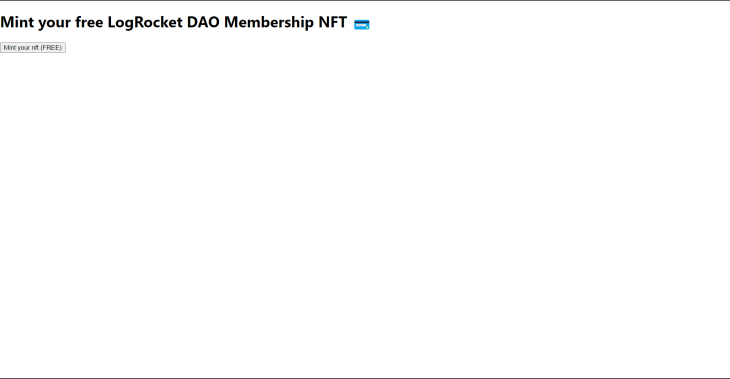
Let’s create the button now! Inside the final return block add the following:
```js
<div>
<h1>Mint your free LogRocket DAO Membership NFT 💳</h1>
<button disabled={isClaiming} onClick={() => mintNft()}>
{isClaiming ? "Minting..." : "Mint your nft (FREE)"}
</button>
</div>
```
Now, after we sign in, it should show us a screen like this.
You can even view your NFT on [Opensea Testnets](https://testnets.opensea.io/); just go to https://testnets.opensea.io/assets//0
Finally, just above the final return block, add this check to see if the user has claimed the NFT already:
```js
if (hasClaimedNFT) {
return (
<div>
<h1>You have the DAO Membership NFT!</h1>
</div>
);
}
```
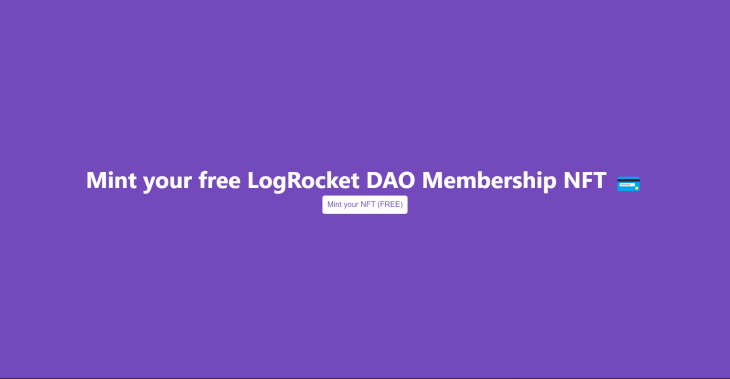
### Adding styles
We have completed building the minting NFT functionality, but it looks ugly, so let’s add some basic stylings. Inside `Home.module.css` add the following:
```css
.container {
min-height: 100vh;
display: flex;
flex-direction: column;
justify-content: center;
align-items: center;
background-color: #7449bb;
}
.container > h1 {
font-size: 3rem;
color: #fff;
font-weight: bold;
}
.button {
color: #7449bb;
background-color: white;
border: none;
border-radius: 5px;
padding: 10px;
font-size: 16px;
margin: 4px 2px;
cursor: pointer;
font-weight: 500;
}
```
We also need to add the `classNames`:
```js
if (hasClaimedNFT) {
return (
<div className={styles.container}>
<h1>You have the DAO Membership NFT!</h1>
</div>
);
}
return (
<div className={styles.container}>
<h1>Mint your free LogRocket DAO Membership NFT 💳</h1>
<button
className={styles.button}
disabled={isClaiming}
onClick={() => mintNft()}
>
{isClaiming ? "Minting..." : "Mint your NFT (FREE)"}
</button>
</div>
);
};
```
This gives us a better mint screen.
## Creating and deploying a governance token
Create a new file called `deploy-token.js` in the `scripts` folder. Add the following to it:
```js
import sdk from "./initialize-sdk.js";
const app = sdk.getAppModule("YOUR_APP_ADDRESS");
(async () => {
try {
const tokenModule = await app.deployTokenModule({
name: "LogRocket Token", // name of the token
symbol: "LR", // symbol
});
console.log(
"✅ Successfully deployed token module, address:",
tokenModule.address
);
} catch (error) {
console.error("failed to deploy token module", error);
}
})();
```
This script will create a new token module with a name and symbol. You will need to manually update the app address, token name, and symbol yourself.
After updating, run the script.
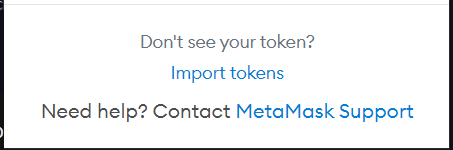
You can check this token by the address on Rinkeby Etherscan, and also add it on your MetaMask wallet by clicking **Import tokens**.
After importing, you should see the token under your assets.
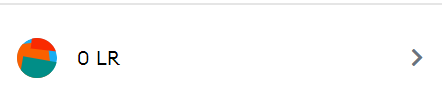
It is currently zero, so let’s mint some tokens!
### Minting tokens
Create a new file called `mint-token.js` inside the `scripts` folder and add the following:
```js
import { ethers } from "ethers";
import sdk from "./initialize-sdk.js";
const tokenModule = sdk.getTokenModule(
"TOKEN_MODULE_ADDRESS"
);
(async () => {
try {
const amount = 1_000_000;
const amountWith18Decimals = ethers.utils.parseUnits(amount.toString(), 18);
await tokenModule.mint(amountWith18Decimals);
const totalSupply = await tokenModule.totalSupply();
console.log(
"✅ There now is",
ethers.utils.formatUnits(totalSupply, 18),
"$LR in circulation"
);
} catch (error) {
console.error("Failed to mint tokens", error);
}
})();
```
Update the token module address with the address you got in the last script, and you can update the amount you want to mint.
After you are ready to mint, run the script:
```js
node scripts/mint-token.js
```
You should now see the amount of tokens you minted on your MetaMask wallet! 🎉

### Airdropping tokens
We might want to airdrop the tokens to our NFT holders, so let’s build a script for that. Create a new `airdrop.js` file inside `scripts` and add the following:
```js
import { ethers } from "ethers";
import sdk from "./initialize-sdk.js";
const bundleDropModule = sdk.getBundleDropModule(
"BUNDLE_DROP_ADDRESS"
);
const tokenModule = sdk.getTokenModule(
"TOKEN_MODULE_ADDRESS"
);
(async () => {
try {
const walletAddresses = await bundleDropModule.getAllClaimerAddresses("0");
if (walletAddresses.length === 0) {
console.log(
"No NFTs have been claimed yet, ask your friends to mint some free ones :P!"
);
process.exit(0);
}
const airdropTargets = walletAddresses.map((address) => {
const randomAmount = Math.floor(
Math.random() * (10000 - 1000 + 1) + 1000
);
console.log("✅ Going to airdrop", randomAmount, "tokens to", address);
return {
address,
amount: ethers.utils.parseUnits(randomAmount.toString(), 18),
};
});
console.log("🌈 Starting airdrop...");
await tokenModule.transferBatch(airdropTargets);
console.log(
"✅ Successfully airdropped tokens to all the holders of the NFT!"
);
} catch (err) {
console.error("Failed to airdrop tokens", err);
}
})();
```
After you run the script you should get something like this.

Currently, only you have minted an NFT, so it won’t send the token to someone else. But this can be used to send it to other NFT holders later on.
## Allowing users to vote
Create a new `deploy-vote.js` file in the `scripts` folder and add the following:
```js
import sdk from "./initialize-sdk.js";
const appModule = sdk.getAppModule(
"APP_MODULE_ADDRESS"
);
(async () => {
try {
const voteModule = await appModule.deployVoteModule({
name: "LR Dao's Proposals",
votingTokenAddress: "0x6fb07DCBC53Fd8390de38CDBfCc267b5A72761ca",
proposalStartWaitTimeInSeconds: 0,
proposalVotingTimeInSeconds: 24 * 60 * 60,
votingQuorumFraction: 0,
minimumNumberOfTokensNeededToPropose: "0",
});
console.log(
"✅ Successfully deployed vote module, address:",
voteModule.address
);
} catch (err) {
console.error("Failed to deploy vote module", err);
}
})();
```
Update the app address, the name, and the voting token address, then run the script:
```js
node scripts/deploy-vote.js
```
We also need to set up a vote module, so create a new script called `setup-vote.js` and add the following:
```js
import { ethers } from "ethers";
import sdk from "./initialize-sdk.js";
const voteModule = sdk.getVoteModule(
"0xA57A03B9e117723b6873100742116A01140C43f4"
);
const tokenModule = sdk.getTokenModule(
"0x6fb07DCBC53Fd8390de38CDBfCc267b5A72761ca"
);
(async () => {
try {
await tokenModule.grantRole("minter", voteModule.address);
console.log(
"Successfully gave vote module permissions to act on token module"
);
} catch (error) {
console.error(
"failed to grant vote module permissions on token module",
error
);
process.exit(1);
}
try {
const ownedTokenBalance = await tokenModule.balanceOf(
process.env.WALLET_ADDRESS
);
const ownedAmount = ethers.BigNumber.from(ownedTokenBalance.value);
const percent90 = ownedAmount.div(100).mul(90);
await tokenModule.transfer(voteModule.address, percent90);
console.log("✅ Successfully transferred tokens to vote module");
} catch (err) {
console.error("failed to transfer tokens to vote module", err);
}
})();
```
You will need to run this script to finish it up:
```js
node scripts/setup-vote.js
```
Now that we have our vote module ready, let’s create some proposals!
Create a new file called `vote-proposals.js` inside the `scripts` folder and add the following:
```js
import { ethers } from "ethers";
import sdk from "./initialize-sdk.js";
const voteModule = sdk.getVoteModule(
"VOTE_MODULE"
);
const tokenModule = sdk.getTokenModule(
"TOKEN_MODULE"
);
(async () => {
try {
const amount = 10000;
await voteModule.propose(
"Should the DAO mint an additional " +
amount +
" tokens into the treasury?",
[
{
nativeTokenValue: 0,
transactionData: tokenModule.contract.interface.encodeFunctionData(
"mint",
[voteModule.address, ethers.utils.parseUnits(amount.toString(), 18)]
),
toAddress: tokenModule.address,
},
]
);
console.log("✅ Successfully created proposal to mint tokens");
} catch (error) {
console.error("failed to create first proposal", error);
process.exit(1);
}
})();
```
You need to update the module addresses, and if you want to update the message of the proposal, you can update that as well.
Finally, run the script. It should give you something like this.

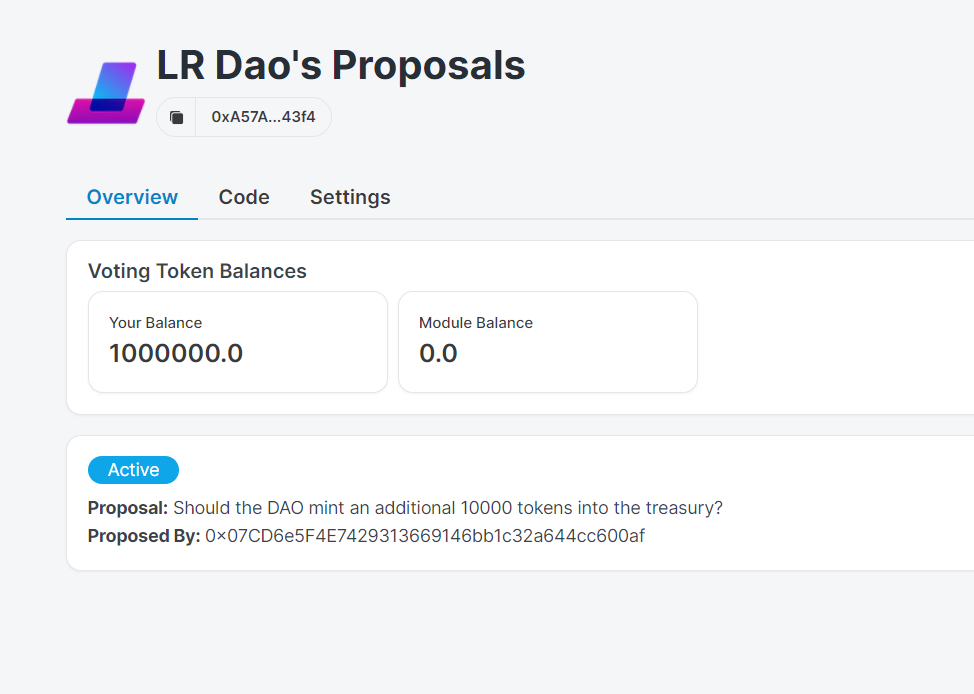
If you now check the thirdweb dashboard, the proposal has been created. 🎉
### Showing proposals on the website
First, import the token and vote module:
```js
const voteModule = sdk.getVoteModule(
"0xf738973379b8B6444e429D2fd6C8B1f223247390"
);
const tokenModule = sdk.getTokenModule(
"0x8C35288de335070dd1C00d68d71383d81437472A"
);
```
We are going to need three `useState`s, like so:
```js
const [proposals, setProposals] = useState([]);
const [isVoting, setIsVoting] = useState(false);
const [hasVoted, setHasVoted] = useState(false);
```
#### Getting the proposals
We need to get the proposals to display them on the screen, so create this `useEffect`:
```js
useEffect(() => {
if (!hasClaimedNFT) {
return;
}
voteModule
.getAll()
.then((proposals) => {
setProposals(proposals);
})
.catch((err) => {
console.error("failed to get proposals", err);
});
}, [hasClaimedNFT]);
```
Then, create a new `handleFormSubmit` function:
```js
const handleFormSubmit = async (e) => {
e.preventDefault();
e.stopPropagation();
setIsVoting(true);
const votes = proposals.map((proposal) => {
let voteResult = {
proposalId: proposal.proposalId,
vote: 2,
};
proposal.votes.forEach((vote) => {
const elem = document.getElementById(
proposal.proposalId + "-" + vote.type
);
if (elem.checked) {
voteResult.vote = vote.type;
return;
}
});
return voteResult;
});
try {
const delegation = await tokenModule.getDelegationOf(address);
if (delegation === ethers.constants.AddressZero) {
await tokenModule.delegateTo(address);
}
try {
await Promise.all(
votes.map(async (vote) => {
const proposal = await voteModule.get(vote.proposalId);
if (proposal.state === 1) {
return voteModule.vote(vote.proposalId, vote.vote);
}
return;
})
);
try {
await Promise.all(
votes.map(async (vote) => {
const proposal = await voteModule.get(vote.proposalId);
if (proposal.state === 4) {
return voteModule.execute(vote.proposalId);
}
})
);
setHasVoted(true);
} catch (err) {
console.error("failed to execute votes", err);
}
} catch (err) {
console.error("failed to vote", err);
}
} catch (err) {
console.error("failed to delegate tokens", err);
} finally {
setIsVoting(false);
}
};
```
This function is going to collect the vote.
#### Rendering the proposals
Replace the `if (hasClaimedNFT)` block with this:
```js
if (hasClaimedNFT) {
return (
<div className={styles.container}>
<h2>Active Proposals</h2>
<form onSubmit={handleFormSubmit}>
{proposals.map((proposal) => (
<Proposal
key={proposal.proposalId}
votes={proposal.votes}
description={proposal.description}
proposalId={proposal.proposalId}
/>
))}
<button
onClick={handleFormSubmit}
type="submit"
className={styles.button}
>
{isVoting
? "Voting..."
"Submit Votes"}
</button>
</form>
</div>
);
}
```
We are creating a separate component for the proposal to keep things clean. So, create a new file called `Proposal.js` in the `components` folder and add the following:
```js
import styles from "../styles/Proposal.module.css";
const Proposal = ({ description, votes, proposalId }) => {
return (
<div className={styles.proposal}>
<h5 className={styles.description}>{description}</h5>
<div className={styles.options}>
{votes.map((vote) => (
<div key={vote.type}>
<input
type="radio"
id={proposalId + "-" + vote.type}
name={proposalId}
value={vote.type}
defaultChecked={vote.type === 2}
/>
<label htmlFor={proposalId + "-" + vote.type}>{vote.label}</label>
</div>
))}
</div>
</div>
);
};
export default Proposal;
```
I also added basic styling, so create a new `Proposal.module.css` file in the `styles` folder:
```css
.proposal {
display: flex;
flex-direction: column;
align-items: center;
justify-content: center;
background-color: #fafafa;
border-radius: 10px;
box-shadow: 0px 0px 10px rgba(0, 0, 0, 0.1);
padding: 20px;
margin: 20px;
}
.options {
display: flex;
flex-direction: column;
justify-content: space-between;
align-items: flex-start;
width: 100%;
margin-top: 1rem;
}
```
To center the items, I have added the following styles in `Home.module.css` as well:
```css
.container > form {
display: flex;
flex-direction: column;
align-items: center;
}
```
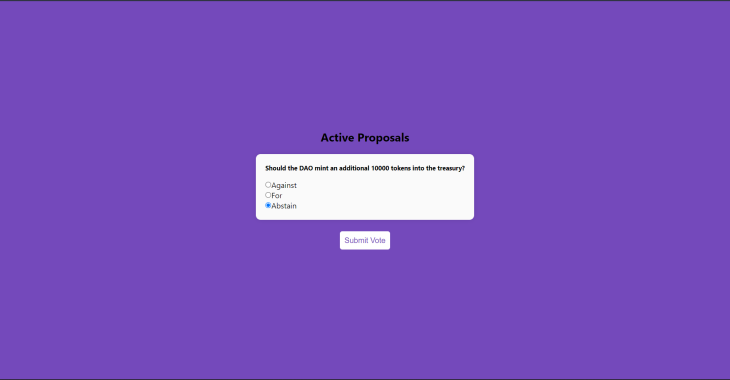
You will get to this screen where you can submit your votes. 🎉
Finally, let’s make a function to check if the person has already voted.
First, create a new `useEffect`:
```js
useEffect(() => {
if (!hasClaimedNFT) {
return;
}
if (!proposals.length) {
return;
}
voteModule
.hasVoted(proposals[0].proposalId, address)
.then((hasVoted) => {
setHasVoted(hasVoted);
if (hasVoted) {
} else {
}
})
.catch((err) => {
console.error("failed to check if wallet has voted", err);
});
}, [hasClaimedNFT, address, proposals]);
```
And replace the button with this:
```js
<button
onClick={handleFormSubmit}
type="submit"
disabled={isVoting || hasVoted}
className={styles.button}
>
{isVoting ? "Voting..." : hasVoted ? "You Already Voted" : "Submit Votes"}
</button>
```
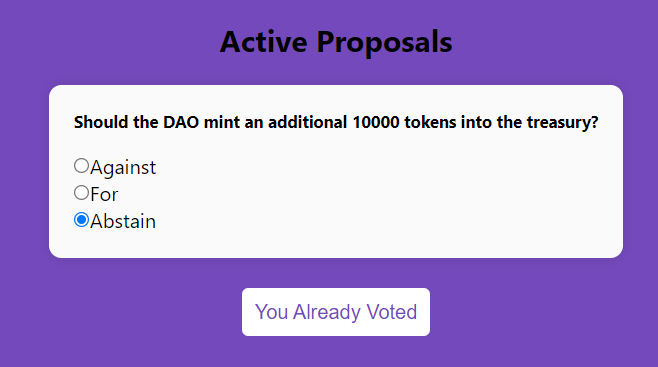
After you have voted, it should show the message **You Already Voted**:
## Conclusion
This was it for this tutorial, hope you liked it and can use it to make your own DAO! You can always update the DAO and add more features if you like.✌️
You can find the [GitHub repo for this project here](https://github.com/avneesh0612/DAO-tutorial).
---
## [LogRocket](https://logrocket.com/signup): Full visibility into production Next.js apps
Debugging Next applications can be difficult, especially when users experience issues that are hard to reproduce. If you’re interested in monitoring and tracking Redux state, automatically surfacing JavaScript errors, and tracking slow network requests and component load time, try [LogRocket](https://logrocket.com/signup).

[LogRocket](https://logrocket.com/signup) is like a DVR for web and mobile apps, recording literally everything that happens on your Next app. Instead of guessing why problems happen, you can aggregate and report on what state your application was in when an issue occurred. LogRocket also monitors your app's performance, reporting with metrics like client CPU load, client memory usage, and more.
The LogRocket Redux middleware package adds an extra layer of visibility into your user sessions. LogRocket logs all actions and state from your Redux stores.
Modernize how you debug your Next.js apps — [start monitoring for free](https://logrocket.com/signup).

Oldest comments (0)