
Written by Antonello Zanini✏️
Node.js is a popular and powerful platform for building scalable and efficient web applications. However, in some cases, it may be necessary to build a Node.js application for a quick proof-of-concept or in collaboration with other developers.
Creating local environments can be a major inconvenience, particularly when attempting to prototype ideas quickly, experiment with open-source libraries, collaborate with colleagues, or reproduce bugs. This is where the browser-based WebContainers come into play.
This article will discuss how to create full-stack Node.js environments that can be launched within seconds and are immediately accessible and shareable via a single click. We’ll cover:
- What are WebContainers?
- About our sample project
- Setting up WebContainers with Express.js
- Running an Express.js service inside WebContainers
- Editing the Express.js application inside the WebContainer
- Adding pretty logging with
xterm
What are WebContainers?
Browser-based WebContainers, also known as web-based containers, are runtime environments that allow developers to execute code and run applications within a web browser without the need for installing additional software or infrastructure. These WebContainers are typically powered by technologies like Docker, Kubernetes, or WebAssembly, and provide a consistent and secure runtime environment for web development.
With browser-based WebContainers, developers can build, test, and deploy applications directly in the browser, without the need for setting up a local development environment or relying on cloud-based virtual machines. Instead, a WebContainer creates an isolated environment within the browser, which includes all of the dependencies, libraries, and system resources required to run an application. This environment is separate from the developer's local machine or any cloud-based infrastructure, providing a consistent and secure runtime environment for the application.
Developers can interact with the application running in the WebContainers using a web-based interface, which provides a GUI for interacting with the application and its associated files. The WebContainer API alsos provide a command-line interface for running system commands and executing code directly within the browser.
About our sample project
This article will guide you through the steps necessary to create a new Express.js application and configure it as a WebContainer for efficient deployment and management of web applications.
Whether you are an experienced web developer or just starting with WebContainers, this practical guide will provide a comprehensive understanding of how to get started with WebContainers in Node.js.
You can find the entire source code for this project on my GitHub.
Initial setup
To begin, we will create a new folder to store our project:
mkdir WebContainers

cd WebContainers
Initialize a new npm project:
npm init
Make sure that Node.js is installed on your system:
node -version
If Node.js is not installed, please follow the official guide to install it or use Node version manager.
npm init is a command used to initialize a new Node.js project. When you run this command in your terminal, npm will prompt you to enter some information about your project, such as the:
- Project name
- Version
- Description
- Entry point
- Author
- License
Once you have provided this information, npm will generate a package.json file in your project directory with all the metadata and configuration for your project.
The package.json file is a key component of Node.js development because it contains the dependencies and scripts required to build, test, and deploy your application. By running npm init and filling out the necessary information, you can create a new Node.js project and easily manage its dependencies and configuration with npm.
Add the next content to your index.html file:
<!DOCTYPE html>
<html lang="en">
<head>
   <meta charset="UTF-8">
   <title>node.js WebContainers</title>
   <link rel="stylesheet" href="styles.css"/>
</head>
<body>
<div class="container">
   <div class="editor">
       <textarea>Editor</textarea>
   </div>
   <div class="preview">
       <iframe src="placeholder.html"></iframe>
   </div>
</div>
<div class="terminal"></div>
<script type="module" src="/index.js"></script>
</body>
</html>
Add the placeholder.html file to show the initial content in iframe:
<!DOCTYPE html>
<html lang="en">
<head>
   <meta charset="UTF-8">
   <title>Loading placeholder</title>
</head>
<body>
   Installing dependencies...
</body>
</html>
We’ll use Vite to construct and operate our application; install it below:
npm install vite@4.1.0
Add a script to run our application in package.json:
{
 "name": "WebContainers",
 "version": "1.0.0",
 "description": "node.js WebContainers application",
 "main": "index.js",
 "scripts": {
   "start": "vite"
 },
 "dependencies": {
   "vite": "^4.1.0"
 }
}
Now, we can run our initial application with this command:
npm start
You should see the simple application in your browser. The default location in the browser is http://localhost:5173. 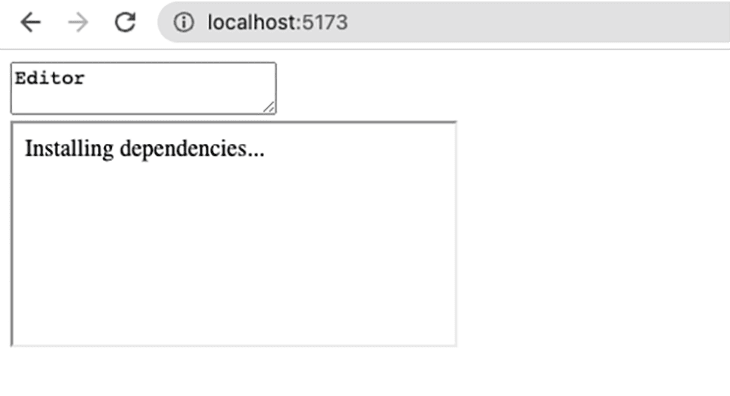 Let's enhance the visual appeal of our application. Include the file
 styles.css:
* {
 box-sizing: border-box;
}

body {
 margin: 0;
 height: 100vh;
}

.container {
 display: grid;
 grid-template-columns: 1fr 1fr;
 gap: 1rem;
 height: 50%;
 width: 100%;
}

textarea {
 width: 100%;
 height: 100%;
 resize: none;
 border-radius: 0.5rem;
 background: black;
 color: greenyellow;
 padding: 0.5rem 1rem;
}

iframe {
 height: 100%;
 width: 100%;
 border-radius: 0.5rem;
}
Restart the application; you should see the following: 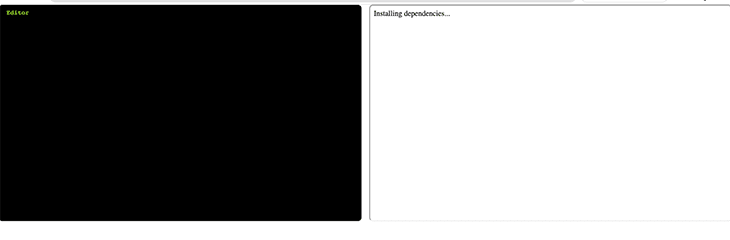
Setting up WebContainers with Express.js
Express.js is a web application framework for Node.js that allows developers to build fast and scalable web applications with features such as middleware, routing, and templating engines. It is simple and flexible, making it a popular choice among developers.
For demonstration purposes, I have integrated it within our app, but in the actual production environment, our Express.js application will be separate from our main application. Later, you can connect any Express.js application to WebContainers.
Creating the Express.js application
Create a new folder called app:
mkdir app
cd app
Inside the app folder, we need two files: index.js and package.json. index.js is a straightforward Express.js application that returns “Hello World” text on the root route:
import express from 'express';
const app = express();
const port = 3111;

app.get('/', (req, res) => {
 res.send('Hello World!');
});

app.listen(port, () => {
 console.log(`The application can be accessed at http://localhost:${port}, as it is now live.`);
});
To run the application, we should install dependencies. Add the following in the app/package.json file:
{
 "name": "example-app",
 "type": "module",
 "dependencies": {
   "express": "latest",
   "nodemon": "latest"
 },
 "scripts": {
   "start": "nodemon --watch './' index.js"
 }
}
And install your dependencies inside the app folder:
npm install
Now, you can run your Express.js application with the following command:
npm start
And see the result on http://localhost:3111: 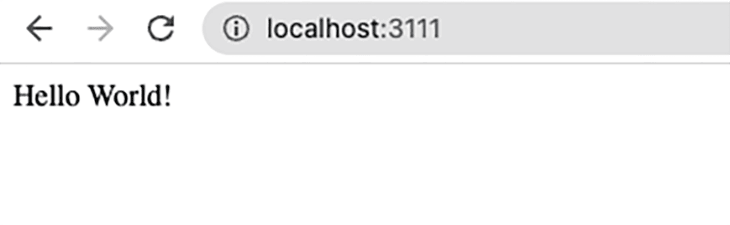
Integrating WebContainers
Once we are done with the Express.js application, we can move back to the root folder and continue working on WebContainers:
cd ..
First things first, let’s install WebContainers in our application:
npm install @webcontainer/api@1.0.2
We'll create a file named index.js, where we declare constants to manipulate HTML elements and create a WebContainers instance:
import {WebContainer} from '@webcontainer/api'

const iframe = document.querySelector('iframe')
const textarea = document.querySelector('textarea')

let WebContainersInstance
Add a load event listener for the window object:
window.addEventListener('load', async () => {
   console.log('Window is loaded')
})
Creating a file autoloader
Let's create a file autoloader to ensure that our Express.js files are loaded into our WebContainers.
Create a new file autoloader.js and put the following content inside:
const fs = require('fs')

const INPUT = 'app'
const OUTPUT = 'files.js'
// List of files to include into WebContainers
const files = ['index.js', 'package.json']
const exportLine = 'export const files = '

const content = {}

files.forEach(file => {
   const buffer = fs.readFileSync(`./${INPUT}/${file}`)
   content[file] = {
       file: {
           contents: buffer.toString()
       }
   }
})

fs.writeFileSync(OUTPUT, `${exportLine}${JSON.stringify(content, null, 2)}`)
It is advisable to prepare our scripts so that this code is executed prior to commencing project. Change the script section in the package.json file:
"scripts": {
 "start": "npm run prepare && vite",
 "prepare": "node ./autoloader.js"
},
The last changes should be done in the index.js file: import the data from the created file and attach it to our editor window:
// …
import {files} from "./files"

// …

window.addEventListener('load', async () => {
   textarea.value = files['index.js'].file.contents

   console.log('Window is loaded')
})
Now you can run the application:
npm start
Make sure that the content from your app/index.js appears in the editor window.
Running WebContainers
Now, we will instantiate a new WebContainers instance:
window.addEventListener('load', async () => {
   textarea.value = files['index.js'].file.contents

   WebContainersInstance = await WebContainer.boot()
   await WebContainersInstance.mount(files)

   console.log('Window is loaded')
})
With most popular browsers, you may meet an error with a blocking frame. We should include headers to match the Vite configuration. Create a vite.config.js file with the next content:
export default {
   server: {
       port: 5173,
       headers: {
           'Cross-Origin-Embedder-Policy': 'require-corp',
           'Cross-Origin-Opener-Policy': 'same-origin',
       },
   }
}
Then, hard reload the page (Control+Command+R on macOS, Control+Shift+R on Windows) to prevent caching and restart the Vite server.
Installing dependencies
It is time to install our Express.js project dependencies inside our WebContainer. Add another function to the index.js file:
async function installDependencies() {
   const installProcess = await WebContainersInstance.spawn('npm', ['install'])

   installProcess.output.pipeTo(new WritableStream({
       write(data) {
          console.log(data)
       }
   }))

   return installProcess.exit
}
Run this function in the load callback:
window.addEventListener('load', async () => {
   textarea.value = files['index.js'].file.contents

   WebContainersInstance = await WebContainer.boot()
   await WebContainersInstance.mount(files)

   await installDependencies()

   console.log('Window is loaded')
})
After running the application, you can see the entire dependency installation process within the browser’s console.
Running an Express.js service inside WebContainers
We are ready to run the Express.js application inside WebContainers. Add a function in the index.js file:
async function startDevServer() {
   const serverProcess = await WebContainersInstance.spawn('npm', ['run', 'start'])

   serverProcess.output.pipeTo(new WritableStream({
         write(data) {
             console.log(data)
         }
     }))

   WebContainersInstance.on('server-ready', (port, url) => {
       iframe.src = url
   })
}
Execute this function inside the load callback:
window.addEventListener('load', async () => {
   textarea.value = files['index.js'].file.contents

   WebContainersInstance = await WebContainer.boot()
   await WebContainersInstance.mount(files)

   await installDependencies()

   startDevServer()

   console.log('Window is loaded')
})
After all dependencies are installed you can see the express.js app response in the iframe window.
Editing the Express.js application inside the WebContainer
Merely reading the Express.js application would be futile; we should have the ability to modify it. Add a function into index.js file:
async function writeIndexJS(file, content) {
   await WebContainersInstance.fs.writeFile(`/${file}`, content)
}
We would like to catch all input events from the editor window and reflect them in the iframe window. Add an event listener inside the load callback:
window.addEventListener('load', async () => {
   textarea.value = files['index.js'].file.contents

   textarea.addEventListener('input', (e) => {
       writeIndexJS('index.js', e.currentTarget.value)
   })

   // …
})
Adding pretty logging with xterm
In essence, we have integrated our basic Express.js application into a WebContainer. However, we aim to incorporate elegant logging instead of relying on the console within the browser. This will provide a more convenient way to access log files and dig into the complete dependency installation process when needed.
Let’s install a new dependency:
npm install xterm@5.1.0
xterm is a JavaScript library that provides a web-based terminal emulator with ANSI escape sequences, Unicode characters, and other features. It is easy to use and customize, making it a popular choice for adding a terminal interface to web applications.
We have to capture the HTML element with the class terminal and attach the terminal to it. Import xterm and its styles into index.js:
//…
import {Terminal} from 'xterm'
import 'xterm/css/xterm.css'
//…
And add a variable for terminal HTML element:
const iframe = document.querySelector('iframe')
const textarea = document.querySelector('textarea')
const terminalElement = document.querySelector('.terminal')
Initialize the terminal in the load callback:
window.addEventListener('load', async () => {
   //…

   const terminal = new Terminal({
       convertEol: true,
   })
   terminal.open(terminalElement)

   //…
})
We have to pass the terminal instance in all functions where we need output and replace the console.log. Refactor the installDependencies function:
async function installDependencies(terminal) {
   const installProcess = await WebContainersInstance.spawn('npm', ['install'])

   installProcess.output.pipeTo(new WritableStream({
       write(data) {
           terminal.write(data)
       }
   }))

   return installProcess.exit
}
The same for the startDevServer function:
async function startDevServer(terminal) {
   const serverProcess = await WebContainersInstance.spawn('npm', ['run', 'start'])

   serverProcess.output.pipeTo(new WritableStream({
       write(data) {
           terminal.write(data)
       }
   }))

   WebContainersInstance.on('server-ready', (port, url) => {
       iframe.src = url
   })
}
Pass the terminal instance to the functions in the load callback:
await installDependencies(terminal)

startDevServer(terminal)
Restart the application. The end result should look like this:  The entire source code can be found on my GitHub.
Conclusion
Browser-based WebContainers are a powerful tool for web developers when combined with Node.js, especially if you’re looking to streamline your development process and improve your workflow. These containers offer a lightweight and scalable solution for building and deploying web applications, allowing developers to easily test and deploy their code in a secure and isolated environment.
As Node.js remains popular in web development, browser-based WebContainers provide an innovative and efficient way to leverage its capabilities in new settings. By incorporating this technology into your workflow, you can enhance your productivity and create high-performance web applications with ease.
Overall, browser-based WebContainers with Node.js are a valuable addition to any web development toolkit, and their potential for innovation and optimization is only set to increase in the future.
Get setup with LogRocket's modern Node error tracking in minutes:
1.Visit https://logrocket.com/signup/ to get an app ID.
2.Install LogRocket via NPM or script tag. LogRocket.init() must be called client-side, not server-side.
NPM:
$ npm i --save logrocket

// Code:

import LogRocket from 'logrocket';
LogRocket.init('app/id');
Script Tag:
Add to your HTML:

<script src="https://cdn.lr-ingest.com/LogRocket.min.js"></script>
<script>window.LogRocket && window.LogRocket.init('app/id');</script>
3.(Optional) Install plugins for deeper integrations with your stack:
- Redux middleware
- ngrx middleware
- Vuex plugin

Top comments (0)