
Written by Timothy Olaleke✏️
Building and managing applications in development or local environments can be a daily struggle for devs. Like anything, wouldn't it be great if it were more straightforward? Luckily for us, there’s a tool called Dagger!
In this article, we will be demonstrating how you can use Dagger with Docker to improve your CI/CD pipelines.
Jump ahead:
- Why CI/CD is important
- What is Dagger?
- Installation
- What Dagger does
- Dagger actions and lifecycle
- Setting up our Dagger plan
- Building Docker images with Dagger
- Benefits of using Dagger with Docker for CI/CD
Why CI/CD is important
CI/CD pipelines have become an essential part of our software development lifecycles. While they make it a lot easier to release software reliably and consistently, they also add a degree of complexity and have a bit of a learning curve for developers to bear in mind.
Most CI/CD tools are hosted on the cloud, meaning you will have to push your changes to a remote repository and typically wait a long time for the CI process to execute.
You may be thinking why we can’t just run it locally. Well, most CI/CD tools don’t work locally, and the ones that do are very difficult to set up. What we need is the ability to run our CI/CD pipelines locally on our machine, while also in a cloud-based CI/CD tool of our choice.
And that’s where Dagger comes in.
What is Dagger?
Dagger is an open source dev kit for CI/CD. It works using Cue, a powerful configuration language made by Google that helps to validate and define text-based and dynamic configurations. We will also be using BuildKit, in which Dagger’s configuration is executed.
Additionally, the client-server architecture has the same concept as that of Docker. The Dagger daemon engine, meanwhile, runs on any container runtime.
Dagger aims to solve many issues by standardizing the way we write CI/CD pipelines. In this tutorial, we'll explore how to install and set up Dagger and build a container image.
Before we proceed, it is necessary to be familiar with the following technologies:
- Dagger: A tool that allows for the development, testing, and execution of pipelines locally
- CUE: A language that helps to validate and define text-based and dynamic configuration
- Docker: An open source platform for developing, shipping, and running applications
- CI/CD: Continuous integration (CI) and continuous delivery (CD) is a modern software development practice in which incremental code changes are made consistently and reliably
N.B., Dagger’s configuration is executed in BuildKit — this is one of the most-used features of Docker Engine
Installation
Before you begin, you’ll need to have Docker Engine installed, as this is required for Dagger to work. If you don’t have Docker installed, you can do so by using a Docker installation script.
Docker
Run the following to get started:
curl -fsSL https://get.docker.com -o get-docker.sh
sh get-docker.sh
Once this is completed, you can run docker version to be sure Docker was installed correctly.
Dagger
The next step is to install Dagger, and this can be done using the following installation script:
cd /usr/local
curl -L https://dl.dagger.io/dagger/install.sh | sh
If you are not a super user, you may need to prepend the last command with sudo.
Once complete, run the command dagger version to confirm Dagger’s installation.
N.B., if you're not running Linux or macOS, or you face any issues during installation, you can check out the official installation guide here.
What Dagger does
In any CI system, you need to define steps and actions in a certain format (YAML, most likely) and run it in your CI system.
Dagger makes it possible to:
- Automate actions with your favored programming language
- Test and debug instantly on your local machine
- Integrate with existing pipelines on any Docker-compatible runtime
- Reuse actions from a large and growing catalog
- Tie it all together using the CUE language
Dagger actions and lifecycle
As noted in the official docs, actions are the basic building blocks of Dagger — they abstract complex automation into simple components that can be reused.
Actions can be executed using the following command:
dagger do <action_name>
A cool feature of Dagger is that it doesn’t need to distinguish between pipelines and steps; everything is simply an action.
There are two types of Dagger actions:
- Core actions, which are implemented by the Dagger engine itself
- Composite actions, which are made out of other actions
Composite actions have four lifecycle stages:
- Definition: A CUE syntax that describes the action's inputs, outputs, sub-actions, and their connection
- Integration: A relationship between an action’s definition and a Dagger plan
- Discovery: Identifying the composite action(s)
- Execution: Running the composite action(s)

Setting up our Dagger plan
It all starts with a plan! The keyword dagger.#Plan is used to identify a plan in our Dagger configuration files.
A plan is an execution context for actions. It specifies:
- What actions to present to the end user
- Dependencies between those tasks
- Interactions between the tasks and the client system
Now, let’s move on to using Dagger to build container images.
Building Docker images with Dagger
Dagger can execute regular Docker files to build container images.
To begin, you need to create a main.py file with the following contents (this would be a Python application):
# filename: main.py

from flask import Flask
app = Flask(__name__)
@app.route("/")
def hello_world():
    return "<p>Hello, Dagger!</p>"
The next step is to create a Dagger configuration file; dagger.cue.
// filename: dagger.cue
package main

import (
    "dagger.io/dagger"
    "universe.dagger.io/docker"
)

#PythonBuild: docker.#Dockerfile & {
    dockerfile: contents: """
        FROM python:3.7-stretch
        RUN apt-get update -y
        RUN apt-get install -y python-pip python-dev build-essential
        COPY . /app
        WORKDIR /app
        RUN pip install flask
        ENTRYPOINT ["python"]
        CMD ["main.py"]
        """
}

dagger.#Plan & {
    client: filesystem: "./": read: contents: dagger.#FS
    actions: build: #PythonBuild & {
        source: client.filesystem."./".read.contents
    }
}
You can see from the Dagger configuration that the action builds a Docker image from the Python application we created earlier.
In addition, the build steps are defined using an inline approach that allows us to write the Dockerfile contents inside Dagger’s configuration.
It is required to initialize and update the project, as this installs these required Dagger packages. You can do this using the following commands:
dagger project init
dagger project update
Now, we can proceed to executing the build plan using Docker. To trigger the build action, run the following command:
dagger do build
You can also confirm that Dagger has successfully built the container image using the Dockerfile contents by checking the list of Docker images to verify that the image exists, as shown here: 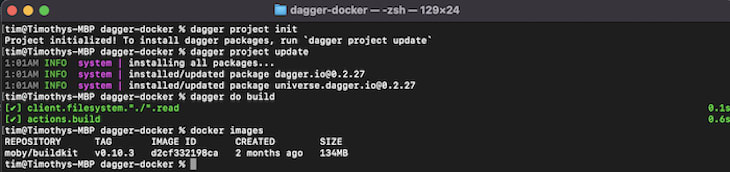
Now, you know how to build container images with Dagger!
Benefits of using Dagger with Docker for CI/CD
Dagger is making an effort to replace the complicated Bash scripts that many existing CI/CD systems require in place of more modular, quicker, and portable components.
You may create reusable modules that are adapted to your needs and dependent on the tools you're using to produce them, and other people can use your modules as a starting point to create new modules that are suited to their unique use cases.
As someone that works for a consulting firm, we have a number of use cases where we must frequently swap between projects that use different CI/CD stacks. Therefore, the promise to build an abstraction layer on top of a current CI runner seems intriguing to me — independent of CI runners, we could set up our own processes and apply them to our projects.
Conclusion
To finish up our article today, there are several use cases for why you may want to use Dagger with Docker for your CI/CD pipelines.
If you frequently write intricate build or deployment scripts, share large sections of scripts between teams, spend a lot of time attempting to debug problems in the CI, or prefer a local build to be an easy script, then Dagger may well be the tool for you.
Likewise, it might also be right for you if your CI pipeline is taking too long to do tasks serially when it might be parallelized. Finally, the project we’ve worked on today shows how simple it is to create container images using Dagger!
Here are some additional helpful resources you can use for your projects:
Let me know about your experiences using Dagger with Docker in the comments section below!
Resolve more tickets per month with LogRocket
LogRocket is a digital experience analytics solution that helps you fix user-reported bugs faster. LogRocket combines session replay with deep technical information, bug aggregation, and product analytics to help you reproduce issues and ship fixes faster.
What's behind it? LogRocket records every error, network request, performance metric, UX interaction, and much more so you can immediately reproduce an issue and see the context behind a bug. It takes seconds to install and integrates with all of the ticketing systems and backend monitoring tools you use today.
Instantly reproduce issues — try LogRocket today.

Top comments (0)