Hi everyone, my name is Lionnel Lubangi, I'm a full-stack developer and I'm passionate about writing tech articles. I used to publish on other platforms, but I have discovered that dev.to is one of the best platforms built for developers, so I'll be submitting a couple of articles here.
By the way, let's get back to the main topic. In this tutorial, I'm going to show you the right way of setting up your react project with Tailwind 3.x.
If you don't have any experience with Tailwind, don't mind, because I'll start with an overview of both react and tailwind. I will tell you what React and Tailwind are as well as telling you the relationship between them. with all that in mind, let's get started.
what's react?
React is a JavaScript library for building user interfaces, this definition comes from the official website of react. In another way, React is a library for helping developers build user interfaces (UIs) as a tree of small pieces called components. As for react, a component is a mixture of HTML and JavaScript that captures all of the logic required to display a small section of a larger UI. Each of these components can be built up into successively complex parts of an app. To illustrate what are components in react, let's look at the bellow screenshot.
Here, you can see that we have three columns, from the left to the right:
A column that I can call a Menu which contains different icons such as the Twitter icons, the home icon, the Tag icons, and so on..;
In the second column, I can name Posts, we have different posts from people that I follow on Twitter;
Eventually, in the third column, I can name Suggestions we have some suggestions for Twitter accounts that I could be interested in.
So in react, those are called components, you understand now that a component is nothing but a small part of the UI of an application.
And if you look well, you'll quickly realize that those three components can also be subdivided into other smaller components. I'm not going to dig far because this is not the react course. Are you angry? why then, take a look at the main topic, and you'll see that I'm right (lol). So that's all about components in react.
Now that you have an idea of react's components, a common question we could ask is how are we syling those components to make our application beautiful?
Right, there are so many options to choose from when it comes to styling a react application, the natural option being to use vanilla CSS.
So what are others possibles options? Right, there are plenty of CSS frameworks and tools based on CSS that you can use including Bootstrap, Sass, and Tailwind to name a few.
For this tutorial, we will only talk about Tailwind.
What's Tailwind?
Tailwind CSS, as per their website is a "utility-first CSS framework" which provides several utility classes that you can use directly inside your markup to design an element.
There are so many utility classes that Tailwind provide, I don't know if there's someone who knows all of them, but the best part is, we do not have to write these utility classes ourselves and keep them in any global CSS file. We directly get them from Tailwind. if you have never worked with tailwind before, I promise you that you will see it in action in this tutorial after learning to set up the project.
Now I think you have learned what react and Tailwind are, now it's time to set up our project using react and Tailwind.
Prerequisite:
Before installing React and Tailwind, there are some prerequisites:
You must have node installed on your computer, if you don't, this article could help you.
If you are not sure that you have node installed, open your terminal on Mac or Linux and type
node --version
You should see the version of node in the termial.
now that you have node installed, you are ready for the next step.
- Go to the Tailwind website
Once on the landing page, click get started as shown in the below image.
- Now in the left navigation panel, click on installation, then Framework guides to the right.
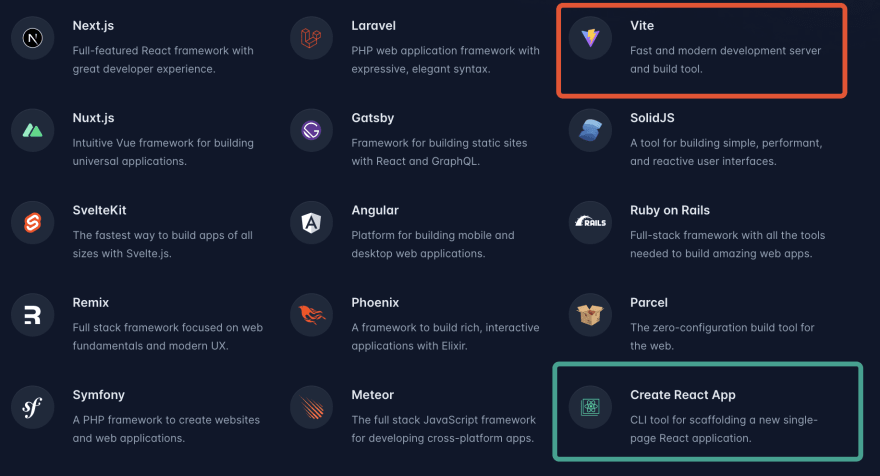
- Now you have two options depending on the framework you want to use to create your react-app. Keep in mind that there are different ways of starting a new react project. the popular way is to use the framework CRA which stands for Create React App. But there are some complaints from developers including me who think that the CRA framework takes much times to configure a new application. Depending on your device performance, it could take you up to 8 minutes to set up a new project. Also, with CRA, react installs many packages behind the scene ( webpack, babel, axios and so on) so you will be working with those packages not because you need them, but because react has decided so. For that, some developers choose the CRA alternative such as Vite. That's what I'm showing you in the below screenshot, so if you want to work with CRA, click on the green rectangle, if you want to work with vite, choose the red rectangle.
As for this tutorial, I'm using CRA, so if you want to follow along with me, go ahead and click on Create React App.
Now, it's time to open your IDE, there are so many and I don't know which one you are using, but I recommend Visual Studio code. Create a new folder and name it as you want then drag it into your editor.
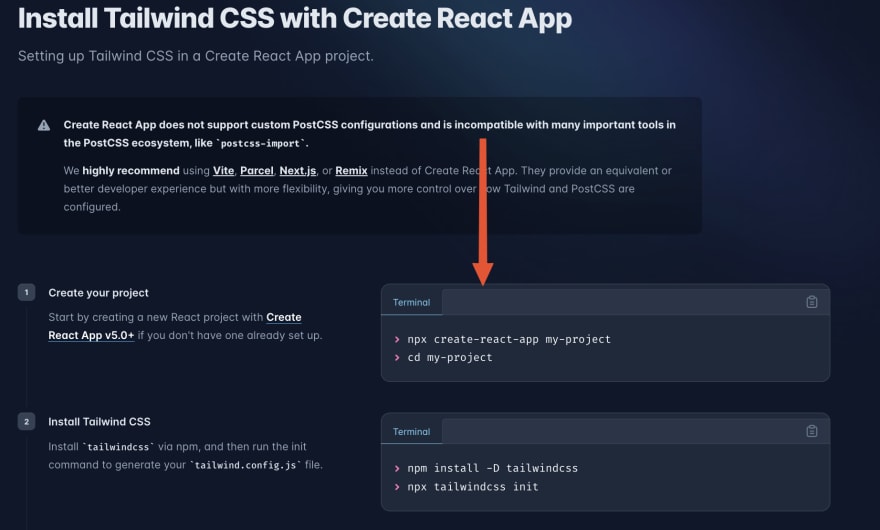
if you are using VsCode, please hit Ctrl+Backtick to open your terminal, you can also use the menu Terminal, New terminal from VsCode.From now you should follow the instructions provided on the tailwind website as shown in this screenshot:
- In your terminal, type the following command:
Please notice that my-project is the name of your project so feel free to name it as you want:
npx create-react-app my-project
I named my project 'react18-tailwind3x', so my command is as follows:
npx create-react-app react18-tailwind3x
As I told you early, this could take a couple of minutes depending on your computer performance and the speed of your internet connection.
If everything goes well, you should see the created application :
Now navigate to your application like this :
cd react18-tailwind3x
You have your react app installed, let's move to the next step and Install tailwind css via npm, and then run the init command to generate your tailwind.config.js file.:
Start with the first command, then run the second.
npm install -D tailwindcss
npx tailwindcss init
Now check your application's files, you will see a file named
tailwind.config.js
Alright, we are about to finish, one more thing, open your tailwind.config.js file, and you will see an object with a couple of properties, I will explain to you the purpose of each one of them, as for now, let's focus on the content property. This is to tell Tailwind to look for every react file located in your src folder and to apply the style when needed. ( By default, when working with CRA, every component will have the extension. JS, but as you could know, react use a particular syntax called JSX, so the components could also have the .JSX extension. It's up to you as a Developer to choose what you want, as for me, I prefer the .JSX extension for components and .JS for regular Javascript functions).
It's also possible to use Typescript in react, now I'm not going to teach you Typescript yet, maybe later, I could submit an article on how to use react and Typescript. When you see something like .ts or .tsx, that's Typescript. So, if you are working with react and Typescript, your components could have the extension .ts or .tsx.
Again, it's up to you to decide which extension you prefer, that's one of the qualities of react as compared to other frameworks and libraries like Angular, the freedom!
Now, in the below code, copy everything in the array of the content property and paste it into the corresponding array of the tailwind.config.js in your project. You can also delete everything in the file you have currently, copy the bellow code, and paste it there.
  /** @type {import('tailwindcss').Config} */
module.exports = {
  content: [
   ** "./src/**/*.{js,jsx,ts,tsx}",**
  ],
  theme: {
    extend: {},
  },
  plugins: [],
}
- Now open the index.css in your project and past those directives :
@tailwind base;
@tailwind components;
@tailwind utilities;
The purpose of those directives is to help you better organize your CSS. Tailwind provides a great guide on this topic, take a look at that if you want to learn more here.
- Now everything is ok, just run
npm run start
That's it, you have your react and Tailwind project ready.
Now, how to use Tailwind?
Let's create a small app that lists the blog's authors.
in your project created early, open the src folder, inside that folder, create a new component called Author.js, then past the following code:
import React from 'react'

const Author = () => {
  return (
    <div>
      <h1>List of authors</h1>
        <div>
            <h1>Author name: Lionnel</h1>

          <div>
              <p>Title</p>
              <img src=''/>
              <link></link>
          </div>

        </div>
        <div>
            <h1>Author name: Lubangi</h1>

          <div>
              <p>Title</p>
              <img src=''/>
              <link></link>
          </div>

        </div>
        <div>
            <h1>Author name: Mohamed</h1>

          <div>
              <p>Title</p>
              <img src=''/>
              <link></link>
          </div>

        </div>

    </div>
  )
}

export default Author
We have a basic page with a div containing a heading and three others div that list 3 authors.
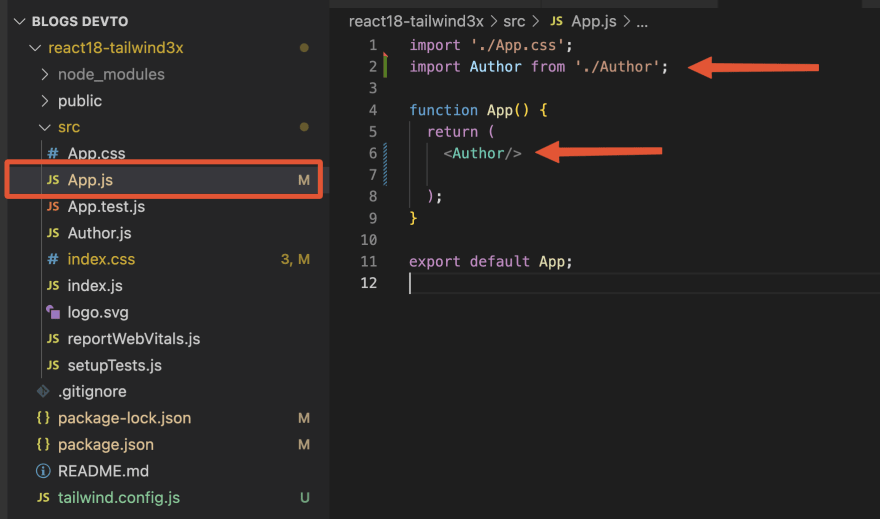
Now, go into App.js, remove everything between the parentheses located in the return keywords, and put the Author component inside:
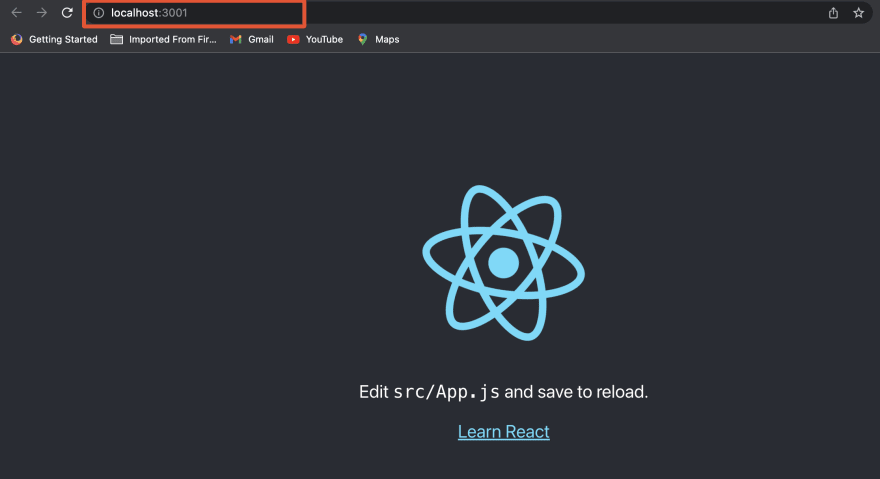
Now run your app :
npm run start
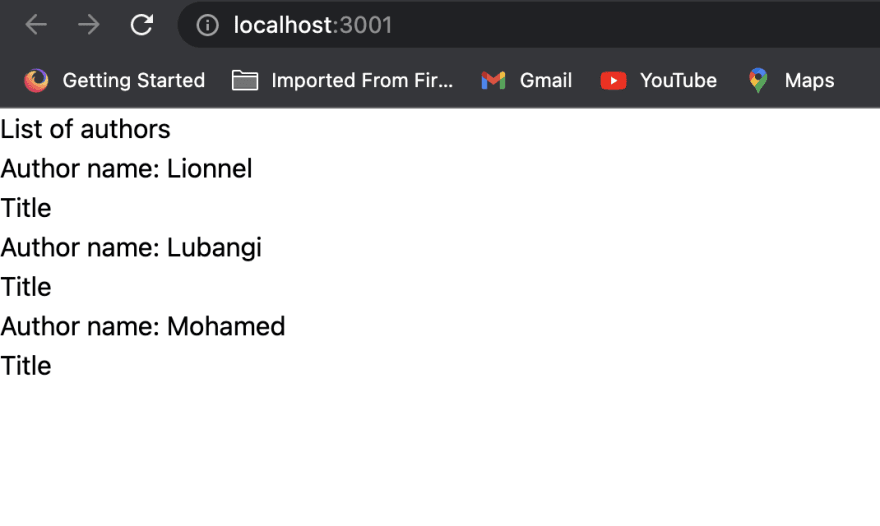
You should see the following screenshot in your browser
Until now, react has done its job, which is to render the author component to the browser, styling it is your job. You can do it using plain CSS or Tailwind, since we are talking about Tailwind, let's style it using the tailwind classes.
As I told you before, you don't need to memorize all the tailwind classes in your head, as you are working with Tailwind, you could memorize some of them, but you should always use the Tailwind Documentation to copy and paste the provided classes.
For example, if you want to change the background, the width, and the height of a div, in plain css, you will do something like this:
 div {
   background-color : #FFF333;
   width: 100%;
   height: 800 px;
}
Now let's use Tailwind to do the same job :
  <div className = " bg-[#FFF333] w-full h-4/5 ">
    My content
  </div>
Now to achieve our author's app, I'm going to provide you with the GitHub link where you can find the source code. There are so many resources online you can use to learn React and Tailwind, I don't want to provide the udemy link because it could sound like I'm doing affiliate marketing, just go ahead and search.
The purpose of this tutorial was to show you how you can set up React and Tailwind in your project.
If you have any questions, please ask in the comment, and I'll be happy to answer you. You can also follow me on Twitter
Lionnel Lubangi , full-stack Developer.






Top comments (0)