So you made a new cool thing and you get an idea to share it in open-source and to publish on NPM.
You cannot just publish your code in a public repository. It will doom the project to a lack of development and failure. On the other hand, you know there’s a lot of collateral work: versioning and publishing of package, setting up Continuous Integration, hosting and deploy for project demo, organizing community contribution.
If you just want to publish a small package, such amount of work can scare you away. The bright idea of sharing something useful will get buried in a box labeled «complicated tasks».
Actually, all of this can take you less than an hour. Without any knowledge of DevOps and for free.
Versioning
If your library is ready for its first release, you can use standard-version. This package will be fully responsible for the versioning of your library. It will bump versions of package.json, generate CHAGELOG.md file and add tags for your git history.
It manages CHANGELOG.md using Conventional Commits. This also means you will have a clear commit message format in your package. It is helpful for you and any developer who decided to contribute to your project.
Using standard-version is easy. How to use it is described in detail on the Github page. We can also add a set of release commands into our package.json to make our releases more convenient:
"release": "standard-version",
"release:patch": "npm run release -- --release-as patch",
"release:minor": "npm run release -- --release-as minor",
"release:major": "npm run release -- --release-as major",
Organizing CI
I suggest using Travis CI for Continuous Integration. It is friendly to users:
Login through Github
Choose your project from the list and activate Travis in it
Add a simple config in the root folder of the project. Travis will execute this config on CI
    language: node_js
     node_js: - "10"
    script:
     - npm run lint
     - npm run build
     - npm run test:ci
The basic CI is ready. Travis will run linters, build a project and run tests after every update of your repository.
You can also see the state of all your branches and Pull Requests and analyze each running build.

Other developers will feel more confident using your package because all your code is tested.
We can delegate code coverage control to an application-specific service Coveralls. Travis will send the result of tests after each CI build.
We just need to login to Coveralls and turn it on for a repository. Like in Travis.
Work on the project side:
Set up Coveralls as a dev-dependency of your project
Add the script for running coveralls and add it to test:ci command
    "test:ci": "npm run test && npm run coveralls",
    "coveralls": "cat coverage/lcov.info | coveralls",
Do not forget about a --code-coverage flag in your npm run test script. Coveralls needs your file lcov.info that your test runner generates. If you do not have such a flag, you can use istanbulJS package.
Work on the Travis side:
If your repository is public, you can set it up with a couple of new strings in .travis.yml:
    notifications:
       webhooks: https://coveralls.io/webhook
In any other case you can bind them using a token:
Go to repository settings on Coveralls and generate Repo Token:
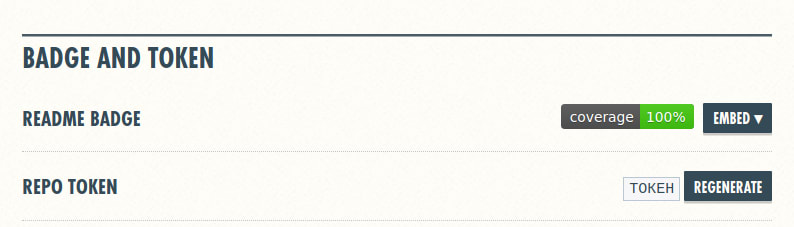
Add the token as environment variable called COVERALLS_REPO_TOKEN in repository settings on Travis:

The token binds these two services. Now we can also protect the master-branch of our project:
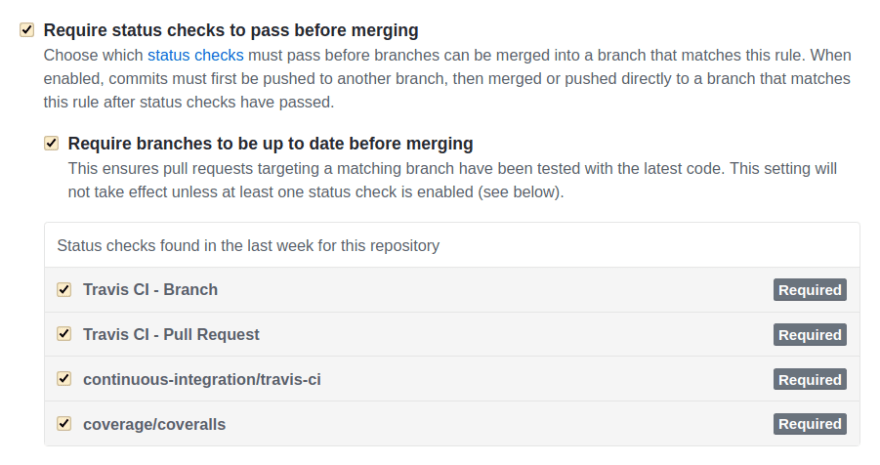
Go to Github repository -> Settings -> Branches
Create a new rule for all branches: *
Turn on status checks. Now you cannot merge a pull request into master until Travis and Coveralls gave you green lights
Now we can turn back to *Coveralls *settings. There is a section “PULL REQUESTS ALERTS”. You can set a level of code coverage decrease that will trigger failing a build of your CI. Do it to be sure that your package is well tested.
Improve workflow
All code in your project should follow the same coding convention. Otherwise, the code base will gradually degrade and it will be harder for you to mantain the project. Do not forget that other developers are not very interested in your code style guide. That is why you need to automize this issue.
Firstly, check that you have .editorconfig file in your project folder and there are settings on how to format your code.
After that, you should install the following dev-dependencies: husky and lint-staged. The first one calls your scripts on git hooks. The second one runs your linters only for files that are staged for commit.
For example, a sample of settings for a package with TypeScript and Less:
{
   ...
   "scripts": {
       ...
       "typecheck": "tsc --noEmit --skipLibCheck",
   },
   "husky": {
       "hooks": {
           "pre-commit": "lint-staged && npm run typecheck"
       }
   },
   "lint-staged": {
       "*.{js,ts,html,md,less,json}": [
           "prettier --write",
           "git add"
       ],
       "*.ts": "tslint",
       "*.less": "stylelint"
   }
}
If you do not have any linters in your project, I can recommend you:
There are many ready to use configs for them on Github that take into account all important linting rules. For example, you can take our solution: @tinkoff/linters
Publish on NPM
And now it is time to publish your package. Add one simple script to package.json:
"publish": "npm run build && npm publish ./dist"
In this case, our repository contains source code and dev files, but NPM gets only a compiled package without anything else.
We build and publish. Cool!
And furthermore, you can create some scripts that will help you with publishing. For example, let’s use NPM-hooks and add postbuild script that will copy README.md file to the dist folder. So we will not forget to update the package description on NPM.
    "build": "..",
    "postbuild": "node scripts/postbuild.js",
Set up demo
Not every package needs a demo page. If your package has a couple of methods in its public API that is well documented, you can skip this part.
In other cases, it would be better to show something. Do not forget that we publish a library. The typical demo on Github pages is not the best option for us. It is more convenient for developers to open your demo in some online IDE: they can see how to work with a package, change something or test a worrying case.
You can make a demo in another repository or just put it into a new folder near your project. We don’t even have to set up a deploy! Modern online IDEs can pull your projects or their single branches/folders from Github.
Some services that allow you to open your project in a couple of minutes:
stackblitz.com can open Angular, React, Ionic, TypeScript, RxJs and Svelte. The information about how to open your project from Github with one link is here.
codesandbox.io can open Angular, React, Vue and compile JavaScript. Here you can also open your project with a link.
repl.it is a service that can import a repository with NodeJS, Express, NextJS, GatsbyJS. TypeScript and vanilla JS are also available.
You can choose any option, add a link in your README.md and forget about setting a demo page. All updates will work automatically.
You can also add a script to CI that will build a demo with the last version of the package in NPM. It can be an additional check that an actual version works well on an external package.
Final touches
Add badges into README.md. It is a little thing but it helps a visitor of your package to navigate on Github.
For example, there are four badges saying that the project is built and has good code coverage, you can access NPM in one click.
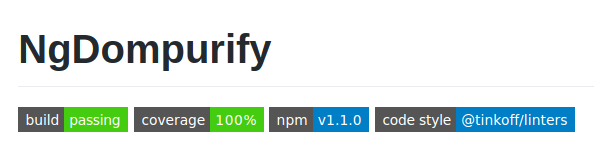
I recommend using a service Shields.io to generate badges. They are simple and of high quality.
Summary
Such a set of tools is enough to give a good start for your project. An occasional visitor on NPM or Github will take your project more likely because it is well-described and has a good demo page.
This foundation will allow you to accept external Pull Requests restfully. Other developers will fork it without issues. Now you can focus on the implementation of the package itself, without worrying about the processes around its development.

Top comments (0)