In this post, I will be showing a simple example of object recognition in images using the TensorFlow library from Smalltalk.
Doing Machine Learning without Python? With Smalltalk? Seriously?
Whenever you start entering the world of AI and Machine Learning you will notice immediately that Python has been widely accepted as the “default” programming language for these topics.
I am not against Python and I believe that people are using it for a reason. However, I do believe that providing alternatives is a good thing, too. And Smalltalk could be that alternative you are looking for.
Last week, my smalltalker friend Maxi Tabacman told me:
Smalltalk is for complex models and Machine Learning is complex.
Apart from Maxi’s point, there is another reason to have it in Smalltalk. If you are working in a Smalltalk project, you are likely managing complex data. This means you would probably benefit from applying Machine Learning. So, why would you work outside of your Smalltalk environment and model to apply it?
Then, even Gilad Bracha told me:
A civilized front end for TensorFlow would be great.
As for what that means – well that’s a long discussion :)
A long time ago, Gera “Richie” Richarte said:
Smalltalk is an excellent environment for learning and experimentation. It’ll be a great place to start playing with Machine Learning.
And he did eventually start playing with ML and Smalltalk a few years ago. He started developing a TensorFlow wrapper for Cuis Smalltalk. Later on, this binding was ported to Pharo Smalltalk too and now finally to VASmalltalk. So…as you can see.. as Serge Stinckwich said:
All Smalltalk unite for Machine Learning and Deep Learning!
This project is not just a binding/wrapper. It tries (as it is still evolving and improving) to provide a much richer API and take advantage of the unique features of Smalltalk.
Liquid error: internal
Preparing the example
In this post I will be using the VASmalltalk TensorFlow wrapper but a similar approach could be done with the other Smalltalk dialects. The first thing you must do is to download TensorFlow shared libraries, install the Smalltalk wrapper and configure it. All the details are explained in the official docs. To confirm everything is working with the wrapper, you can run the 250+ unit tests we have (not all of them are currently passing in this early preview of the VASmalltalk version).
Liquid error: internal
You will see that TensorFlow examples are loaded within the standard load process. This means you should have the LabelImage class loaded. You may want to check its class comment for explanations and details.
LabelImage example shows how you can use a pre-trained TensorFlow network to recognize objects in images. As this is a pre-trained model, you will need its proto buffers file (.pb). This example also needs a “labels” file. But don’t worry, we have already included everything necessary in examples/labelImage. So… all you need to do is copy the directory examples from the git root directory to your Smalltalk image working directory.
Running the examples!
Single image – Inception V3
The first example runs with this image:

And runs an Inception V3 model. You can read more info about it here.
|results|
results := LabelImage new
    imageSize: 299@299;
    imageFiles: OrderedCollection new;
    graphFile: 'examples\labelImage\inception_v3_2016_08_28_frozen.pb';
    labelsFile: 'examples\labelImage\labels.txt';
    addImageFile: 'examples\labelImage\grace_hopper.jpg';
    prepareImageInput;
    prepareSession;
    predict.
Transcript cr.
results do: [ :eachImage |
    (eachImage first: 3) do: [:each |
        Transcript
            show: each key;
            show: ' %';
            show: ((each value * 100) roundTo: 0.01) asString;
            cr.
    ]
].
And that should print the following on the Transcript:
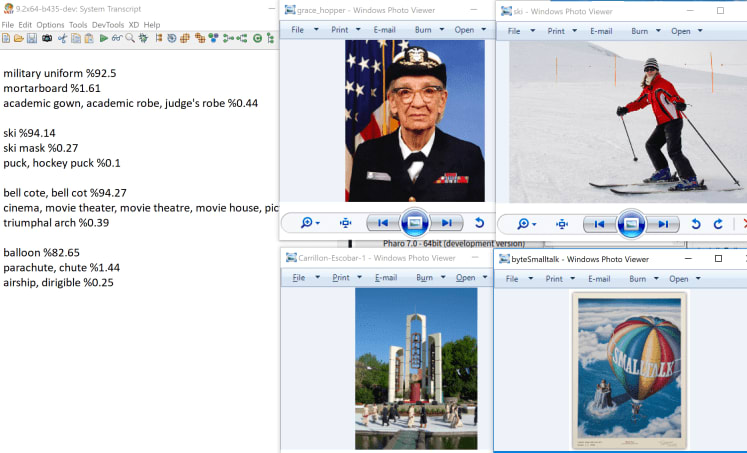
military uniform %92.5
mortarboard %1.61
academic gown, academic robe, judge's robe %0.44
Single image – Mobilenet V1
The Mobilnet model doesn’t give results as good as the Inception V3 but it runs much faster.
You can run this code:
((LabelImage new
        imageSize: 224@224;
        graphFile: 'examples\labelImage\mobilenet_v1_1.0_224_quant_frozen.pb';
        labelsFile: 'examples\labelImage\labels.txt';
        addImageFile: 'examples\labelImage\grace_hopper.jpg';
        prepareImageInput;
        prepareSession;
        predict)
            first
                first: 10)
                    collect: [:each | each key -> ((each value * 100) roundTo: 0.01) asString]
And it will print:
 ('military uniform' -> '39.73'
 'Windsor tie' -> '24.14'
 'bow tie, bow-tie, bowtie' -> '10.52'
 'bulletproof vest' -> '4.59'
 'mortarboard' -> '3.88'
 'bolo tie, bolo, bola tie, bola' -> '1.69'
 'suit, suit of clothes' -> '1.21'
 'bearskin, busby, shako' -> '1.21'
 'microphone, mike' -> '0.87'
 'wig' -> '0.74')
Important: note that in both models I am specifying a different image size: 299 for Inception V3 and 224 for Mobilenet V1. This is because the image size is dependent on the pre-trained model we are using. You must read the documentation in order to know which value to use.
Multi image – Inception V3
In the previous examples we saw only one image processing at a time. However, TensorFlow allows us to run multiple images in parallel. This is what the example below does:
|results|
results := LabelImage new
    imageSize: 299@299;
    imageFiles: OrderedCollection new;
    graphFile: 'examples\labelImage\inception_v3_2016_08_28_frozen.pb';
    labelsFile: 'examples\labelImage\labels.txt';
    addImageFile: 'examples\labelImage\grace_hopper.jpg';
    addImageFile: 'examples\labelImage\ski.jpg';
    addImageFile: 'examples\labelImage\Carrillon-Escobar-1.jpg';
    addImageFile: 'examples\labelImage\byteSmalltalk.jpg';
    prepareImageInput;
    prepareSession;
    predict.
Transcript cr.
results do: [ :eachImage |
    (eachImage first: 3) do: [:each |
        Transcript
            show: each key;
            show: ' %';
            show: ((each value * 100) roundTo: 0.01) asString;
            cr.
    ].
    Transcript cr.
].
Here are the results. Can you match the picture to the Transcript results? :)
Important: note that in this case there is still only ONE Smalltalk process doing a single (well, a few) FFI call to TensorFlow… the exact same FFI calls as it would do for a single-image scenario. The magic is in TF, as it will parallelize the processing of those images. Depending on the hardware, how TF was built, your configuration, etc., it may be using only CPUs or also GPUs.
How to train your dragon
This post was about a pre-trained net that we simply downloaded. But obviously, the more interesting and complex scenario is to develop and train your own model. That will be a topic for a future post. But in the meantime, you can get a taste of it by checking the snippets below.
The first one is nice and simple:
initializeForwardGraph
   | input |
   input := graph placeholder: 'Input' type: TF_Tensor typeFloat.
   activation := (weights * input) sigmoid.
The following one is a bit more complicated but you can see how you can nest things to build the net:
initializeInferenceGraph
        hidden1 := graph
                fromBlock: [:image |
                        input := image.
                        (image * weights1 + biases1) rectified]
                named: 'layer1'.
        hidden2 := graph fromBlock: [
                (hidden1 * weights2 + biases2) rectified] named: 'layer2'.
        prediction := graph
                fromBlock: [
                        netInput := hidden2 * weights3 + biases3.
                        netInput softmax findMaxOn: 1 asInt32Tensor]
                named: 'layer3'.
Ready to train your own?
Now imagine… TensorFlow + Smalltalk + ARM + GPU
As you can see in previous posts like this one and this one, I have been building TensorFlow on different ARM-based SoB (Raspberry Pi, Rock64, etc). I succeeded on both ARM and ARM64. And VASmalltalk supports both too.
Liquid error: internal
So…why did I do this? One obvious reason is that soon I want to test an ARM-based board with good GPU…like Nvidia Jetson Nano (128 GPU cores) or XT2 (256 cores). That is….I want TensorFlow running and taking advantage of all those cores!
Liquid error: internal
Conclusions
Only time will tell if doing Machine Learning and Deep Learning with Smalltalk is a good idea. From my side, even if I am far from being an expert in this area, I will do my best to make it happen.
Thanks to Gera Richarte and Koan-Sin TanThanks for pushing these examples and to Maxi Tabacman for reviewing the post.

Oldest comments (0)