
Image source
IoT-Internet of Things, the simplest the term, the more complex is bringing this concept into use in the real world. You must have heard about the presents of IoT, or maybe you would be using today's simplest IoT devices: Amazon Echo, Awair, Canary, or more. Moreover, it is predicted that IoT devices will create $344 billion in revenue and provide $177billion of cost reduction.
Controlling electronic equipment through a smartphone remotely is a state-of-the-art invention that is attracting people and becoming a new game for humans. This is also being recognized by the magic touch of the internet of things.
Currently, Google Home, Amazon Alexa is the most popular device that is allowing people to control electronic devices in their home; moreover, you can control the equipment of your home through mobile devices with Bluetooth connectivity.

Image source
It's all part of smart tech, and this new generation experience is boosting tremendously among businesses and consumers. IoT is growing as a transformation tech that is reshaping various business verticals, including retail, logistics, finance, and more. Whether you are a developer or a business owner, you would be curious to know how to create a mobile application that can connect with electronic instruments.
So, let's don't waste a single minute and understand IoT-enabled app development with Flutter.
Developing An IoT Based Application Using Flutter
Developing an IoT-based application isn't as tricky as it seems but, for fledgling business owners, it matters which IoT dedicated application development company they connected. As if an organization doesn't have expertise in IoT application development, businesses may end up losing all the investment and having dirt in their hands in the name of IoT solution.
Thus, before getting into IoT solution development, you must know what challenges you can face during the development cycle. Here are some major challenges:
1)Device management, monitoring, and control:
Probably your application would connect with multiple devices at a single time, and controlling, monitoring, and managing them simultaneously can be a bit tricky in real-time due to the single network of connections, i.e., Bluetooth.
2)Integration & Maintenance:
Apparatuses may have primitive software that may avert connection to IoT mobile applications. Thus, continual updation of equipment software and maintenance would be required with the arrival of updates of IoT-based mobile applications.
3)Safe Data Storage & Access:
Another major challenge is storage and access of data, as anyone can intrude your Wi-Fi and Bluetooth network, and your data would be exposed to the intruder through the network. Thus, storage of data and access are major risk factors in IoT application development solutions that you need to safeguard.
IoT mobile app development can enable your business to attract a huge consumer base and drive revenue generation. But! it possesses risks that can turn out the biggest data breaches in no time and loss of both wealth & sensitive information.
Now when you know about the challenges that IoT-based mobile application developers, let's get insight into Flutter that we are going to use in the development of IoT-enabled app solutions for remote device connectivity.
Flutter: Cross-Platform Application Development Framework
The heading already determines what exactly is Flutter. It is an open-source software application UI development tool kit for cross-platform applications using Dart programming language. Its primary focus is creating iOS and Android applications, but it also enables support for web and desktop apps.
So, when a flutter developer creates a codebase for a specific function, it can be deployed to multiple platforms. It is just in infancy but being largely compared with React Native. But! Flutter possesses so many differences from React Native.

Image source
It offers an entirely new set of skills for developing an app, and when it comes to developing IoT-enabled applications solutions, then you need to rely on a team of developers with a comprehensive skill set. Flutter is an outstanding tech concept that makes development easier for you.
It is a well-integrated framework with rich widgets, making everything seamless for you to build and run a project. So, let's get straight into IoT application development using Flutter.
Creating IoT Application Using Flutter
Creating IoT Apps require you to think from scratch, such as:
-Devices that would be connected with App
-Features that devices would have and commands that can be given to devices using mobile App
-Data sharing modes from devices to App
-Type of data devices would send to application & responses from application.
-Mode of communication such as voice commands and touch on the app screen.
Once you would have a blueprint of all types of features, your application is going to have and all major aspects considered. Here is the way you are going to develop the application with Flutter.
Step 1: Setting Up Bluetooth in App & Pairing
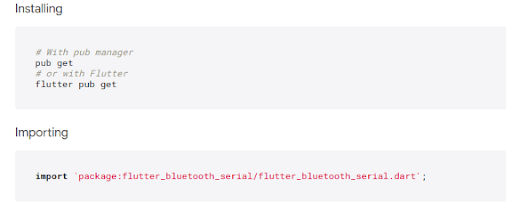
The goal of establishing a system for pairing and setting up Bluetooth is to establish seamless communication with IoT Devices. When you are integrating Bluetooth in your IoT app, you should know that Flutter doesn't have In-Built Bluetooth support.
Thus, you would have to look for a third-party Bluetooth plugin. You would have to deal with so many things while interacting with third-party Bluetooth API, ensure that you do everything correctly, as any glitch in integrating Bluetooth API can cause a blunder.
Many people use flutter_blue but face so many issues. Thus, flutter developers commonly use Flutter_Bluetooth_serial. This plugin allows them to choose a variety of features and ensure better connection & control over Bluetooth connection while devices are connected.
When you hire flutter app developers for any application development, then you must know that it is not going to be very complex, but with an IoT-based App, you need to think of how it can be processed in practice.
Some basics that you must need to follow:
-> You need to include the main.dart file and erase all the Flutter Demo Counter app code.
-> Use StatefulWidget for enabling BluetoothApp class, as you would have to evolve the state several times during the app lifecycle.
1)Enabling Bluetooth Connect & Retrieving Paired Connection
Now you already know how basic structure would begin up now, remove all demo codes and integrate the Bluetooth class. In this section of code, you have to enable the Bluetooth connection of the device of users' and retrieve the connection device.
To work this out, you need to initialize variables to add some more classes while building an app. For retrieving devices and enabling Bluetooth, you have to set up the Current Bluetooth state via initState() function. This function determines the state of Bluetooth in terms of on or off.

When it is not turned on, the function sends the user the request to offer Bluetooth permission to enable the connection on their device. Once the Bluetooth is enabled, you need to define two major functions related to plugin APIs.
enableBluetooth() to get access to Bluetooth from users.
getPairedDevices() to retrieve the list of paired devices.

Moreover, you need to define dispose() function to avert, leaving any risk of memory leading. In short, the connection must be closed timely to ensure the security of resources.
2)Designing User Interface & Device Pairing
With the above code, you have an app structure that needs a method to integrate a clear Bluetooth connection with the device. Now, map out some UI widgets that enable you to customize an eloquent app user experience.
Once you are done with creating the UI, now you need to add a Witch widget that will allow you to operate Bluetooth on/off connectivity. The switch will compute the output depending on whether the Bluetooth connection is enabled/disabled.
Despite whether Bluetooth is on/off, the method getPairedDevice will refresh the device list. Moreover, DropdownButton widget and display the paired device list can be used to browse pairing devices.
3)Establishing Connection & Disconnection
From Bluetooth, connection and disconnection to the device are critical in each instant. To bring this feature into your application, you need to craft a UI that can enable you to use the functionality in reality. Now when you complete designing the UI for connecting and disconnecting Bluetooth devices. Your device should enable the user to select from the list and establish a connection.
Your list must monitor the device easily and track the device to establish a connection. To accomplish this, a user method onDone() that will trigger when methods dispose(), close() of finish() are called for connection.
You need to infuse close() method for the connected devices to ensure disconnection of the device from Bluetooth.
4)Button For UI Connection & Disconnection
The connection and disconnection buttons on the App are essential, and you need to integrate them with the right coding.
Whether you hire IoT app developers or do it on your own, the following code structure is that you need to integrate to infuse this feature.
Step 2: Connection Of Modules To Ardunio
By now, you have created a structure for connecting the device with Bluetooth. Now we will look at how to pair it.
Doing coding of pairing can be a bit complex and time-consuming. Thus, you need to connect with a company for the best IoT app development, India. Expert developers can seamlessly carry out this process. For any case, you need the following hardware components to control the development of devices:

Image source
-Arduino UNO REV3
-Some electrical wires
-Jumper wires
-Switch
-HC-05 Bluetooth Transceiver Module
Step 3: Introducing Arduino
Here is the final step to configure your App to it.
In this step, you need to upload your code to the Arduino Uno device. For this, you can leverage Arduino Web Editor. But! Before you begin writing and uploading code, you need to install the plugin that can help you detect and establish a connection with the Arduino device from the Web Editor.
Once you are done installing the plugin to the device, use Go To Web Editor to start writing the Arduino device's code and leverage the upload button.
Now the development is done, and you can cherish the application.
Wrapping Up
The Internet of things is radically changing the world by storm. If you are thinking out loud to develop an IoT-enabled solution that can go along with your organization’s needs or boost your product sales, then you must acquire IoT-enabled Flutter app development services

Top comments (3)
wow... this a feel good article if any of the engineering students are looking for assistance regarding there project I found this site arduino projects for engineering students is the company name for more details visit their site.
Great guide on developing IoT-based apps using Flutter! It's fascinating to see how Flutter can integrate seamlessly with smart devices. For a top-notch IoT app, to hire IoT developers is crucial. They bring expertise in connecting the physical world to digital platforms.
I am developing something similar, but without flutter, only with dart CLI, now I communicate only by http with the other devices, but I have not tried how to use USB serial communication, has anyone tried it?