A Basic Guide on How to Deploy An Application to Alibaba Cloud Container Service from Bitbucket and Securing it with Let’s Encrypt SSL/ TLS 2019

When you are working with micro-services, you always want to make sure that all instances of the same service are always the same and all the micro-services can easily communicate with each other, and that’s where containerization comes in, and Docker is one of the most popular containerization technology out there. And in this article we will learn how to deploy a simple Node.js Application to Alibaba Cloud Container Service from our Bitbucket Repo, and then we will secure the domain we will be using for it with Let’s Encrypt SSL/TLS.
So, here is a list of services that we will be using:
- Docker
- Bitbucket
- Alibaba Cloud Container Registry
- Alibaba Cloud Container Service
- Node.js
- Let’s Encrypt SSL/TLS
Docker
Docker is an open source software designed to create, deploy, and run applications by using containers. Containers allow a developer to package up an application with all of the parts it needs, such as libraries and other dependencies, and ship it all out as one package. By doing so, thanks to the container, the developer can rest assured that the application will run on any other Linux machine regardless of any customized settings that machine might have that could differ from the machine used for writing and testing the code.
Containers are a bit like a virtual machines. But unlike a virtual machine, rather than creating a whole virtual operating system, Docker allows applications to use the same Linux kernel as the system that they’re running on and only requires applications be shipped with things not already running on the host computer. This gives a significant performance boost and reduces the size of the application. Learn More >>
In this tutorial we will be using Docker to containerize our Application, so we can deploy and run it on Alibaba Cloud Container Service.
Bitbucket
Bitbucket is a Git version control repository management solution designed for professional teams. It gives you a central place to manage git repositories, collaborate on your source code and guide you through the development flow. It allows you to create unlimited private free Repositories with up to 5 collaborators. Which makes it an optimal place to host proprietary code. Learn More>>
Some of its main features are:
- Access control to restrict access to your source code.
- Workflow control to enforce a project or team workflow.
- Pull requests with in-line commenting for collaboration on code review.
- Jira integration for full development traceability.
- Full Rest API to build features custom to your workflow if they are not already available from their Marketplace
In this tutorial we will be using Bitbucket to host the Repository for our Application’s code and we will be creating a CI/CD pipeline through it to deploy the application to Alibaba Cloud Container Service.
Alibaba Cloud Container Registry
Alibaba Cloud Container Registry (ACR) is a secure image hosting platform that provides containerized image lifecycle management. With ACR, you have full control over your stored images. ACR has a number of features, including integration with GitHub, Bitbucket etc. It can also automatically build new images after the compile and test from source code to applications. This service simplifies the creation and maintenance of the image registry and supports image management in multiple regions. Combined with other cloud services such as Container Service, Container Registry provides an optimized solution for using Docker in the cloud. Learn More>>
In this tutorial, we will be using ACR for hosting our Docker images, which we can later use to deploy our Application on Alibaba Cloud Container Service.
Alibaba Cloud Container Service
Alibaba Cloud Container Service(ACS) is a high-performance and scalable container application management service that enables you to use Docker and Kubernetes to manage the lifecycle of containerized applications.
Container Service offers a variety of application publishing methods and continuous delivery capabilities and supports micro-service architectures.
Container Service simplifies establishment of container management clusters and integrates Alibaba Cloud virtualization, storage, network, and security capabilities to create the optimal container running environment on the cloud. Learn More >>
In this tutorial, we will be using Alibaba Cloud Container Service to host and deploy our micro-services.
Node.js
Node.js is an asynchronous event driven JavaScript runtime environment. It is designed to build scalable network applications. The Node run-time environment includes everything you need to execute a program written in JavaScript on your machine as a standalone application. Node.js run on the V8 JavaScript runtime engine. This engine takes your JavaScript code and converts it into a faster machine code. Machine code is low-level code which the computer can run without needing to first interpret it. Learn More >>
In this tutorial, we will be using Node.js to create a simple “Hello World” application that we will try to deploy ACS.
Let’s Encrypt SSL/TLS
Let’s Encrypt is a global Certificate Authority (CA). They let people and organizations around the world obtain, renew, and manage SSL/TLS certificates. These certificates can be used by websites to enable secure HTTPS connections. Let’s Encrypt only offers Domain Validation (DV) certificates. They do not charge a fee for these certificates. Let’s Encrypt is a nonprofit, with a mission to create a more secure and privacy-respecting Web by promoting the widespread adoption of HTTPS. Their services are free and easy to use so that any website can deploy HTTPS. Learn More >>
In this tutorial, we will be using Let’s Encrypt SSL/TLS to secure our application.
Now Lets Get Started
To begin with, we will be creating a private repository for our Application’s code on Bitbucket, so for that you must have a Bitbucket account, if you don’t have one then you can sign up for an account. Then we will be using Alibaba Cloud Services to create Docker images and deploy our Containerized Application. So, you must also have an Alibaba Cloud account set up. If you don’t have one, you can sign up for an account.
Part I: Creating the Bitbucket Git Repository And Adding our Application and Docker Configurations in it
Step 1: Creating the Bitbucket Repository
First, login to your Bitbucket account and click on the “+” button located in the left menu bar, and then from the options select “Repository”, and then in the “Create a new repository” form, provide the name for the Repository. And then press the “Create Repository button”.

Step 2: Adding the Application and Docker files into the Repository
Now that we have successfully created the Repository, we start by adding the files for our Application and Docker into that Repository.
So, to start, we will initialize git in a local directory. First, create an empty directory on your local machine, lets call it “sample-app-for-alibaba-cloud” and open it in “Git Bash” or your preferred CLI. And run the git init command inside it.
Now, we will add the files in that directory. First we will add our Application file “app.js”, with the following contents:
const http = require('http');

const hostname = '127.0.0.1';
const port = 3000;

const server = http.createServer((req, res) => {
  res.statusCode = 200;
  res.setHeader('Content-Type', 'text/plain');
  res.end('Hello World\n');
});

server.listen(port, hostname, () => {
  console.log(`Server running at [http://${hostname}:${port}/`](http://%24%7Bhostname%7D:%24%7Bport%7D/%60));
});
This will create a simple “Hello World” Application that will run on Node.js’ built’in server on port 3000.
Now, we will be adding the Docker configuration file “Dockerfile”, with the following contents:
# Use Node version 10.15.1
FROM node:10.15.1

# Create a directory where our app will be placed
RUN mkdir -p /usr/src/app

# Change directory so that our commands run inside this new directory
WORKDIR /usr/src/app

# Get all the code needed to run the app
COPY . /usr/src/app

# Expose the port the app runs in
EXPOSE 3000

# Serve the app
CMD node app.js
The comments in the file should explain what each line does. The configurations inside this file will be used to determine how the container image for our Application will be created.
Now, you should be ready to push these files to the Bitbucket repository we created earlier, it can be done using these git commands:
git add .

git commit -m "app.js and dockerfile added"

git remote add origin https://your-username@bitbucket.org/your-username/the-repo-name.git

git push -u origin master
Part II: Integrating Bitbucket with ACR
The first thing you need to do is to activate the Alibaba Cloud Container Registry. It can be found under the “Elastic Computing” section on your Alibaba Cloud Console.
It will take you to the Container Registry Console where you can configure and deploy the service. At that time It might ask you to enter the Password for the docker client, and remember “When logging into docker, use your Alibaba Cloud account for the user name and password you set just now”.
Now, we will Create a new ACR Namespace. Usually the containers are used to create micro-services. Although we are using only single service in our application, this will not usually be the case in the real world. So, that is where ACR Namespaces comes in, a Namespace is a collection of Repositories and Repository is a collection of images. It is recommended to create one Namespace for each Application and one Repository for each service image.
So, to create a new Namespace, go to the Namespaces tab in the ACR console and then click on “Create Namespace” button on the top right corner. Then enter the name for the Namespace and click the “Confirm” button.

Now we will bind our Bitbucket account with the ACR. To do that go to the “Code Source” tab on the main ACR console, from there you should click on the “Bind Account” button next to Bitbucket, which will prompt a little dialog and now you should click on “Go to the source code repository to bind account” link.
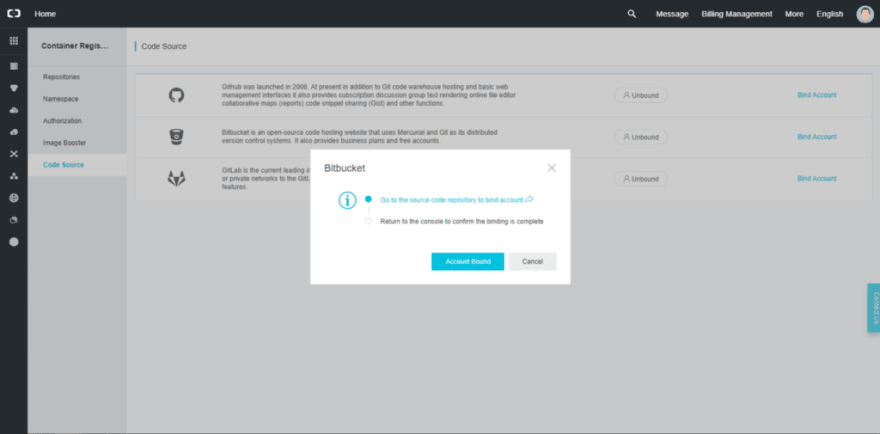
Which will take you to Bitbucket, requesting you to grant access to Alibaba Cloud. There you should click on “Grant Access” button to continue.

Now you should be ready to create an ACR Repository, to do that, just go to the “Repositories” tab on the ACR console and click on the “Create Repository” button on the top right corner. It will present you with a form where you will have to enter the details for the Repository, such as Region, Namespace, Repository Name, Summary etc.

After filling that part out click on the “Next” button. ON the next page it will present you with a form to select the “Code Source” options. And on this page, we will be integrating our Bitbucket Repository with our ACR Repository. From the “Code Source” tabs select “Bitbucket” and click on the the Bitbucket Repository we created earlier.
To help configure continuous Integration be sure to check the “Automatically Build Image”. With this selected the image can be automatically built after you submit the code, without requiring you to manually trigger the build. Now finally click on the “Create Repository” button to create the ACR Repository and Integrating the Bitbucket Repository with it.

Part III: Deploying The Application
To begin, we will need to create a VPC, to do that simply navigate to the Virtual Private Cloud under Networking. This will take you to the VPC console, where you click on the “Create VPC” button to create the VPC and VSwitch. After clicking the button you will be presented with a small form to select the options for your new VPC, we will use the default settings for the most part and just enter names, and then click “OK” button to continue.

To get started with the Alibaba Cloud Cloud Service, the first thing we need to do is navigate to the Container Service dashboard. This dashboard can be found under the Elastic Computing section on your Alibaba Cloud Console.
On first try, it might present you with a warning “Container service needs to create default roles”. That is because once you request a cluster, Alibaba Cloud will go about provisioning the resources necessary to run it. This includes load balancers, virtual machines, routers etc. Basically everything required to run your own Docker cluster. And the load balancer requires the Resource Access Management (RAM) service to be set up before it will work.. To deal with that just click on the “Go to RAM console” button, and once redirected, click on the “Confirm Authorization Policy” button.
This will finally take you to the Container Service Overview page, from there select the “Container Service-Swarm” on the top left corner and then click on the “Create Cluster” button.

This will take you to the Cluster Creation Wizard. It will present you with all the options required to configure the Cluster e.g. Name, Region, Zone, VPC etc.

We will be using the default values for the most part, but we will be changing “Instance Type” under “Instance Configuration” to “ 1 Core(s) 1 G ( ecs.n1.tiny )” for the purpose of this demo. We will also need to setup login for the ECS instances that will be created for this cluster, you will have 2 options “Key Pair” or “Password”, choose whichever you prefer. After configuring this click on the “Create” button to continue. Then you will be prompted with a dialog with all the details of the cluster that was just created, make sure everything is correct and click on “OK” button to continue.

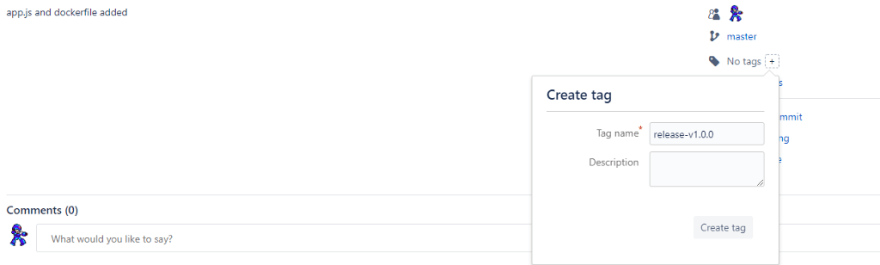
Now we will create a Tag(release) for our source code on Bitbucket, this will automatically build an image in ACR. To do this, first navigate to the commits page of the Bitbucket Repository we created earlier and select the latest commit we pushed into it. On that page you will see a “Tags” option on the right side of the page with “+” button next to it, click it to open the dialog to create a new tag, in the dialog there will be two fields Name and Description, enter the name in the format of “ release-v*” e.g. “ release-v1.0.0” and then click the “Create Tag” button.
Next, navigate back to the Repositories on the ACR console and click on the “manage” button next to the ACR Repository that we created earlier.

This will take you to the Details page for that Repository, there you will find all the details for your repository e.g. Name, Region, Type, Code Repository Link, Internet Address, VPC Address etc. From there navigate to the “Build” tab, there under the “Build Log” you will find the build for the tag that we created earlier. Once the status for the build is “Successful”, click on the “Deploy Application” button on the top right corner, it will present you with a small dialog where you can configure the deployment options like “Repository Address” and “Container Cluster”. For the “Container Cluster” option select “Swarm” and then click on the “Deploy” Button.

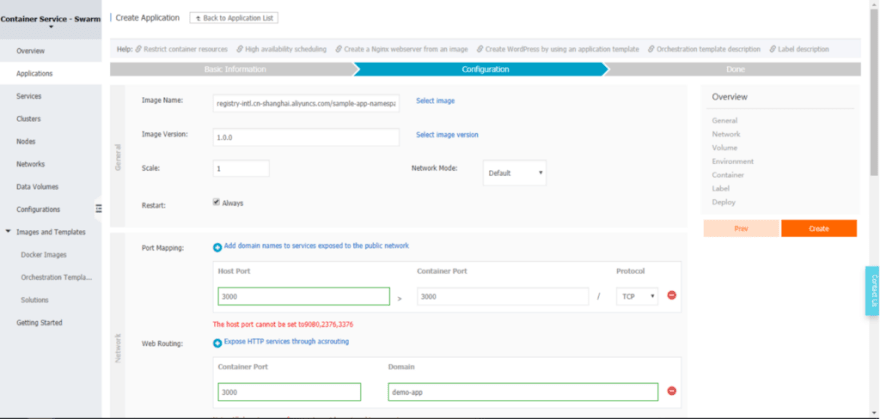
This will take you to the ACS Application creation wizard. There, on the “ Basic Information” tab, you will be provided with the options like Name, Version, Cluster, Update and Description etc. Enter the name and select the cluster we created earlier, then check the “Pull Docker Image” and click “Next” button to continue.

This will take you to the “Configuration” tab of the creation wizard. There you should select the “Image Name” and “Image Version”of our Docker container and use “3000” as the “host Port” under “Port Mapping”. Then proceed to add Port and Domain under “Web routing”. You will also find a lot of other configuration options on that page, but we will use their default values for the purposes of this article. Now click on the “Create” button to finally create the Application.
Then on the Done page click on the “View Application List” link to continue to to the Applications List page, there you will find the application that we just created, click on it to go to the Application’s overview page. Then click on the “Routes” tab to get the Access Endpoint for our Application.

And there you go, we have successfully deployed our Containerized Application. Now, on to the final part.
Part IV: Securing our Application with Let’s Encrypt SSL/TLS
To get Started with this, you should first go through this guide by John Hanley on configuring Let’s Encrypt ACME on Alibaba Cloud. Now once you have configured everything and have created the Certificate files, proceed to follow the aforementioned steps.
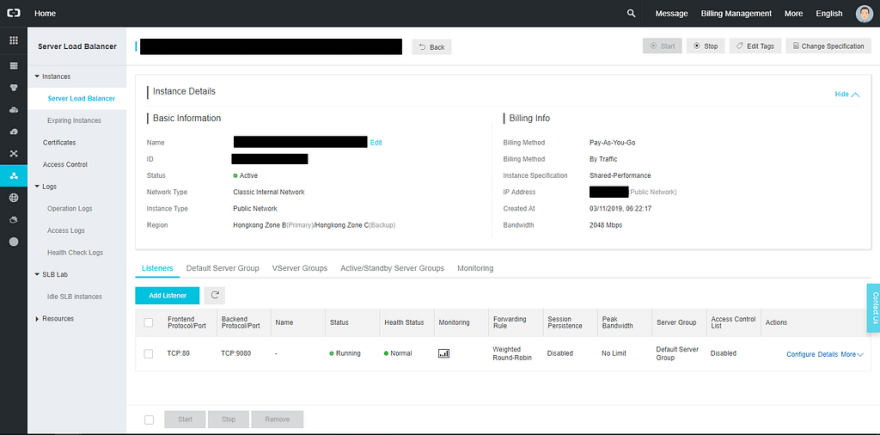
As HTTPS is supported at the Server Load Balancer layer. To support HTTPS, we will need to create a Server Load Balancer certificate. To do that navigate to the Server Load Balancer console under Networking, and then proceed onto the “Certificates” page by clicking the “Certificates” link in the left panel. Once there then click on “Create Certificate” button and then select the “ Upload Third-Party Certificate” option and click the “Next” button.

That will take you to “Upload Third-Party Certificate”, fill in the information required and click the “Next” button.

After the certificate is successfully created, Navigate to the Server Load Balancer page and locate and click on the Server Load Balancer instance that was assigned during cluster creation. Once in, click on the “Add Listener” button under the “Listeners” tab.
That will open the Wizard for adding Listeners, from there you should follow this guide changing HTTP to HTTPS to fill out the wizard. Once done with that you are all set with your Containerized Application that is secured with Let’s Encrypt SSL/TLS.

Top comments (0)