
Is Vanilla JS even important to learn?
VanillaJS is a name to refer to using plain JavaScript without any additional libraries.
Now you may ask — Is it worth to spend time on learning Vanilla JS when we have so many frameworks around making development process and efficient for us?
If your knowledge is limited only to a single JavaScript framework, you will have a hard time learning a new one. All the JavaScript frameworks and libraries are inevitably based on its Vanilla core. This should convince anyone that knowledge of a pure JavaScript is a must in the long run. — David Kopal
That said, it is true that investing time in Vanilla JavaScript will pay off in the long run. So keeping this significance of Vanilla JS in mind, let’s dive in this tutorial to understand JavaScript concepts along with creating an interesting game.
What are we making?
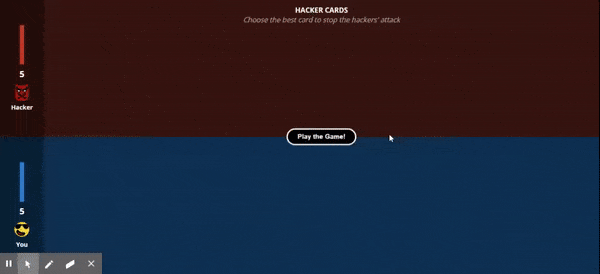
Story behind this Project
If you are into stories like me, then you might be interested in knowing — How I came up with the idea of this project? (If you are not interested in knowing this story, skip to the next section to understand the Project Structure).
Some years ago, when I was in school, I attended a seminar about Cyber Security. So when I came across an article about Cybersecurity few months aback, it strikes to me that the whole seminar I attended back in school can be converted to a game to educate kids about Internet Privacy. So Let's Begin.
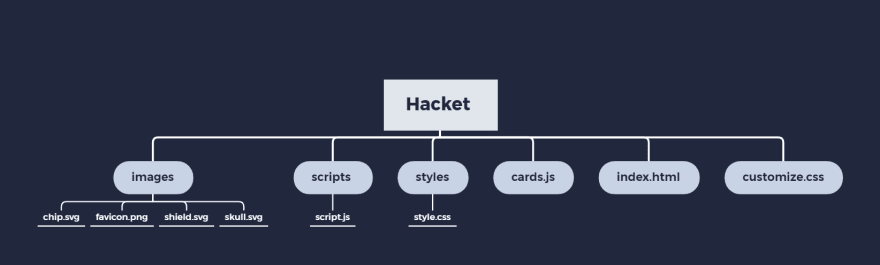
Step 1 - Understanding Project Structure and Setting Up files
I personally use Visual Studio Code, you can use any IDE you like. The first step is to create the following files with the right extension attached to them.
Step 2 - Creating skeleton of the project with HTML
Now we will create the basic skeleton of our project using HTML. This file will be called index.html.
Give your brain time to think, what will constitute to the structure of this game.
Now start writing down the components -
- You are creating a game, so ofcourse there will be a game-board.
- Then the game board is divided into hacker-area and player-area.
- We are also needed to recorded Life value of both Hacker and You, so that we can calculate the winner. Let's say these stats, hacker-stats, player-stats, life-bar, life-left, life-total.
- We also have cards and text(scenarios) written on them, with certain power as well that is revealed after the player chooses any card. We will call these as, card, hacker-card, player-card, text and power.
- We have few buttons such as, Next(to bring the next scenarios to the player), start-game button to start the game.
- Lastly, we have a winner-section to show the winner-message to notify the player, whether s(he) lost or won against the hacker, and the option for playing the game again, restart.
Each part we discussed in the above points, will serve as an individual class. We have used classes for dividing the components, so that we can use document.querySelectorAll for adding behavior to our game.
You can read more about queryselector and classes here - document.querySelectorAll and Classes in JavaScript
Now we will create the
tag to define the above divisions. Like this -<div class="game-board">
<div class="hacker-area">
<h1>
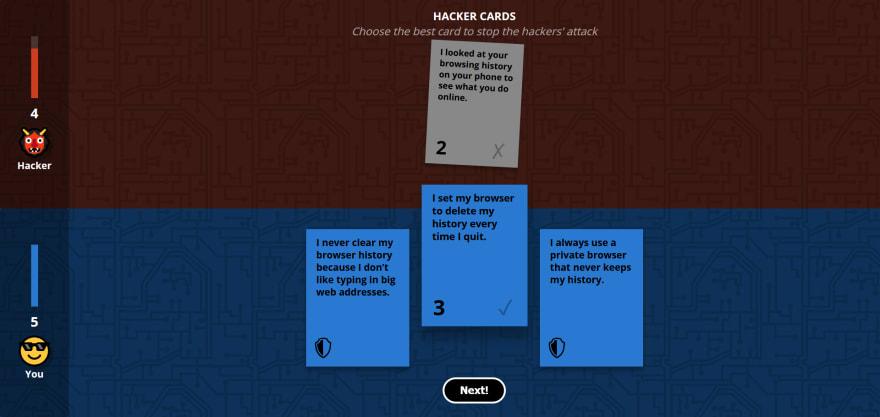
<strong>HACKER CARDS</strong> <br/> Choose the best card to stop the hackers' attack
</h1>
</div>
</div>
Note - Nest div sections in the right way. Ex - All the other divisions will come under game board, life-bar will come under stats and so on.
Try yourself to create the whole HTML skeleton like this, you can also refer to the code file here.
Steps 3 - Adding Scenarios using a JavaScript Object
Now we will be adding scenarios with a JavaScript Object. There will be 1 hackerCard per scenario and 3 playerCards per scenario. We will write these in the cards.js file. Scenario number 1 will look like this -
var scenarios = [
  {
    hackerCard : {
      description : "I set up a fake Wi-Fi station to steal people’s email and track them online.",
      power : 4,
    },
playerCards : [
      {
        description : "I never use public wifi networks.",
        power : 5,
      },
      {
        description : "I browse the web, but I never do any personal business on a public wifi network.",
        power : 3,
      },
      {
        description : "I connect to any wifi network I can use in public.",
        power : 1,
      }
    ]
  },
];
You can add as many as scenarios you want. I have kept 8 different scenarios, you can refer to them here
Read more about Objects in JavaScript here
Step 4 - Adding behavior to the project with a Script
Our script.js file will contain several functions that will add behavior to our projects. So let's start writing these functions.
First things first, set the starting life totals here
var playerLife = 5;
var hackerLife = 5;
Read more about variable declaration here
Now the Message that will appear when the game is over
var hackerWinnerMessage = "Game over: You got hacked!";
var playerWinnerMessage = "You defeated the hacker!";
Game code starts here
var playerStartLife = parseInt(playerLife);
var hackerStartLife = parseInt(hackerLife);

var roundFinished = false;
var cardSelected = false;

updateScores();

document.querySelector(".game-board").classList.add("before-game");

var allCardElements = document.querySelectorAll(".card");
Now let's add click handler to all player card elements
for(var i = 0; i < allCardElements.length; i++) {
var card = allCardElements[i];
if(card.classList.contains("player-card")) {
card.addEventListener("click",function(e){
cardClicked(this);
});
}
}
We need a function that will execute when a card is clicked
function cardClicked(cardEl) {

  if(cardSelected) { return; }
  cardSelected = true;

  cardEl.classList.add("played-card");

  document.querySelector(".game-board").classList.add("card-selected");
### To wait 500ms to reveal the hacker power
  setTimeout(function(){
    revealHackerPower();
  },500)
Waits for 750ms to reveal the player power
 setTimeout(function(){
    revealPlayerPower();
  },800)
Waits for 1250ms to compare the card scores
 setTimeout(function(){
    compareCards();
  }, 1400);
}
Read more about the set timed out function here.
Now we gotta show the power level on the player card
function revealPlayerPower(){
  var playerCard = document.querySelector(".played-card");
  playerCard.classList.add("reveal-power");
}
Read more about classList and its functionality here.
Similarly a function to show the power level on the hacker card
function revealHackerPower(){
  var hackerCard = document.querySelector(".hacker-card");
  hackerCard.classList.add("reveal-power");
}
A function for comparing the cards based on their power value.
function compareCards(){
  var playerCard = document.querySelector(".played-card");
  var playerPowerEl = playerCard.querySelector(".power");

  var hackerCard = document.querySelector(".hacker-card");
  var hackerPowerEl = hackerCard.querySelector(".power");

  var playerPower = parseInt(playerPowerEl.innerHTML);
  var hackerPower = parseInt(hackerPowerEl.innerHTML);

  var powerDifference = playerPower - hackerPower;

  if (powerDifference < 0) {
    // Player Loses
    playerLife = playerLife + powerDifference;
    hackerCard.classList.add("better-card");
    playerCard.classList.add("worse-card");
    document.querySelector(".player-stats .thumbnail").classList.add("ouch");
  } else if (powerDifference > 0) {
    // Player Wins
    hackerLife = hackerLife - powerDifference;
    playerCard.classList.add("better-card");
    hackerCard.classList.add("worse-card");
    document.querySelector(".hacker-stats .thumbnail").classList.add("ouch");
  } else {
    playerCard.classList.add("tie-card");
    hackerCard.classList.add("tie-card");
  }

  updateScores();

  if(playerLife <= 0) {
    gameOver("Hacker");
  } else if (hackerLife <= 0){
    gameOver("Player")
  }

  roundFinished = true;

  document.querySelector("button.next-turn").removeAttribute("disabled");
}
Once the game is over we will use the following function to show the winner message.
function gameOver(winner) {
  document.querySelector(".game-board").classList.add("game-over");
  document.querySelector(".winner-section").style.display = "flex";
  document.querySelector(".winner-section").classList.remove("player-color");
  document.querySelector(".winner-section").classList.remove("hacker-color");

  if(winner == "Hacker") {
    document.querySelector(".winner-message").innerHTML = hackerWinnerMessage;
    document.querySelector(".winner-section").classList.add("hacker-color");
  } else {
    document.querySelector(".winner-message").innerHTML = playerWinnerMessage;
    document.querySelector(".winner-section").classList.add("player-color");
  }
}
When the Start button is clicked, this function will Start the game
function startGame() {
  document.querySelector(".game-board").classList.remove("before-game");
  document.querySelector(".game-board").classList.add("during-game");
  playTurn();
}
This function updates the displayed life bar and life totals
function updateScores(){

  // Update life totals for each player
  document.querySelector(".player-stats .life-total").innerHTML = playerLife;
  document.querySelector(".hacker-stats .life-total").innerHTML = hackerLife;

  // Update the player lifebar
  var playerPercent = playerLife / playerStartLife * 100;
  if (playerPercent < 0) {
    playerPercent = 0;
  }
  document.querySelector(".player-stats .life-left").style.height =  playerPercent + "%";

  // Update the hacker lifebar
  var hackerPercent = hackerLife / hackerStartLife * 100
  if (hackerPercent < 0) {
    hackerPercent = 0;
  }
  document.querySelector(".hacker-stats .life-left").style.height =  hackerPercent + "%";
}
For shuffling the set of 3 player cards at each run we will use this shuffleArray function
function shuffleArray(a) {
  var j, x, i;
  for (i = a.length; i; i--) {
    j = Math.floor(Math.random() * i);
    x = a[i - 1];
    a[i - 1] = a[j];
    a[j] = x;
  }
  return a;
}
Read more about Math.random here.
Plays one turn of the game
function playTurn() {

  roundFinished = true;
  cardSelected = false;

  document.querySelector(".game-board").classList.remove("card-selected");

  // Remove "ouch" class from player and hacker thumbnails
  document.querySelector(".hacker-stats .thumbnail").classList.remove("ouch");
  document.querySelector(".player-stats .thumbnail").classList.remove("ouch");

  // Hides the "next turn" button, will show again when turn is over
  document.querySelector(".next-turn").setAttribute("disabled", "true");

  for(var i = 0; i < allCardElements.length; i++) {
    var card = allCardElements[i];
    card.classList.remove("showCard");
  }

  setTimeout(function(){
    revealCards();
  }, 500);
}
For revealing cards to the player
function revealCards(){
  var j = 0;
  var cardIndexes = shuffleArray([0, 1, 2]);

  // Get scenario cards
  console.log("scenarios.length == " + scenarios.length);

  var randomScenarioIndex = Math.floor(Math.random() * scenarios.length);
  var scenario = scenarios[randomScenarioIndex];
  console.log(scenario.hackerCard.description);

  scenarios.splice(randomScenarioIndex, 1);

  console.log("scenarios.length after splice == " + scenarios.length);

  var hackerCard = scenario.hackerCard;
  var hackerCardEl = document.querySelector(".hacker-area .card");

  // Contents of the player cards
  var playerCards = scenario.playerCards;

  for(var i = 0; i < allCardElements.length; i++) {
    var card = allCardElements[i];

    card.classList.remove("worse-card");
    card.classList.remove("better-card");
    card.classList.remove("played-card");
    card.classList.remove("tie-card");
    card.classList.remove("prepared");
    card.classList.remove("reveal-power");

    // Display the payer card details
    if(card.classList.contains("player-card")) {
      card.querySelector(".text").innerHTML = playerCards[cardIndexes[j]].description;
      card.querySelector(".power").innerHTML = playerCards[cardIndexes[j]].power;
      j++;
    }

    // Reveal each card one by one with a delay of 100ms
    setTimeout(function(card, j){
      return function() {
        card.classList.remove("prepared");
        card.style.display = "block";
        card.classList.add("showCard");
      }
    }(card,i), parseInt(i+1) * 200);
  }

  // Display the hacker card
  hackerCardEl.querySelector(".text").innerHTML = hackerCard.description;
  hackerCardEl.querySelector(".power").innerHTML = hackerCard.power;
}
Read more about innerHTML here.
You can access to my *scripts.js * file here
Step 5 - Styling the Project
Congratulations! You have covered a big chunk of work till now, give yourself a pat on the back.
Now we will be adding styling to our project.
Styling that can be customized
First we have the customize.css file, that have the basic colors and background images that can be changed anytime to change the whole appearance of the project.
/* Change the colors in this stylesheet to customize the game. */

/* Player Styles */

.player-color {
  background-color: #2a79d0;
}

.player-area {
  background-color: #0d3158;
  background-image: url(images/chip.svg);
}

.player-card .power {
  background-image: url(images/shield.svg);
}

/* Hacker Styles */

.hacker-color {
  background-color: #ce3d20;
}

.hacker-area {
  background-color: #3c1912;
  background-image: url(images/chip.svg);
}

.hacker-card .power {
  background-image: url(images/skull.svg);
}
Note - The changes made to the customize.css file doesn't affect the functionality.
You can access the images required for the styling from here
Styling that adds to the functionality
You can try styling all the elements by using class selectors and the reveal animations by yourself, or you can simply take help of this file
What's Next?
If you have followed this article till now, you surely would be able to pull of the creation of whole game successfully. If you encounter any problem you can always refer to my code here.
If you liked this tutorial, share it with your friends and help them in creating there first JavaScript Project.
Stay tuned until the next simplified bomb of knowledge lands to your feed.
Keep Exploring! Keep Coding!

Oldest comments (1)
Hey ! Nice article, there are just some typos (payer instead of player, ### not rendered by markdown, some code not rendered either), maybe you could reread yourself =D
Another little thing, why don't you use let instead of var ?