In 20 years of being a developer, I've used lots of various desk types: sitting; stand only; sit/stand; metal; wood. Each had its' pros & cons. But since I've started doing woodworking, I've always wanted to build a desk that fits me. So welcome to my journey to build my ultimate developer desk. This is the first time I've written a post over a period of days & weeks so hopefully it's all coherent at the end.
The reason I say "my" ultimate developer desk, is because we all have our own preferences for how we work best. Over the years I've found a few things that I prefer in my desk:
Length Over Depth
My arms aren't really long so I prefer a desk that isn't as deep. I like to be able to reach the back of my desk without a lot of reaching. However, I love having a long desk so I can put more on it without cramping my work area. So after taking some measurements of my current desk I finalized on a size of 7' (1.82m) x 27.5" (698.5mm). This depth was also partially determined because I had decided to build with 2x6 boards. In the US, 2x6 boards have an actual size of 1.5"x5.5". So 5 boards would naturally create my depth without the need for cuts.
Strength for Mountings
Previously, I had 3 24" monitors mounted to the wall behind my desk. I'm moving these to mounts on the desk itself so I can raise & lower it easier. Also, I recently purchased a new computer and want it on the desk rather than underneath. It's a behemoth at nearly 50 pounds (22.6kg) and will sit near the edge of the desk so strength will be important.
Technical Conveniences
I'm a stickler for good cable management so it would be nice to include some way to manage cables within the desk that makes things look tidy. Also, the correct number of USB ports is always n+1 so I want to integrate a USB hub into the desk, ideally mounted flush with the desktop, so I can always have a spot to plug in something quick.
Finally, I don't want to use a cable to charge my phone. That's so 2018. I want to integrate a wireless charger, maybe under the desk, so I can just set my phone in a specific area on the desktop to charge it while I work.
Motorized Sit/Stand Capabilities
I've been spoiled in the past by the Ikea sit/stand desk and want that convenience again. I'm currently using a sit/stand desk but it's a very manual transition between those states so I want to automate it. Also, the monitors being mounted on the wall limits my current sit/stand flexibility so those are going to come to the desk.
Worn & Rustic Aesthetic
I'm not sure I know the correct name for the design/style/whatever of my office. There's lots of wood, iron pipe, a ship-lap wall, and overall "rustic/industrial" vibe so I don't want a perfectly shaped & polished desk. My goal was to build something that looks a little worn and old.
Tools & Material
There weren't a lot of materials required. I already had all the screws needed so all I needed to purchase was the lumber, stain and, polycrylic. While I listed the tools I used below, it's important to know that all of them can be replaced with manual tools.
Materials
- 5 - 2"x4"x8" pine boards
- 16 - 2" screws
- 10-ish - 1" screws
- 1 quart Minwax Espresso Wood Stain
- 1 quart Minwax Polycrylic Matte Finish
Tools Used
- Measuring tape
- Speed square
- Power drill driver
- Power impact drill
- Random orbital sander
- Various clamps (12-30" (304-762mm))
- Miter saw (but any saw will do)
- Kreg pocket-hole jig (Planned to use a biscuit joiner, but forgot I had one)
- Foam brush (for stain & poly)
- Couple of rags
Measuring & Measuring & Cutting
First up was cutting the boards to length. Because the ends of store-bought boards aren't always straight, I cut 2" (50mm) off one end of each. Then I measured, marked, and cut one of the boards 7' (1.82m) from the straight end.
Rather than measure and mark the others, I used a square jig I had previously created on my tabletop with two scrap pieces of wood to square each one with the jig and cut board to mark the cut line. This made sure all boards were the same length and saved the time of measuring each board by hand. With each board cut to length, I was ready to glue them together.
If you want a perfectly flat top with no cracks between boards, you need to use a planer and jointer on each board to ensure they are identical. I really want a more rustic look so I don't want the boards perfectly flat/straight/even. I painstakingly checked the boards at the store for any warping or twists and was able to get some really straight boards that meshed well together.
Stuck On You
Before I started the glue-up, I clamped a scrap board to my table that I knew was straight. Then I lined each board against it and reviewed how each board fit with those around it and compared their uniqueness to decide which boards should be in the front versus the back. Once I got each laid out where I liked them, I made some markings to add some pocket screws for stability.
I had originally planned to use glue and biscuits to align the boards, but when I got to the glue-up I forgot that I had the biscuits and a plate joiner. Because, you know... I'm a winner.
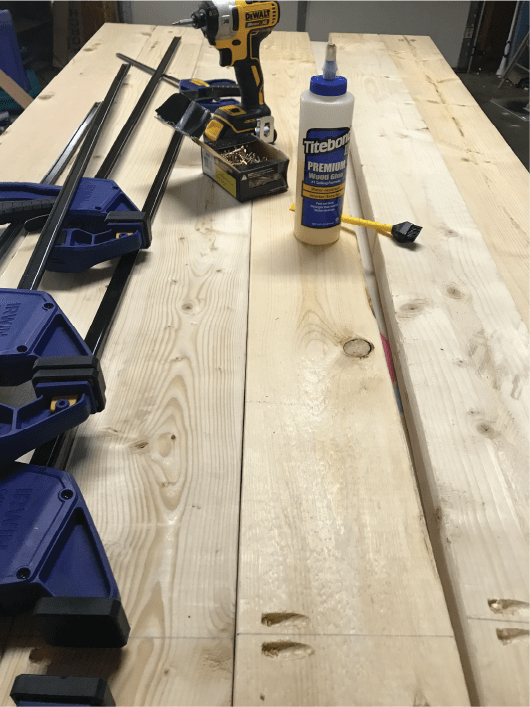
Once the marks were in place, I used my pocket-hole jig to create holes for the screws. Once they were all pre-drilled I glued the boards and quickly aligned and screwed them together to help hold them in place while the glue dried. The glue will provide more than enough strength to hold them together. The screws were more helpful for holding them while I worked and before I could clamp them all together.
With the glue and screws ready, I added clamps on both sides of the board to help ensure good contact across the boards and left them to dry for a day.
Sanding, Sanding & More Sanding
I was really messy in my glue-up. I didn't bother to clean the joints between the boards or any runs. That meant I was going to have to do extra sanding to clean it all up. I ended up spending a couple days sanding the entire desk starting with 240 grit and working my way down to 80 grit.
Let's Be Extra
Hi. My name is Michael and I'm extra. I'm the guy who was being interviewed for a job and suggested they hire me because I have an animatronic puppet that would be great to control with their product. But hey, I hear the best way to overcome your issues is to first admit you have the problem.
I saw a YouTube video a while back where someone had built a desk with a wireless charger mounted underneath. They could set their phone on the top of the desk and charge it while they worked.
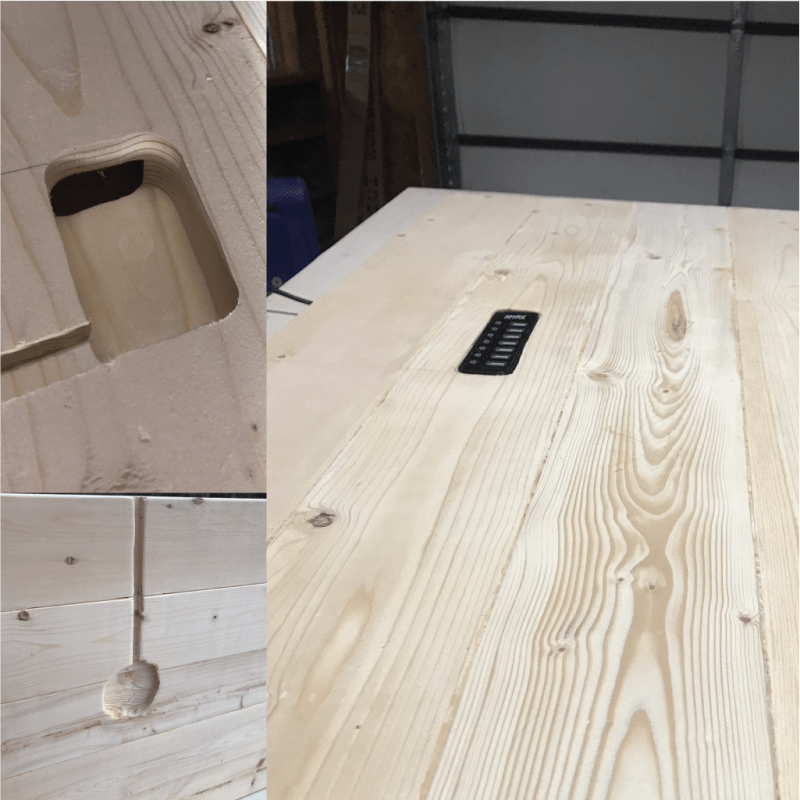
So, inspired by that, I watched my behavior for the next week and found that 90% of the time I sat my phone directly in front of me in the middle of my desk. I purchased a wireless charger and drew its outline on the bottom of the desk where I'd expect my phone to rest. Then I used my router to cut out that piece of the desk and routed deep enough to only leave a quarter inch from the desktop to ensure the signal could get through. Finally, I routed a channel from that spot to the back of the desk where I could run the cable for the charger.
Next, I bought a 7-port powered USB hub and following the same steps of picking a place for it to live, drew its outline on the desktop. I then measured its' depth and routed the top of the desk precisely to allow the USB to sit snugly in the hole and flush with the top of the desk. Once that was done, I did some measurements on the bottom of the desk to allow me to route an area on the end of where the USB hub would be sitting so its power and USB cables could come through and be routed to the back of the desk without hanging down.
Looking back I seriously have a problem. Before this project, I had never stained wood, used polycrylic, or built a desk. Heck, the little routing I had done was to make a hole for a battery pack for a LED strip mounted behind a guitar hanging on my wall. Why I thought I could do any of this, much less the complex routing required for the USB hub, is beyond me.
Needless to say, I was really worried about the routing. One wrong cut and the entire desk and all my work would have been wasted. Luckily it all fell in place and after a quick test fit of all the components, it was time to start the finishing work.
Make It Pretty
I spent some time at my local hardware store and picked a stain that I thought would match the rest of my office well. After a quick tutorial from the staff at the store, I set off to stain and poly the desk. First, I created two samples using some scrap wood and the stain with one and two coats. It really seemed like one coat provided the color I wanted and that was perfect because I'm lazy.
After applying the stain with a foam brush, I let it sit for about 7-8 minutes and wiped the excess off with scraps of an old t-shirt. Then I let the stain dry for 24 hours.
Once it was dry, I applied the first coat of polycrylic with a foam brush. I picked out a matte finish to the polycrylic because I didn't want a glossy look to the desk. The polycrylic was solely for protection and not to shine. Every four hours, I applied another coat of polycrylic until I had 3 coats. Then I let it dry for 24 hours.
Finish Him
I searched online for programmable motorized legs to use as the base. The key metrics I was looking for was the ability to have a wide base (as the desk was 7' long) and able to support 250+ pounds. The weight limit was the deciding factor in my choice because I knew that a real wood desktop, my PC, two monitors, etc would add up to a lot of weight for the motor to raise and lower.
Once the polycrylic was dry, I mounted it to the desktop and stood it up for the first time. Then it was just a matter of adding the wireless charger, USB hub, and then setting everything up in my office.
What Did I Miss?
I'm completely in love with this desk. The USB hub is such a time-saver. But, just like our code projects, I'm already planning the next version. Got any ideas on something I should add? Add a comment and let me know!


Top comments (0)