So, what is a linked list? It is a linear data structure where data is not stored at contiguous memory locations and the elements are linked using the reference field.
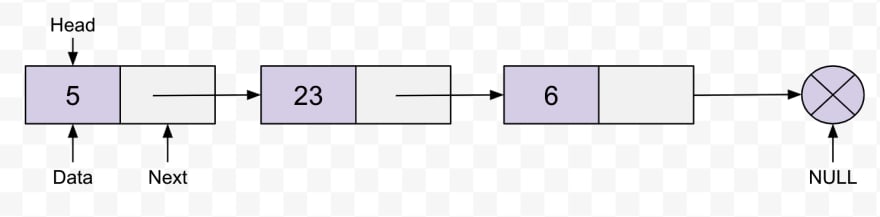
As you can see, elements are linked together using the arrows which represent the reference. The elements of a linked list are called nodes so we can also say that all the nodes are linked by pointers and that’s how nodes are organized in a sequence. The first node is called the head. If the linked list is empty, then the value of the head is NULL. The last node of the linked list has NULL as its reference which represents there is no next node. A Singly Linked List has two parts -
- Data (value of the node)
- Next (a reference to the next node)
Advantages
- You can insert data dynamically in a linked list without declaring the size and allocating memory beforehand.
- Insertion and deletion operations in the linked list are much easier than array as unlike an array, we don’t need to move all elements past the inserted or deleted elements.
Drawbacks
- Extra memory space is needed to store the reference of the next node.
- Random access of elements is not allowed. We have to access elements sequentially starting from the first node. So we cannot do a binary search with linked lists efficiently with its default implementation.
Implementation of a Linked List using Javascript functions -
In this section, we will implement the following functions while designing a Singly Linked List in javascript
-
get(index): Get the value of the node at the given index in the linked list. -
addAtHead(value): Add a node with value as data before the first node of the linked list. -
addAtTail(value): Append a node with value at the end of the linked list. -
addAtIndex(index, value): Add a node with value at the given index of the linked list. -
deleteAtIndex(index): Delete the node at the given index in the linked list.
Let us start with the function MyLinkedList. This function contains another function getNewNode which creates a new node using value from the arguments and returns the newly created node with reference initialized as NULL. We want to hold the first entry (the head) and the list’s size in the memory.
var MyLinkedList = function() {
 this.getNewNode = value => {
   return { value, next: null };
 };

 this.head = null;
 this.length = 0;
};
get(index)
This method returns -1 if the index is not valid. If the index is valid we will traverse the linked list starting from the head. For this, we will use a while loop which keeps on continuing until the index is reached and return the value of the node.
MyLinkedList.prototype.get = function(index) {
  let head = this.head;
  let i = 0;
  if (index < 0 || index >= this.length) {
    return -1;
  }
  while (head.next) {
    if (i === index) {
      break;
    }
    head = head.next;
    i++;
  }
  return head.value;
};
addAtHead(value)
This method creates a new node and with the passed value, add it at the first position of the linked list.
- Initialize a new node with the value.
- If the head is not present (when the linked list is empty), we assign the node to the head.
- If the head is present, assign the original head node to the new node’s next (reference).
- Assign the new node to the head.
- Increase the length by 1.
MyLinkedList.prototype.addAtHead = function(value) {
  const newNode = this.getNewNode(value);
  if (this.head) {
    newNode.next = this.head;
  }
  this.head = newNode;
  this.length++;
};
This method clearly explains how easy and less expensive is the insertion operation for a linked list as unlike an array, we don’t need to move all elements past the inserted element.
addAtTail(value)
This method creates a new node with the passed value and appends it to the linked list.
- We will check if the head exists. If not, we can directly call addAtHead(value) or initialize a new node and assign it to the head.
- If the head exists, we will traverse the list starting from the beginning (the head) until the next is not NULL (i.e. till we reach the last node of the linked list whose next reference is NULL). When we reach the last node, we will initialize the new node with the value passed and assign it to the next of the original last node.
- Increase the length by 1.
MyLinkedList.prototype.addAtTail = function(value) {
 if (!this.head) {
   const newNode = this.getNewNode(value);
   this.head = newNode;
   this.length++;
   return;
 }
 let head = this.head;
 while (head.next) {
   head = head.next;
 }
 const newNode = this.node(value);
 head.next = newNode;
 this.length++;
};
addAtIndex(value, index)
This method creates a new node with the argument value and adds it to the passed index of the linked list.
- Initialize a new node with the value.
- If the index is not valid, we do not do any insertion. If the index is 0 or the head does not exist (i.e. the linked list is empty ), we simply call addAtHead function. If the index is equal to the length of the linked list, we simply call addAtTail function as the node will be added to the end of the linked list.
- For the other cases, we will traverse until the index. At ( index -1 ) we will store the previous node. At index, we access the original or current element’s next ( reference ) and assign it as the reference to the new node. Now we add the new node to the next ( reference ) of the previous node.
- Increase the length by 1.
MyLinkedList.prototype.addAtIndex = function(index, value) {
 if (index < 0 || index > this.length) {
   return;
 } else if (index === 0 || !this.head) {
   this.addAtHead(value);
   return;
 } else if (index === this.length) {
   this.addAtTail(value);
   return;
 }
 let head = this.head;
 let i = 0;
 let prev = null;
 while (head.next || index === this.length - 1) {
   if (i === index - 1) {
     prev = head;
   } else if (i === index) {
     const newNode = this.getNewNode(value);
     newNode.next = head;
     prev.next = newNode;
     this.length++;
     break;
   }
   head = head.next;
   i++;
 }
};
deleteAtIndex(index)
This function deletes the node at the passed index.
- If the index is 0 we access node at the 1st index and assign it to the head.
- If the index is equal to the length of the linked list, we traverse until the (length -1) index and assign NULL to the reference of the (length-1) index.
- For the remaining cases, we traverse the linked list until the index. At the index, we assign the current node’s next (reference) to the (index -1) node’s next (reference)
- Decrease the length by 1.
MyLinkedList.prototype.deleteAtIndex = function(index) {
 let head = this.head;
 let i = 0;
 let prev = null;
 if (index === 0) {
   while (head.next) {
     if (i === index + 1) {
       this.head = head;
       this.length--;
       break;
     }
     head = head.next;
     i++;
   }
 } else if (index === this.length - 1) {
   while (head.next) {
     if (i === this.length - 2) {
       head.next = null;
       this.length--;
       break;
     }
     head = head.next;
     i++;
   }
 } else {
   while (head.next) {
     if (i === index - 1) {
       prev = head;
     }
     if (i === index) {
       prev.next = head.next;
       this.length--;
       break;
     }
     head = head.next;
     i++;
   }
 }
};
Conclusion
After designing your own linked list in javascript, you should now be more clear with the pros and cons of the linked list data structure. While insertion and deletion operations are easier in the linked list, accessing random items is an expensive operation.
Though we can use arrays for most of our operations, the use of a linked list could be very useful in the implementation of other data structures like graphs, stacks, and queues. One real-life example where a linked list can be used in the real world is a Photos viewer for linking between previous and next photos.
And that’s a wrap!
To see the complete code of our implementation, check out this GitHub gist.
I hope you found this implementation useful to design one of computer science’s fundamental data types, and if you have any questions or feedback, feel free to leave a comment.

Top comments (0)