
2020 is my year of personal computing.
When I think “I wish there was an app for...”, I build myself that app with low/no-code tools. Now I have a bunch of nice single-purpose apps on my phone, custom-built for one user: me.
Most of the tools I use for this are built into the apps I already use every day. When I want to stitch apps together, Zapier fills the gap-iers.
I called my newest personal app “Ask Future Me”. It lets me write a journal prompt and send it to myself in the future, and it gives me a place to record my answer.
It’s a little act of belief in an interesting future, built with some of the magic of the contemporary computing age.
It uses Google Apps (Forms, Sheets, and Calendar) and one Zapier zap.
What it Does
- Records a question I want to answer in a future journal entry, plus the date and time when I want to answer it
- Sends me a push notification prompting me to answer the question on that date and time
- The push notification includes a link to a form that is pre-filled with:
- the question
- the date it was originally asked
- On that form, I can:
- Enter my answer
- Check a box to indicate that I have a longer answer to the prompt in my handwritten journal
How it was Built, Step by Step
I’m going to take you through the steps to create it in what I feel is the most efficient order.
It’s not the same order I took when I was building the app! I went through all the usual struggles of trying to tell a computer what to do. I’ll spare you that drama and just show you what worked.
⚠️ Before You Start ⚠️
This tutorial assumes you're already comfortable with Google Forms, Google Sheets, and Zapier. I won't go into detail on how to use the basic features of those apps.
I'll use the QUERY, SPLIT and JOIN functions in Google Sheets. You don't need to know how these specific functions work, but you should be comfortable with creating and editing formulas in Google Sheets.
Step One: Taking Questions
The first step is creating a Google Form to record questions for the future.
The form takes in a question, a date, and a time of day.
If you could use a refresher on how to set up a form, check out Google's documentation for forms.

This form automatically creates a new Sheet in Google Sheets that records form entries and a Timestamp column. This sheet is where things start to get interesting.
Step Two: Create a Formula-Ready Copy of the Questions Sheet
I’ll show you why I need to use formulas in step three, but for now let's get the sheet data ready to work with formulas.
Each Google Forms response creates a new row in the Sheet that records the responses. Which, unfortunately, means you can’t put formulas directly onto the responses Sheet. If you do, they’ll be erased by the responses as they’re added to the sheet.
To work around this, I create a second Sheet tab on the Sheet with the form responses.
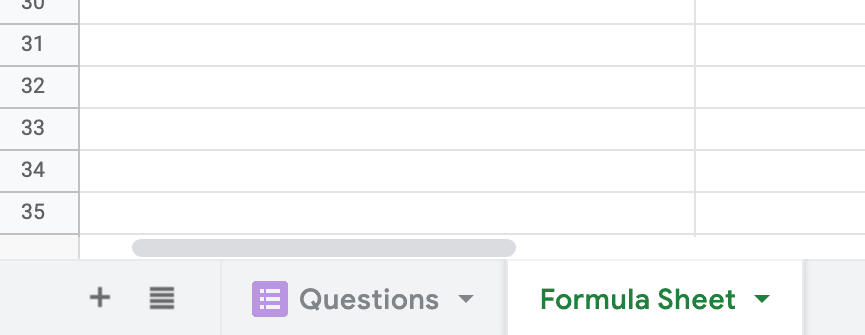
I name the form entries tab "Questions" and the second sheet "Formula Sheet".
On "Formula Sheet", I use a QUERY function to copy over all of the the content from the first three columns of "Questions" into "Formula Sheet".

I like to use named ranges in QUERY formulas. In this example I named the columns on the Questions sheet "Questions", but you can use a different named range or the column + cell ranges.
At this point, the difference between the two Sheets is subtle, but important. On the "Questions" Sheet, every entry takes up a full row. On “Formula Sheet”, every entry is confined to its column, leaving space for formulas in the other columns.
Step Three: Format the Question and Asked-On Date for URL Parameters
Google Forms lets you prefill fields using URL parameters. This means I can build a link that will automatically fill some of the form fields on the "Answers" form with data from the "Questions" form. I will add this link to the Google Calendar event so it will send me straight to the prefilled answer form.
To make that work, the question and date from the Questions form needs to be in a URL-friendly format.
Google Forms’ prefill format takes dates in YYYY-MM-DD format, and text with a plus sign (+) in place of spaces.
So this date in the Timestamp column: 09/12/2020
Needs to be converted to: 2020-09-12
And this question: Which basil plant turned out better?
Needs to be converted to Which+basil+plant+turned+out+better?
I convert the Timestamp column to the YYYY-MM-DD format with Google Sheet’s built-in formatting tools.
YYYY-MM-DD is under Format > Number > More Formats > More date and time formats
Removing the spaces in the question and replacing them with plus signs calls for a formula using SPLIT and JOIN.
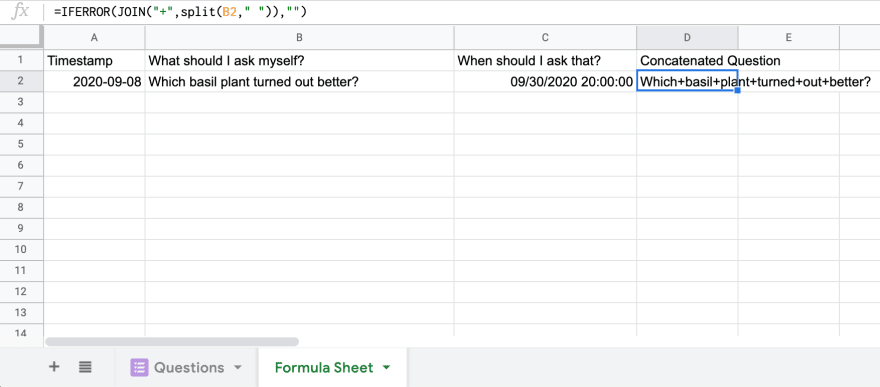
I create a new column on the Formula Sheet called “Concatenated Question” and enter this formula (sending it down the full column):
=IFERROR(JOIN(“+”,SPLIT(B2,” “)),””)
This SPLITs the question into individual words, then JOINs them back together with plus signs in place of the spaces.
I went into more depth on how these two functions can work together in this post about manipulating text in a spreadsheet cell if you’re interested in learning more about how this works.
I wrapped the split & join in an IFERROR function that sets the cell to blank if the split & join errors out. This prevents the sheet from filling up with a bunch of false-alarm errors when the B column is blank. It will be blank until there’s a new question on the sheet; that’s expected.
Here's what the Formula Sheet looks like once the date formatting and the split & join are done. Notice that the Timestamp date is in YYYY-MM-DD format, and the Concatenated Question field has a copy of the question with plus signs in place of the original spaces.
Step Four: Build the Answer Form
Now I need a form to accept the answers. I create a second Google Form with fields for:
- The original question
- The date when I asked the question
- My answer to the question
- A checkbox to indicate if there is a paper journal entry that corresponds to this question

Now that this form is created, I can use it to generate a prefillable URL that I can modify for use in the Zapier zap.
Step Five: Get the Prefillable URL
Every Google Form has a “Get pre-filled link” option in the 3-dot menu up top by the “Send” button.
To get a prefill link, I enter a test answer and date on the answer form, then click the "Get Link" button. That triggers a little popup that says "Share this link to include pre-filled responses COPY LINK".
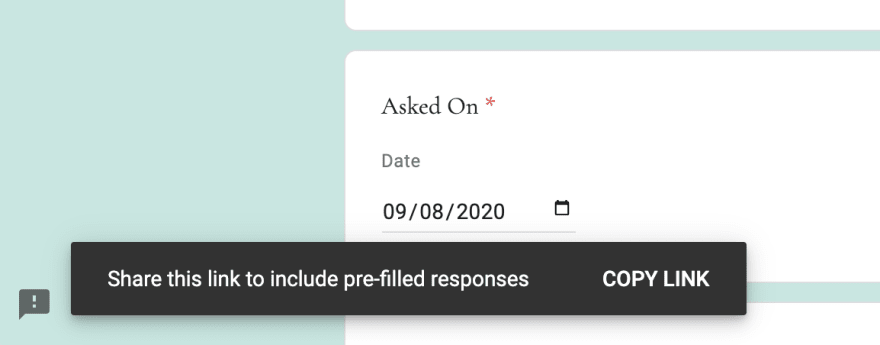
Clicking "COPY LINK" gives me a URL that includes the unique IDs for each of the prefilled form fields.
The URL ends with a query string that looks this:
&entry.FIELDNUMBER=Example+answer&entry.FIELDNUMBER=2020-09-12
Where FIELDNUMBER is the unique ID number for the field to prefill. For now, I just copy and paste this URL to a scratchpad so it's handy when I need it in step eight.
When I add this prefilled form link in Zapier, I’ll modify it to insert the the "Concatenated Question" from the "Formula Sheet" in the “original question” field, and the formatted Timestamp for the date I asked the question in the “asked on” field.
Step Six: Connect Google Sheets and Google Calendar in Zapier
With both forms built, all the data in the right format, and field IDs discovered, I can now use Zapier to link up the Forms with Google Calendar.
I create a new calendar event that, on the date and time I enter on each question form, sends me the question with a link to a form to enter my answer. The link prefills the form with the question and the date the question was asked on. It's up to me to fill in the rest with my journal entry.
This is a single-task zap that can be built on the free Zapier tier.
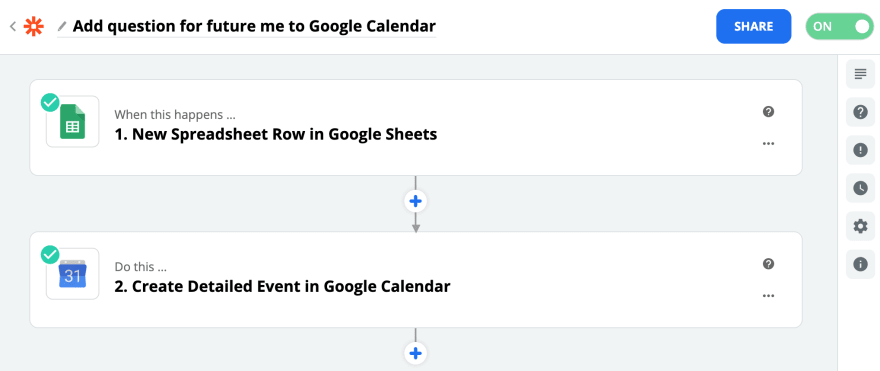
The first step is to connect Google Sheets with Google Calendar. Set "When this happens..." to "New Spreadsheet Row in Google Sheets", and "Do this..." to "Create Detailed Event in Google Calendar".
Then, there are some configuration steps to get the zap up and running.
Here’s a quick walkthrough of configuring the zap.
Step Seven: Configure Google Sheets in the Zap
- On the “Choose App & Event” step, select “Google Sheets” and “New Spreadsheet Row”
- For “Choose Account”, choose the Google account that has your Forms.
- For “Customize Spreadsheet”, choose “Ask Future Me” (or whatever you named your questions form) as the Spreadsheet, and “Formula Sheet” as the Worksheet.
Step Eight: Configure the Calendar Event in the Zap
- On the “Choose App & Event” step, select “Google Calendar” and “Create Detailed Event”.
- For “Choose Account”, choose the Google account that owns the Calendar you want to use for your reminders.
“Customize Detailed Event” is where we finally get to use those query parameters.
Choose the “Calendar” where you want to add the question. In the “Summary” field, I put “A question from past me”. This appears as the title of the event on the calendar and in push notifications.
Then, put your cursor in the Description field and select “Insert Data”. I inserted the question (from the Formula Sheet form column labeled “What should I ask myself?”) and the prefill URL to the answers form, including the query parameters.
After the equals sign (=) that follows each form field ID number, I insert data from the related field on the Formula Sheet.
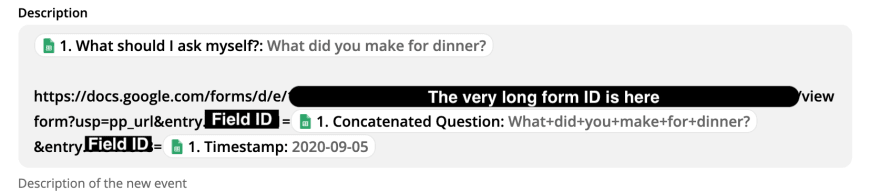
Here I've inserted the contents of the "Concatenated Question" after the equals sign following the field ID for "The original question" field on the answer form, and the contents of the Timestamp field after the equals sign following the field ID for the "Asked On" field.
I've crossed out the form ID and field IDs from my own URL here because they're unique to every form. Yours will be different. The form ID is a very long alphanumeric string, and the field IDs are short numeric strings.
Now the zap is ready. Questions can be sent to the future 🚀
The Finishing Touch: Making the Questions Form Look Like an App on an iPhone
I can enter my questions for the future in any browser, but I like having a button I can push on my phone to open it up, app-like.
A Google Form is a webpage, and just like any webpage I can pin it to my home screen on my iPhone.
To do that, I airdropped the link to the form from my desktop computer to my iPhone and opened it up in Safari. From the “Share” menu, I selected “Add to Home Screen”. This gives me an app-style icon for the form so I can open it up in one click from my phone.
Here it is hanging out with the other journaling apps I use on my phone.

That's the works! Happy personal computing 👩🏼💻

Top comments (0)