
Originally published at blog.mphomphego.co.za on September 02, 2019.
The Story
Indoor plants can give fresh life to the room, boost oxygen in an area that can boost productivity and inspire everyone. However, due to the job often needed, they are not only substituted by artificial, counterfeit crops which are tossed into sites sometime in their lives. They do not give as much benefit as true crops. The younger generation is often seen as having a pet because of the responsibilities, and although the plants can make the most of the rooms, they're often forgotten.
Whether it is too hot, cold, dry or humid, it is very essential to regulate water levels reached by the crops. Watering crops constitute the most significant cultural practice and can be the most labor-intensive or tedious job.
So, an idea of automagic plant watering system will be effective to only water plants when they need it, this reduces the amount of time required to babysit the plant.
The method employed to monitor the soil moisture level continuously and to decide whether watering is needed or not, and how much water is needed in the plant’s soil.
Essentially, the system is designed and programmed to monitor humidity in the soil at specific times. Where the moisture level exceeds the set threshold value, a water pump is triggered and the required quantity of water will be provided until the threshold value is predetermined.
TL;DR
Find the code here
The How
The automagic plant watering system runs on a Wemos D1 esp8266 running Arduino
uPython (NOT A TYPO, Yes - Python on a microprocessor) , a capacitive soil moisture sensor reads the moisture content in the soil and uploads the data to ubidots which is a data collection, analysis, and visualization tool. A Slack message is sent to a specific channel when soil moisture reaches a threshold and a water pump notification is sent.
The system operates 24/7. Every 15 minutes it checks sensors in the following order and acts based on this:
- Soil Humidity sensors. If soil humidity is lower than 70% in a plant pot - the system activates a water pump for 3 seconds and,
- Sends a slack notification
- Upload data to ubidots.
, In essence, this saves my plant(s) and enables me to concentrate on other boring kinds of stuff.
The Walk-through
In this section, I will detail the implementation.
Circuit Diagram
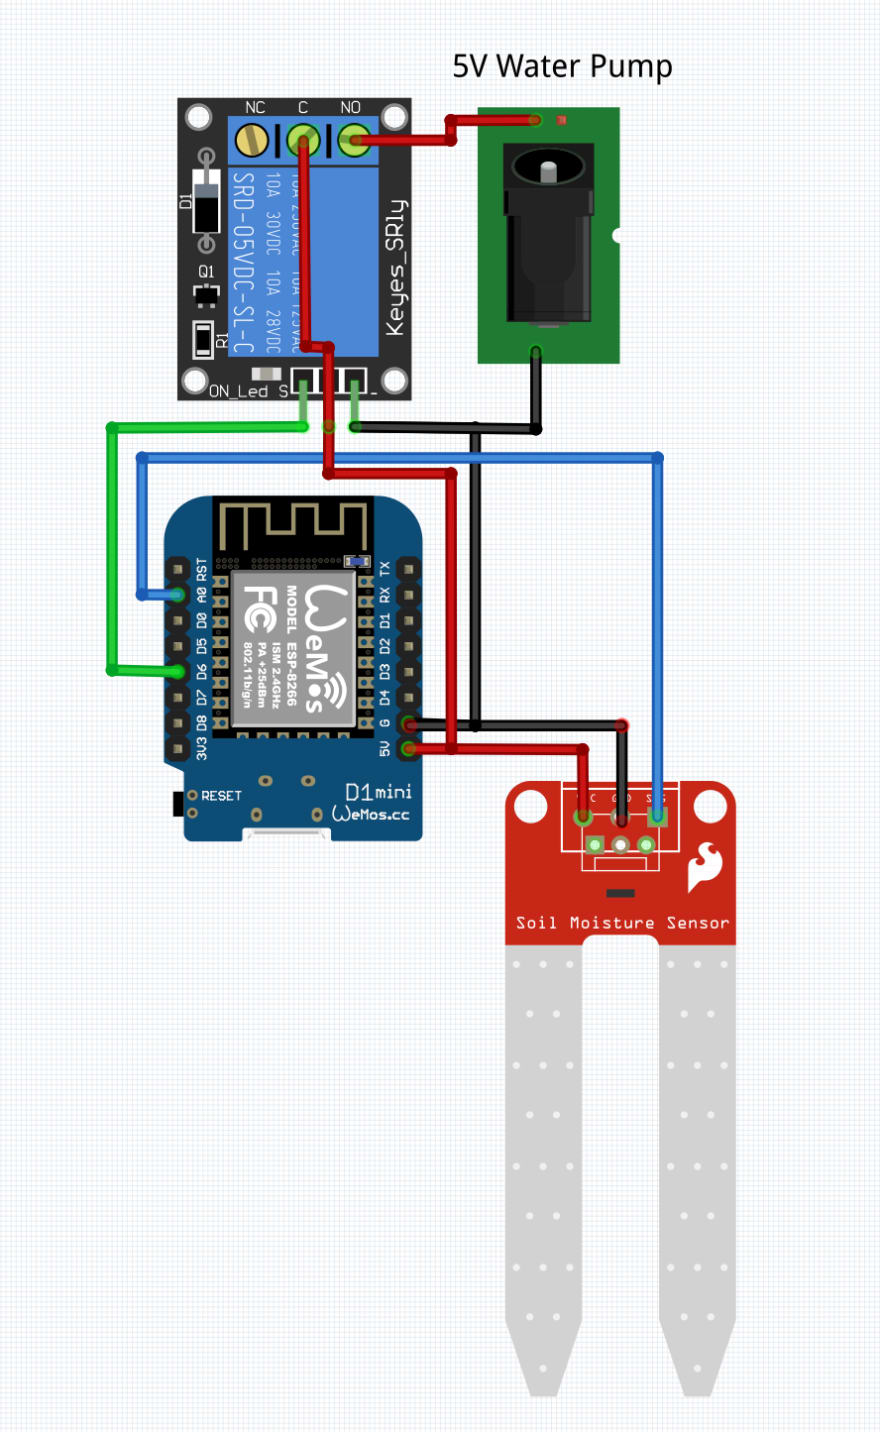
Circuit designed with fritzing.org
Parts Checklist
- 1x Wemos D1 ESP8266
- 1x Capacitive Soil Moisture Sensor
- 1x Single Channel 5V Relay Module
- 1x Mini Submersible Water Pump 3-6VDC
- 1x Silicone Tubing Hose (Pump)
Setup
Calibrating the Soil Moisture Sensor
Calibrating the sensor has two parts, the goal is to make sure sensor functions properly:
- Connect up the soil moisture sensor and dip it in a bowl of water and take the reading.
- Wipe the sensor, and place it on a dry surface and take the reading
These readings should be entered in config.json file.
Setup NodeMCU & Tools
Read the docs
TL;DR
- Clone the repo and,
-
Plugin the device to your computer
NOTE: The installation assumes that the port name of device is
/dev/ttyUSB0else, modifyMakefilewith port name [Hint:$ ls /dev/tty*]. Add you WiFi settings on
config.jsonRun
make all: Bootstrap i.e erase, flash, and upload scripts
NOTE: This will install esptool and mpfshell for communicating with ESP chips and for serial connection with MicroPython boards, Erase and flash the chip with firmware esp8266-20190125-v1.10.bin as well as upload the required files to the ESP.
Click here to get the latest uPython firmware.
Setup config
The config file is self-explanatory, fill in the missing parts.
{
    "Pin_Config":{
        "ADC_Pin": 0,
        "Water_Pump_Pin": 12
    },
    "wifi_config": {
        "ssid": "",
        "password": ""
    },
    "MQTT_config": {
        "Host": null
    },
    "moisture_sensor_cal": {
        "dry": 841,
        "wet": 470,
        "Threshold": 80
    },
    "water_pump_time": {
        "delay_pump_on": 3
    },
    "slack_auth": {
        "app_id": "",
        "secret_id": "",
        "token": ""
    },
    "ubidots":{
        "token": "",
        "device": ""
    }
}
Setup Slack
I previously added a blog post on how to send Slack messages using Python, you can find the post here

Sample code:
class Slack:
    def __init__(self, app_id, secret_id, token):
        """
        Get an "incoming-webhook" URL from your slack account.
        @see https://api.slack.com/incoming-webhooks
        eg: https://hooks.slack.com/services/<app_id>/<secret_id>/<token>
        """
        self._url = "https://hooks.slack.com/services/%s/%s/%s" % (
            app_id,
            secret_id,
            token,
        )

    def slack_it(self, msg):
        """ Send a message to a predefined slack channel."""
        headers = {"content-type": "application/json"}
        data = '{"text":"%s"}' % msg
        resp = urequests.post(self._url, data=data, headers=headers)
        return "Message Sent" if resp.status_code == 200 else "Failed to sent message"
Setup Ubidots Data Viz
Who doesn't love visualized data, added Ubidots support for Viz

code:
class Ubidots:
    def __init__(self, TOKEN, device_label):
        self.url = "https://things.ubidots.com/api/v1.6/devices/{}?token={}".format(
            device_label, TOKEN
        )

    def post_request(self, payload):
        """Creates the headers for the HTTP requests and Makes the HTTP requests"""
        print("[DEBUG] Uploading Payload: %s" % payload)
        assert isinstance(payload, dict)

        status = 400
        attempts = 0
        while status >= 400 and attempts <= 5:
            req = urequests.post(url=self.url, json=payload)
            status = req.status_code
            attempts += 1
            utime.sleep(1)
            print("[DEBUG] Sending data to Ubidots...")

        # Processes results
        if status == 200:
            print("[INFO] Request made properly, Updated Ubidots with %s." % payload)
            return True
        else:
            print(
                "[ERROR] Could not send data after 5 attempts, please check "
                "your token credentials and internet connection."
            )
            return False
Conclusion
In this post, you learned how to set up and run Python on an esp8266 as well as how to use an Analog-to-Digital converter. You then used a sensor to monitor the moisture level of the soil in a plant pot. The software allows us to see this sensor reading on the repl and chart over the Internet and through slack.
There was a lot to learn, but now you can use these techniques for all sorts of different sensors to measure temperature, humidity, light intensity and so on.
In conclusion, the project works as expected. However, depending on the type of plant you have adjustments will be needed. What do I mean by adjustments, moisture level threshold and time to water are very crucial as you might end up drowning your plants?
Future Work
It would be great if I add some AI to the system. Adding some blue filters and monitor the white light from the leaves using a camera (OpenCV library) and making use of FFT to calculate the plants "happiness" levels indicating photosynthesis production and measure the height of the plant over time or future height prediction.
Final Implementations
Current setup at the office, Hot glue, and prestik mess but works.


Latest comments (1)
Some comments may only be visible to logged-in visitors. Sign in to view all comments.