One of the perks of the "Ultimate" version of Ruby on Mac is access to the private GitHub repo. As a developer — especially one who loves automation — it was tempting to try to completely automate inviting new Ultimate customers to the repo.
To do that would require implementing a custom checkout that captures the customer's GitHub username, so I can then pass it on to the Paddle checkout flow. Paddle unfortunately doesn't support adding custom fields to their checkout.
From there, I would only need to add a few lines of code to my existing small Rails app that receives the Paddle webhook. I'm currently using it to automatically add/update customers in my ConvertKit account, so I can easily segment them based on which product they bought, calculate their lifetime value, auto-populate a field with their upgrade coupon, and other useful things.
After extracting the GitHub username from the Paddle payload, I would use the octokit gem to add the customer as a read-only collaborator to the repo. Something like this:
client = Octokit::Client.new(access_token: github_token)
client.add_collaborator(repo, username, permission: 'pull')
Given that I'm only getting a few orders of Ultimate per week, I thought I would practice the fine art of flintstoning and invite each user manually for now. However, that doesn't mean I have to do it the slow way each time.
When a customer emails me to request access, all I have to do is copy their username from the email they sent me, then I press ⌃-⌥-⌘-A, and it's done!
This automation uses Keyboard Maestro, the GitHub API, and 1Password CLI.
Here's what the Keyboard Maestro macro looks like:
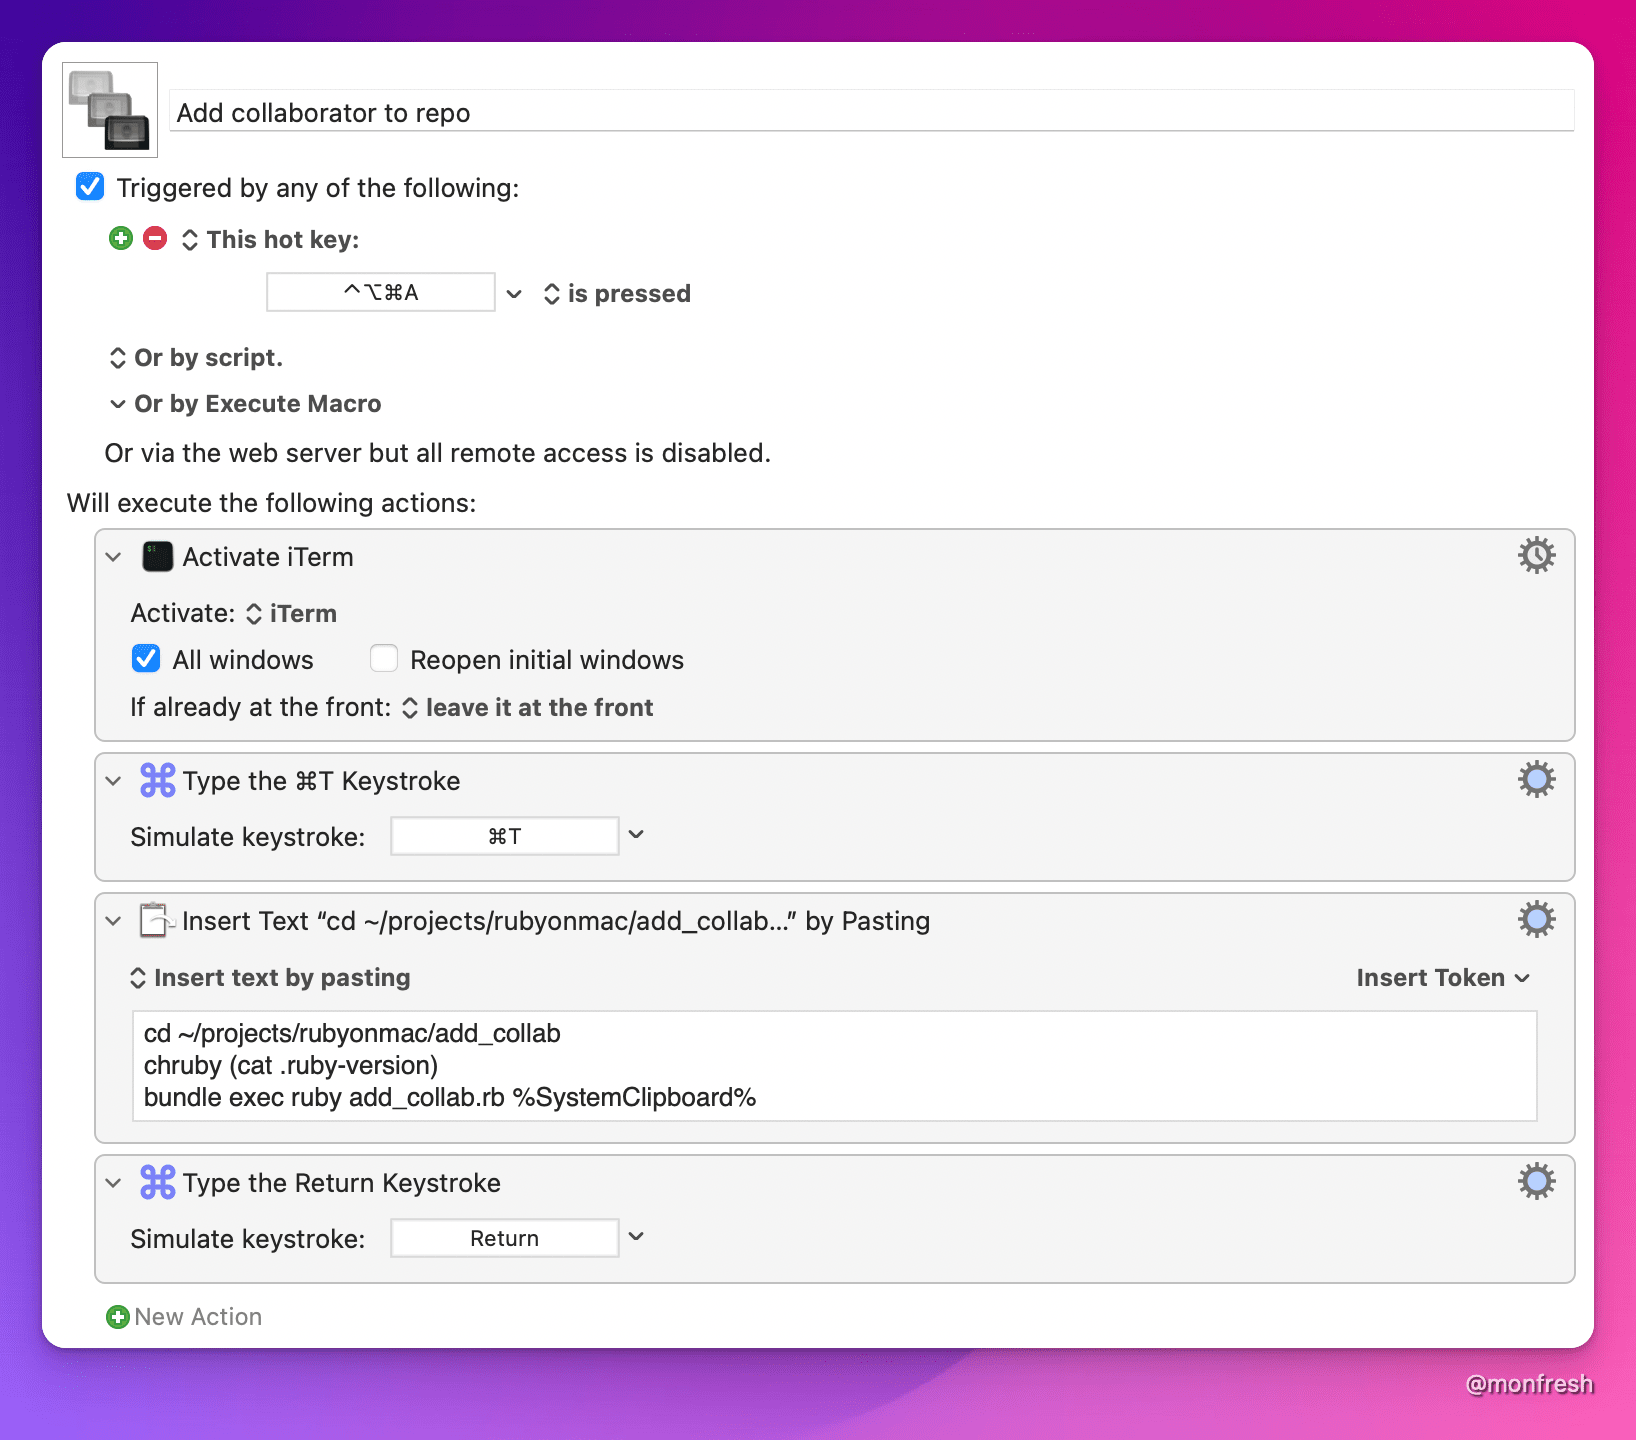
While you can run scripts directly in Keyboard Maestro, I chose to run the script from the project folder in iTerm because the octokit gem is already installed there. Here's what the add_collab.rb file looks like:
require 'octokit'

def repo
  "rubyonmac/rom-ultimate"
end

def github_token
  `op item get "add_collab GH token" --fields label=notesPlain`
end

def client
  @client ||= Octokit::Client.new(access_token: github_token)
end

customer_github_username = ARGV[0]

puts "adding collaborator #{customer_github_username}"
response = client.add_collaborator(repo, customer_github_username, permission: 'pull')
puts "response: #{response}"
And here's the Gemfile:
source "https://rubygems.org"
ruby File.read(".ruby-version").strip
gem "octokit"
If you've read my previous automation guides featuring Keyboard Maestro, you'll recall that it comes with many handy tokens that are placeholders for data that would otherwise require complicated code to fetch. In this case, I'm using the %SystemClipboard% token to pass in the username (that I copied from the customer's email) as an argument to the Ruby script. When you pass an argument to a Ruby script, you can access it via ARGV[0].
For security reasons, I need to provide the Octokit gem with a valid GitHub token associated with my account to be able to make this particular GitHub API call. The way I created this token was by adding a new Personal Access Token to my GitHub account, and giving it the appropriate scopes: admin:org and repo. I also set it to expire after 30 days.
Because I use two Macs at home, I keep all my projects on GitHub so I can easily have the latest code on both computers. However, I gitignore files that contain secrets (like GitHub tokens), even on my private repos. I do this for added security, and also out of habit.
In the past, this would require copying the secret file (such as .envrc if using direnv) from one computer to the other, and then updating it on both computers each time I renew it. It also requires remembering to back up the gitignored file on an external drive if I ever replace my Macs.
But now that I discovered the 1Password CLI, I can get rid of .envrc, and I don't need to worry about copying files back and forth or backing anything up. I can fetch the token from my 1Password account, which is automatically available on both computers.
What I like most about this approach is that I no longer need to have any secrets stored in plain text on my computer (except in 1Password)! I can also safely make this repo public if I wanted to.
So, instead of the usual ENV['GITHUB_TOKEN'], I can fetch the token with the 1Password CLI op tool:
def github_token
  `op item get "add_collab GH token" --fields label=notesPlain`
end
In Ruby, you can run shell commands by surrounding them with backticks. You might also be familiar with the system command, but it doesn't return the output of the command. It returns true if the command succeeds (with a zero exit status). Since I want the actual output of the command, I need the backticks.
As you might guess from the op command, the token is stored in a Secure Note in 1Password called "add_collab GH token". I figured out the full command by reading the documentation for item get, and then running just this command at first:
op item get "add_collab GH token"
which returned something like this:
ID:          some_unique_id
Title:       add_collab GH token
Vault:       Personal
Created:     4 days ago
Updated:     4 days ago by Moncef Belyamani
Favorite:    false
Version:     1
Category:    SECURE_NOTE
Fields:
  notesPlain:    my_github_token
That's how I knew that the label I needed was notesPlain. Here's the full command again:
op item get "add_collab GH token" --fields label=notesPlain
To make this more robust, I could redirect stderr to stdout by adding 2>&1 to the end of the command, then store the result in a variable, and only call the GitHub API if there's no error. Something like this:
def github_token
  token = `op item get "add_collab GH token" --fields label=notesPlain 2>&1`
  if token.include?("ERROR")
    puts "Failed to fetch token from 1Password: #{token}"
    nil
  else
    token
  end
end

def client
  @client ||= Octokit::Client.new(access_token: github_token)
end

if github_token
  puts "adding collaborator #{customer_github_username}"
  response = client.add_collaborator(repo, customer_github_username, permission: 'pull')
  puts "response: #{response}"
end
The reason for redirecting stderr to the output is to be able to read and store the error message. Without the redirection, if there's an error, token will just be an empty string.
Alternatively, I could still use direnv by calling the op command in .envrc, like this:
export GITHUB_TOKEN=`op item get "add_collab GH token" --fields label=notesPlain`
Since there's no secrets in it anymore, I would be able to commit .envrc to the repo. And if there's an error fetching the token, I would see it after running direnv allow. This approach would be handy for projects that depend on secrets being stored in env vars, like the RAILS_MASTER_KEY in Rails apps.
To save even more time, I could automate the process of verifying that the person who is requesting access did indeed buy Ruby on Mac Ultimate. Again, Keyboard Maestro makes this easy with the %MailSender% token.
I would then pass this email address as a second argument to my Ruby script, and then use the ConvertKit API via the convertkit-ruby gem to see if there's an existing entry for that email address, and that the custom field that indicates they purchased Ultimate is filled in.
There you have it. Thanks to Keyboard Maestro, 1Password CLI, the Octokit gem, and a few lines of Ruby, I save about 30 seconds per customer compared to doing everything manually via the GitHub site. With 52 Ultimate customers so far (I just launched the Ultimate version in late July 2022), that's almost 30 minutes saved so far!
If you enjoyed this post and want more free automation ideas and tutorials, sign up for my weekly newsletter.

Top comments (0)