This article was written by Moses Anumadu.
In modern-day applications, there is often a need to collect user data through forms. When many details are required from users, the form can be very long and look messy. This often leads to a bad user experience and a high bounce rate from the application. A simple solution to this is creating multi-step forms.
This tutorial will build a multi-step form using MongoDB, Laravel, and Laravel Livewire.
For this tutorial, we are using MongoDB as our database because it stores data in nested form, document-based model, and has a flexible schema. MongoDB does not need many tables and relationships like a typical relational database would. Also, it does not require creating migrations. If you know nothing about MongoDB, you can read our Getting Started docs for more.
Livewire, on the other hand, is a full-stack Laravel framework that enables developers to build dynamic interfaces easily without the need to write extensive JavaScript code.
Livewire is easy to use and follows Laravel's syntax. Check out the Laravel documentation to get started!
With that said, let's get started.
Prerequisites
To follow along with this tutorial, the following are required:
- Global installation of PHP and Composer
- MongoDB PHP Driver
- A free MongoDB Atlas cluster
- NPM
- Prior Laravel knowledge
- Prior Livewire knowledge
- Familiarity with MongoDB and NoSQL databases
Environment setup
Before proceeding, ensure that you have the MongoDB PHP Driver installed in the development environment so that MongoDB can work effectively. To verify, run the command below:
php -i | grep mongo
The expected output should look similar to the image below:
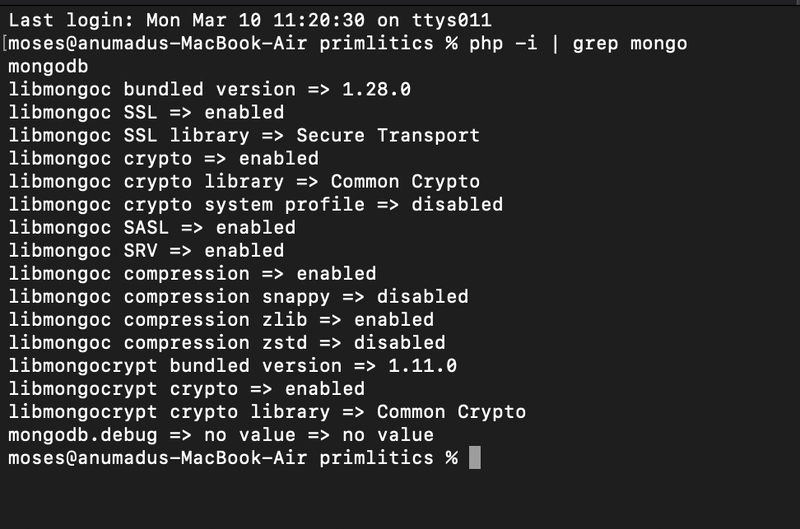
If you have a different output, it means you probably do not have the MongoDB PHP Driver installed. To install it, visit the MongoDB extension for detailed instructions on how to install it.
Also, ensure that you have PHP and Composer installed before proceeding.
Project setup
Let's get started building our multi-step form by creating a fresh Laravel project. We can do this using the command below:
composer create-project laravel/laravel multi_step_form_tutorial
After creating the Laravel project, we need to configure the application to work with MongoDB. Laravel does not come configured to work with MongoDB out of the box. We must install and configure the Laravel-MongoDB package to get it to work. So, let's get started by installing the Laravel-mongodb package using the command below:
composer require mongodb/laravel-mongodb
After successfully installing the Laravel-MongoDB package, we need to adjust some of the configuration in the config/database.php file to get it to work. You can do that by adding the code below:
'mongodb' => [
'driver' => 'mongodb',
'dsn' => env('MONGODB_URI'),
'database' => 'YOUR_DATABASE_NAME',
],
Let's take a moment to explain. The dsn value is obtained from the .env file. In your .env file, create a value for MONGODB_URI and set it to the value of your MongoDB Atlas connection string, like below:
MONGODB_URI="<<MONGODB_ATLAS_CONNECTION_STRING>>"
DB_CONNECTION=mongodb
Set up Livewire
Let's proceed to install and configure Livewire to work in our application. We first need to install Livewire using the command:
composer require livewire/livewire
After installing Livewire, we need to import it into the app. To keep things organized, let's create a layout file and make it a Blade component file. If Blade templates sound new to you, check out the Laravel documentation to get started. You can also get a deeper dive into Blade custom directives. With that said, let's generate our Blade template using the artisan command below:
php artisan make:component layouts/App
This will generate two files: app/View/Components/layouts/App.php and resources/views/components/layouts/app.blade.php. Open resources/views/components/layouts/app.blade.php and replace the content of the page with the code below:
<!DOCTYPE html>
<html lang="en">
<head>
<meta charset="UTF-8">
<meta name="viewport" content="width=device-width, initial-scale=1.0">
<title>Multi-Step Form</title>
@vite(['resources/css/app.css', 'resources/js/app.js']) {{-- If using Vite --}}
@livewireStyles
</head>
<body class="bg-gray-100">
<div class="container mx-auto mt-10">
{{ $slot ?? '' }}
</div>
@livewireScripts
</body>
</html>
From the code above, we added the HTML layout for the layout file. We also imported Livewire using @livewireStyles and @livewireScripts. This makes Livewire available on any page with this layout.
Before we create the Livewire multi-form component, let's ensure that the database configuration works correctly. To do this, we need to create a route in routes/web.php to ping our MongoDB Atlas cluster and ensure things are set up correctly. Navigate to routes/web.php and add the following code snippet below the existing code on the page:
use Illuminate\Http\Request;
use Illuminate\Support\Facades\DB;

Route::get('/ping', function (Request $request) {
$connection = DB::connection('mongodb');
try {
$connection->command(['ping' => 1]);
$msg = 'MongoDB is accessible!';
} catch (Exception $e) {
$msg = 'You are not connected to MongoDB. Error: ' . $e->getMessage();
}
return ['msg' => $msg];
});
Now, start the application using:
php artisan serve
This will start the application with the IP address 127.0.0.1:8000. If the 8000 port is not available, Laravel will automatically switch to an available port.
In a different terminal window, run the following to install and build the Node.js dependencies in the application.
Npm install && Npm run dev
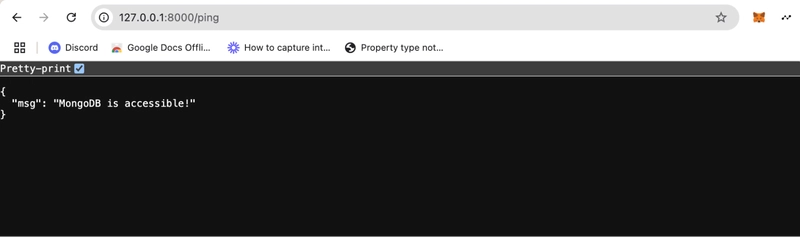
Let's test. From your browser, navigate to the newly created route, 127.0.0.1:8000/ping. If everything was done right, your screen should look just like the image below:
Building the Livewire component
Before building the Livewire component, let's talk a little about how our form will work. We are building a multi-step form with three (3) steps. The first step will contain the basic user information, like name and email. The second step will contain address details like street, city, or state, and the third will contain pieces of information like checkboxes and dropdowns for gender and marital status.
The form will be programmed to validate data for each step, save the validated data, and have a back, next, and submit button. Information will be saved for each validated step in our database.
MongoDB schema is very flexible and often preferred when handling dynamic data. Its schematic approach to saving data makes it a good approach for our form here. With MongoDB, we can easily add new fields to the form and don’t need to add extra columns to a migration file. Also, when working with MongoDB in Laravel, we don't need to create migration files. New fields can be added on the fly.
With that said, let's create our Livewire component using the command below:
php artisan livewire:make MultiStepForm
After running the command above, it will create a Livewire component with two files: app/Livewire/MultiStepForm.php and resources/views/livewire/multi-step-form.blade.php. app/Livewire/MultiStepForm.php will contain all the PHP code for the component while resources/views/livewire/multi-step-form.blade.php will contain the HTML side of things.
Let's import our Livewire component into our resources/views/welcome.blade.php file by updating the content of the page with the code below:
<x-layouts.app>
<livewire:multi-step-form />
</x-layouts.app>
In routes/web.php, create a route for our Livewire component by adding the code below.
Route::get('/', function () {
    return view('welcome');
});
With that done, replace the content of resources/views/livewire/multi-step-form.blade.php with the code below:
<div>
    <div class="max-w-4xl mx-auto p-6 bg-white shadow-xl rounded-xl">
        @if (session('success'))
            <div class="mb-4 p-4 bg-green-100 text-green-700 rounded-lg">
                {{ session('success') }}
            </div>
        @endif
        <h1 class="text-4xl">Multi step form with MongoDB</h1>
        <h2 class="text-base font-semibold mb-4">Step {{ $currentStep }} of 3</h2>
        <div>
            @if ($currentStep == 1)
                <div>
                    <label class="block text-sm">Name</label>
                    <input type="text" wire:model="name" class="border rounded-lg p-2 w-full">
                    @error('name') <span class="text-red-500 text-sm">{{ $message }}</span> @enderror

                    <label class="block mt-2 text-sm">Email</label>
                    <input type="email" wire:model="email" class="border rounded-lg p-2 w-full">
                    @error('email') <span class="text-red-500 text-sm">{{ $message }}</span> @enderror
                </div>
            @endif

            @if ($currentStep == 2)
                <div>
                    <label class="block text-sm">Address</label>
                    <input type="text" wire:model="address" class="border p-2 w-full">
                    @error('address') <span class="text-red-500 text-sm">{{ $message }}</span> @enderror

                    <label class="block mt-2">City</label>
                    <input type="text" wire:model="city" class="border p-2 w-full">
                    @error('city') <span class="text-red-500 text-sm">{{ $message }}</span> @enderror

                </div>
            @endif

            @if ($currentStep == 3)
                <div>
                    <label class="block">Gender</label>
                    <select wire:model="gender" class="border p-2 w-full">
                        <option value="male">Male</option>
                        <option value="female">Female</option>
                    </select>
                </div>
            @endif

            <div class="mt-4 flex justify-between">
                @if ($currentStep > 1)
                    <button wire:click="previousStep" class="px-4 py-2 bg-gray-500 text-white rounded">Back</button>
                @endif

                @if ($currentStep < 3)
                    <button wire:click="nextStep" wire:loading.class="opacity-50" class="px-4 py-2 bg-blue-500 text-white rounded">
                        <span wire:loading.remove>Next</span>
                        <span wire:loading>
                            Loading..
                        </span>
                    </button>
                @else
                    <button wire:click="nextStep" wire:loading.class="opacity-50" class="px-4 py-2 bg-green-500 text-white rounded">
                        <span wire:loading.remove>Save</span>
                        <span wire:loading>
                            Loading..
                        </span>
                    </button>
                @endif
            </div>
        </div>
    </div>
</div>
Let's break down the code above. It contains the HTML and TailwindCSS for our multi-step form. The form fields contain wire:model which binds them to elements that will be declared in the Livewire component. The form is wrapped in a centered container div with Tailwind classes for spacing, background color, and a subtle shadow.
In the code, we use the ($currentStep) variable to update the current step of the form as the user fills the form.
 @if (session('success'))
         <div class="mb-4 p-4 bg-green-100 text-green-700 rounded-lg">
              {{ session('success') }}
          </div>
   @endif
Check if a success message exists in the session. If this returns true, it’s displayed with a green background and a lighter green text.
We used a conditional statement and the value of $currentStep to identify the current step and display the relevant information for that step:
@if ($currentStep == 1)
 @enderror
This shows each step based on the value of $currentStep. In step one, it displays fields to collect names and emails. These forms’ input are bound to $name and $email in app/Livewire/MultiStepForm.php using wire:model. We repeated the process for steps two and three. We also handle errors in the form using the @error() Blade directive.
We used a conditional statement to display the back button for the second and third steps, like the code below:
@if ($currentStep > 1)
                    <button wire:click="previousStep" class="px-4 py-2 bg-gray-500 text-white rounded">Back</button>
                @endif
We did the same for the Next button to proceed to the next step. We added a save button in the final stage to save the value in step three. To spice it up, we added wire:loading buttons to display a loading place holder when the form is loading.
Handling form data with MongoDB
The MongoDB PHP driver makes it very easy to work with MongoDB in Laravel. It enables us to interact with MongoDB using Eloquent the same way we would in a relational database situation (MySQL or PostgreSQL). To get started, let's create a model form using the command below:
php artisan make:model MultiStepForm
The command above will create a app\Models\MultiStepForm.php file. Open the file and update the content with the following:
<?php
namespace App\Models;
use MongoDB\Laravel\Eloquent\Model;
class MultiStepForm extends Model
{
protected $connection = 'mongodb';
protected $table = 'multi_step_form';

protected $fillable = [
'name', 'email', 'address', 'city', 'gender',
];
}
This is a typical Laravel model class. We imported MongoDB Eloquent using use MongoDB\Laravel\Eloquent\Mode. We connected the model to MongoDB using protected $connection = 'mongodb' and created a database table named multi_step_form using the protected $table = 'multi_step_form'.
Handling the form in the Livewire class
Let's handle the rest of the functionality of our form using Livewire.
Navigate to app/Livewire/MultiStepForm.php and replace the content of the page with the code below:
<?php
namespace App\Livewire;
use Livewire\Component;
use Illuminate\Support\Facades\DB;
use App\Models\MultiStepForm as MultiStepFormDB;
class MultiStepForm extends Component
{
    public $currentStep = 1;
    public $totalSteps = 3;
    public $name;
    public $email;
    public $address;
    public $city;
    public $gender;
    public function nextStep()
    {
        $this->validateStep();
        if($this->currentStep < $this->totalSteps){
            $this->currentStep++;
        }
    }
    public function previousStep()
    {
        $this->currentStep--;
    }
    public function validateStep()
    {
        if($this->currentStep === 1){
            $rules = [
                'name' => 'required|string',
                'email' => 'required|email',
            ];
            $this->validate($rules);
            $this->saveProgress($this->email, ['name' => $this->name], ['email' => $this->email]);
            session()->flash('success', 'Step '.$this->currentStep.' saved');
        }elseif($this->currentStep === 2){
            $rules = [
                'address' => 'required|string',
                'city' => 'required|string',
            ];
            $this->validate($rules);
            $this->saveProgress($this->email, ['address' => $this->address], ['city' => $this->city]);
            session()->flash('success', 'Step '.$this->currentStep.' saved');
        }elseif($this->currentStep === 3){
            $rules = [
                'gender' => 'required|string',
            ];
            $this->validate($rules);
            $this->saveProgress($this->email, ['gender' => $this->gender]);
            session()->flash('success', 'Step '.$this->currentStep.' saved');
        }
    }
    public function saveProgress($email, ...$formFields)
    {
        $data = [];
        foreach($formFields as $value){
            if (is_array($formFields)) {
                $data = array_merge($data, $value);
            }
        }
        try{
            MultiStepFormDB::updateOrCreate(['email' => $email], $data);
        }catch(\Exception $e){
            \Log::error('Error saving MultiStepForm: ' . $e->getMessage());
            session()->flash('error', 'There was an error saving your data. Please try again.');
        }
    }
    public function render()
    {
        return view('livewire.multi-step-form');
    }
}
The logic of the form we created in resources/views/livewire/multi-step-form.blade.php is done in app\Models\MultiStepForm.php. Let's break down the code above for easier understanding.
To keep track of the steps, we declared two variables for this purpose. The $currentStep keeps track of the user's current step and has a default value of 1. The $totalSteps variable defines how many steps the form has. It has a default value of 3, indicating that our form has three steps in total.
We declared other public properties to hold form data, like name and email, address and city, and finally gender.
These are Livewire properties. They automatically update in real time as the user types and are connected to the form using wire:model which we mentioned earlier.
nextStep(): This method validates the form input by calling the $this->validateStep() method. It displays an error message if the form fields are not fielded correctly. If everything is done right, it moves the user to the next step. It also flashes a success message to show progress.
previousStep(): This method moves the user one step back in the form by decreasing the value of $this->currentStep less by one.
$this->validateStep(): This method handles form validation and updates the database after each step to avoid data loss. It checks for the current step, validates the data required for the step, and updates the database—in step one, validated for name and email; in step two, validated for address and city; and finally, in step three, validated for gender. If there is an error, we display it. This error is displayed as an error message in the blade.php file.
Each time the user moves to the next step, their data is saved using the $this->saveProgress().
$this->saveProgress(): This is a custom method created for creating or updating data in our MongoDB database and to prevent us from repeating ourselves.
 public function saveProgress($email, ...$formFields)
    {
        $data = [];
        foreach($formFields as $value){
            if (is_array($formFields)) {
                $data = array_merge($data, $value);
            }
        }
        try{
            MultiStepFormDB::updateOrCreate(['email' => $email], $data);
        }catch(\Exception $e){
            \Log::error('Error saving MultiStepForm: ' . $e->getMessage());
            session()->flash('error', 'There was an error saving your data. Please try again.');
        }
    }
It accepts the $email of the user. The $email is used as a unique identifier to update a record that already exists or create a new record that does not exist.
I also accept another argument, ...$formFields. This enables us to pass in unlimited numbers of arrays to the method. We looped through and assigned the correct value to $data which is passed to our MultiStepFormDB::updateOrCreate() method to create the record.
The render() is shipped with Livewire. It loads the livewire.multi-step-form Blade view, which contains the form.
Testing
At this point, we can test. Ensure that your Laravel application is still served and npm is still running. If not still served, you can reserve it using the command below:
php artisan serve
From a different window:
npm run dev
Navigate to the local host URL. In my case, it is http://127.0.0.1:8000/. You should see a screen just like mine:

Fill out the form and ensure that everything works as expected.
Conclusion
Good job, if you followed along up until now. We have come to the end of the tutorial. Let's take a minute to recap. In this tutorial, we:
- Built a functional, multi-step form using Laravel and Livewire.
- Utilized MongoDB’s schema flexibility to store nested form data effectively.
- Leveraged the MongoDB PHP Driver for seamless data interaction.
If you like a little challenge, you can try adding user authentication to your form, and integrating email notifications using Laravel and MongoDB triggers for incomplete forms.
Find the project on GitHub. Feel free to clone it, sign up for MongoDB Atlas, and customize it to your specific needs. For more support, join the MongoDB Developer Community.

Top comments (0)