
Setting up an e-commerce site is often seen as laborious, but with the Jamstack ecosystem, we can create an e-commerce site very easily. This is what I'm going to demonstrate here by creating a fictitious e-commerce site that will offer graphic novels inspired by the world of music, called PaperJam. My GitHub directory is available here https://github.com/cynthiahenaff/paperjam and the demo site is available at this address https://paperjam.henaff.io.
I chose to use the following technical stack:
- Gatsby as a static site generator
- DatoCMS for the content
- Snipcart for the e-commerce part
- Vercel for CDN hosting
To get off to a good start, we will create an account on each SaaS that we will use: DatoCMS, Snipcart and Vercel.
Initiating the project with Gatsby
Gatsby is a static site generator based on React and GraphQL. The initialization of a project with Gatsby is quite simple and accessible to all, it is enough to type the following command in our terminal:
npm init gatsby
We can be guided through the CLI steps to the next question: Will you be using a CMS? We then select the answer DatoCMS.
To the question Would you like to install a styling system? , let's answer no, and concentrate on the other aspects of the design.
Continuing with the question Would you like to install additional features with other plugins?, select the options below:
◉ Add responsive images
◉ Add page meta tags with React Helmet
◉ Add an automatic sitemap
◉ Generate a manifest file
Finally, let's enter our API key for DatoCMS in response to the question Configure the DatoCMS plugin.
This key can be found under the name Read-only API token in the Settings/API tokens section of our project, on the DatoCMS website. It is write-protected and read-only for the data.
To start the project server, just use the following command at its root.
npm start
Now that our server is up and running, the home page of our web application is accessible at http://localhost:8000. The code for this page can be found in the JavaScript file src/pages/index.js. Within the pages folder, the different pages of our web application are determined.
For example, it is common on an e-commerce site to have an « About » page that talks either about our company or our product in detail. So we will create this page on our application. As we want to create the /about route, we will create an about.js file in the pages folder, as below:
|– src
    |– pages
        |— index.js
        |— about.js
import React from 'react';

const AboutPage = () => {
  return (
    <div>
      <h1>My « About » page</h1>
    </div>
  );
};

export default AboutPage;
The route http://localhost:8000/about is then automatically created.
For an e-commerce site, beyond the performance of the site, it is essential for a good referencing to add the metadata tags in the HTML files.
To add these elements in the head tag of our pages, the simplest method is to use the Helmet library.
We will create a Layout component in our components folder which we will call on our various pages. This component will also allow us to use the same layout throughout our site. We will include the header and footer of our project in this component.
import React from 'react';
import { Helmet } from 'react-helmet';

const Layout = ({ children, title, description, image }) => {
  return (
    <div>
      <Helmet
    defaultTitle="PaperJam"
    defer={false}
    htmlAttributes={{
          lang: 'en',
        }}
       >
        <title>{title}</title>
        <meta name="description" content={description} />
        <meta property="og:title" content={title} />
        <meta property="og:description" content={description} />
        <meta property="og:image" content={image} />
        <meta property="og:type" content="website" />
        <meta property="og:locale" content="en_GB" />
        <meta property="twitter:card" content="summary_large_image" />
        <meta property="twitter:creator" content="@monsieur_riz" />
      </Helmet>

      <div class="content">
        <header />
        <main>{children}</main>
        <footer />
      </div>
    </div>
  );
};

export default Layout;
This is what our pages/about.js file looks like after adding our Layout component.
import React from 'react';
import Layout from '../components/Layout';

const AboutPage = () => {
  return (
    <Layout
    title="My About page"
    description="Discover why I decided to create this ecommerce website"
     >
      <div>
        <h1>My "About" page</h1>
      </div>
    </Layout>
  );
};

export default AboutPage;
Content creation with DatoCMS
Now that our project is ready, we will move on to creating a product data model with DatoCMS.
DatoCMS has the advantage of being easy to use and ergonomic. It allows you to easily make mandatory elements such as product names or alternative texts on images. A gallery is available, which allows to store images, but also to edit them directly. It is also possible to manage the translation of our site into up to 5 different languages.
To do this, let's go to the Settings/Models section of the project in DatoCMS.
We will name our first data model Product; it will contain the following elements:
- Name - Text — Single-line string
We will make this element mandatory as it is essential for the correct display of a product


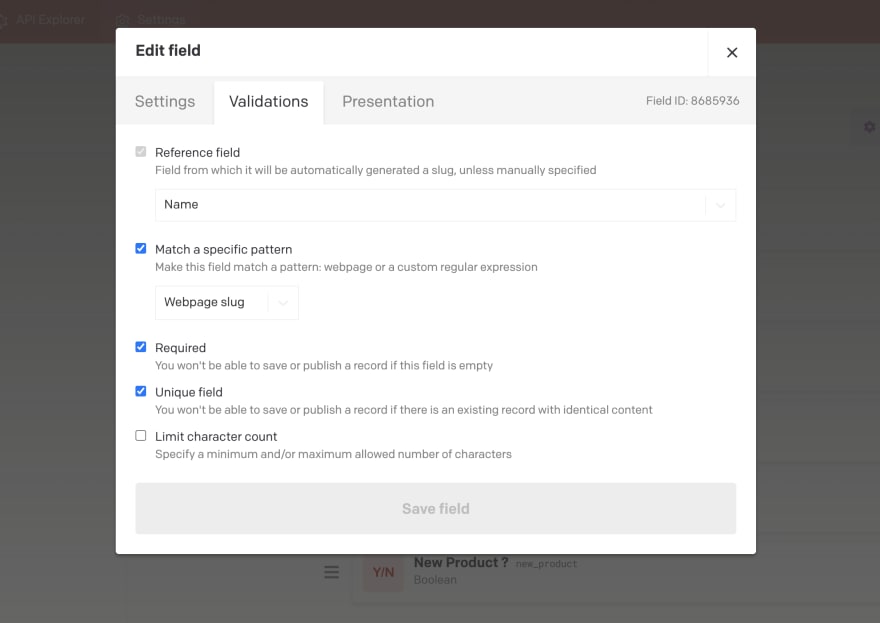
- Slug - type SEO — Slug
The slug is a part of the address that will allow us to uniquely identify a page. It must be in a format that is easily readable by users and search engines for UX and SEO purposes.
DatoCMS allows us to use a reference value such as the name of our product to generate it automatically.
It will have the following validations:
- Thumbnail - type Media — Single asset
In terms of validation, we will make alternative text mandatory with the Require alt and/or title option as this is essential for accessibility and SEO.
- Price - type Number – Floating-point number
This will also be mandatory.
During development, after a modification of a data model, it is necessary to shut down the server and type the following command in the terminal before restarting it.
npm clean
This will clear our site's cache and search for it on DatoCMS.
Now that our template is created, we can go back to the Content section and create our first product.
Creating the homepage
We will now display our products on the home page. To do this, we'll get the products registered in DatoCMS in the index.js file
The first thing to do is to import graphql from Gatsby by adding this line to the top of the JavaScript file.
import { graphql } from 'gatsby';
Under the HomePage component declaration, let's export a new constant called query. The name of the constant is not important, as Gatsby looks for a GraphQL string exported from the file rather than a specific variable. It is important to remember that we can only have one GraphQL query per file.
The first part of writing a GraphQL query is to define the type of operation (in this case query) and a name.
Gatsby integrates the GraphiQL tool, which is a development environment available at http://localhost:8000/__graphql
It allows us to build GraphQL queries and copy/paste them directly into our code.

Now that the request is ready, we can directly retrieve the data object from the component props as below.
import React from 'react';
import { graphql } from 'gatsby';

const IndexPage = ({ data }) => {
  const products = data?.allDatoCmsProduct?.edges ?? [];

  return (
    <div>
      <h2>Last product</h2>
      <div>
        {products.map(({ node }) => (
          <div key={node?.id}>
        <figure>
          <img src={node?.thumbnail?.url} alt={node?.thumbnail?.alt} />
        </figure>
        <div>
          <h3>{node?.name}</h3>
        </div>
      </div>
    ))}
      </div>
    </div>
  );
};

export const query = graphql`
  query getProducts {
    allDatoCmsProduct {
      edges {
        node {
          id
          slug
          name
          price
          thumbnail {
        url
        alt
          }
        }
      }
    }
  }
`;

export default IndexPage;
Snipcart integration
Our home page now contains a list of items, so we can now look at integrating Snipcart for the e-commerce part.
Snipcart is a shopping cart manager that is very easy to integrate into a web application. A simple addition of a piece of JavaScript code allows you to integrate the resources, JavaScript and CSS files into the source code. This is similar to adding a third party script like Google Analytics. As Gatsby has a very large community, there is already a plugin that will allow us to add the necessary scripts to Snipcart. We will install the gatsby-plugin-snipcart-advanced library.
npm install gatsby-plugin-snipcart-advanced
Once the installation is complete, we will add the necessary configuration to the gatsby-config.js file
module.exports = {
  plugins: [
    {
      resolve: `gatsby-plugin-snipcart-advanced`,
      options: {
        publicApiKey: "YOUR_SNIPCART_APIKEY",
        currency: 'eur',
        openCartOnAdd: true,
        useSideCart: true,
        // be careful with this mode cart. The cart in this mode has a bug of scroll in firefox
      },
    },
  ],
};
The API key needed to run Snipcart is available in the configuration area of our dashboard. Once logged in, this area can be accessed by clicking on the user icon in the upper right corner of the screen. It allows you to configure all administrative settings such as payment gateways, delivery, etc.
The API key is accessible in the API KEYS area under the name "public test API key".

It is also necessary to customise our regional settings (located in the Regional Settings tab) to configure the currency supported, the time zone and the countries in which it will be possible to place orders.
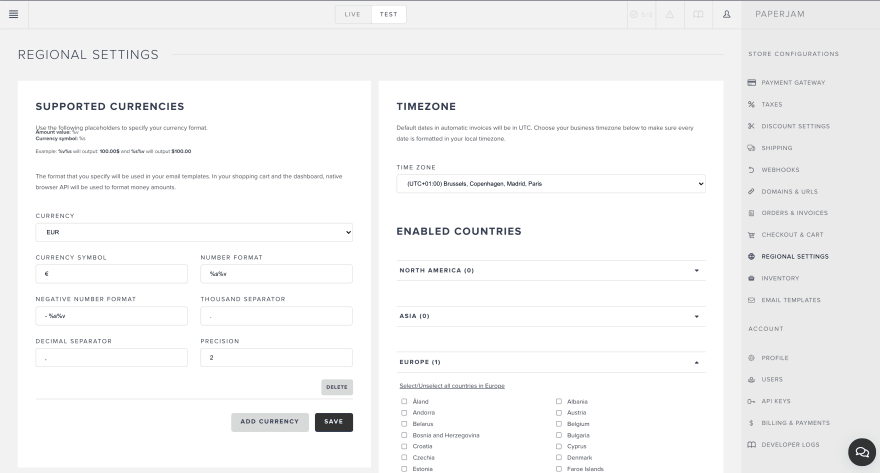
Snipcart offers many features that can be configured in this area, such as inventory management, delivery, automatic email layout and payment gateway.
Snipcart supports many payment gateways such as Stripe, Paypal or Square. For this guide, we will not configure the payment gateway and will remain in the "test" mode of Snipcart.
Adding an item to the basket
In order for Snipcart to react to add-to-cart events, we need to add the class snipcart-add-item to the add-to-cart buttons for each product, along with the following attributes:
-
data-item-id: Unique identifier for our product -
data-item-price: Price of the product -
data-item-image: URL of the product image -
data-item-name: Name of the product
import React from 'react';
import { graphql } from 'gatsby';

const IndexPage = ({ data }) => {
  const products = data?.allDatoCmsProduct?.edges ?? [];

  return (
    <div>
      <h2>Last product</h2>
      <div>
        {products.map(({ node }) => (
      <div key={node?.id}>
        <figure>
          <img src={node?.thumbnail?.url} alt={node?.thumbnail?.alt} />
        </figure>
        <div>
          <h3>{node?.name}</h3>
          <button
        class="snipcart-add-item"
        data-item-id={node?.slug}
        data-item-price={node?.price}
        data-item-image={node?.thumbnail?.url}
        data-item-name={node?.name}
          >
        Add to basket
          </button>
        </div>
      </div>
    ))}
      </div>
    </div>
  );
};

export const query = graphql`
  query getProducts {
    allDatoCmsProduct {
      edges {
        node {
          id
          slug
          name
          price
          thumbnail {
        url
        alt
          }
        }
      }
    }
  }
`;

export default IndexPage;
Viewing the cart
A summary of the basket allows customers to access it quickly and reminds them of its contents.
We have the ability to add elements with specific CSS classes to our web application that allow interaction with Snipcart directly.
To add a button that opens the shopping cart, we need to add the class snipcart-checkout . It is also possible to display the number of items in the basket or the total price by adding the snipcart-items-count or snipcart-total-price class to a JSX element.
We'll add this button inside our header element in our layout component to display this information and give our user the option to go and view their basket in detail.
...
<header>
  <button class="snipcart-checkout">
    Basket
    <span class="snipcart-total-price"></span>
    (<span class="snipcart-items-count"></span>)
  </button>
</header>
Our shopping tunnel is now ready to be tested on the server.
Putting your website online with Vercel
We are going to use Vercel which is one of the big players in automated front-end deployment.
Vercel allows us, in addition to simplifying the deployment, to deploy our site on servers in the four corners of the world. This is what we call a CDN (Content Delivery Network). In addition to the unbeatable price and the certainty that the site will withstand any load, it allows the content of the web page to be loaded from the server closest to the user and therefore reduces the loading time.
It is essential to use Vercel, or any other CDN, to host your code on a Git platform such as GitHub or GitLab.
Vercel allows you to easily import a Git directory once authenticated with the chosen Git platform.

When importing our project, Vercel detects which library it uses and pre-fills the necessary configuration. A good practice in terms of security is to add our environment variables on Vercel and not to expose them on your Github.
Now it's time to deploy our site. Vercel will automatically assign it a URL.

Now that our e-commerce site is available online, we still have a few steps to go before we have a working site.
Let's start with the configuration on the Snipcart dashboard.
In the Domains & URLS section, we will add the domain we just created with Vercel. This will determine the domains and sub-domains that our Snipcart shop can run on.

Finally, we will import all the products available on our site into Snipcart.
To do this, in the Products / Fetch section, simply enter the address of the page in our web application where our list of products is located; this is the home page.
Snipcart will automatically fetch our page to retrieve the items that carry the classes we added earlier.

We can now go to the end of our purchase tunnel and validate our very first order. Snipcart automatically manages the sending of the summary email to the customer.
Finally, as our site is pre-built on our server, we need a site update function to take into account the updated data on DatoCMS.
To do this, it is necessary to add a build trigger in the DatoCMS project parameters. This is directly connected to Vercel and configured as below.
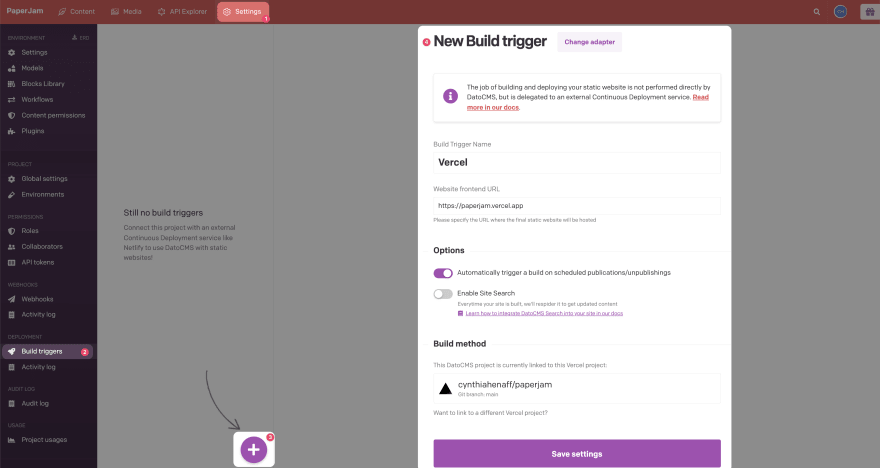
The "build method" automatically adds the DatoCMS integration to Vercel, which adds a site redeployment button to all DatoCMS pages.

Our e-commerce site is now online, quickly accessible from anywhere in the world and ready to receive our first visitors!
SEO = Performance, but not only
Thanks to Gatsby, our e-commerce site is fast and efficient. But if speed is essential for referencing, it is not everything. Indeed, one should not put aside the basics of SEO which are among others :
- A good structure of the pages by using the appropriate tags (h1, h2,...)
- A unique and quality content
- Optimised images to reduce their loading time
- Alternative text on all images that require it
- Good internal linking (links from one page to another)
- A large number of inbound links to the site
You now have all the cards in hand to launch and optimise your e-commerce site, but don't forget your target: you must always be a user of your own product in order to understand your customers and satisfy them as much as possible.

Top comments (0)