
Caching is an essential technique to improve the performance of applications by reducing database load and response time. In this post, we will explore how to integrate Redis as a caching layer in a Spring Boot application, running Redis inside a Docker container.
Why Use Redis for Caching?
Redis (Remote Dictionary Server) is an in-memory key-value store known for its high performance and scalability. It supports various data structures, persistence, and high availability, making it a great choice for caching in Spring Boot applications.
Setting Up Redis with Docker Compose
Update our docker-compose.yaml file with:
redis:
    image: redis:latest
    ports:
      - "6379:6379"
    volumes:
      - example-redis-data:/var/lib/redis/data
volumes:
  example-redis-data:
Adding Redis Cache to a Spring Boot Application
Step 1: Add Dependencies
In your pom.xml, add the necessary dependencies for Spring Boot caching and Redis:
<dependencies>
    <dependency>
        <groupId>org.springframework.boot</groupId>
        <artifactId>spring-boot-starter-cache</artifactId>
    </dependency>
    <dependency>
        <groupId>org.springframework.boot</groupId>
        <artifactId>spring-boot-starter-data-redis</artifactId>
    </dependency>
</dependencies>
Step 2: Create a cache configuration with Redis
Annotate your class configuration with @EnableCaching:
@Configuration
@EnableCaching
public class RedisCacheConfig {

    @Bean
    public CacheManager cacheManager(RedisConnectionFactory redisConnectionFactory) {
        RedisCacheConfiguration cacheConfiguration = RedisCacheConfiguration.defaultCacheConfig()
                .entryTtl(Duration.ofMinutes(10))
                .serializeValuesWith(RedisSerializationContext.SerializationPair
                        .fromSerializer(new GenericJackson2JsonRedisSerializer()));

        return RedisCacheManager.builder(redisConnectionFactory)
                .cacheDefaults(cacheConfiguration)
                .build();
    }

    @Bean
    public SimpleKeyGenerator keyGenerator() {
        return new SimpleKeyGenerator();
    }

}
Explanation of the parameters:
- entryTtl(Duration.ofMinutes(10)) → Defines that every entry of the cache expires after 10 minutes.
- GenericJackson2JsonRedisSerializer() → Serializes the objects in a JSON format, granting the compatibility and readability of the data.
- SimpleKeyGenerator → Use the key automatically generated by Spring to identify the objects on cache.
Step 3: Configure Redis Connection
Add the following properties to your application.properties or application.yml file:
spring.redis.host=localhost
spring.redis.port=6379
Step 4: Implement Caching in a Service
Create a service class that caches data using the @Cacheable annotation:
import org.springframework.cache.annotation.Cacheable;
import org.springframework.stereotype.Service;

@Service
public class UserService {

    private final UserRepository userRepository;

    public UserService(UserRepository userRepository) {
        this.userRepository = userRepository;
    }


    @Cacheable(value = "users", key = "#id")
    public UserResponseDto findById(UUID id) {
        var user = userRepository.findById(id).orElseThrow();
        return new UserResponseDto(user.getId(), user.getName());
    }
}
With caching enabled, the first request for a product ID will take time to process, but subsequent requests will return the cached value almost instantly.
Step 5: Test the Caching
- Grab a id from a user you stored in the database.
- With that id, you call the endpoint
users/{id from user}. - In my tests using Bruno, the call to the database, without the cache is responding in 31ms
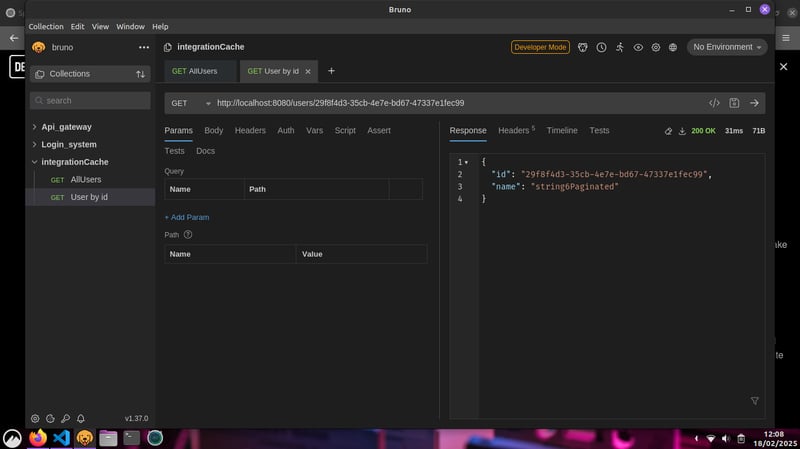
- With the cache the response comes in 8ms.

Step 6: Remove Cache
If a user was deleted, we need to remove him from the cache to avoid outdated data.
import org.springframework.cache.annotation.Cacheable;
import org.springframework.stereotype.Service;

@Service
public class UserService {

    private final UserRepository userRepository;

    public UserService(UserRepository userRepository) {
        this.userRepository = userRepository;
    }


    @Cacheable(value = "users", key = "#id")
    public UserResponseDto findById(UUID id) {
        var user = userRepository.findById(id).orElseThrow();
        return new UserResponseDto(user.getId(), user.getName());
    }

    @Transactional
    @CacheEvict(value = "users", key = "#id")
    public void deleteById(UUID id) {
        userRepository.deleteById(id);
    }
}
Step 7: Refreshing Cache
If you want to guarantee that the cach will always be updated, even we a new user is created, you can use @CachePut.
import org.springframework.cache.annotation.Cacheable;
import org.springframework.stereotype.Service;

@Service
public class UserService {

    private final UserRepository userRepository;

    public UserService(UserRepository userRepository) {
        this.userRepository = userRepository;
    }


    @Cacheable(value = "users", key = "#id")
    public UserResponseDto findById(UUID id) {
        var user = userRepository.findById(id).orElseThrow();
        return new UserResponseDto(user.getId(), user.getName());
    }

    @Transactional
    @CacheEvict(value = "users", key = "#id")
    public void deleteById(UUID id) {
        userRepository.deleteById(id);
    }

    @Transactional
    @CachePut(value = "users", key = "#result.id")
    public UserResponseDto save(CreateUserDto user) {
        var newUser = new UserModel(user.name());

        var userCreated = userRepository.save(newUser);

        return new UserResponseDto(userCreated.getId(), userCreated.getName());
    }
}
Conclusion
Integrating Redis as a caching layer in Spring Boot significantly improves application performance by reducing database calls. Running Redis in a Docker container makes it easy to set up and maintain. By using Spring Boot’s caching abstraction, we can seamlessly cache frequently accessed data and enhance the user experience.

Top comments (3)
@mspilari
Thanks Matheus for this crisp blog. I have few questions on this as follows
Hi @unmeshch. I'm glad that you like the blog.
Thank you for your comment.
Sorry if my answer was a bit long, but I love learning from others and sharing what I learn.
Okay, here are the answers...
The @Transactional annotation on the deleteById method ensures that the deletion operation runs within a transaction. While Spring Data JPA’s deleteById method is already transactional, explicitly marking it as @Transactional can be useful in specific cases, such as:
Consistency when performing multiple operations – If the method includes additional database operations before or after deletion (e.g., deleting related entities, logging changes, or updating another table), @Transactional ensures that all changes are either fully applied or rolled back if an error occurs.
Cascading deletions in relationships – When dealing with complex entity relationships that rely on cascading deletes (@OneToMany(cascade = CascadeType.REMOVE)), a transaction ensures that all dependent deletions are executed atomically.
Handling Lazy Loading Issues – If the deletion logic involves accessing lazy-loaded relationships, marking the method as @Transactional ensures that the session remains open during execution, preventing LazyInitializationException.
However, if the method simply calls userRepository.deleteById(id), like i do in this post, adding @Transactional is not strictly necessary, as Spring Data JPA already handles transactions internally.
The SimpleKeyGenerator bean is not strictly necessary in this case.
Spring provides a default key generator that works well for your current cache configurations, where you explicitly define the keys using SpEL expressions (e.g., key = "#id" or key = "#result.id"). Since the cache keys are being explicitly set, the default behavior of Spring's caching mechanism will correctly map them without needing a custom key generator.
The SimpleKeyGenerator is useful when caching methods have multiple parameters and no explicit key is provided, as it generates a composite key based on method arguments. However, in this case, since each caching annotation already specifies a key, the custom SimpleKeyGenerator bean is redundant.
That said, I like adding those beans/transactions in the post, even if they aren’t necessary, to provide a starting point on how to increment the keys or where to improve and use a transaction.
So, unless you have other caching methods that rely on implicit key generation, you can safely remove the SimpleKeyGenerator bean without affecting the current cache functionality.
@mspilari the long answer indeed helped me. Thanks for taking the time.
This makes sense, you have given the example considering good practices and a base to start with in real world cases. Finding new things to learn is fun :-)
Cheers!