What's in a mesh?
Right now not a whole lot. We have:
1) A list of coordinates
2) A list of colors
We're going to need to more. In this chapter we'll look at the foundational data for textures.
Adjusting for faces
Currently we're using 8-vertices for the cube. This is why we have that no-so-good-looing red-green gradient going on. Instead we could color each side individually to give the faces character. One thing to point out that we cannot mix and match indices of colors, UVs, normals and positions. Consider that for our cube we have 8 positions because a cube has 8 points. Well if the different faces have different colors even though they share the same positions then we no longer can configure triangles from our list of 8 points, we actually need a list of 24 points which include not just the x,y,z but also the normals, colors and UVs as well. This allows us to use the single index to index into all of the values at once. Here's the cube:
export const cube = {
    positions: [
        //Front
        -0.5, -0.5, -0.5,
        0.5, -0.5, -0.5,
        0.5, 0.5, -0.5,
        -0.5, 0.5, -0.5,
        //Right
        0.5, -0.5, -0.5,
        0.5, -0.5, 0.5,
        0.5, 0.5, 0.5,
        0.5, 0.5, -0.5,
        //Back
        0.5, -0.5, 0.5,
        -0.5, -0.5, 0.5,
        -0.5, 0.5, 0.5,
        0.5, 0.5, 0.5,
        //Left
        -0.5, -0.5, 0.5,
        -0.5, -0.5, -0.5,
        -0.5, 0.5, -0.5,
        -0.5, 0.5, 0.5,
        //Top
        -0.5, 0.5, -0.5,
        0.5, 0.5, -0.5,
        0.5, 0.5, 0.5,
        -0.5, 0.5, 0.5,
        //Bottom
        -0.5, -0.5, 0.5,
        0.5, -0.5, 0.5,
        0.5, -0.5, -0.5,
        -0.5, -0.5, -0.5
    ],
    colors: [
        //Front
        1.0, 0.0, 0.0,
        1.0, 0.0, 0.0,
        1.0, 0.0, 0.0,
        1.0, 0.0, 0.0,
        //Right
        0.0, 1.0, 0.0,
        0.0, 1.0, 0.0,
        0.0, 1.0, 0.0,
        0.0, 1.0, 0.0,
        //Back
        0.0, 0.0, 1.0,
        0.0, 0.0, 1.0,
        0.0, 0.0, 1.0,
        0.0, 0.0, 1.0,
        //Left
        1.0, 1.0, 0.0,
        1.0, 1.0, 0.0,
        1.0, 1.0, 0.0,
        1.0, 1.0, 0.0,
        //Top
        1.0, 0.0, 1.0,
        1.0, 0.0, 1.0,
        1.0, 0.0, 1.0,
        1.0, 0.0, 1.0,
        //Bottom
        0.0, 1.0, 1.0,
        0.0, 1.0, 1.0,
        0.0, 1.0, 1.0,
        0.0, 1.0, 1.0
    ],
    triangles: [
        0, 1, 2, //front
        0, 2, 3,
        4, 5, 6, //right
        4, 6, 7,
        8, 9, 10, //back
        8, 10, 11,
        12, 13, 14, //left
        12, 14, 15,
        16, 17, 18, //top
        16, 18, 19,
        20, 21, 22, //bottom
        20, 22, 23
    ]
};
I've colored each side individually with red being forward, green being right etc. to make a sort of clown cube. As we can see we need to duplicate more data but thankfully the normals and UVs will be the same per face so we won't need more than 24 values per attribute. Once we get all of this correct we can render:
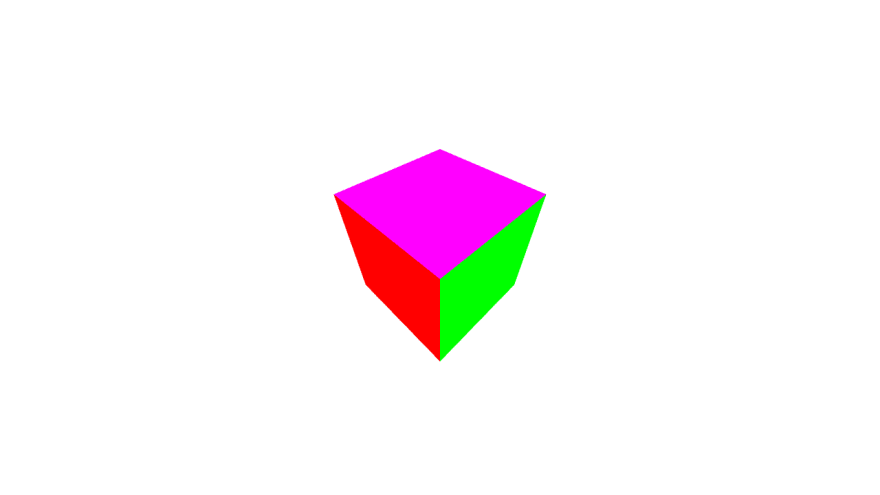
That looks a little more distinct.
UVs
UVs are how we can map 2d coordinates to our 3d object surface. These are how we do textures. Again it's an interpolation process except this time the coordinates represent the pixels (or more accurately "texels") in the texture. Since these values might not be integers there's various types of sampling algorithms we can use that give different effects.
UVs start at the upper left corner of the texture in WebGL. They grow in the same direction as the pixel coordinates and go from 0 to 1 in each direction (U = horizontal, V = vertical). Which of course doesn't match any of the other coordinates systems we've seen.
UVs are added to the model like other attributes:
//for the cube
uvs: [
    //front
    0, 0,
    1, 0,
    1, 1,
    0, 1,
    //right
    0, 0,
    1, 0,
    1, 1,
    0, 1,
    //back
    0, 0,
    1, 0,
    1, 1,
    0, 1,
    //left
    0, 0,
    1, 0,
    1, 1,
    0, 1,
    //top
    0, 0,
    1, 0,
    1, 1,
    0, 1,
    //bottom
    0, 0,
    1, 0,
    1, 1,
    0, 1,
]
And we also bind them like other attributes:
bindUvs(uvs) {
    const uvBuffer = this.context.createBuffer();
    this.context.bindBuffer(this.context.ARRAY_BUFFER, uvBuffer);
    this.context.bufferData(this.context.ARRAY_BUFFER, uvs, this.context.STATIC_DRAW);
    const vertexUvLocation = this.context.getAttribLocation(this.program, "aVertexUV");
    this.context.enableVertexAttribArray(vertexUvLocation);
    this.context.vertexAttribPointer(vertexUvLocation, 2, this.context.FLOAT, false, 0, 0);
}
Call this with the rest of the model binding.
Textures
Textures are just images that get mapped onto the shape and WebGL does all the work to make sure they are rendered correctly we just need to set some parameters.
Getting an image
To start we need to get access to an image, which is a bit of a roundabout process so we'll make a helper function:
function loadImage(url) {
    return new Promise((res, rej) => {
        const image = new Image();
        image.src = url;
        image.onload = () => res(image);
        image.onerror = rej;
    });
}
We're basically creating an HTML image but not adding it to the DOM.
Setting up a texture
Next we'll create a texture. I'll start with the code and then walk through it:
createTexture(image) {
    const texture = this.context.createTexture();
    this.context.bindTexture(this.context.TEXTURE_2D, texture);
    this.context.texImage2D(this.context.TEXTURE_2D, 0, this.context.RGBA, this.context.RGBA,
this.context.UNSIGNED_BYTE, image);
    this.context.texParameteri(this.context.TEXTURE_2D, this.context.TEXTURE_WRAP_S, this.
context.CLAMP_TO_EDGE);
    this.context.texParameteri(this.context.TEXTURE_2D, this.context.TEXTURE_WRAP_T, this.
context.CLAMP_TO_EDGE);
    this.context.texParameteri(this.context.TEXTURE_2D, this.context.TEXTURE_MIN_FILTER, this.
context.NEAREST);
    this.context.texParameteri(this.context.TEXTURE_2D, this.context.TEXTURE_MAG_FILTER, this.
context.NEAREST);
}
First we create a texture on the GPU with createTexture(). Then we "bind" the texture with bindTexture. Similar to the bindBuffer the sets the texture to be the active texture for modification. Then we get a series of texParameteri calls. These set various parameters on the texture the i suffix on the method is because the parameters take integer values (it's a weird API holdover). The 4 things we set are:
- TEXTURE_WRAP_S
- TEXTURE_WRAP_T
- MIN_FILTER
- MAG_FILTER
The first 2 are how the texture behaves once it reaches the end (eg what happens at UVs greater than 1). Does it clamp to the end or does it tile? The S/T is basically just another name for U/V, but if we want to be super technical S/T is the surface coordinates whereas U/V is the texture coordinates. Think of it like this, UVs go from 0 to 1 always, STs can go further but they still have to index into the texture using whatever the behavior we defined. Don't think about it too hard.
The second 2 are the minify and magnify filters or how does the texture sample when it's bigger than its native size and how does it when it's smaller. You basically get 2 options if it's "linear" or "nearest neighbor" with linear doing interpolation between pixels to produce a more blurred effect and nearest neighbor just taking the closest actual value giving it a more pixelated effect.
Linear:

Nearest:

Finally the meat. We actually set the image into the texture. The first parameter is the type of texture (we're just using normal 2d textures but it also allows cubemaps), 2nd is the level or which mipmap level (more on this later but just set it to 0 to get started), the next 2 are the texture format. There's a zillion texture formats but mainly we're going to be more at home in RGBA. We set both the internal format and format which is required for WebGL 1 and for 2 only if you know what you're doing would they be different (I don't know what I'm doing). Then we have the byte representation (I don't know why this is separate from the format) and we set that to an unsigned int (basically 1 byte per channel in RGBA like we're used to). Finally we can pass in the texture image data. You can also generate this from a canvas or video or whatever, anything that conforms to the bitmap interface.
Let's start with a simple texture made in MS paint:

I call it plus.png in the img folder. This is intentionally 512x512. It's just easier to work with power of 2 textures and older WebGL browsers can support them better.
We need to load it:
async loadTextures(){
    this.textures = {
        plus: this.createTexture(await loadImage("./img/plus.png"))
    };
}
This just needs to be called sometime after bootGpu.
UVs in the shader
We get them in as attributes but like colors they aren't very useful in the vertex shader and we need to pass them down using a varying output value:
//vertex shader
uniform mat4 uProjectionMatrix;
uniform mat4 uModelMatrix;

attribute vec3 aVertexPosition;
attribute vec3 aVertexColor;
attribute vec2 aVertexUV;
varying mediump vec4 vColor;
varying mediump vec2 vUV;

void main(){
    gl_Position = uProjectionMatrix * uModelMatrix * vec4(aVertexPosition, 1.0);
    vColor = vec4(aVertexColor, 1.0);
    vUV = aVertexUV;
}
In the fragment shader is where the interesting stuff happens:
//fragment shader
varying lowp vec4 vColor;
varying lowp vec2 vUV;
uniform sampler2D uSampler;
void main() {
    gl_FragColor = texture2D(uSampler, vUV);
}
We don't need to use vColor anymore.

And now we have a texture loaded. To make it show up better I changed the clear color for the background. You can do this with:
this.context.clearColor(0, 0.5, 0.5, 1); //whatever color you want
I do it in bootGpu where I set other global settings.
Using multiple textures for multiple objects
For another example I'm going to use a grass texture I found: http://texturelib.com/texture/?path=/Textures/grass/grass/grass_grass_0124
We can load this just like the plus texture but now that we have more than one how do we know which one we are using?
WebGL provides a few texture "slots" that can be bound. When we call bindTexture we bind a texture to the current slot which by default is 0. We can change the slot we're binding to by making that slot "active" with this.context.activeTexture(this.context.TEXTURE0); Where TEXTURE0 can be at least 0-7 and on my machine 0-31. We're only rendering one thing at a time and we're only doing one texture for now so we'll just use TEXTURE0 which doesn't require activation since it's automatic, just binding. While I don't know that I want to keep it like this, we can add the texture name to the mesh as a property (I won't show code but it's the same as everything else). Then we bind textures:
bindTexture(name){
    this.context.bindTexture(this.context.TEXTURE_2D, this.textures[name]);
}
Just like all the other binds.
We can test by re-adding the pyramid but we need to edit the vertices just like we did for the cube to differentiate the shared points.
export const quadPyramid = {
    positions: [
        //front
        0.0, 0.5, 0.0,
        -0.5, -0.5, -0.5,
        0.5, -0.5, -0.5,
        //right
        0.0, 0.5, 0.0,
        0.5, -0.5, -0.5,
        0.5, -0.5, 0.5,
        //back
        0.0, 0.5, 0.0,
        0.5, -0.5, 0.5,
        -0.5, -0.5, 0.5,
        //left
        0.0, 0.5, 0.0,
        -0.5, -0.5, 0.5,
        -0.5, -0.5, -0.5
    ],
    colors: [
        //front
        1.0, 0, 0,
        1.0, 0, 0,
        1.0, 0, 0,
        //right
        0, 1.0, 0,
        0, 1.0, 0,
        0, 1.0, 0,
        //back
        0, 0, 1.0,
        0, 0, 1.0,
        0, 0, 1.0,
        //left
        1.0, 1.0, 0,
        1.0, 1.0, 0,
        1.0, 1.0, 0,
    ],
    uvs: [
        0.5, 1,
        0, 0,
        1, 0,
        0.5, 1,
        0, 0,
        1, 0,
        0.5, 1,
        0, 0,
        1, 0,
        0.5, 1,
        0, 0,
        1, 0,
    ],
    triangles: [
        0, 1, 2,
        3, 4, 5,
        6, 7, 8,
        9, 10, 11
    ],
    textureName: "grass"
}
And we can add the grass texture to loadTextures:
async loadTextures(){
    this.textures = {
        plus: this.createTexture(await loadImage("./img/plus.png")),
        grass: this.createTexture(await loadImage("./img/grass.jpg"))
    };
}
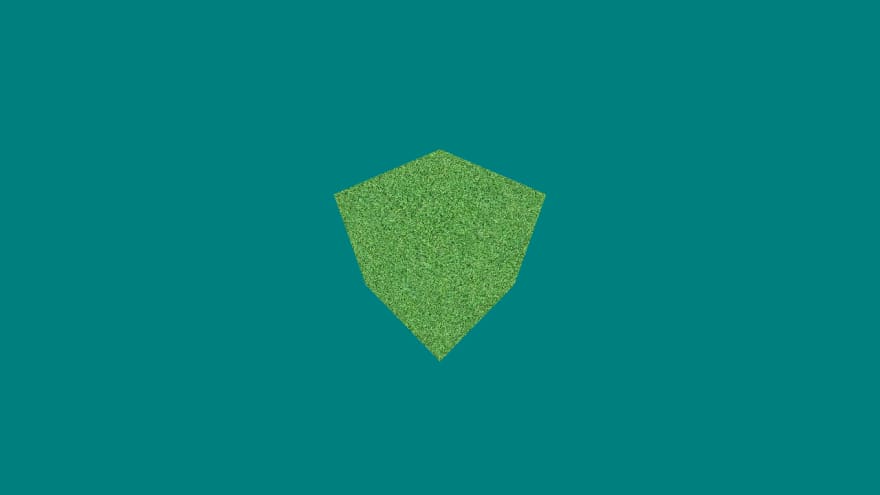
And we get this fun thing:

Mip Maps
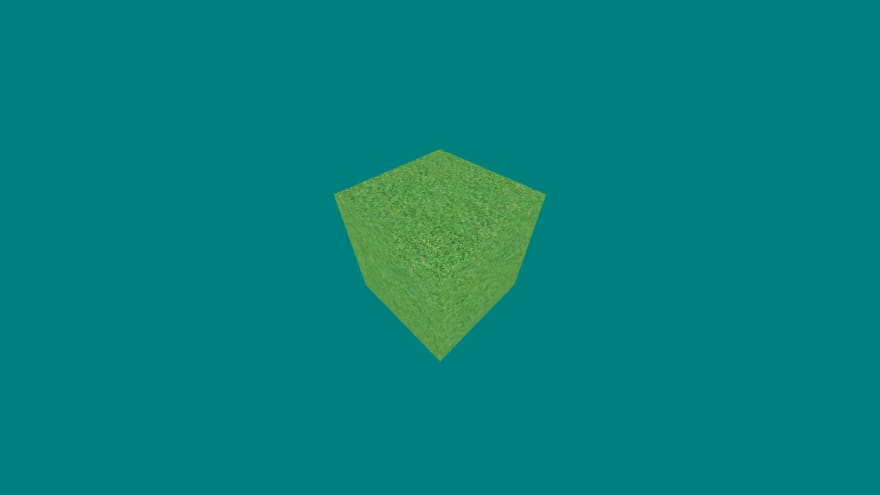
So what's this "mipmapping" business about? Basically, we can generate smaller versions of the texture to show in certain situations. You might think "Why would I want that? Doesn't that just take up more memory?" and that's true, it does but it can improve the image quality. Let's look at the grass texture. It's 4096x4096 which is pretty big, and here's what happens when it's mapped onto the cube:
You can't really tell what it is at all. This is because we're picking texels (texture's pixels) from the texture but it's so far away from the camera that the leaps between texels is big. We might get a green spot, or a dark spot and it's kinda random which is why it looks like random noise. It would actually be better to sample from a smaller texture as there's less variance between the texels. As it turns out WebGL can do this automatically. If you'll remember when we called texImage2D we gave it a level parameter. This corresponds to the mipmap level and we can manually upload all of the different ones if we really wanted but we can also just generate them. By uploading level 0 and calling this.context.generateMipmap(this.context.TEXTURE_2D); it will do that for us. I'm not 100% on the details but I believe for a power of 2 texture (WebGL 1.0 doesn't support auto mipmaps for non power of 2 textures, ie a texture with height/width no a power of 2) you'll get one mipmap level per power of 2. So if I had a 512x512 texture for level 0, then level 1 is 256x256, level 2 is 128x128, level 3 is 64x64 and so forth down to 1. To actually use the mip map we set the TEXTURE_MIN_FILTER to NEAREST_MIPMAP_LINEAR or LINEAR_MIPMAP_LINEAR. They have subtle differences (you may need to actually click to enlarge to see the detail and even then...):
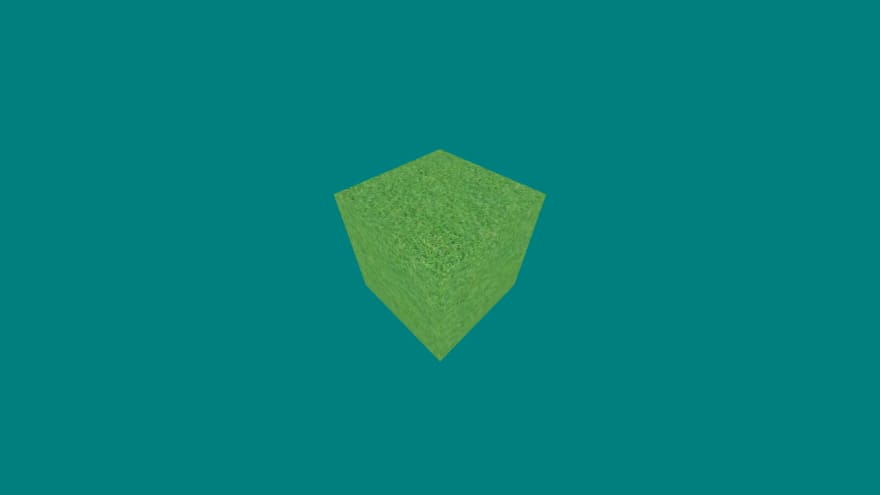
Nearest Mipmap Linear:

Linear Mipmap Linear:

Nearest Mipmap Linear takes the nearest mipmap and linearly interpolates texel colors. Linear Mipmap Linear linearly interpolates the mipmap then linearly interpolates the texels (also called trilinear filtering). We can also check out others like:
Nearest Mipmap Nearest
Linear Mipmap Nearest
It's subtle but the bottom line is it's going to look better when the texture is small than not doing any mip mapping. Also keep in mind that mipmapping doesn't work for magnification because you gave it the highest res version so we can't generate mipmaps upward (at least not that I'm aware but maybe you could manually do deep-learning super-sampling or something...), you need to set magnification to either NEAREST or LINEAR.
And with that we have a pretty good overview of basic texturing, a skill that will be handy in the future. Sadly, we've outgrown codepen with our big multi-file project. But even though there's no live demo, fear-not. You can find the source for this chapter here: https://github.com/ndesmic/geogl/tree/v1.
Just clone and npm start!

Latest comments (0)