
For the past few weeks I have been learning Kubernetes fundamentals, as part of the hands on lab, I will be creating an EKS Cluster in my AWS account using Managed Nodes. I would be making use of the AWS Console to create the cluster & the CLI to create nodes & communicate from my local system using kubectl tool with the remote nodes to deploy the container images.
Pre-requisites:
- AWS account Setup the AWS CLI & kubectl tools in your local machine.
- AWS CLI: Install the CLI tool & check the successful installation using the below command

- kubectl : Install the kubectl tool & then check the successful installation using the below command
![]()
Code repository:
https://github.com/neetu-mallan/ManagedNodeEKSCluster/tree/master
To create the cluster, follow the below steps:
- VPC & Subnet creation: Create a custom VPC, 2 public & 2 private subnets, Internet Gateway, NatGateway etc. using the below command.
aws cloudformation create-stack \
--region ap-south-1 \
--stack-name VPCForEKSCluster \
--template-url https://s3.us-west-2.amazonaws.com/amazon-eks/cloudformation/2020-10-29/amazon-eks-vpc-private-subnets.yaml
- Create a cluster IAM role The below command creates a STS role which can be assumed by the EKS service.
Command:
aws iam create-role \
--role-name EKSClusterRole \
--assume-role-policy-document file://cluster-role-trust-policy.json

3.Attach the AmazonEKSClusterPolicy to the IAM role created above
Command:
aws iam attach-role-policy \
--policy-arn arn:aws:iam::aws:policy/AmazonEKSClusterPolicy \
--role-name EKSClusterRole

- Cluster Creation: Create a cluster using the AWS Management Console, make sure to select the VPC, subnets, security groups as created on Step 1.


- Create kubeconfig file. This config file helps you to communicate with the remote cluster using the kubectl tool
aws eks update-kubeconfig --region ap-south-1 --name MyCluster

As shown in the command output in the above screenshot, if we try to print the contents of the config file, we can see that it creates an entry for the Cluster created in Step 4 in our local .kube folder.
Be sure to change the region name & cluster name as per your AWS account.
Run the "kubectl get svc" command to ensure the config is working fine & you are able to connect to the cluster.

Note: In my case, I faced an issue wherein I was getting the "exec plugin: invalid apiVersion "client.authentication.k8s.io/v1alpha1", the config file was updated with the api version v1alpha1 which was no longer valid. I had to update the aws cli & rerun the update-kubeconfig command mentioned above to fix the issue.
a. Create an IAM Role for the nodes to interact with AWS resources.
aws iam create-role \
--role-name EKSNodeRole \
--assume-role-policy-document NodeIAMRole.json

Assign the specific policies to the EKSNode Role using the below commands:
aws iam attach-role-policy \
--policy-arn arn:aws:iam::aws:policy/AmazonEKSWorkerNodePolicy --role-name EKSNodeRole
aws iam attach-role-policy \
--policy-arn arn:aws:iam::aws:policy/AmazonEC2ContainerRegistryReadOnly --role-name EKSNodeRole
aws iam attach-role-policy \
--policy-arn arn:aws:iam::aws:policy/AmazonEKS_CNI_Policy --role-name EKSNodeRole
- Add Nodes to Cluster:
- There are 2 options here- we can go for Fargate(Serverless) & Managed(EC2) nodes.
- I am choosing the EC2 Managed nodes for the below exercise
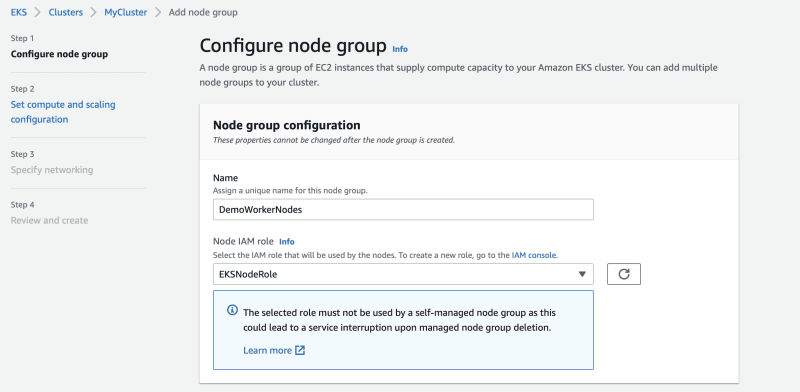
Go to the Compute tab under the cluster & click on Add NodeGroup. I have created a NodeGroup "DemoWorkerNodes" as shown below. The cluster & node group creation can take a couple of minutes.

 ]
]

Troubleshooting pointers: Initially I changed the Instance Config from t3.medium to t2.micro but 3 of the 5 containers were not starting. I had to delete the node group & re-create using t3.medium as default EC2 config & then the deployment worked fine.
Commands to be used to troubleshoot:
kubectl get pods
kubectl describe pod pod-name
kubectl logs pod-name .... replace pod-name with the name of your pod.
Run the kubectl get nodes command to check that we can see the nodes created through the node group in our local system too.
This ensures that all the config done above works & we are able to connect to the remote nodes locally.

Deploy the containers using the kubectl create command onto the nodes from your local machine as shown below:

Once done, copy the load balancer services external IP as shown in the screenshot & open them in the web browser to see the successfully deployed application.


Note: Clean up your account post the successful deployment. Delete the node groups & then the EKS cluster & the associated IAM roles.
Hands-On Idea:
AWS EKS Official Documentation & KodeKloud Kubernetes Beginner's Course https://docs.aws.amazon.com/eks/latest/userguide/getting-started.html

Top comments (0)