Let's be honest—we've all rage-clicked on a sluggish web app wondering if it's frozen or just ignoring us. Why do some websites feel buttery smooth while others make you want to throw your laptop out the window? After spending countless late nights debugging performance issues in production, I've realized it often boils down to how we handle UI events and rendering.
I'm not going to pretend I haven't shipped laggy UIs before—I definitely have. But through painful trial and error (and plenty of customer complaints), I've collected a toolbox of JavaScript helper functions that have saved my bacon time and again. Whether you're trying to tame a data-heavy dashboard that's bringing browsers to their knees or just trying to make your portfolio site feel snappier, these practical patterns have got your back.
⚡ TL;DR:
Slow UI? It's not always the framework's fault. Usually, it's too many DOM updates, rapid-fire events, or heavy JavaScript blocking the main thread. In this article, I'm sharing battle-tested JavaScript helpers (debounce, throttle, lazy loading, and more) that have saved me from late-night debugging nightmares. If you're ready to make your UIs faster and your users happier, keep reading!
Table of Contents
Understanding Performance Bottlenecks
Before we dive into the good stuff, let's quickly talk about what actually makes UIs slow. After profiling more websites than I care to admit, these five culprits keep showing up:
- DOM update hell - Every time you touch the DOM, the browser potentially recalculates layouts. Do this too often, and your UI starts crawling.
- Event tsunami - Try logging scroll events sometime. Your poor function might fire 30+ times per second! No wonder things get choppy.
- JavaScript traffic jams - When your code hogs the main thread, nothing else gets processed—not clicks, not scrolls, nothing. Users hate this.
- Calculation groundhog day - Recomputing the same values over and over is like hitting every red light on your commute. Utterly unnecessary.
- Event listener bloat - Each listener takes memory and CPU cycles. Hundreds of them? That's a recipe for a sluggish experience.
The helper functions below have quite literally saved projects I've worked on. Let's start with the dynamic duo that should be in every frontend dev's toolkit: debounce and throttle.
Debounce: Taming Rapid-Fire Events
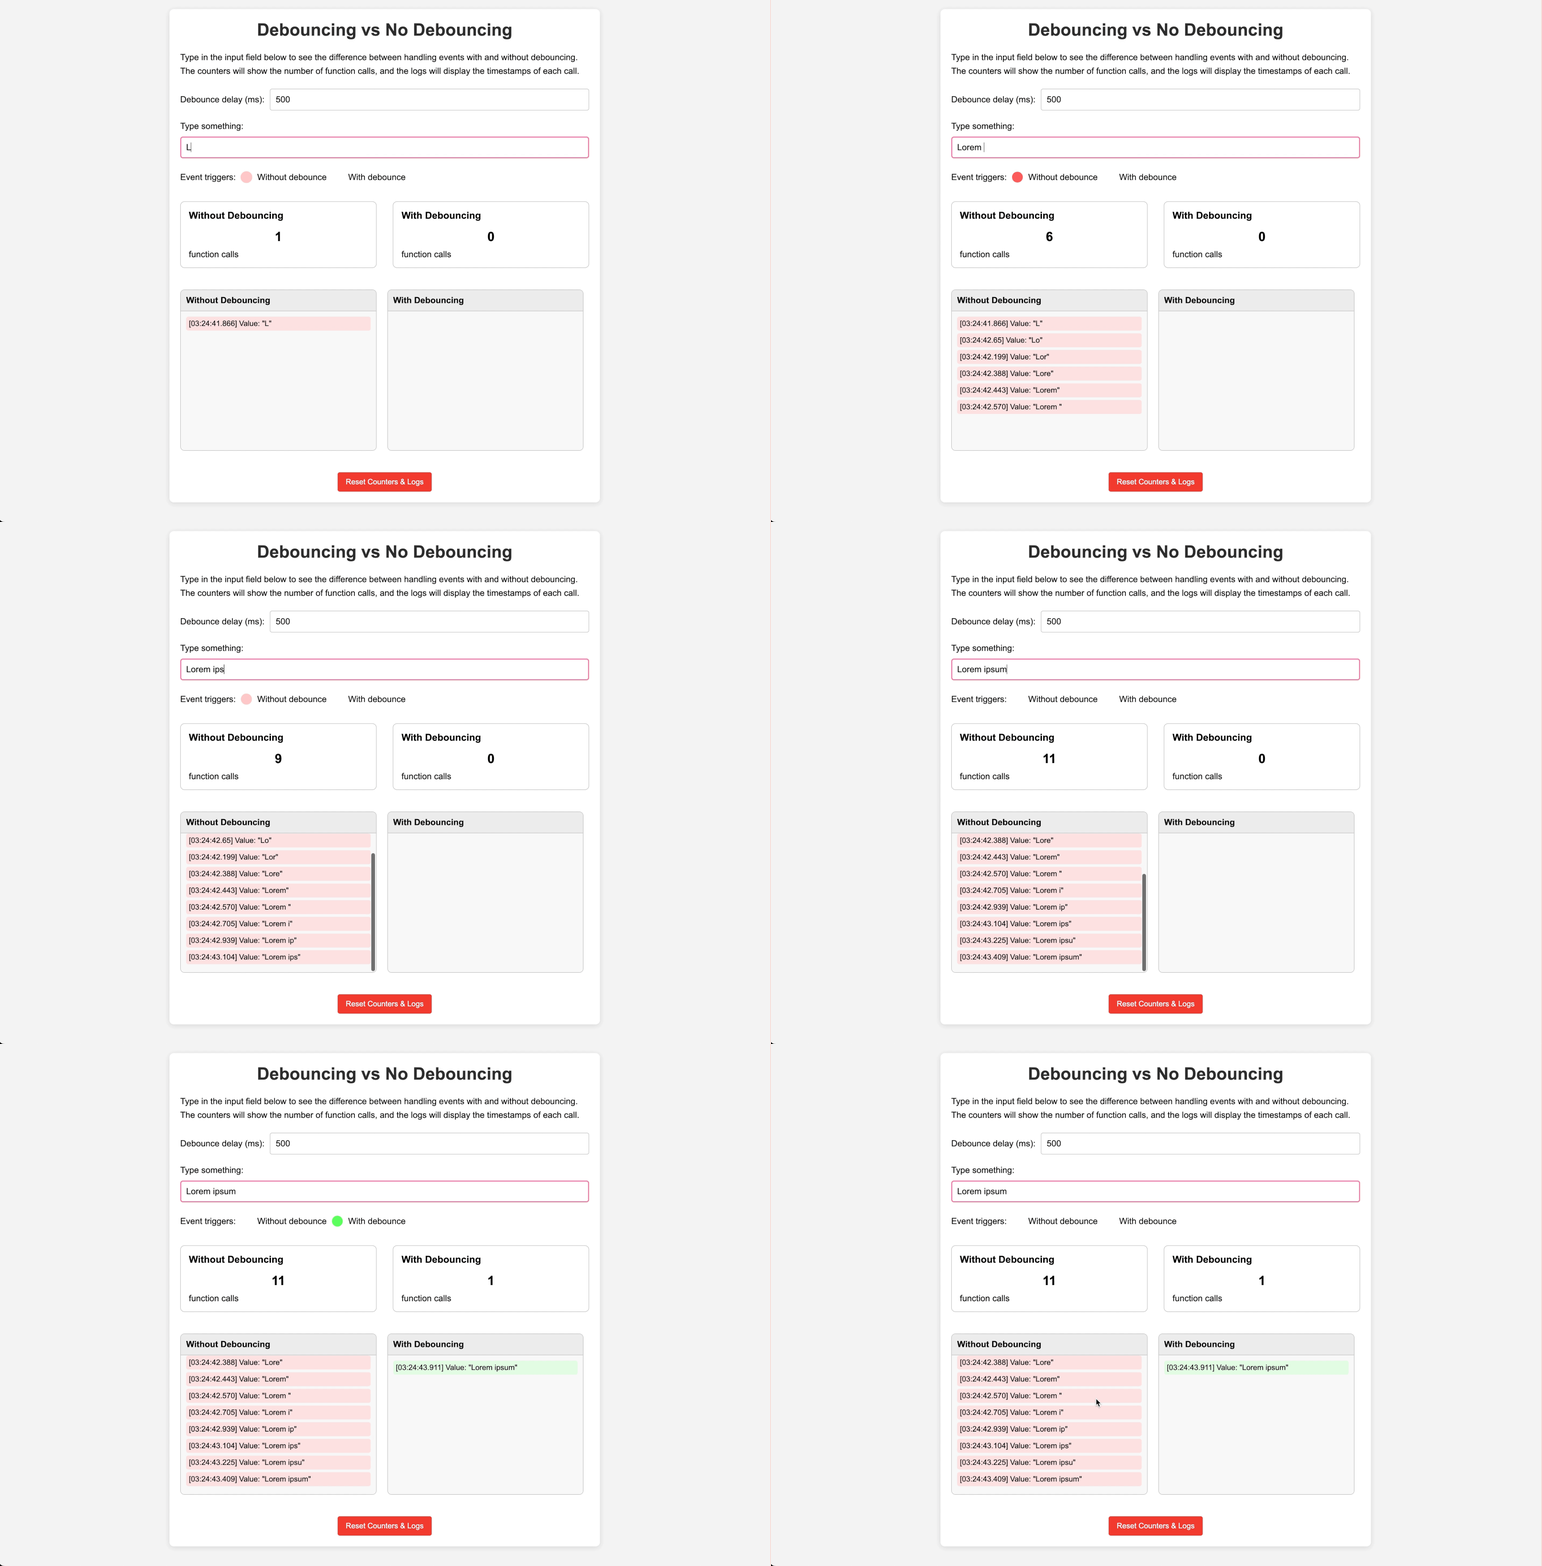
Think of debouncing like this: you're at a bar with a chatty friend who keeps starting new thoughts mid-sentence. Instead of responding to every half-formed idea, you wait until they take a breath before replying. That's debounce in a nutshell—it waits for a pause before acting.
What Problem Does Debounce Solve?
I once built a search feature that fired API requests with every keystroke. Typing "javascript" triggered 10 separate network calls—the "j" query returned Java results, then "ja" returned something else, creating a messy race condition. The customer complained about seeing flashes of wrong results. Debouncing fixed all of that by waiting until typing stopped before making a single request. Ever since that embarrassing disaster, debounce has been my trusty sidekick for any project with rapid-fire events. I've literally added it to my project starter templates—right up there with the things I never leave home without.
Implementation
/**
 * Creates a debounced version of a function that delays execution
 * until after wait milliseconds have elapsed since the last time it was invoked.
 *
 * @param {Function} func - The function to debounce
 * @param {number} wait - The number of milliseconds to delay
 * @param {boolean} [immediate=false] - Whether to invoke the function on the leading edge
 * @return {Function} The debounced function
 */
function debounce(func, wait, immediate = false) {
  let timeout;

  return function executedFunction(...args) {
    const context = this;

    // Function to execute after the delay
    const later = function() {
      timeout = null;
      if (!immediate) func.apply(context, args);
    };

    const callNow = immediate && !timeout;

    // Reset the timer
    clearTimeout(timeout);
    timeout = setTimeout(later, wait);

    // Call immediately if needed
    if (callNow) func.apply(context, args);
  };
}
Example Usage
// Without debounce - would fire many times during typing
searchInput.addEventListener('input', handleSearch);

// With debounce - only fires 300ms after typing stops
searchInput.addEventListener('input', debounce(handleSearch, 300));

function handleSearch(e) {
  // Run search query with input value
  fetchSearchResults(e.target.value);
}
Common Use Cases
- Search inputs and filtering
- Window resize handlers
- Form input validation
- Saving content while typing (like Google Docs)
- Autocomplete/type-ahead features
Pitfalls to Avoid
- I've set the delay too high (1000ms+) and had users ask if the feature was broken. Keep it snappy!
- Going too low (like 50ms) pretty much defeats the purpose—I've made this mistake when debugging and forgotten to change it back.
- Watch out for
thiscontext and event objects. I once spent hours debugging because my debounced function lost its event object. Facepalm moment. - Sometimes you want immediate feedback AND debouncing. That's what the
immediateflag is for—like when validating forms where you want instant validation on the first keystroke but not every single one after.
Throttle: Steady Control for Frequent Events
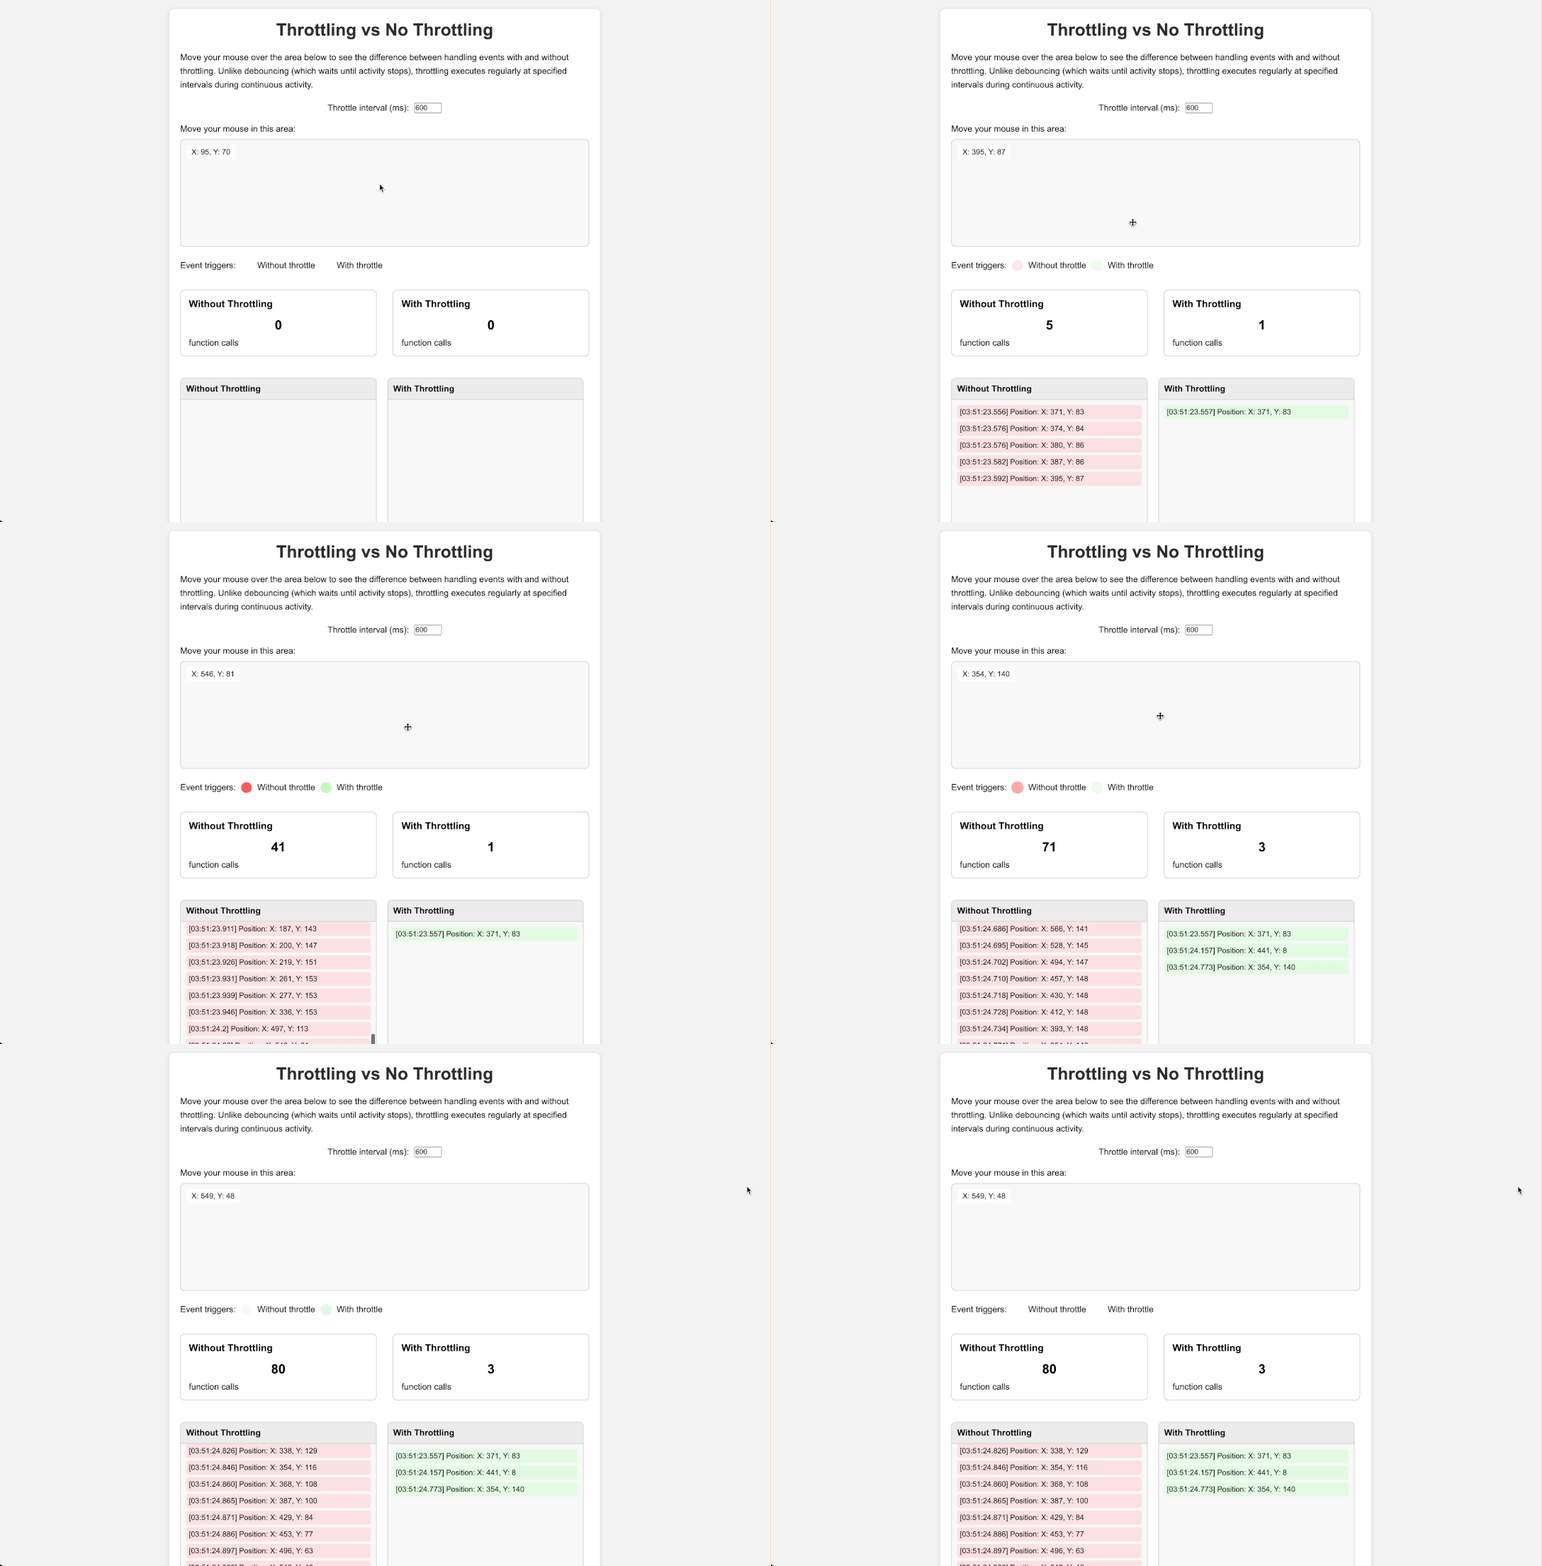
If debounce is waiting for someone to shut up, throttle is more like "I'll hear you out, but only every 5 seconds." No matter how much they talk, you're only going to respond at regular intervals. This is clutch for events that fire like a machine gun (looking at you, scroll events).
What Problem Does Throttle Solve?
True story: I once built this fancy scroll-based animation without throttling. It worked fine on my beefy dev machine, but QA testing on a mid-range phone turned it into a slideshow. The scroll handler was firing 30+ times per second, killing performance. Throttling it to execute at most every 100ms made everything buttery smooth while still feeling responsive. The animation actually looked better because it wasn't trying to do too much.
Implementation
/**
 * Creates a throttled function that only invokes the provided function
 * at most once per every wait milliseconds.
 *
 * @param {Function} func - The function to throttle
 * @param {number} wait - The number of milliseconds to throttle invocations to
 * @return {Function} The throttled function
 */
function throttle(func, wait) {
  let lastCall = 0;
  let timeout = null;

  return function executedFunction(...args) {
    const context = this;
    const now = Date.now();
    const timeSinceLastCall = now - lastCall;

    // If enough time has passed, call the function immediately
    if (timeSinceLastCall >= wait) {
      lastCall = now;
      func.apply(context, args);
    } else {
      // Otherwise, schedule a call for when the wait time has passed
      clearTimeout(timeout);
      timeout = setTimeout(() => {
        lastCall = Date.now();
        func.apply(context, args);
      }, wait - timeSinceLastCall);
    }
  };
}
Example Usage
// Without throttle - would fire too frequently during scrolling
window.addEventListener('scroll', updateScrollIndicator);

// With throttle - only fires every 100ms at most
window.addEventListener('scroll', throttle(updateScrollIndicator, 100));

function updateScrollIndicator() {
  const scrollTop = document.documentElement.scrollTop;
  const height = document.documentElement.scrollHeight - window.innerHeight;
  const scrolled = (scrollTop / height) * 100;

  document.getElementById('scroll-indicator').style.width = scrolled + '%';
}
Common Use Cases
- Scroll event handlers
- Mouse move/hover effects
- Drag operations
- Canvas drawing/game loop operations
- Real-time data updates (like stock tickers)
Pitfalls to Avoid
- Throttle isn't great when you absolutely need that final event. I've seen devs use throttle for "save draft" functionality and then wonder why the last few keystrokes sometimes get lost. Use debounce for that!
- I've gone too aggressive with 500ms+ throttling on mousemove events and created this weird laggy feeling. For mouse-related stuff, stick closer to 100ms or less.
- Some implementations let you choose between executing on the first event, last event, or both. Worth understanding the difference if your UX needs that level of fine-tuning.
Debounce vs. Throttle Visualization
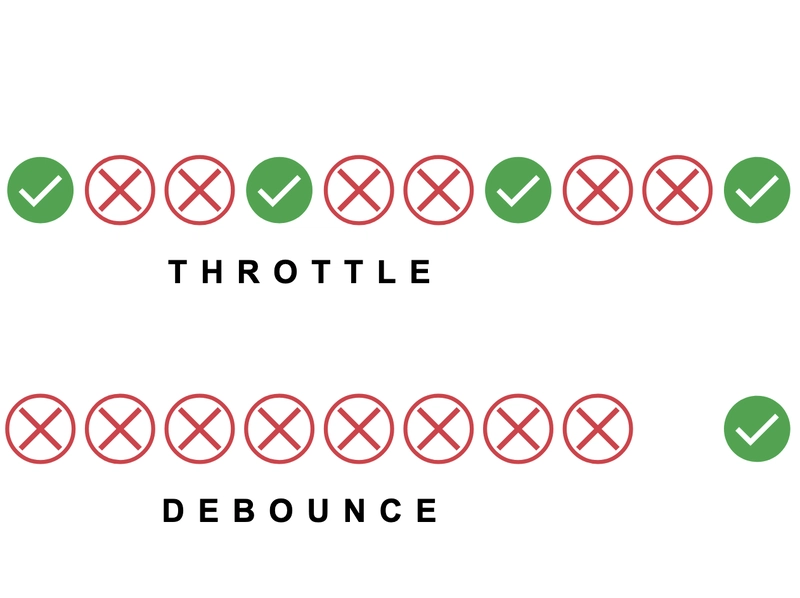
This is a representative image to explain the difference. The red X marks represent rapid-fire events like keystrokes or scroll movements, while the green checkmarks show when your function actually executes. Throttle runs your function at regular intervals regardless of event frequency, while debounce waits until the events completely stop before running the function once. One approach gives you regular updates; the other prevents unnecessary work until you're finished.
RequestAnimationFrame Wrapper: Smooth Visual Updates
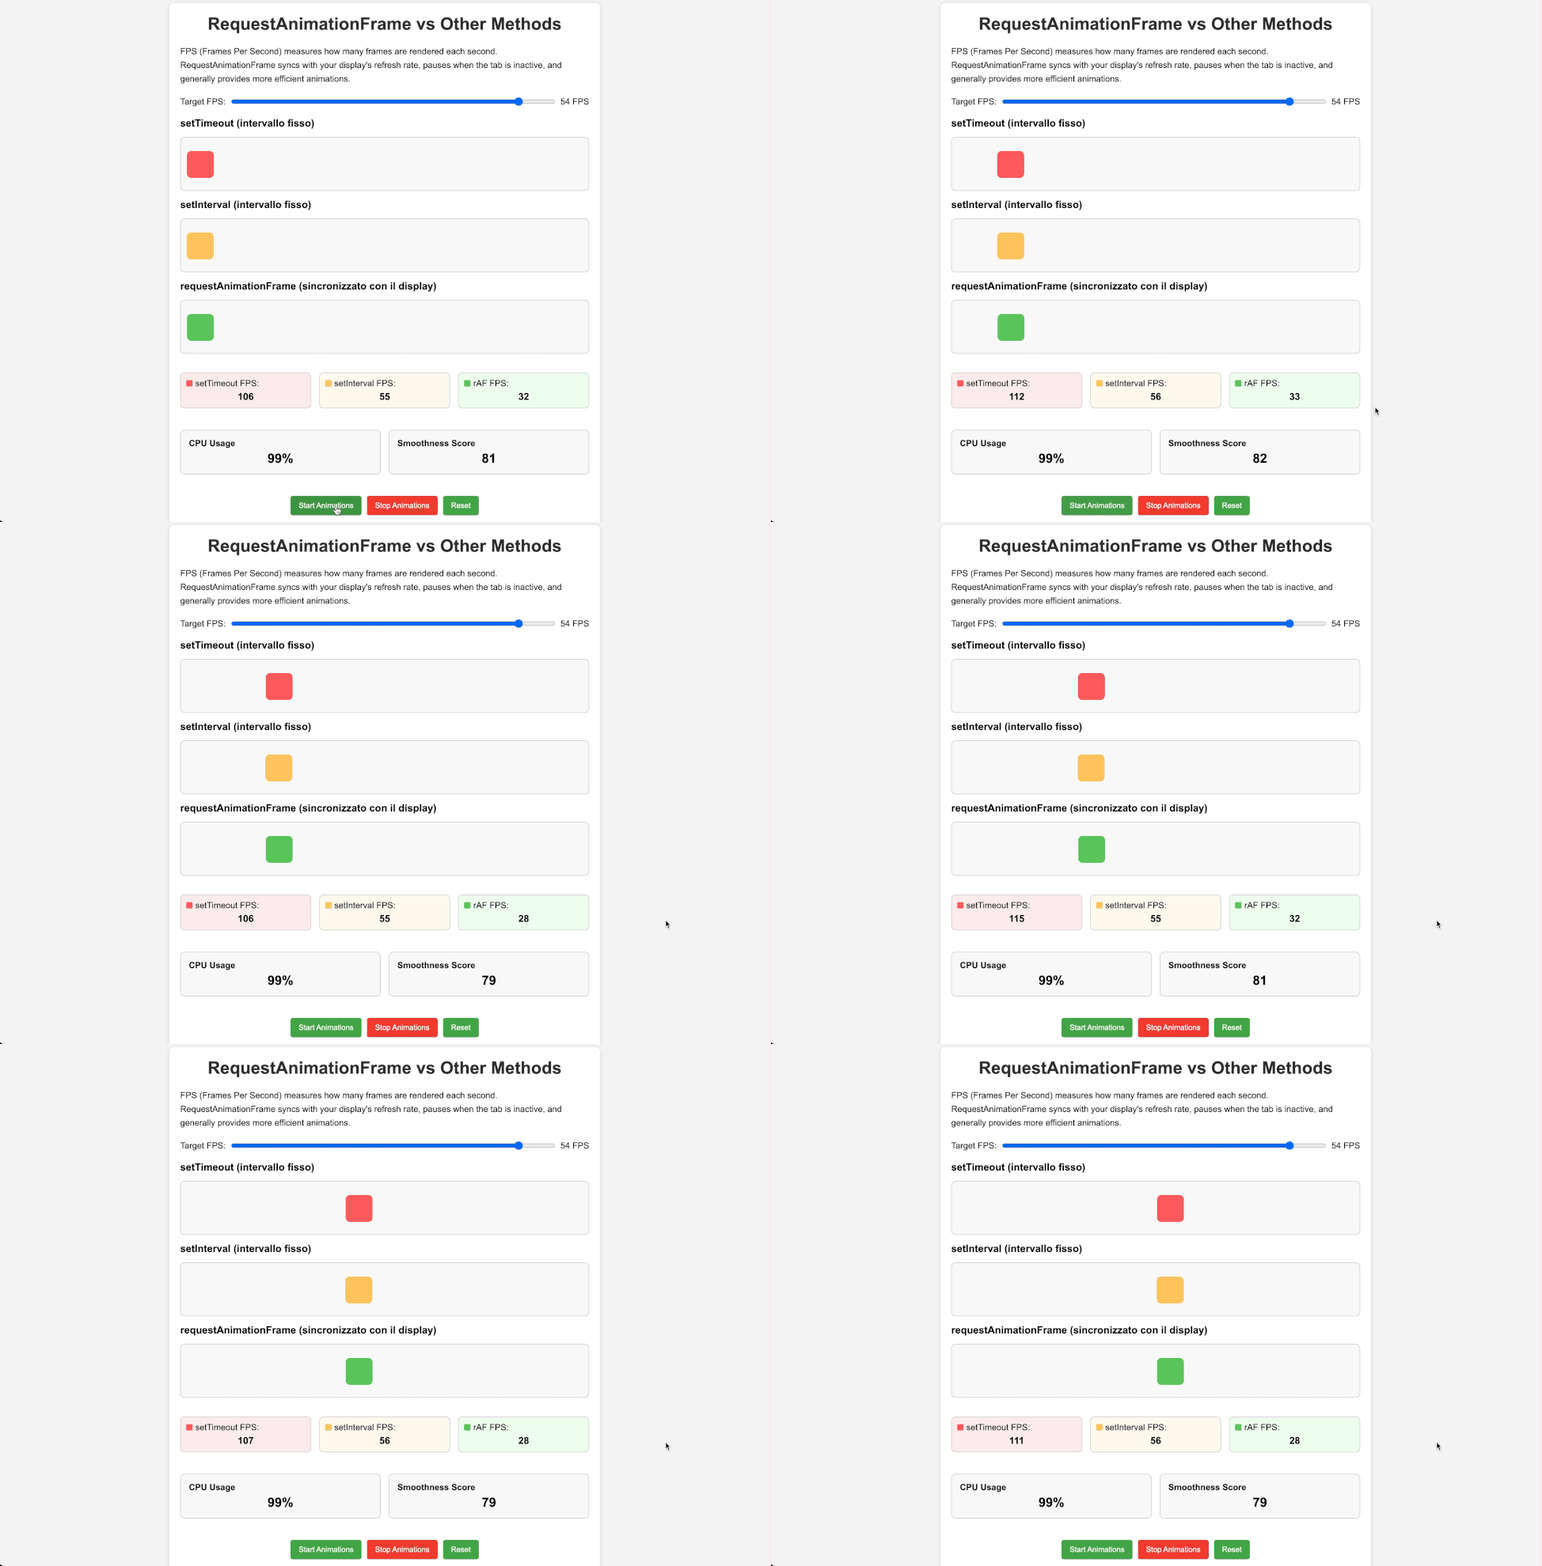
I avoided requestAnimationFrame for years because it seemed like overkill. Boy, was I wrong. It's basically the browser saying, "Hey, let me know what you want to draw, and I'll call you at the perfect time." A wrapper makes it easier to use and adds some niceties that the bare API doesn't provide.
What Problem Does rAF Wrapper Solve?
I learned this one the hard way. I had this slick progress indicator that updated as content loaded. Used standard DOM manipulation and it stuttered like crazy. The browser was trying to repaint after every tiny update, causing this ugly flickering effect. Switching to rAF was like magic—the browser batched all my visual changes into smooth frames, and users stopped complaining about the "glitchy" animation.
Implementation
/**
 * Wraps a function to ensure it runs in sync with the browser's render cycle.
 * Adds support for cancellation and once-only execution.
 *
 * @param {Function} callback - The function to run on animation frame
 * @param {Object} [options] - Configuration options
 * @param {boolean} [options.once=false] - Run the callback only once
 * @return {Object} Controls for the animation frame
 */
function rafHelper(callback, { once = false } = {}) {
  let rafId = null;
  let cancelled = false;

  const animate = function(timestamp) {
    if (cancelled) return;

    callback(timestamp);

    if (!once && !cancelled) {
      rafId = requestAnimationFrame(animate);
    }
  };

  return {
    start() {
      if (!rafId && !cancelled) {
        rafId = requestAnimationFrame(animate);
      }
      return this;
    },
    cancel() {
      cancelled = true;
      if (rafId) {
        cancelAnimationFrame(rafId);
        rafId = null;
      }
      return this;
    },
    isPending() {
      return !!rafId;
    }
  };
}
Example Usage
// Smooth scrolling implementation
function smoothScrollTo(element) {
  const start = window.pageYOffset;
  const target = element.getBoundingClientRect().top + start;
  const distance = target - start;
  const startTime = performance.now();
  const duration = 1000; // ms

  const animation = rafHelper(function step(timestamp) {
    const elapsed = timestamp - startTime;
    const progress = Math.min(elapsed / duration, 1);
    const easeProgress = easeOutCubic(progress);

    window.scrollTo(0, start + distance * easeProgress);

    if (progress < 1) {
      // Continues automatically because rafHelper repeats by default
    } else {
      animation.cancel(); // Stop when we're done
    }
  }).start();

  // Return the animation controller so scrolling can be cancelled
  return animation;
}

function easeOutCubic(x) {
  return 1 - Math.pow(1 - x, 3);
}
Common Use Cases
- Smooth animations
- Scroll effects
- DOM-based visualizations
- Parallax effects
- Performance monitoring
Pitfalls to Avoid
- Don't nest rAF calls as this can lead to unpredictable timing
- Be mindful of cleanup - always cancel animations when components unmount
- Don't use excessive calculations in rAF callbacks as they can lead to dropped frames
Virtual Scrolling Helper: Rendering Only What's Needed
Virtual scrolling changed my life. It's a fancy term for a simple concept: only render what the user can actually see. Everything else? Smoke and mirrors.
What Problem Does Virtual Scrolling Solve?
I inherited this news portal with 3,000+ articles, each with its own image card. Opening the hub was painful – 20+ seconds to load while Chrome threw "page unresponsive" warnings. After implementing virtual scrolling, the difference was night and day. We only rendered the 15-20 news cards actually visible in the viewport, swapping in new ones as users scrolled.
Implementation
/**
 * Creates a virtual scroll container that efficiently renders only visible items
 *
 * @param {Object} options - Configuration options
 * @param {HTMLElement} options.container - The container element
 * @param {Function} options.renderItem - Function to render a single item (index) => HTMLElement
 * @param {number} options.totalItems - Total number of items in the list
 * @param {number} options.itemHeight - Height of each item in pixels
 * @param {number} [options.overscan=5] - Number of items to render beyond visible area
 * @return {Object} Methods to control the virtual list
 */
function virtualScroller({
  container,
  renderItem,
  totalItems,
  itemHeight,
  overscan = 5
}) {
  let scrollTop = 0;
  let visibleItems = [];
  const contentHeight = totalItems * itemHeight;

  // Create placeholder to maintain scroll height
  const placeholder = document.createElement('div');
  placeholder.style.height = `${contentHeight}px`;
  placeholder.style.position = 'relative';
  container.appendChild(placeholder);

  function updateVisibleItems() {
    // Calculate visible range with overscan
    const viewportHeight = container.clientHeight;
    scrollTop = container.scrollTop;

    const startIndex = Math.max(0, Math.floor(scrollTop / itemHeight) - overscan);
    const endIndex = Math.min(
      totalItems - 1,
      Math.ceil((scrollTop + viewportHeight) / itemHeight) + overscan
    );

    // Remove all current items
    while (placeholder.firstChild) {
      placeholder.removeChild(placeholder.firstChild);
    }

    // Add newly visible items
    for (let i = startIndex; i <= endIndex; i++) {
      const item = renderItem(i);
      item.style.position = 'absolute';
      item.style.top = `${i * itemHeight}px`;
      item.style.height = `${itemHeight}px`;
      item.style.left = '0';
      item.style.right = '0';
      placeholder.appendChild(item);
    }

    visibleItems = Array.from({ length: endIndex - startIndex + 1 }, (_, i) => startIndex + i);
  }

  // Initial render
  updateVisibleItems();

  // Listen for scroll events with throttle
  container.addEventListener('scroll', throttle(updateVisibleItems, 16)); // ~60fps

  return {
    refresh: updateVisibleItems,
    getVisibleItems: () => visibleItems,
    scrollToItem(index) {
      container.scrollTop = index * itemHeight;
    }
  };
}
Example Usage
const listContainer = document.getElementById('list-container');

const virtualList = virtualScroller({
  container: listContainer,
  totalItems: 10000, // Imagine rendering 10,000 items!
  itemHeight: 40,
  renderItem: (index) => {
    const item = document.createElement('div');
    item.className = 'list-item';
    item.textContent = `Item #${index + 1}`;
    return item;
  }
});

// Later, if data changes:
virtualList.refresh();

// Jump to a specific item:
document.getElementById('jump-btn').addEventListener('click', () => {
  virtualList.scrollToItem(5000); // Jump to the middle
});
Common Use Cases
- Long lists or tables of data
- Social media feeds
- Chat applications
- Large spreadsheets
- Search results
Pitfalls to Avoid
- Variable height items require more complex implementations
- Don't forget to update when window is resized
- Consider adding key-based rendering for React-like frameworks
- Be careful with focus management when items appear/disappear
Lazy Loading: Loading Resources Just in Time
Lazy loading is like good procrastination—putting off work until you absolutely have to do it. Why load 50 product images when the user can only see 5?
What Problem Does Lazy Loading Solve?
I worked on a furniture design website that was taking forever to load. We're talking 15MB of high-res images hitting the network on page load - sofas, dining tables, and decor pieces in stunning detail that the client insisted had to be ultra high-quality. During development, we realized this would be completely unacceptable to deliver - it would have been embarrassing. After implementing lazy loading, initial page load dropped to under 200kb, and images loaded just as users scrolled to them. Load time went from "go make coffee" to "blink and you'll miss it." The client thought we'd compressed all their precious furniture images (we hadn't)—we just delayed loading them until needed.
Implementation
/**
 * Creates a helper to lazy load images as they approach the viewport
 *
 * @param {Object} [options] - Configuration options
 * @param {string} [options.selector='img[data-src]'] - Selector for lazy images
 * @param {number} [options.rootMargin='200px'] - Margin around viewport for preloading
 * @param {string} [options.srcAttribute='data-src'] - Attribute containing the image URL
 * @return {Object} Lazy loading controller
 */
function lazyLoader({
  selector = 'img[data-src]',
  rootMargin = '200px',
  srcAttribute = 'data-src'
} = {}) {
  let observer;
  const loadedImages = new Set();

  function loadImage(img) {
    if (loadedImages.has(img)) return;

    const src = img.getAttribute(srcAttribute);
    if (!src) return;

    // Start loading the image
    img.src = src;
    img.removeAttribute(srcAttribute);

    // Mark as loaded and dispatch event when fully loaded
    img.addEventListener('load', () => {
      loadedImages.add(img);
      img.dispatchEvent(new CustomEvent('lazyloaded'));
    });
  }

  function init() {
    // Use Intersection Observer API if available
    if ('IntersectionObserver' in window) {
      observer = new IntersectionObserver((entries) => {
        entries.forEach(entry => {
          if (entry.isIntersecting) {
            loadImage(entry.target);
            observer.unobserve(entry.target);
          }
        });
      }, { rootMargin });

      // Observe all matching elements
      document.querySelectorAll(selector).forEach(img => {
        if (!loadedImages.has(img)) {
          observer.observe(img);
        }
      });
    } else {
      // Fallback for browsers without IntersectionObserver
      document.querySelectorAll(selector).forEach(loadImage);
    }
  }

  function disconnect() {
    if (observer) {
      observer.disconnect();
    }
  }

  return {
    init,
    disconnect,
    loadImage, // Expose to manually load specific images
    refresh() { // For when new images are added to the DOM
      disconnect();
      init();
    }
  };
}
Example Usage
<!-- HTML structure -->
<img data-src="large-image-1.jpg" src="tiny-placeholder.jpg" alt="Description">
<img data-src="large-image-2.jpg" src="tiny-placeholder.jpg" alt="Description">
// Initialize lazy loading
const lazyImages = lazyLoader();
lazyImages.init();

// When new content is loaded via AJAX:
fetchMoreContent().then(() => {
  lazyImages.refresh();
});
Common Use Cases
- Image galleries
- Long content pages with many images
- Product listings
- Media-heavy websites
- Embedded videos
Pitfalls to Avoid
- Always provide a placeholder or low-res version for initial render
- Be careful with layout shifts when images load
- Consider adding loading animations for better user experience
- Think about no-JavaScript fallbacks for SEO and accessibility
Chunked Processing: Breaking Up Heavy Tasks
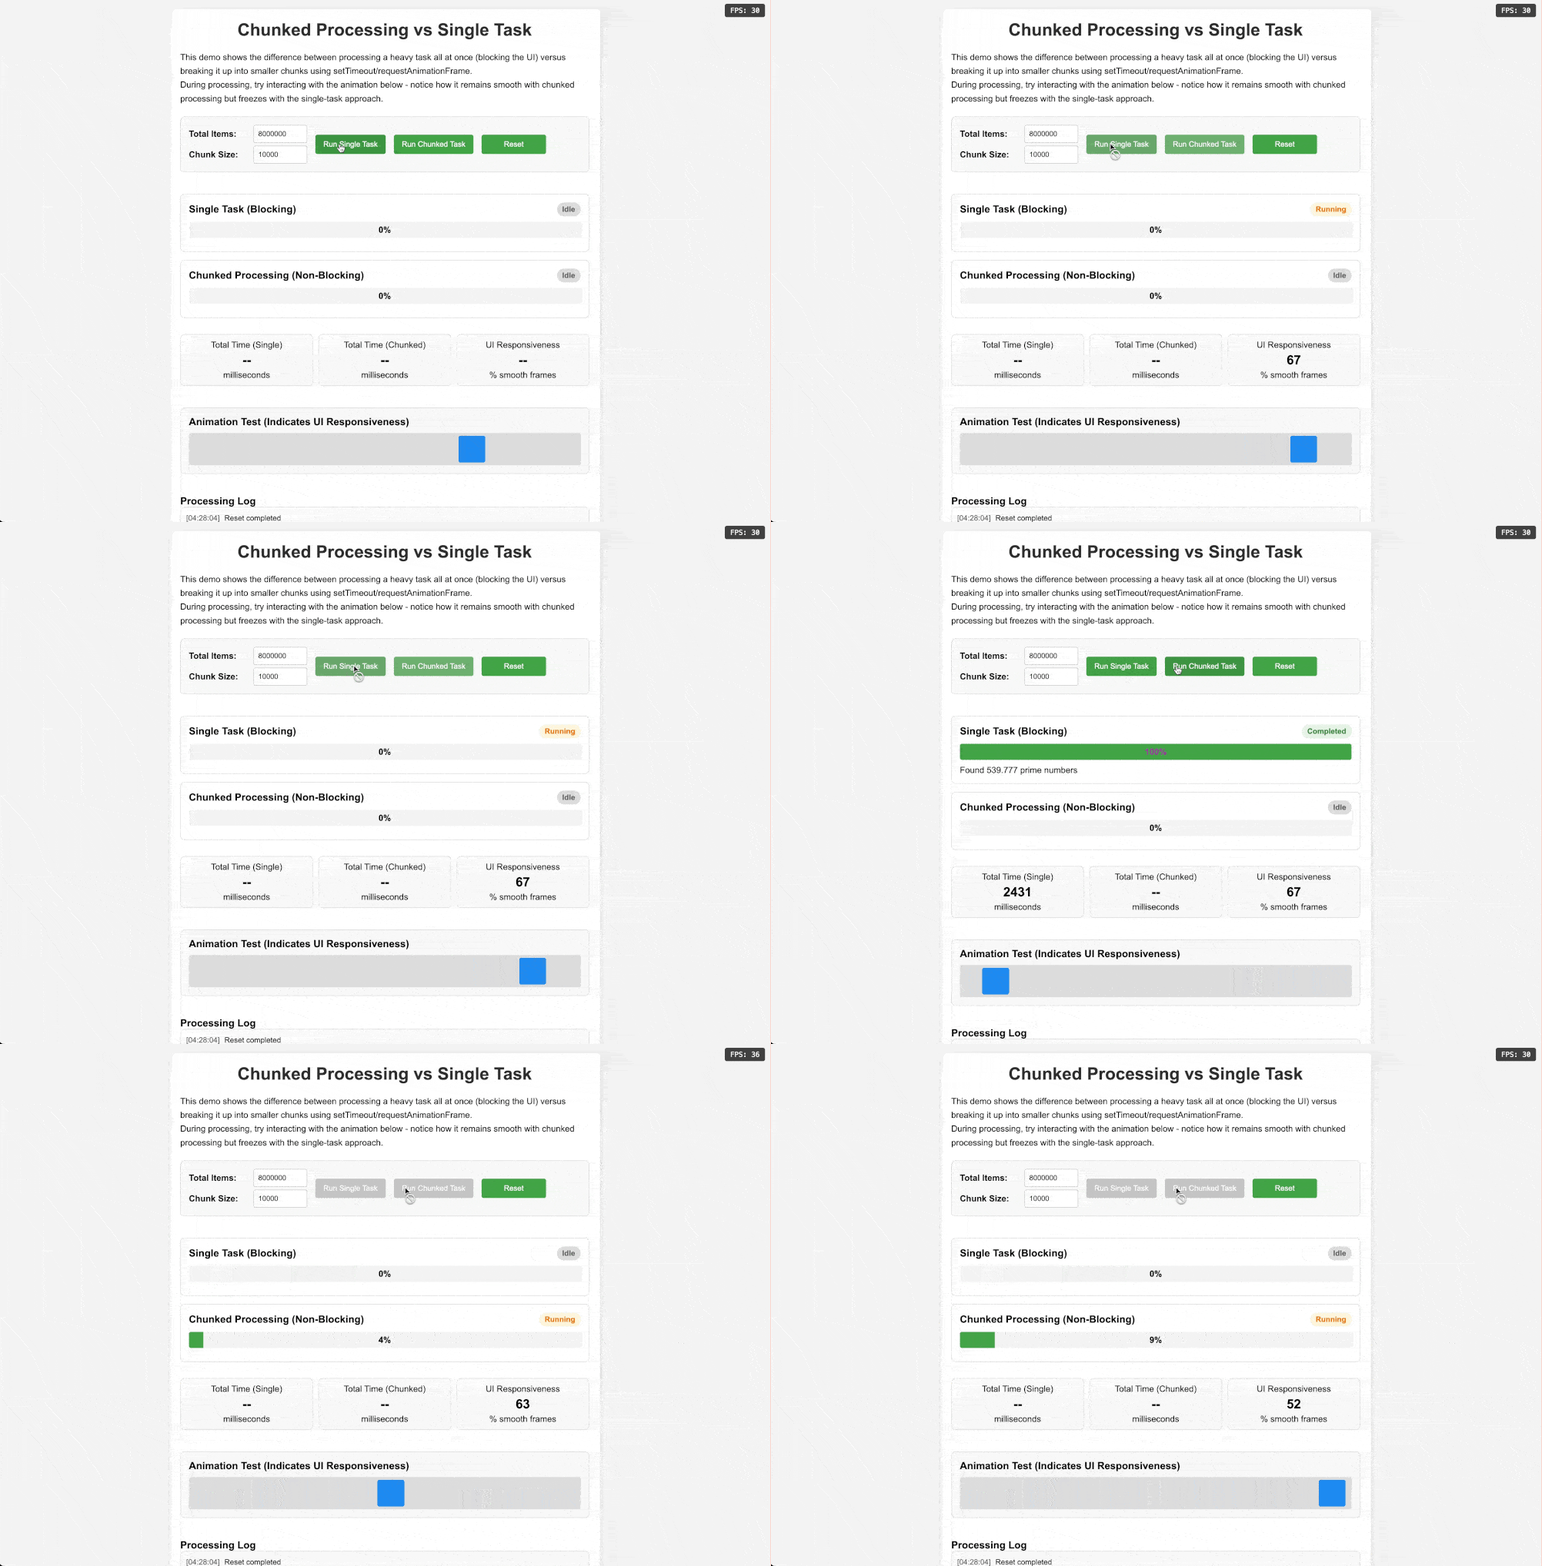
Chunked processing is kind of like how you'd eat an elephant: one bite at a time (not that I'm advocating eating elephants). Big tasks lock up the browser, so we break them into small digestible chunks.
What Problem Does Chunked Processing Solve?
This one hits close to home. I had built this data-visualization tool that needed to process thousands of records. Everything worked in testing, but once we got real user data... disaster. The app would freeze for up to 10 seconds while crunching numbers. Users thought it had crashed. By chunking the work into small batches and using a progress indicator, not only did the UI stay responsive, but users actually felt better seeing the progress rather than staring at a frozen screen. The actual processing took about the same total time, but the perceived performance was night and day.
Implementation
/**
 * Process a large array of items in chunks to avoid blocking the UI thread
 *
 * @param {Array} items - Array of items to process
 * @param {Function} processItem - Function to process a single item
 * @param {Object} [options] - Configuration options
 * @param {number} [options.chunkSize=100] - Number of items to process per chunk
 * @param {number} [options.delayBetweenChunks=0] - Delay in ms between chunks
 * @return {Promise} Resolves when all processing is complete
 */
function processInChunks(items, processItem, {
  chunkSize = 100,
  delayBetweenChunks = 0
} = {}) {
  return new Promise((resolve) => {
    const total = items.length;
    let processed = 0;

    function processNextChunk() {
      const start = processed;
      const end = Math.min(processed + chunkSize, total);

      // Process this chunk
      for (let i = start; i < end; i++) {
        processItem(items[i], i);
      }

      processed = end;

      // Report progress
      const progress = processed / total;
      const detail = { processed, total, progress };
      window.dispatchEvent(new CustomEvent('chunkProcessed', { detail }));

      // Check if we're done
      if (processed >= total) {
        resolve();
        return;
      }

      // Schedule next chunk
      if (delayBetweenChunks > 0) {
        setTimeout(processNextChunk, delayBetweenChunks);
      } else {
        requestAnimationFrame(processNextChunk);
      }
    }

    // Start processing
    processNextChunk();
  });
}
Example Usage
// Process 10,000 data points without freezing the UI
const largeDataset = Array.from({ length: 10000 }, (_, i) => ({ id: i, value: Math.random() }));

// Show progress indicator
const progressBar = document.getElementById('progress-bar');
window.addEventListener('chunkProcessed', (e) => {
  progressBar.style.width = `${e.detail.progress * 100}%`;
  progressBar.textContent = `${Math.round(e.detail.progress * 100)}%`;
});

// Start processing
processInChunks(largeDataset, (item) => {
  // Do something computationally expensive with each item
  item.processed = complexCalculation(item.value);

  // Optionally update the DOM (carefully)
  if (item.value > 0.95) {
    addToHighValueList(item);
  }
}, { chunkSize: 200 }).then(() => {
  console.log('All processing complete!');
  showResults(largeDataset);
});
Common Use Cases
- Processing large datasets
- Complex DOM transformations
- Text analysis
- Data visualization preparation
- Batch API requests
Pitfalls to Avoid
- Don't make DOM modifications in every iteration (batch them)
- Choose an appropriate chunk size (too small = overhead, too large = lag)
- Be mindful of memory usage when processing large datasets
- Consider using Web Workers for very intensive calculations
Memoization for Rendering: Don't Repeat Expensive Calculations
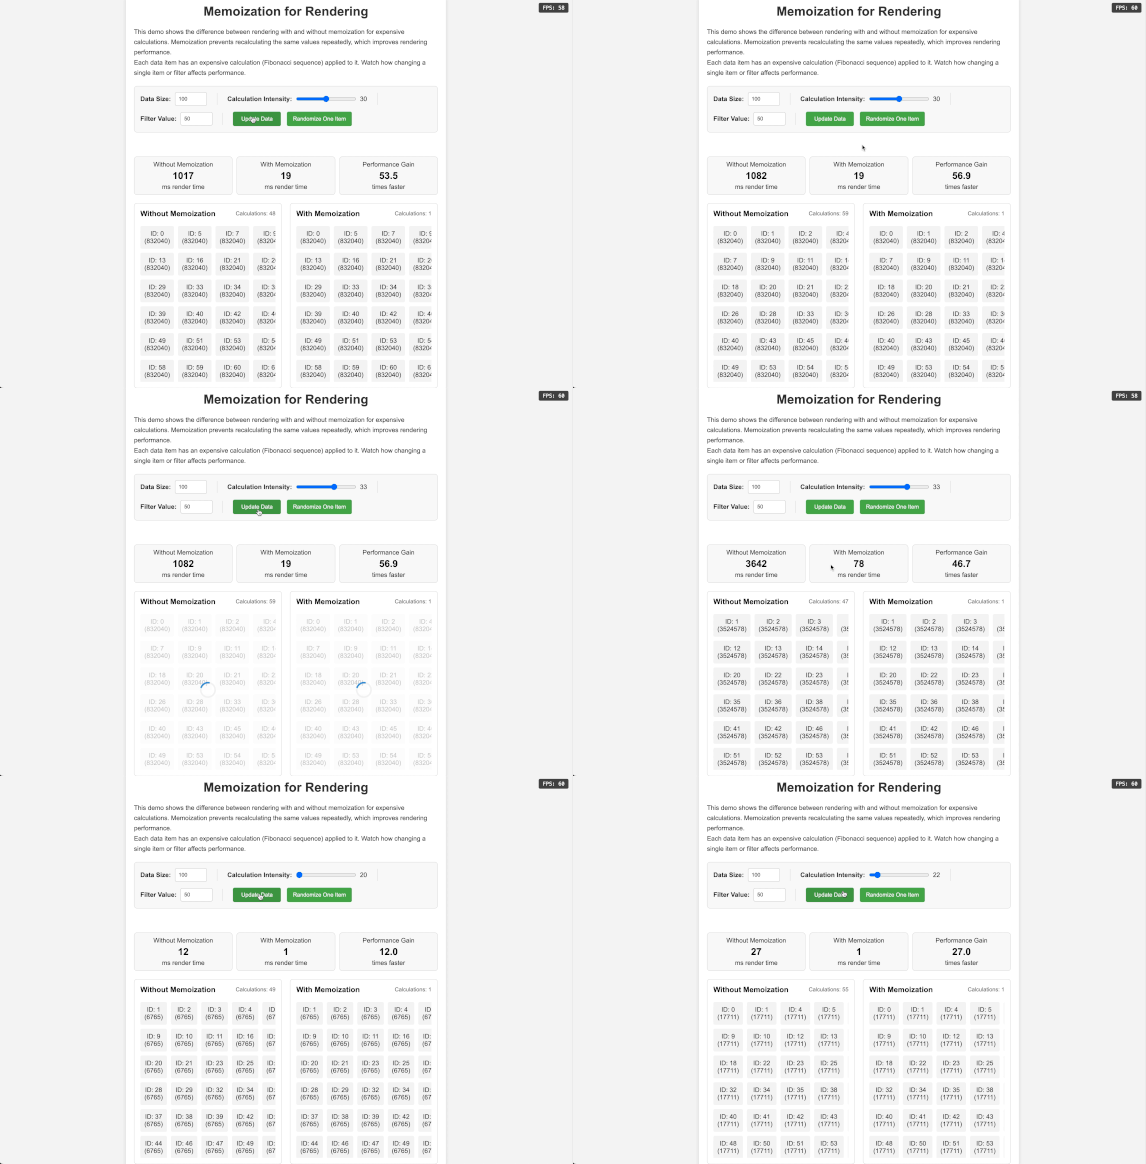
Memoization is just fancy caching. It's like telling your code, "Hey, if I ask for the 23rd Fibonacci number twice, don't recalculate it—just remember what you told me the first time."
What Problem Does Memoization Solve?
I once worked on a tool that calculated carbon footprints for websites and saved analysis history. Every time someone viewed a past analysis or toggled between different metrics, we'd recalculate the SAME carbon data over and over. We'd fetch the complete JSON with all the resources and redo every calculation from scratch, taking the same amount of time as the initial analysis despite using data we'd already processed. One particular set of emissions calculations took 300ms on a moderate-sized site. I caught this during development when I noticed the same calculations running repeatedly in the console logs. After adding memoization, subsequent calls returned instantly. Same code, same results, just not doing the same work repeatedly. The performance difference was so dramatic that I couldn't believe I'd missed something so obvious - we were essentially acting like we'd never seen the data before, even though we were processing identical inputs over and over.
Implementation
/**
 * Creates a memoized version of a function that remembers results for input combinations
 *
 * @param {Function} fn - The function to memoize
 * @param {Function} [keyFn] - Optional function to generate cache keys (defaults to JSON.stringify)
 * @return {Function} Memoized function
 */
function memoize(fn, keyFn = JSON.stringify) {
  const cache = new Map();

  function memoized(...args) {
    const key = keyFn(args);

    if (cache.has(key)) {
      return cache.get(key);
    }

    const result = fn.apply(this, args);
    cache.set(key, result);
    return result;
  }

  // Expose the cache for inspection or clearing
  memoized.cache = cache;
  memoized.clearCache = () => cache.clear();

  return memoized;
}
Example Usage
// Expensive function to calculate layout positions
function calculateNodePositions(nodes, width, height, iterations) {
  console.log('Running expensive layout calculation...');
  // Imagine complex force-directed graph layout algorithm here
  return nodes.map(node => ({
    ...node,
    x: Math.random() * width,
    y: Math.random() * height
  }));
}

// Memoized version
const getMemoizedLayout = memoize(calculateNodePositions);

// Now we can call it multiple times with same parameters without penalty
const nodes = [{id: 1}, {id: 2}, {id: 3}];
const layout1 = getMemoizedLayout(nodes, 800, 600, 500); // Calculates
const layout2 = getMemoizedLayout(nodes, 800, 600, 500); // Returns cached result

// Only recalculates when inputs change
const layout3 = getMemoizedLayout(nodes, 1024, 768, 500); // Recalculates
Common Use Cases
- Complex layout calculations
- Data transformations for visualization
- Expensive string operations
- Recursive functions with overlapping subproblems
- Component rendering in frameworks like React
Pitfalls to Avoid
- Be careful with memory usage for large cached results
- The default key function may not work for complex objects
- Be aware that memoization keeps references to objects
- Consider cache clearing strategies for long-running applications
Event Delegation: Efficient Event Handling
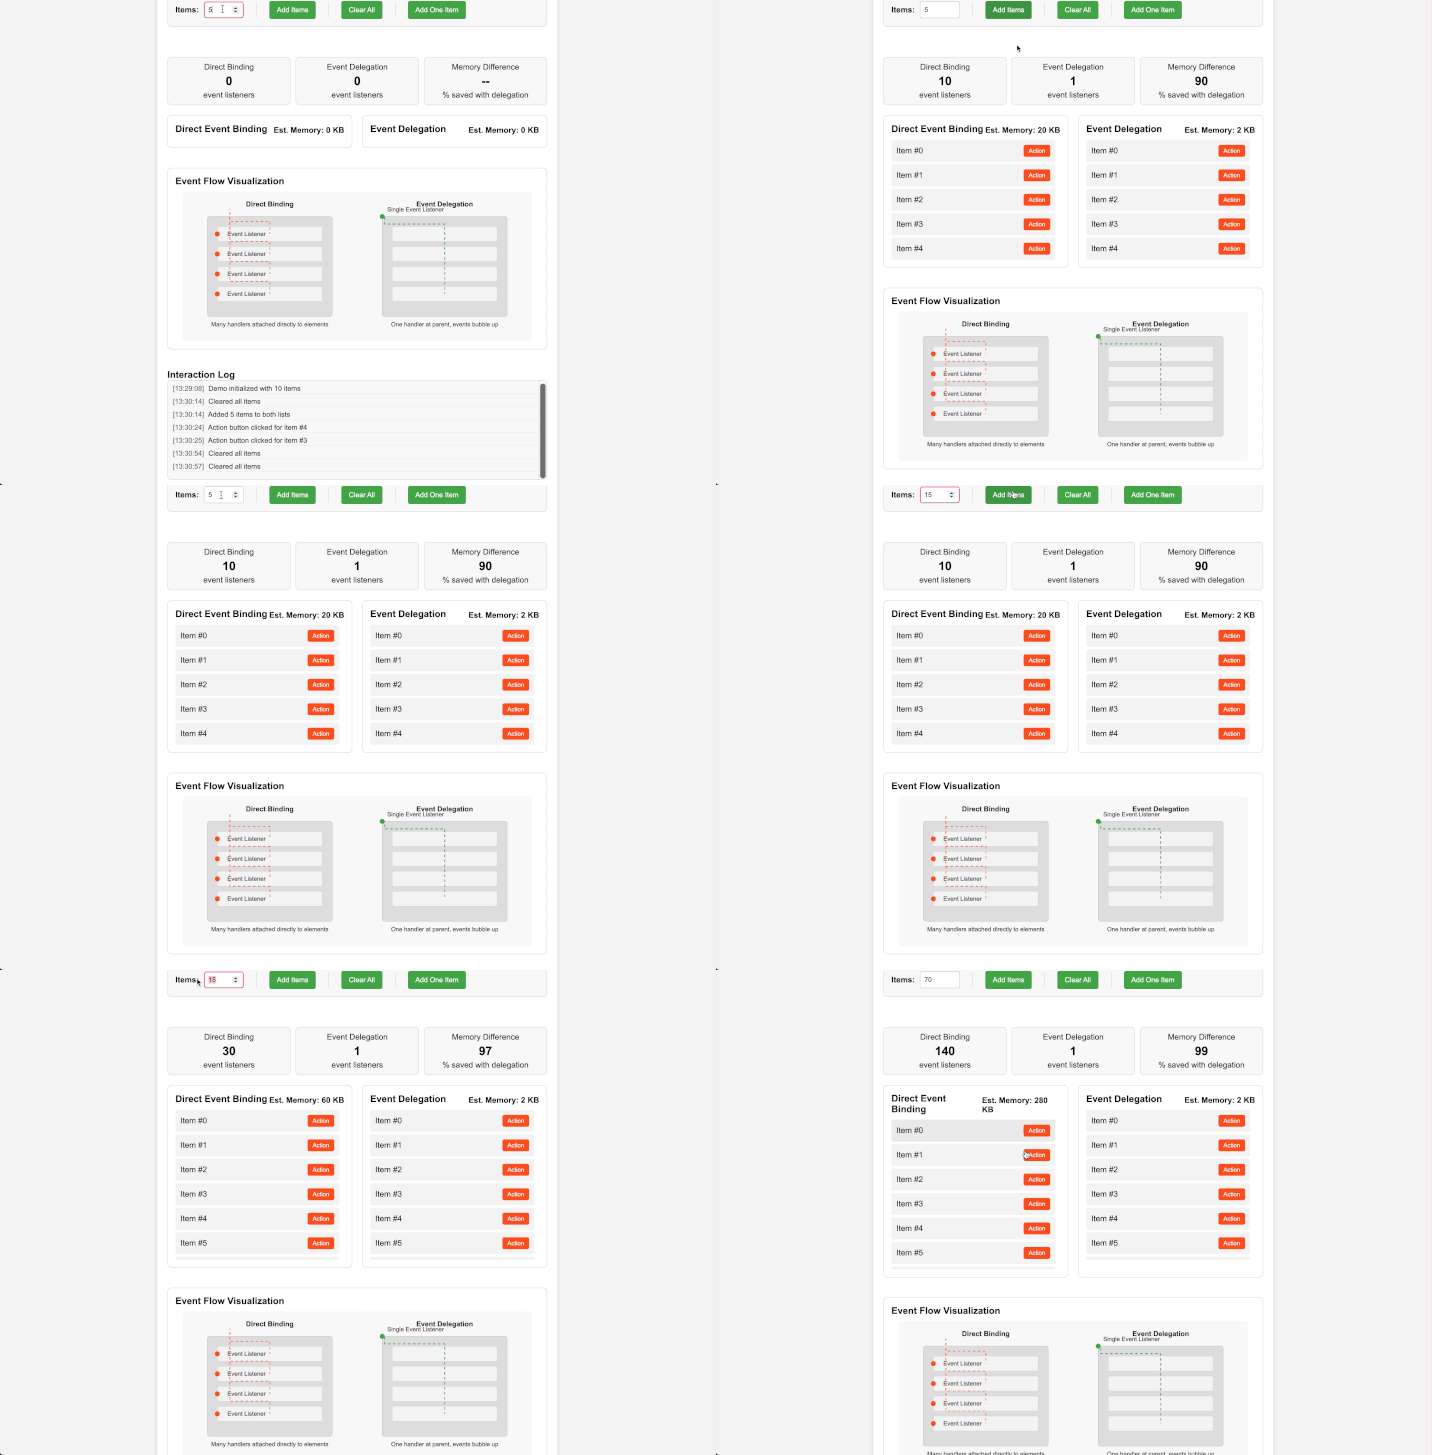
Event delegation is pure genius—instead of giving instructions to each employee (DOM element), you tell their manager, "Just forward me anything important from your team." One listener instead of hundreds.
What Problem Does Event Delegation Solve?
I once debugged a memory leak in a website with complex interactive components. The site had a car configurator and a colorizer feature that let users customize their vehicle, but it would get slower and slower as you used it, eventually crawling to a halt. The culprit? Every time the configurator updated its options, we were adding new click handlers to each component and color swatch... without removing the old ones. With dozens of configurable parts and color options that changed based on selections, we were piling up thousands of zombie event listeners. Switching to a single delegated event on the container fixed the leak instantly. The configurator stayed snappy even after hours of tweaking options. Added bonus: new components and colors automatically worked without any extra code to bind events.
Implementation
/**
 * Creates an event delegation handler for efficient event management
 *
 * @param {HTMLElement} element - Parent element to attach the event to
 * @param {string} eventType - Type of event to listen for (e.g., 'click')
 * @param {string} selector - CSS selector to match target elements
 * @param {Function} handler - Event handler function(event, matchedElement)
 * @return {Object} Methods to manage the delegated event
 */
function delegate(element, eventType, selector, handler) {
  function delegatedFunction(e) {
    // Find the matching element by traversing up from the event target
    let target = e.target;
    while (target && target !== element) {
      if (target.matches(selector)) {
        // Call the handler with the event and matched element
        handler.call(target, e, target);
        return;
      }
      target = target.parentElement;
    }
  }

  // Attach the delegated event handler
  element.addEventListener(eventType, delegatedFunction, false);

  // Return controls for removing or updating
  return {
    destroy() {
      element.removeEventListener(eventType, delegatedFunction, false);
    },
    update(newHandler) {
      handler = newHandler;
    }
  };
}
Example Usage
// Instead of adding click handlers to each button...
document.querySelectorAll('.product-card button.add-to-cart').forEach(button => {
  button.addEventListener('click', handleAddToCart); // BAD: Many listeners
});

// Use a single delegated handler
const cartHandler = delegate(document.querySelector('.product-grid'), 'click', 'button.add-to-cart', (e, button) => {
  e.preventDefault();

  const card = button.closest('.product-card');
  const productId = card.dataset.productId;

  addToCart(productId);
  button.textContent = 'Added to Cart';
  button.disabled = true;
});

// Later cleanup when needed
function unmountProductGrid() {
  cartHandler.destroy();
}
Common Use Cases
- Lists of similar interactive elements
- Tables with interactive cells
- Dynamic content (elements added/removed frequently)
- Form validation
- Navigation menus
Pitfalls to Avoid
- Don't use for events that don't bubble (focus, blur, etc.)
- Remember that
thisin the handler refers to the matched element - Use caution with complex selectors that might be slow to match
- Consider performance when delegation parent contains many elements
Choosing the Right Helper Function
I'm a firm believer in using the right tool for the job. After bombing a few projects by picking the wrong approach, here's my cheat sheet:
| If You Need To... | Reach For This | Or Maybe This Instead |
|---|---|---|
| Handle typing or resize | Debounce | Throttle (when you need regular feedback) |
| Deal with scroll madness | Throttle | rAF Wrapper (when updating visuals) |
| Make buttery animations | rAF Wrapper | Web Animations API (simpler cases) |
| Make massive lists not suck | Virtual Scrolling | Chunked Rendering (for static content) |
| Speed up initial page load | Lazy Loading | Browser's native loading="lazy" (for basic cases) |
| Crunch numbers without freezing | Chunked Processing | Web Workers (for truly heavy calculations) |
| Stop calculating the same crap | Memoization | Framework computed props (React useMemo, etc.) |
| Manage thousands of clickables | Event Delegation | Component systems with built-in delegation |
Conclusion and Next Steps
We've all seen plenty of sluggish websites out there. These helper functions have rescued my projects repeatedly, transforming frustrating experiences into smooth ones. They aren't silver bullets, but they make a world of difference when implemented thoughtfully.
Have performance horror stories or your own helper function variations? Share them in the comments! The best optimization tricks come from collective wisdom, and we all benefit from exchanging battle-tested solutions.
Further Learning Resources
- MDN's Web Performance docs
- Chrome DevTools Performance panel – worth learning
- High Performance JavaScript by Nicholas Zakas – still relevant despite its age
Now go make something fast! ⚡
If this helped you out, a follow would make my day! I write about the painful performance lessons I've learned so you don't have to suffer like I did. And hey, if you know someone wrestling with laggy UIs, sharing might save their sanity.





Top comments (0)