TL;DR
In this blog post, we will explore how to leverage AWS Batch and Amazon S3 to efficiently process files using .NET
Source code: https://github.com/NikiforovAll/aws-batch-dotnet
- TL;DR
- Introduction
- Part 1: Understanding AWS Batch and S3
- Part 2: Building a .NET CLI for AWS Batch operations
- Part 3: Setting up AWS with Terraform IaC
- Part 4: Running AWS Batch Jobs with CLI Commands
- Conclusion
- References
Introduction
In many scenarios, it is common to have a task that needs to process a large number of files. A real-world example of tasks involving processing a large number of files:
- A deep learning model used for natural language processing (NLP). The model might be trained on a dataset consisting of millions of text files, each containing a piece of text, such as a book, an article, or a conversation. Each of these text files would need to be processed and fed into the model for it to learn and understand the structure of the language.
- Genomics researchers often have to process massive amounts of data. For instance, they might need to analyze the genomes of thousands of individuals to identify patterns and variations. This task involves processing and analyzing a large number of files, each containing the genetic information of an individual.
- A financial institution that needs to process transaction data for millions of their customers for fraud detection. Each transaction would be a separate file, and sophisticated algorithms would need to process these files to detect any irregular patterns that could indicate fraudulent activity.
Part 1: Understanding AWS Batch and S3
AWS Batch allows you to efficiently distribute the workload across multiple compute resources. By leveraging AWS Batch, you can easily scale your file processing tasks to handle any number of files, while taking advantage of the automatic resource provisioning and management provided by the service.
AWS Batch is a powerful service that allows you to distribute computing workloads across multiple resources in the AWS Cloud. By combining it with Amazon S3, we can easily scale our file processing tasks and take advantage of automatic resource provisioning and management.
With AWS Batch, you can easily parallelize the processing of your files, significantly reducing the overall processing time. This is particularly useful when dealing with large datasets or computationally intensive tasks. By distributing the workload across multiple compute resources, AWS Batch enables you to process multiple files simultaneously, maximizing the throughput of your file processing pipeline.
AWS Batch
AWS Batch helps you to run batch computing workloads on the AWS Cloud. Batch computing is a common way for developers, scientists, and engineers to access large amounts of compute resources. AWS Batch removes the undifferentiated heavy lifting of configuring and managing the required infrastructure, similar to traditional batch computing software. This service can efficiently provision resources in response to jobs submitted in order to, you can easily parallelize the processing of your files, which can significantly reduce the overall processing time. Additionally, AWS Batch integrates seamlessly with other AWS services, such as Amazon S3, allowing you to easily access and process your files stored in the cloud.

For more information on how to use AWS Batch you can refer to the AWS Batch documentation.
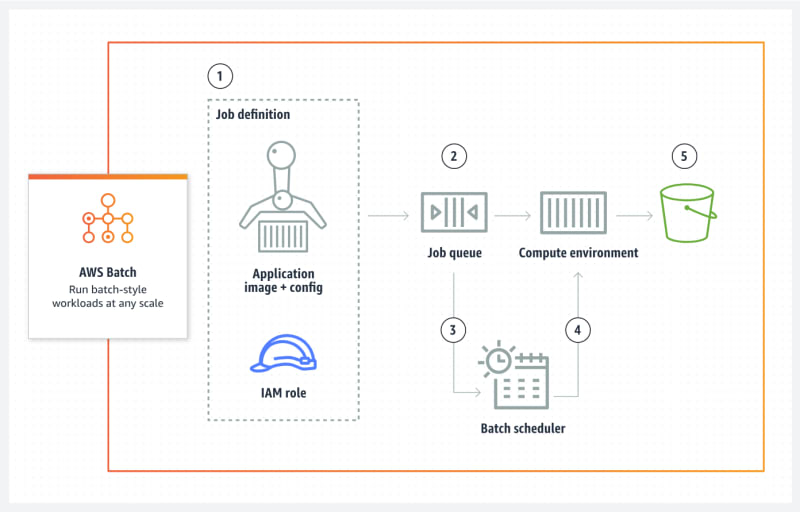
Components of AWS Batch
AWS Batch simplifies running batch jobs across multiple Availability Zones within a Region. You can create AWS Batch compute environments within a new or existing VPC. After a compute environment is up and associated with a job queue, you can define job definitions that specify which Docker container images to run your jobs. Container images are stored in and pulled from container registries, which may exist within or outside of your AWS infrastructure.
Jobs
A unit of work (such as a shell script, a Linux executable, or a Docker container image) that you submit to AWS Batch. It has a name, and runs as a containerized application on AWS Fargate, Amazon ECS container instances, Amazon EKS, or Amazon EC2 resources in your compute environment, using parameters that you specify in a job definition.
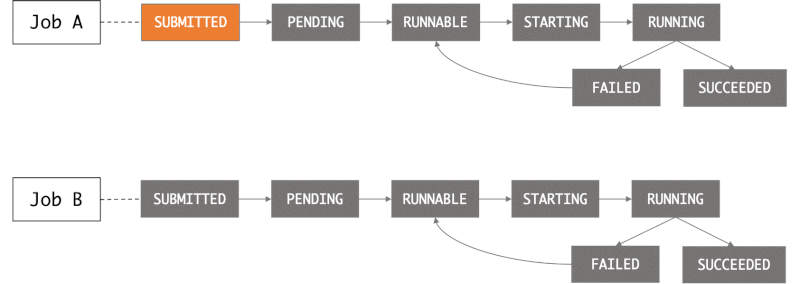
When you submit a job to an AWS Batch job queue, the job enters the SUBMITTED state. It then passes through the following states until it succeeds (exits with code 0) or fails. See Job states - Documentation.
When you submit a job request to AWS Batch, you have the option of defining a dependency on a previously submitted job.
# Submit job A
aws batch submit-job --job-name jobA --job-queue myQueue --job-definition jdA

# Output
{
    "jobName": "example",
    "jobId": "876da822-4198-45f2-a252-6cea32512ea8"
}

# Submit job B
aws batch submit-job --job-name jobB --job-queue myQueue --job-definition jdB --depends-on jobId="876da822-4198-45f2-a252-6cea32512ea8"
Job Definitions
A job definition is a template that describes various parameters for running a job in AWS Batch. It includes information such as the Docker image to use, the command to run, the amount of CPU and memory to allocate, and more. AWS Batch job definitions specify how jobs are to be run. While each job must reference a job definition, many of the parameters that are specified in the job definition can be overridden at runtime.
Job Queues
Jobs are submitted to a job queue where they reside until they can be scheduled to run in a compute environment.
Compute Environments
Job queues are mapped to one or more compute environments. Compute environments contain the Amazon ECS container instances that are used to run containerized batch jobs. A specific compute environment can also be mapped to one or more than one job queue. Within a job queue, the associated compute environments each have an order that’s used by the scheduler to determine where jobs that are ready to be run will run.
S3
Amazon Simple Storage Service (Amazon S3) is an object storage service that offers industry-leading scalability, data availability, security, and performance. Customers of all sizes and industries can use Amazon S3 to store and protect any amount of data for a range of use cases, such as data lakes, websites, mobile applications, backup and restore, archive, enterprise applications, IoT devices, and big data analytics.

For more information on how to use AWS S3 you can refer to the AWS Batch documentation.
Part 2: Building a .NET CLI for AWS Batch operations
Let’s say we want to build a pipeline that analyzes files from an S3 bucket for word frequency and finds the most used words in the bucket. This pipeline can be implemented using AWS Batch and a CLI application.
The process of migration consists of three stages - initialize a migration plan, run a migration for each item in the plan, and aggregate the results.
USAGE:
    BatchMigration.dll [OPTIONS] <COMMAND>

EXAMPLES:
    BatchMigration.dll plan --source s3://source-bucket --destination s3://destination-bucket/output --plan
s3://destination-bucket/plan.json
    BatchMigration.dll migrate --plan s3://destination-bucket/plan.json --index 1
    BatchMigration.dll merge --source s3://destination-bucket/output

OPTIONS:
    -h, --help Prints help information

COMMANDS:
    plan Prepares migration plan for a bucket
    migrate Run a migration based on migration plan and index
    merge Merge the results results

- Initialize Migration Plan:
- Use the
plancommand to prepare a migration plan for a bucket. - Specify the source bucket using the
--sourceoption. - Specify the destination bucket for the output using the
--destinationoption. - Use the
--planoption to generate a migration plan file in JSON format, such ass3://destination-bucket/plan.json.
- Use the
- Run Migration:
- Use the
migratecommand to run the migration for each item in the plan. - Specify the migration plan file using the
--planoption. - Use the
--indexoption to specify the index of the item in the plan to migrate.
- Use the
- Aggregate Results:
- Use the
mergecommand to merge the migration results. - Specify the source bucket for the results using the
--sourceoption.
- Use the
By following these steps, you can migrate files from the source bucket to the destination bucket using AWS Batch and the provided CLI commands.
Here is a relationship between jobs:
Basically, we start one job to build a plan, than based on the number of files we need to process, we run N migration jobs, and process the results based:
Building the CLI
We will be using Spectre.Console to build a CLI application. This library provides a convenient way to create command-line interfaces with rich text formatting and interactive features.
var services = ConfigureServices();
var app = new CommandApp(new TypeRegistrar(services));

app.Configure(config =>
{
    config
        .AddCommand<PlanCommand>("plan")
        .WithDescription("Prepares migration plan for a bucket")
        .WithExample(
            "plan",
            "--source s3://source-bucket",
            "--destination s3://destination-bucket/output",
            "--plan s3://destination-bucket/plan.json"
        );

    config
        .AddCommand<MigrateCommand>("migrate")
        .WithDescription("Run a migration based on migration plan and index")
        .WithExample("migrate", "--plan s3://destination-bucket/plan.json", "--index 1");

    config
        .AddCommand<MergeCommand>("merge")
        .WithDescription("Merge the results results")
        .WithExample("merge", "--source s3://destination-bucket/output");
});

var result = app.Run(args);
Define Commands
The basic idea is to scan the content of S3 bucket and put the plan back to S3, by doing this we can distribute the work between jobs. As you will see later, there is a concept of array job. An array job is a job that shares common parameters, such as the job definition, vCPUs, and memory. It runs as a collection of related yet separate basic jobs that might be distributed across multiple hosts and might run concurrently. At runtime, the AWS_BATCH_JOB_ARRAY_INDEX environment variable is set to the container’s corresponding job array index number. You can use this index value to control how your array job children are differentiated. In our case, we start the subsequent migrate job based on total number of items in migration plan.
💡 The examples below are abbreviated and modified for simplicity, please refer to the source code https://github.com/NikiforovAll/aws-batch-dotnet for details.
Here is a plan command:
public class PlanCommand(IAmazonS3 s3) : CancellableAsyncCommand<PlanCommand.Settings>
{
    private static readonly JsonSerializerOptions JsonSerializerOptions =
        new() { WriteIndented = true };

    public class Settings : CommandSettings
    {
        [CommandOption("-s|--source <SourcePath>")]
        public string Source { get; set; } = default!;

        [CommandOption("-d|--destination <DestinationPath>")]
        public string Destination { get; set; } = default!;

        [CommandOption("-p|--plan <PlanPath>")]
        public string Plan { get; set; } = default!;
    }

    public override async Task<int> ExecuteAsync(
        CommandContext context,
        Settings settings,
        CancellationToken cancellation
    )
    {
        var (source, destination, plan) = (
            S3Path.Parse(settings.Source),
            S3Path.Parse(settings.Destination),
            S3Path.Parse(settings.Plan)
        );

        var files = await this.GetFilesAsync(source.Bucket, source.Key, cancellation);

        var migrationPlan = new MigrationPlan(
            new(source, destination, plan, files.Count),
            files
        );

        await this.StoreMigrationPlan(migrationPlan, cancellation);

        AnsiConsole.MarkupLine($"Running scanning for {source}");
        AnsiConsole.MarkupLine($"Result of the scan will be saved to {destination}");
        AnsiConsole.MarkupLine($"Plan can be found here {plan}");

        return 0;
    }
Here is migrate command:
Here is what it does:
- Loads migration plan based on
AWS_BATCH_JOB_ARRAY_INDEX - Get’s corresponding file to migrate based on index
- Calculate word occurrences for the file
- Put the result to destination bucket, the file name is copied from the source file.
public class MigrateCommand(IAmazonS3 s3, IConfiguration configuration)
    : CancellableAsyncCommand<MigrateCommand.Settings>
{
    public class Settings : CommandSettings
    {
        [CommandOption("-p|--plan <PlanPath>")]
        public string Plan { get; set; } = default!;

        [CommandOption("-i|--index <Index>")]
        public int? Index { get; set; } = default!;
    }

    public override async Task<int> ExecuteAsync(
        CommandContext context,
        Settings settings,
        CancellationToken cancellation
    )
    {
        var plan = S3Path.Parse(settings.Plan);
        var index = settings.Index ?? configuration.GetValue<int>("JOB_ARRAY_INDEX");

        var migrationPlan = await this.GetPlanAsync(plan, cancellation);

        var file = migrationPlan!.Items[index];

        var fileSourcePath = new S3Path(
            migrationPlan.Metadata.Source.Bucket,
            Path.Combine(migrationPlan.Metadata.Source.Key, file)
        );
        var fileDestinationPath = new S3Path(
            migrationPlan.Metadata.Destination.Bucket,
            Path.Combine(migrationPlan.Metadata.Destination.Key, file)
        );

        var sourceText = await this.GetTextAsync(fileSourcePath, cancellation);

        var destinationText = CalculateWordsOccurrences(sourceText!);

        var stream = new MemoryStream(Encoding.UTF8.GetBytes(destinationText));

        await s3.PutObjectAsync(
            new PutObjectRequest()
            {
                BucketName = fileDestinationPath.Bucket,
                Key = fileDestinationPath.Key,
                InputStream = stream
            },
            cancellation
        );

        AnsiConsole.MarkupLine($"Plan: {plan}");
        AnsiConsole.MarkupLine($"Migrating file([blue]{index}[/]) - {fileSourcePath}");
        AnsiConsole.MarkupLine($"Migrating file([blue]{index}[/]) - {fileDestinationPath}");

        return 0;
    }
}
Here is merge command:
public class MergeCommand(IAmazonS3 s3, ILogger<MergeCommand> logger)
    : CancellableAsyncCommand<MergeCommand.Settings>
{
    public class Settings : CommandSettings
    {
        [CommandOption("-s|--source <SourcePath>")]
        public string Source { get; set; } = default!;
    }

    public override async Task<int> ExecuteAsync(
        CommandContext context,
        Settings settings,
        CancellationToken cancellation
    )
    {
        ArgumentNullException.ThrowIfNull(settings.Source);

        var sourcePath = S3Path.Parse(settings.Source);

        var files = await this.GetFilesAsync(sourcePath.Bucket, sourcePath.Key, cancellation);

        // E.g: (word1, 10), (word2: 3)
        var occurrences = await this.AggregateFiles(files, cancellation);

        var top = occurrences
            .Where(x =>x.Key is { Length: > 2 })
            .Where(x => x.Value >= 3)
            .OrderByDescending(x => x.Value)
            .Take(100);

        WriteTable(top);

        return 0;
    }
}
Creating a Docker Image
In order to run our task in AWS Batch we need to push our image to Amazon Elastic Container Registry.
FROM mcr.microsoft.com/dotnet/sdk:8.0 AS build-env
WORKDIR /App

COPY . ./

# Restore as distinct layers
RUN dotnet restore
# Build and publish a release
RUN dotnet publish -c Release -o out

# Build runtime image
FROM mcr.microsoft.com/dotnet/aspnet:8.0
WORKDIR /App
COPY --from=build-env /App/out .
ENTRYPOINT ["dotnet", "BatchMigration.dll"]
CMD ["--help"]
And here is how to build it an push to the public ECR repository:
docker build -t aws-batch-dotnet-demo-repository .

aws ecr-public get-login-password --region $AWS_REGION | docker login --username AWS --password-stdin public.ecr.aws

docker tag aws-batch-dotnet-demo-repository:latest public.ecr.aws/t7c5r3b7/aws-batch-dotnet-demo-repository:latest

docker push public.ecr.aws/t7c5r3b7/aws-batch-dotnet-demo-repository:latest
💡 Note, you will need to create a public repository and get instructions from repository page in AWS Management Console.
Part 3: Setting up AWS with Terraform IaC
I’ve decided to prepare a Terraform example of how to provision a full AWS Batch setup because configuring it from management console can be somewhat tedious. The code below demonstrates main parts of AWS Batch configuration, the code is redacted, once again, please consult source code for precise configuration.
Below you can find a Terraform script that sets up an AWS Batch environment. Here’s a breakdown of what it does:
- It specifies the required provider, in this case, AWS, and the version of the provider and configures the AWS provider with the region “us-east-1”.
- It creates two S3 buckets, one named “aws-batch-demo-dotnet-source-bucket” and the other “aws-batch-demo-dotnet-destination-bucket”.
- It uploads all files from the local “documents” directory to the source bucket.
- It creates an AWS Batch environment using the “terraform-aws-modules/batch/aws” module. This environment includes:
- A compute environment named “main_ec2” with a type of “EC2”, a maximum of 8 vCPUs, and a desired number of 2 vCPUs. The instances launched by this environment will be of type “m4.large”.
- A job queue named “MainQueue” that is enabled and has a priority of 1. This queue uses the “main_ec2” compute environment.
- Three job definitions named “plan”, “migrate”, and “merge”. Each job runs a different command in a container that uses the latest image from the “public_ecr” repository. Each job requires 1 vCPU and 1024 units of memory.
terraform {
  required_providers {
    aws = {
      source = "hashicorp/aws"
      version = "~> 5.0"
    }
  }
}
# Configure the AWS Provider
provider "aws" {
  region = "us-east-1"
}

resource "aws_s3_bucket" "source_bucket" {
  bucket = "aws-batch-demo-dotnet-source-bucket"
}

resource "aws_s3_bucket" "destination_bucket" {
  bucket = "aws-batch-demo-dotnet-destination-bucket"
}

resource "aws_s3_object" "documents" {
  for_each = fileset("./documents", "**/*")

  bucket = aws_s3_bucket.source_bucket.bucket
  key = each.value
  source = "./documents/${each.value}"
}

locals {
  region = "us-east-1"
  name = "aws-batch-dotnet"

  tags = {
    Name = local.name
    Example = local.name
  }
}

module "batch" {
  source = "terraform-aws-modules/batch/aws"

  compute_environments = {
    main_ec2 = {
      name_prefix = "ec2"

      compute_resources = {
        type = "EC2"

        min_vcpus = 0
        max_vcpus = 8
        desired_vcpus = 2
        instance_types = ["m4.large"]

        security_group_ids = [module.vpc_endpoint_security_group.security_group_id]
        subnets = module.vpc.private_subnets
        tags = {
          # This will set the name on the Ec2 instances launched by this compute environment
          Name = "${local.name}-ec2"
          Type = "Ec2"
        }
      }
    }
  }

  # Job queus and scheduling policies
  job_queues = {
    main_queue = {
      name = "MainQueue"
      state = "ENABLED"
      priority = 1

      compute_environments = ["main_ec2"]

      tags = {
        JobQueue = "Job queue"
      }
    }
  }

  job_definitions = {
    plan = {
      name = "${local.name}-plan"
      propagate_tags = true

      container_properties = jsonencode({
        command = ["plan"]
        image = "${module.public_ecr.repository_url}:latest"
        resourceRequirements = [
          { type = "VCPU", value = "1" },
          { type = "MEMORY", value = "1024" }
        ]
      })
      tags = {
        JobDefinition = "Plan"
      }
    },
    migrate = {
      name = "${local.name}-migrate"
      propagate_tags = true

      container_properties = jsonencode({
        command = ["migrate"]
        image = "${module.public_ecr.repository_url}:latest"
        resourceRequirements = [
          { type = "VCPU", value = "1" },
          { type = "MEMORY", value = "1024" }
        ]
      })
      tags = {
        JobDefinition = "Migrate"
      }
    },

    merge = {
      name = "${local.name}-merge"
      propagate_tags = true

      container_properties = jsonencode({
        command = ["merge"]
        image = "${module.public_ecr.repository_url}:latest"
        resourceRequirements = [
          { type = "VCPU", value = "1" },
          { type = "MEMORY", value = "1024" }
        ]
      })
      tags = {
        JobDefinition = "Merge"
      }
    }
  }

  tags = local.tags
}
💡 Note, you don’t need to know terraform to try to use it. Simply, run terraform init and terraform apply to provision the environment.
Part 4: Running AWS Batch Jobs with CLI Commands
aws batch submit-job \
    --job-name aws-batch-dotnet-plan-01 \
    --job-queue MainQueue \
    --job-definition aws-batch-dotnet-plan \
    --share-identifier "demobatch*" \
    --scheduling-priority-override 1 \
    --container-overrides '{
        "command": [
            "plan",
            "--source",
            "s3://aws-batch-demo-dotnet-source-bucket",
            "--destination",
            "s3://aws-batch-demo-dotnet-destination-bucket/output/",
            "--plan",
            "s3://aws-batch-demo-dotnet-destination-bucket/plans/plan-01.json"
        ]
    }'
Here is an example of produced migration plan:
{
  "Metadata": {
    "Source": {
      "Bucket": "aws-batch-demo-dotnet-source-bucket",
      "Key": ""
    },
    "Destination": {
      "Bucket": "aws-batch-demo-dotnet-destination-bucket",
      "Key": "output/"
    },
    "Plan": {
      "Bucket": "aws-batch-demo-dotnet-destination-bucket",
      "Key": "plans/plan-01.json"
    },
    "TotalItems": 2
  },
  "Items": [
    "file1.txt",
    "file2.txt"
  ]
}
Run the migration:
aws batch submit-job \
    --job-name aws-batch-dotnet-migrate-01 \
    --job-queue MainQueue \
    --job-definition aws-batch-dotnet-migrate \
    --share-identifier "demobatch*" \
    --scheduling-priority-override 1 \
    --array-properties size=2 \
    --container-overrides '{
        "command": [
            "migrate",
            "--plan",
            "s3://aws-batch-demo-dotnet-destination-bucket/plans/plan-01.json"
        ]
    }'
💡 Note, --array-properties size=2 because we need to process two files. In this case, array job is scheduled to main queue, once processed, it will produce sub-jobs that are processed concurrently.
Here is an example of file processing:
and:12
batch:11
aws:7
# the list goes on
Aggregate results:
aws batch submit-job \
    --job-name aws-batch-dotnet-merge-01 \
    --job-queue MainQueue \
    --job-definition aws-batch-dotnet-merge \
    --share-identifier "demobatch*" \
    --scheduling-priority-override 1 \
    --container-overrides '{
        "command": [
            "merge",
            "--source",
            "s3://aws-batch-demo-dotnet-destination-bucket/output/"
        ]
    }'
And here is the that was output to console:
┌───────────┬───────┐
│ Key       │ Value │
├───────────┼───────┤
│ batch     │  11   │
│ aws       │   8   │
│ service   │   6   │
│ amazon    │   5   │
│ storage   │   5   │
│ computing │   4   │
│ jobs      │   4   │
│ data      │   4   │
│ services  │   3   │
│ simple    │   3   │
│ workloads │   3   │
└───────────┴───────┘
☝️ We can define dependencies between jobs by providing --depends-on. Alternatively, we can use AWS Step Functions to orchestrate the submission of jobs.

Conclusion
In this post, we have journeyed through the process of implementing file processing pipeline. We have covered everything from creating a .NET CLI for AWS Batch operations and setting up AWS with Terraform IaC, to running AWS Batch jobs with CLI commands.
Through these guides, I hope to have provided you with a comprehensive understanding and practical skills to confidently navigate AWS Batch in a .NET environment.
Remember, the best way to consolidate your learning is through practice. So, don’t hesitate to apply these concepts in your projects and see the magic happen!
References
- https://github.com/NikiforovAll/aws-batch-dotnet
- https://docs.aws.amazon.com/batch/latest/userguide/example_array_job.html
- https://docs.aws.amazon.com/batch/latest/APIReference/API_SubmitJob.html
- https://docs.aws.amazon.com/batch/latest/userguide/what-is-batch.html
- https://aws.amazon.com/blogs/hpc/encoding-workflow-dependencies-in-aws-batch/

Top comments (0)