
Originally published at https://www.nocobase.com/en/tutorials/markdown-template-variables.
Dear guys, welcome to this tutorial! In this section, we will learn step-by-step how to use Markdown together with the Handlebars templating engine to achieve dynamic content display. In the previous lesson, "The Marvels of Markdown Blocks," you learned about the basic syntax, creation methods, and variable filling. Now, let’s dive into some advanced techniques with template variables.
1 Introduction to the Handlebars Templating Engine
After you create a Markdown block, you will find a "Templating Engine" option in the top-right configuration panel, with Handlebars set as the default. Handlebars helps you dynamically render page content based on conditions (such as statuses, numerical values, or options), enabling Markdown to respond to changes.

1.1 The Role of Handlebars
Although Markdown natively only supports static content, by using Handlebars you can toggle display text and styles dynamically based on conditions. This way, even in varying business scenarios, your page can always display the correct information.
2 Practical Scenarios
Let’s explore some practical scenarios and implement their functionalities step by step.
2.1 Handling Order Status
In an online demo, we often need to display different messages depending on the order status. Suppose your orders have a status field with the following statuses:
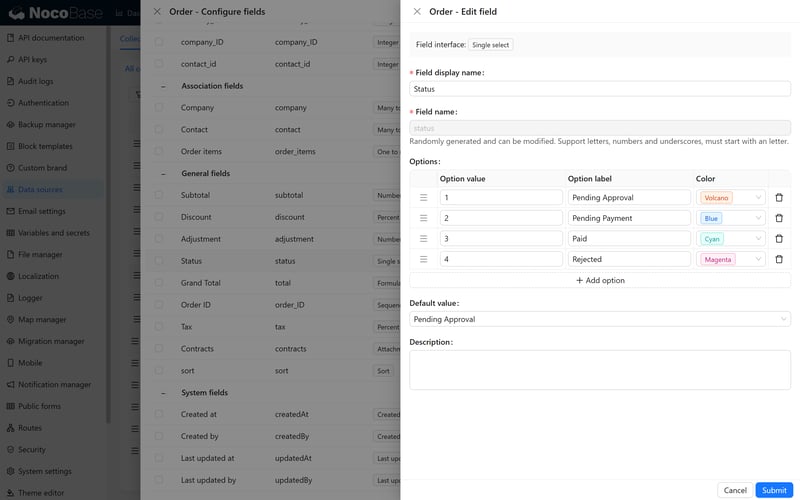
The display contents for the four statuses are as follows:
| Option Label | Option Value | Display Content |
|---|---|---|
| Pending Approval | 1 | Order submitted, awaiting internal review. |
| Pending Payment | 2 | Awaiting customer payment. Please closely monitor the order status. |
| Paid | 3 | Payment confirmed; please proceed with follow-up processing. The assigned consultant will contact you within one hour. |
| Rejected | 4 | Order not approved. If necessary, please review and resubmit. |
On the page, we can capture the order status value and dynamically display different messages accordingly. Below is a detailed explanation of how to implement this using if, else, and else if syntax.
2.1.1 If Syntax
Using an if condition, you can display content when the condition is true. For example:
{{#if condition}}
  <p>Displayed Result</p>
{{/if}}
In this case, "condition" should use Handlebars syntax (such as eq, gt, lt, etc.). Try this simple example:
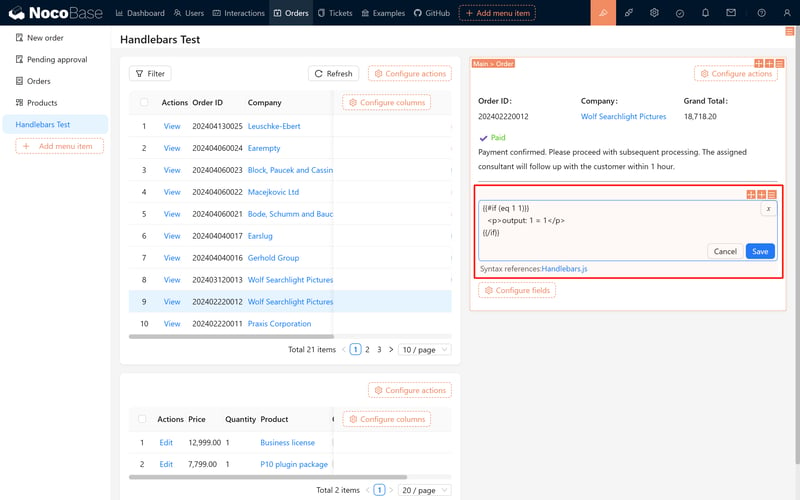
{{#if (eq 1 1)}}
  <p>Displayed Result: 1 = 1</p>
{{/if}}
The result is shown in the figures below:

2.1.2 Else Syntax
When the condition isn’t met, you can specify alternative content using else. For example:
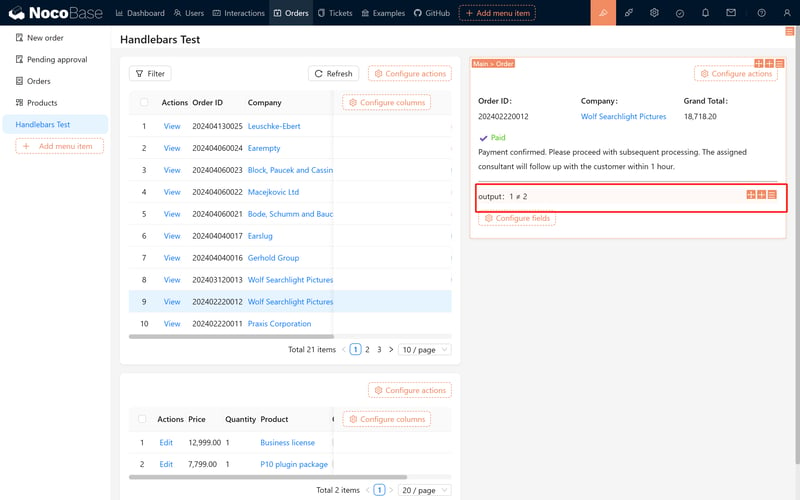
{{#if (eq 1 2)}}
  <p>Displayed Result: 1 = 2</p>
{{else}}
  <p>Displayed Result: 1 ≠ 2</p>
{{/if}}
The outcome is as follows:
2.1.3 Multiple Condition Checks
To check multiple conditions, you can use else if. Example code:
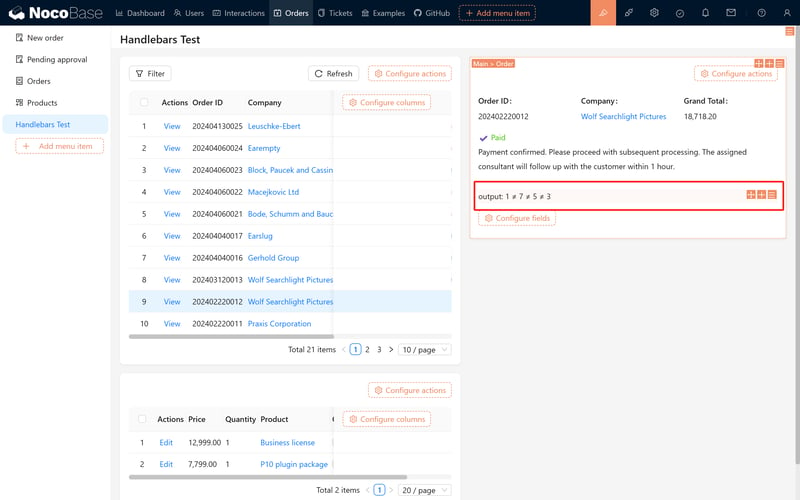
{{#if (eq 1 7)}}
  <p>Displayed Result: 1 = 7</p>
{{else if (eq 1 5)}}
  <p>Displayed Result: 1 = 5</p>
{{else if (eq 1 4)}}
  <p>Displayed Result: 1 = 4</p>
{{else}}
  <p>Displayed Result: 1 ≠ 7 ≠ 5 ≠ 3</p>
{{/if}}
The corresponding effect is illustrated below:
2.2 Displaying Effects
After configuring the order statuses, the page will dynamically update to show content based on the specific status. See the image below:
The code for the page is as follows:
{{#if order.status}}
  <div>
    {{#if (eq order.status "1")}}
      <span style="color: orange;">⏳ Pending Approval</span>
      <p>Order submitted. Awaiting internal review. </p>
    {{else if (eq order.status "2")}}
      <span style="color: #1890ff;">💳 Pending Payment</span>
      <p>Awaiting customer payment. Please monitor the status. </p>
    {{else if (eq order.status "3")}}
      <span style="color: #52c41a;">✔ Paid</span>
      <p>Payment confirmed. Please proceed with subsequent processing. The assigned consultant will follow up with the customer within 1 hour.</p>
    {{else if (eq order.status "4")}}
      <span style="color: #f5222d;">✖ Rejected</span>
      <p>Order approval was not passed. If necessary, please review and resubmit.</p>
    {{/if}}
  </div>
{{else}}
  <p class="empty-state">No pending orders at this time.</p>
{{/if}}
Try switching the order status to see if the page updates accordingly, and verify that your code works properly.
2.3 Displaying Order Details
Besides displaying the order status, order details (such as the list of product details) are common requirements. Here, we can use the each syntax to implement this feature.
2.3.1 Introduction to the Each Syntax
The each helper is used to loop through a list. For example, for the array [1,2,3], you can write:
{{#each list}}
  <p>Displayed Result: {{this}}</p>
  <p>Index: {{@index}}</p>
{{/each}}
Within the loop, {{this}} represents the current element, and {{@index}} represents the current index.
2.3.2 Product Details Example
If you need to display all product information from an order, you can use the following code:
{{#each $nRecord.order_items}}
    <p>{{@index}}</p>
    <p>{{this.id}}</p>
    <p>{{this.price}}</p>
    <p>{{this.quantity}}</p>
    <p>{{this.product.name}}</p>
---
{{/each}}
If you notice that no data appears on the page, make sure the order items field is properly set up to be displayed; otherwise, the system may consider this part of the data redundant and omit querying it.
You might also notice that the product name (this.product.name) isn’t printed. This is because, similar to the previous situation, we also need to display the product object. After it is displayed, we can hide the related field in the linkage rule settings.
2.4 Final Product: Order Product List
After completing the above steps, you will have implemented a complete template for displaying an order product list. Refer to the following code:
<h3>Shopping Cart Items List</h3>

{{#if $nRecord.order_items}}
  <div class="cart-summary">Total: {{$nRecord.order_items.length}} items, Total price: ¥{{$nRecord.total}}</div>

  <table>
    <thead>
      <tr>
        <th>Index</th>
        <th>Product Name</th>
        <th>Unit Price</th>
        <th>Quantity</th>
        <th>Subtotal</th>
      </tr>
    </thead>
    <tbody>
      {{#each $nRecord.order_items}}
        <tr style="{{#if this.out_of_stock}}color: red;{{/if}}">
          <td>{{@index}}</td>
          <td>{{this.product.name}}</td>
          <td>¥{{this.price}}</td>
          <td>{{this.quantity}}</td>
          <td>¥{{multiply this.price this.quantity}}</td>
          <td>
            {{#if this.out_of_stock}}
              <span>Out of stock</span>
            {{else if this.low_stock}}
              <span style="color:orange;">Low stock</span>
            {{/if}}
          </td>
        </tr>
      {{/each}}
    </tbody>
  </table>
{{else}}
  <p>The shopping cart is empty</p>
{{/if}}
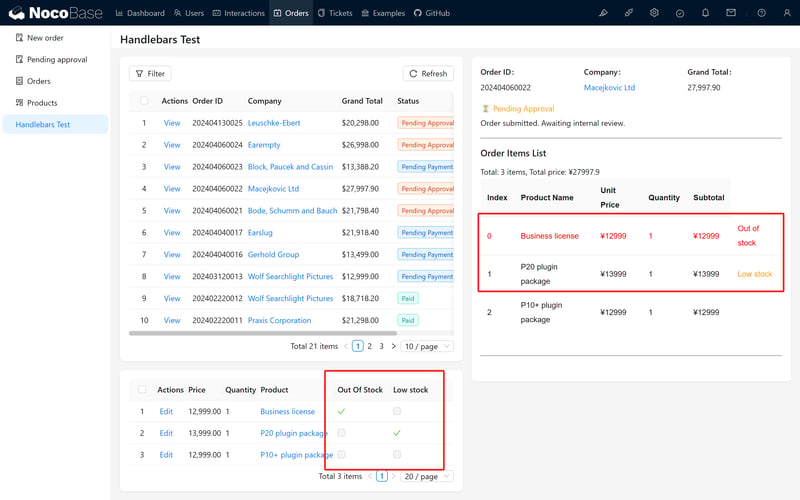
After running the template, you will see an effect similar to the image below:
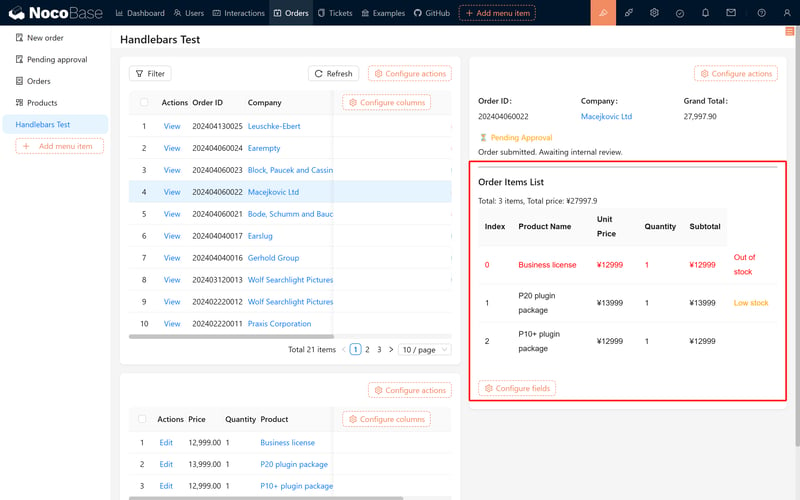
To better demonstrate the flexibility of Handlebars, we have added the “Out of Stock” and “Low Stock” indicators in the order details:
- When out_of_stock is true, “Out of Stock” is displayed and the product row appears in red.
- When low_stock is true, a “Low Stock” note is shown in orange.
3 Summary and Recommendations
Through the explanation above, you have learned how to use Handlebars to achieve dynamic rendering in Markdown templates, including core syntaxes like if/else conditions and each loops. In practical development, for more complex logic, it is recommended to combine linkage rules, calculated fields, workflows, or script nodes to enhance flexibility and scalability.
Hope that by practicing these techniques, you will master them and apply them effectively in your projects. Keep exploring and discovering new possibilities!
If you encounter any issues during the operation, feel free to visit the NocoBase community or refer to the official documentation. We hope this guide helps you successfully implement user registration auditing based on your actual needs and provides flexibility for further extensions. Wishing you smooth usage and project success!

Top comments (0)