Originally published at my blog: blog.naveeraashraf.com
In the first part of this tutorial we explored the two main components behind making a static site generator or SSG - the Markdown parser, Markdown2, and the templating engine, Jinja2. We saw how to use these components together to create HTML files from Markdown files and pre-created templates.
In this part we will create our own static site generator. This is the final product
So let's get started.
Structure
In this tutorial I will create a recipe blog. Since this tutorial is for educational purpose, I will only create two main views: the home page of the recipe blog with all the posts listed on it, and the individual posts pages. You can find the complete code in the github repository
Scaffolding
Create a new folder where you want your code to live:
mkdir recipe-ssg
In this folder, create the content folder where we will write our blog posts in markdown files:
cd recipe-ssg & mkdir content
We will also need posts written in markdown. If you want to follow along, you can copy the recipes written in markdown from here. By the way these are not just place holder recipes. These are my tried and tested recipes. If you are a baker, do give these recipes a try!
We will also need some images. Feel free to use my images from here. Make a folder in your root project called output. Inside the output folder make another folder called img and add all the image files to this folder.
You will also need to install Markdown2 and Jinja2, using pip or pipenv, ideally inside a virtual environment.
pipenv install markdown2
pipenv install jinja2
Writing the Python Script
Create a new file in your project root and call it main.py. First we will import all the packages we will need:
import os
from datetime import datetime
from jinja2 import Environment, PackageLoader
from markdown2 import markdown
Next we will parse our markdown files. This is how we did it in the first part:
from markdown2 import markdown

with open('content/turkish-pide.md', 'r') as file:
    parsed_md = markdown(file.read(), extras=['metadata'])
But since we have more than one file now, we will change the code to loop over all the files in the content folder like so:
POSTS = {}
for markdown_post in os.listdir('content'):
    file_path = os.path.join('content', markdown_post)

    with open(file_path, 'r') as file:
        POSTS[markdown_post] = markdown(file.read(), extras=['metadata'])
Next we will sort these posts in reverse order so the newest posts show first but the dates are in a string format. So we will first need to convert them to datetime:
POSTS = {
    post: POSTS[post] for post in sorted(POSTS, key=lambda post: datetime.strptime(POSTS[post].metadata['date'], '%Y-%m-%d'), reverse=True)
}
So far so good. You can check if your script is working so far by printing some metadata to the console.
Creating Templates
Next we will write our templates. Create a templates directory in the project root. We will write two templates, one for the main home page and the other for individual posts. Let's write the individual posts one first:
<!DOCTYPE html>

<html lang="en">
<head>
    <meta charset="UTF-8">
    <meta name="viewport" content="width=device-width, initial-scale=1.0">
    <meta http-equiv="X-UA-Compatible" content="ie=edge">
    <title>{{ post.title }}</title>
</head>
<body>

    <h1>{{ post.title }}</h1>
    <small>{{ post.date }}</small>
    <p>
        {{ post.content }}
    </p>
</body>
</html>
Save the above code into post.html inside the templates directory. Create another file home.html inside templates directory and paste the following code:
<!DOCTYPE html>

<html lang="en">
<head>
    <meta charset="UTF-8">
    <meta name="viewport" content="width=device-width, initial-scale=1.0">
    <meta http-equiv="X-UA-Compatible" content="ie=edge">
    <title>My Recipes</title>
</head>
<body>

    <h1>My Recipes</h1>
    {% for post in posts %}
    <p>
        <h2>{{loop.index}}: <a href="posts/{{ post.slug }}/">{{post.title}}</a> <small>{{post.date}}</small></h2>
        {{post.summary}}
    </p>
    {% endfor %}
</body>
</html>
This template is a little less straight forward than the individual post one. But we are simply using Jinja2's for loop to loop through all the posts and filling in the place holder with data from those posts. The data will be handed over to this template in a list so we can easily loop over it. When we will go to our main.py again and write the script to pass data along to these templates, this will make much more sense.
Using Template Inheritance
But before we do that, you may have noticed that there is quite a bit of repetition. We had to write the same scaffolding HTML code for both templates. While this is not a big deal in this case because we have just two templates, but imagine having to rewrite the same code for larger projects.
For sites with navigation menus and footers a lot of code will need to be written over and over again. And if you had to make a change, let's say in your navigation menu, you will need to make the change on each and every template.
This can get incredibly monotonous, not to mention increasing the chance of errors and bugs.
Fortunately all templating languages offer the solution to this problem through template inheritance. You can read more about Jinja2's template inheritance from here.
Templates usually take advantage of inheritance, which includes a single base template that defines the basic structure of all subsequent child templates. You use the tags
{% extends %}and{% block %}to implement inheritance. ~ Real Python
Create a new file in templates directory and call it layout.html. In this file we will put all the code that needs to be repeated on every template:
<!DOCTYPE html>

<html lang="en">
<head>
    <meta charset="UTF-8">
    <meta name="viewport" content="width=device-width, initial-scale=1.0">
    <meta http-equiv="X-UA-Compatible" content="ie=edge">
    <title>My Recipes</title>
</head>
<body class="container">

    {% block content %} {% endblock %}

    <br>

</body>
</html>
Now let's make suitable changes to the other two templates as well. In the home.html template paste the following code:
{% extends "layout.html" %}

{% block content %}

<h1>My Recipes</h1>

<div>

{% for post in posts %}

    <p>
        <h2>{{loop.index}}: <a href="posts/{{ post.slug }}.html">{{post.title}}</a> <small>{{post.date}}</small></h2>
        {{post.summary}}
    </p>

{% endfor %}

</div>

{% endblock %}
And in the post.html change the code to:
{% extends "layout.html" %}

{% block content %}

<h1>{{post.title}}</h1>
<p>
    <small>{{post.date}}</small>
    {{post.content}}
</p>

{% endblock %}
Now we have much cleaner code. Now let's work on rendering these templates.
Rendering Home Page
In your main.py file, get the templates with Jinja2 just like we did in the first part. But this time we will get two templates:
env = Environment(loader=PackageLoader('main', 'templates'))
home_template = env.get_template('home.html')
post_template = env.get_template('post.html')
Now let's pass the data to our home page template from our POSTS list. Since the home page only needs the metadata we will pass it metadata only:
posts_metadata = [POSTS[post].metadata for post in POSTS]
home_html = home_template.render(posts=posts_metadata)
This will pass a list of metadata through the variable posts to our home page template. This is the same posts variable over which we looped in the template.
One more thing that I want to do is to have the tags of each post in some kind of list so I can loop through them as I may want to make each tag into a clickable link. Currently all the tags are being passed as a single string.
To change that I will create a new list from the post_metadata['tags'] variable and pass it along with other data to my home template.
posts_metadata = [POSTS[post].metadata for post in POSTS]
tags = [post['tags'] for post in posts_metadata]
home_html = home_template.render(posts=posts_metadata, tags=tags)
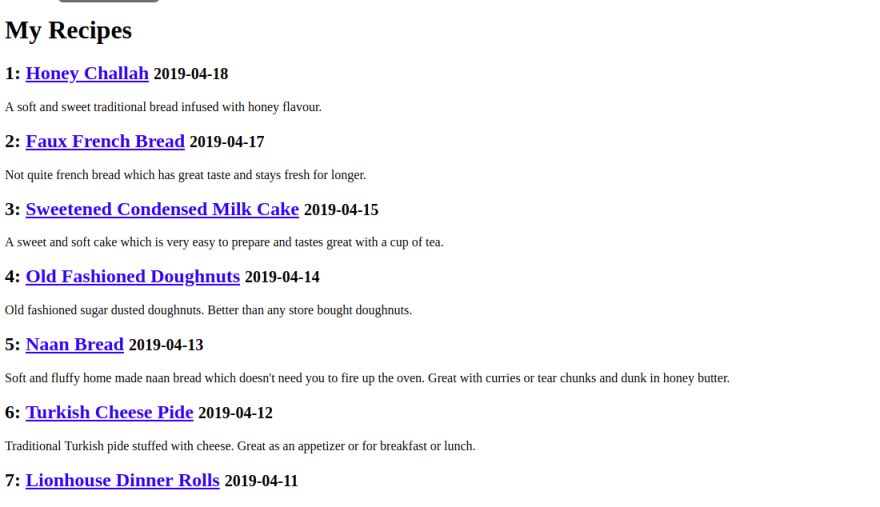
Now let's write this HTML to a file:
with open('output/home.html', 'w') as file:
    file.write(home_html)
Run your main.py and you will get a home.html in your output directory. Open the file in browser and it will look like this:
Rendering Individual Posts
If you click on the title of any of the post in your browser, there will be a not found error. Because the individual post pages haven't been rendered yet. To do so add the following code to your main.py:
for post in POSTS:
    post_metadata = POSTS[post].metadata

    post_data = {
        'content': POSTS[post],
        'title': post_metadata['title'],
        'date': post_metadata['date'],
    }

    post_html = post_template.render(post=post_data)

    post_file_path = 'output/posts/{slug}.html'.format(slug=post_metadata['slug'])

    os.makedirs(os.path.dirname(post_file_path), exist_ok=True)
    with open(post_file_path, 'w') as file:
        file.write(post_html)
Now run the main.py again and now when you click on a link it will take you to the corresponding page.

Extra Bits
Our static site generator is done at this point. But I want to show you a few extra things.
Let's say we want to add some css to make our site look nicer. This is where we will be thankful to the template inheritance. Just add the following styling to your layout.html in the templates directory:
<style>
    .container {
        width: 80%;
        margin: auto;
        margin-top: 3em;
    }
</style>
Run your main.py again and you will see the styles applied to all pages. Great!
Let's add a light-weight css framework to our site. I am using Picnic.
Add this link to the head of your layout.html:
<link rel="stylesheet" href="https://cdn.jsdelivr.net/npm/picnic@6.5.0/picnic.min.css">
Re run main.py and voila!
Remember those tags we passed as an individual list? Using Jinja2's build in filters we can now iterate over that list from within our template and put each tag inside it's own span or button element.
{% set list_of_tags = post.tags.split(",") %}
{% for tag in list_of_tags %}
    <button class="shyButton mybutton">{{ tag }}</button>
{% endfor %}
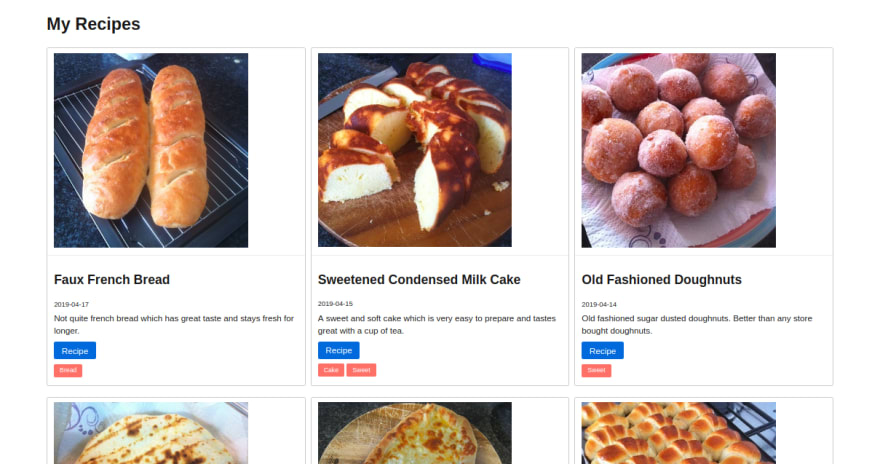
And after adding some CSS classes to my code here is the final product
and

You can find the complete code in the github repository.
That's it! I hope you enjoyed this tutorial. If you did don't forget to share it.

Top comments (4)
i like that you only used jinja and markdown as dependency
I am glad you liked this :)
Nice write up. I also wrote my own static blog generator: tumblelog. There is a Python version. I didn't use jinja, though, but used some regular expressions as the template I use is very simple. I have been using this SSG for Plurrrr for nearly 500 days so I guess most bugs are ironed out of it.
This is #nice. You have a star :)
A few days ago I've built a simple website with panini, quite similar to your tool.