Getting Started with Open-wc
Open Web Components, or open-wc as we refer to it, is a web component platform centered around the idea that utilizing and building web components should be straightforward and accessible to all developers. A proponent of open-source development and tooling, the group see web components as the future of web development, citing it as a: "standards-based solution to problems like reusability, interoperability, and encapsulation" (open-wc.org). Today, I would like to get you up and running with the open-wc boilerplate that can be used as a starting point to create any of your own web components.
Here's what you will need to get started:
- Administrative rights to the computer you will be using
- Basic terminal knowledge and the ability to run basic terminal commands
Steps we will cover:
- Downloading an IDE or Text Editor
- Installing Node.js and NPM
- Installing yarn (another package manager)
- Downloading the open-wc boilerplate
Downloading an IDE
For this tutorial, we will be using VSCode as our IDE as it is freely available and has all of the built in functionality we may need through this project.
Go to VSCode and download the latest stable build.
- When you first open the application, it will ask for permission to access certain levels of your folder structure depending on where you attempt to open and save projects to on your local machine. Please agree to grant access to the directories you plan to use in this class (I recommend the Documents folder at the very least).

Installing Node and NPM
Next, we need to install Node.js in order for us to be able to download and manage the open-wc tooling.
Go to the Node.js website and download the latest LTS Build for your operating system.
- After downloading, it will ask you to go through a brief installation and setup process. Please agree to all necessary permissions and use agreements that you are presented with, leaving any additional optional settings as their default value.
NPM (a.k.a the Node Package Manager) will also be installed when you download Node. To validate that both of these have been installed correctly, run:
node -v
and
npm -v
to check the version numbers of each.
If you get a version number as a response such as:
v14.17.0
you have installed Node correctly.

Installing yarn
Similar to how we downloaded Node and NPM, let's install the yarn package manager:
In order to install yarn, we will need to use the terminal.
- Open up your terminal/console window/shell on your device.
Use the following command using NPM that we just installed:
npm install --global yarnIf you receive an error stating that you do not have appropriate permissions, or that the action could not be completed, this may be because you do not have the correct administrative permissions under the current user. To solve this issue, add "sudo" to the beginning of your command:
sudo npm install --global yarn
Installing the open-wc boilerplate
We made it! We're ready to set up open-wc. First, however, we need to select where we will be installing the boilerplate and all of its dependencies...
- Choose a location on your local machine (I recommend creating a new folder in your "Documents" directory) where you want to install and access the boilerplate.
Now that we know where we want to install the boilerplate, open your terminal again and navigate to the appropriate level and folder:
- Use
lsto look at the files in the current directory level - Use
cd <directory name>to drill into your preferred folder location.
We can finally download the boilerplate and its dependencies:
- Run
npm init @open-wc- (Use 'sudo' at the beginning if you get a permissions error again)
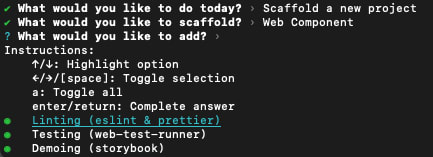
- Once the downloading has began, you will be prompted with a number of questions
- Select "Scaffold a new project" using your Return key to select it

- Select "Web Component"

- Using the spacebar, select all three additional tooling options (Linting, Testing, and Demoing)
- Select "No" for using Typescript
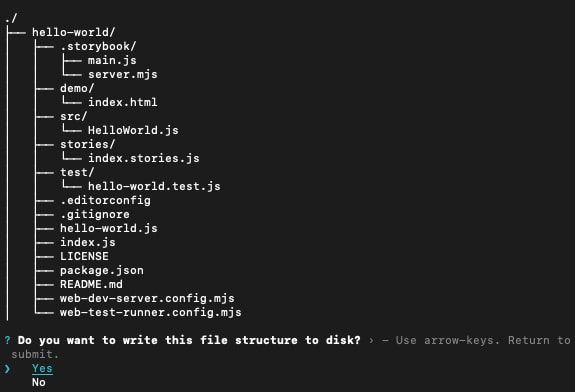
- Write "hello-world" as the tag name for your web component
- Please use lowercase letters only for this name!!
- Select "Yes" that we want to write this file structure to the disk
- Finally, select "Yes, with yarn" to install all of the necessary dependencies that Node requires to support open-wc
If the setup was successful, you should see the following confirmation:
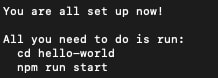
Congratulations!!! You have officially set up your boilerplate for open-wc! Please leave a comment if you have any issues or questions on this installation.
Best of luck on your web component creations!

Top comments (0)