
Hey there, fellow AWS explorers! Ever wondered how to turn the chaotic chatter of social media into actionable insights? Today, we're diving headfirst into the world of serverless architecture to build a simple analytics dashboard for social media sentiment data.
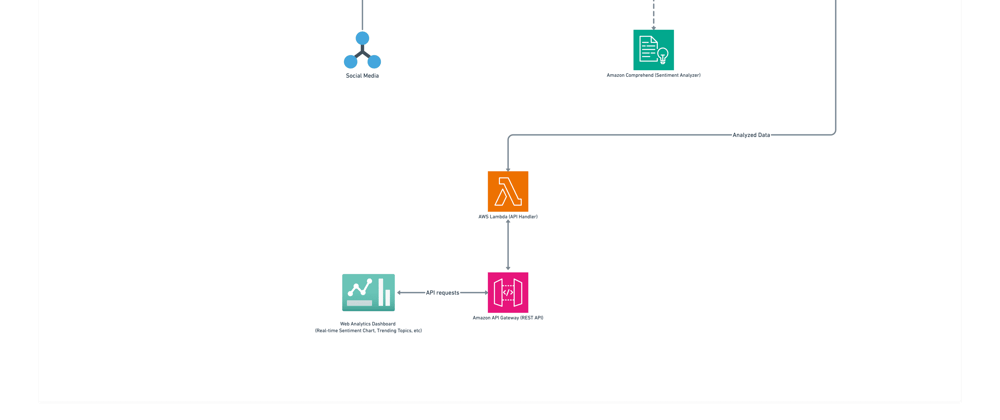
In this tutorial, we'll walk through building a complete serverless backend solution for a social media sentiment analytics dashboard. We'll be leveraging AWS Lambda, API Gateway, DynamoDB, Amazon Kinesis, and a few other services to create a scalable, cost-effective system. We will be using AWS CloudFormation templates to define and manage our infrastructure as code, which enables version control, reproducibility, and easier collaboration.
Why Serverless?
Now, you might be asking, "Why go serverless?" Great question! Here's why:
- No Servers to Manage: Say goodbye to patching, scaling, and the headache of managing infrastructure.
- Pay-as-you-go: Only pay for the compute time you consume.
- Scalability: AWS handles scaling automatically, so your application can handle any load.
- Faster Development: Focus on your code, not infrastructure.
- Infrastructure as Code: Using CloudFormation, we define and manage our infrastructure in a declarative way, enabling version control, reproducibility, and easier collaboration.
Let’s get our Hands Dirty
Pre-requisite
- AWS Account: If you don't have one, sign up for a free tier account.
- IAM User: Create an IAM user with the necessary permissions for Lambda, API Gateway, DynamoDB, etc.
- AWS CLI: Install and configure the AWS CLI for command-line access if you haven’t.
- Mastodon API Credentials: In this project, we’ll use the Mastodon to source our social media data. Follow this link to obtain your access token.
Note: You can find the complete code here.
Let's get started! We'll break this down into manageable steps.
1. Creating your secrets manager
We’ll create a secrets manager to store our mastodon API credentials.
- Navigate to the AWS Secrets Manager console
- Click the
Store new secretsbutton - Select
Other type of secret - Add your Mastodon API credentials
- MASTODON_INSTANCE_URL
- We use
https://mastodon.socialfor this project - MASTODON_ACCESS_TOKEN
- Save and note the Secret ARN (we will use it later 😉)
2. Creating an S3 bucket for Code storage
We’ll create an S3 bucket to store all code for our lambda functions and cloud formation. This is where we will push our compiled lambda code and cloud formation templates for this project. To do this:
- Navigate to the Amazon S3 console.
- Click
Create a bucket - Provide a unique name for your bucket and use all default settings.
- Your bucket URL is
https://{YOUR-UNIQUE-BUCKET-NAME}.s3.amazonaws.com - We will use this URL throughout this project
3. Defining the DynamoDB Table with CloudFormation
We'll use DynamoDB to store our sentiment data. Here's the CloudFormation template (dynamodb-table.yaml) that defines our table:
Resources:
  SentimentDataTable:
    Type: 'AWS::DynamoDB::Table'
    Properties:
      TableName: SentimentDataTable
      AttributeDefinitions:
        -
          AttributeName: DataId
          AttributeType: S
      KeySchema:
        -
          AttributeName: DataId
          KeyType: HASH
      ProvisionedThroughput:
        ReadCapacityUnits: 5
        WriteCapacityUnits: 5
Outputs:
  SentimentDataTableName:
    Value: !Ref SentimentDataTable
    Description: Name of the Sentiment data table
    Export:
      Name: SentimentDataTableName
  SentimentDataTableArn:
    Value: !GetAtt SentimentDataTable.Arn
    Description: ARN of the Sentiment data table
    Export:
      Name: SentimentDataTableArn
-
Explanation:
- The Resources section defines the resources we want to create. Here, we're creating a DynamoDB table named
SentimentDataTable. - Properties specify the table's configuration, including:
- TableName: The name of the table.
- AttributeDefinitions: The attributes that make up the table's schema. We define DataId as a String attribute.
- KeySchema: The primary key for the table. We use DataId as the hash key.
- ProvisionedThroughput: The read and write capacity for the table. For this tutorial, we'll use a basic configuration.
- The Outputs section defines values that are returned when you create the CloudFormation stack. Here, the table name and ARN are exported, which can be used by other stacks.
- The Resources section defines the resources we want to create. Here, we're creating a DynamoDB table named
Deployment: You would deploy this template using the AWS CLI or the AWS Management Console. We will do this later (stay tuned 🙂).
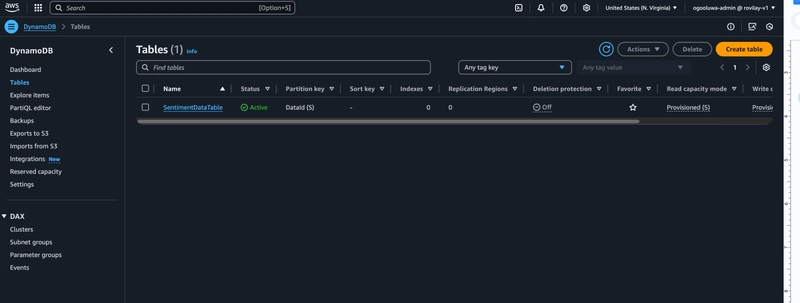
After Deployment, navigate to the AWS console to view the
SentimentDataTable.!
4. Building the Lambda Functions
Lambda is the heart of our serverless backend. We'll create three main Lambda functions:
- data-collection-function: This function will fetch data from a social media source (Mastodon) and send it to a Kinesis stream.
- sentiment-analysis-function: This function will process the data from the Kinesis stream, analyze the sentiment of the text, and store the results in DynamoDB.
- api-handlers-function: This function will handle API requests from the frontend, querying the sentiment data from DynamoDB.
4.1 Data Collection Function
Here's the code for the data-collection-function:
import { KinesisClient, PutRecordCommand, PutRecordCommandInput } from "@aws-sdk/client-kinesis";
import { SecretsManagerClient, GetSecretValueCommand } from "@aws-sdk/client-secrets-manager";
import { Handler } from 'aws-lambda';
import { createRestAPIClient } from 'masto';

const kinesisClient = new KinesisClient({});
const secretsManagerClient = new SecretsManagerClient({});

export const handler: Handler = async (event: any): Promise<{ statusCode: number, body: string }> => {
  try {
    // 1. Retrieve API credentials from Secrets Manager
    const secretResponse = await secretsManagerClient.send(
      new GetSecretValueCommand({ SecretId: "social-media-analytics-secrets-manager" })
    );
    const secrets = JSON.parse(secretResponse.SecretString || "{}");

    const masto = createRestAPIClient({
      url: secrets.MASTODON_INSTANCE_URL || '',
      accessToken: secrets.MASTODON_ACCESS_TOKEN || '',
    });

    // 2. Fetch toots based on your criteria (e.g., keywords, hashtags)
    const toots = await masto.v2.search.list({
      q: "crypto",
      type: "statuses",
      limit: 40
    })

    // 3. Iterate through toots and send them to Kinesis
    const kinesisStreamName = "SocialMediaDataStream";
    const encoder = new TextEncoder()

    const res = await Promise.allSettled(toots.statuses?.map((toot) => {
      const text = toot.content.replace(/<[^>]+>/g, '');
      const postId = toot.id;
      const createdAt = toot.createdAt;
      const authorUsername = toot.account.username;

      const data = {
        PostId: postId,
        Text: text,
        CreatedAt: createdAt,
        AuthorUsername: authorUsername,
      }

      // Prepare data for Kinesis
      const recordParams: PutRecordCommandInput = {
        Data: encoder.encode(JSON.stringify(data)),
        PartitionKey: postId,
        StreamName: kinesisStreamName
      };

      return kinesisClient.send(new PutRecordCommand(recordParams));
    }));

    return {
      statusCode: 200,
      body: "Successfully sent toots to Kinesis",
    };
  } catch (error) {
    console.error("Error processing toots:", error);
    return {
      statusCode: 500,
      body: "Error processing toots",
    };
  }
};
-
Explanation:
- The function uses the
SecretsManagerClientto retrieve the Mastodon API credentials. This is a best practice for security, as it avoids hardcoding sensitive information in your code. - It then uses the Masto library to fetch "toots" (posts) from Mastodon. In this case, we are searching for “crypto” related posts.
- For each toot, it extracts the relevant data (post ID, text, creation date, author) and sends it to a Kinesis stream using the KinesisClient. The PartitionKey is set to the
postIdfor even data distribution across Kinesis shards. - For error handling, we log into the console and return a status
500.
- The function uses the
4.2 Sentiment Analysis Function
Here's the code for the sentiment-analysis-function:
import { ComprehendClient, DetectSentimentCommand } from "@aws-sdk/client-comprehend";
import { DynamoDBClient, PutItemCommand } from "@aws-sdk/client-dynamodb";
import { Handler, KinesisStreamEvent } from "aws-lambda";

const comprehendClient = new ComprehendClient({});
const dynamoDBClient = new DynamoDBClient({});

export const handler: Handler = async (event: KinesisStreamEvent) => {
    try {
      // 1. Process each record (toot)
      for (const record of event.Records || []) {
        if (!record?.kinesis?.data) continue

        const toot: {
          PostId: string,
          Text: string,
          AuthorUsername: string,
          CreatedAt: string
        } = JSON.parse(Buffer.from(record.kinesis.data, 'base64').toString())

        // 3. Detect sentiment using Comprehend
        const sentimentResponse = await comprehendClient.send(
          new DetectSentimentCommand({
            LanguageCode: "en",
            Text: toot.Text,
          })
        );

        // 4. Store toot and sentiment in DynamoDB
        const putItemParams = {
          TableName: "SentimentDataTable",
          Item: {
            DataId: { S: toot.PostId },
            Text: { S: toot.Text },
            AuthorUsername: { S: toot.AuthorUsername },
            CreatedAt: { S: toot.CreatedAt },
            Sentiment: { S: sentimentResponse.Sentiment || "UNKNOWN" },
            SentimentScore: {
              M: {
                Positive: { N: sentimentResponse.SentimentScore?.Positive?.toString() || "0" },
                Negative: { N: sentimentResponse.SentimentScore?.Negative?.toString() || "0" },
                Neutral: { N: sentimentResponse.SentimentScore?.Neutral?.toString() || "0" },
                Mixed: { N: sentimentResponse.SentimentScore?.Mixed?.toString() || "0" },
              },
            },
          },
        };
        await dynamoDBClient.send(new PutItemCommand(putItemParams));
      }
    } catch (error) {
      console.error("Error processing records:", error);
    }
};
-
Explanation:
- This function is triggered by new data arriving in the Kinesis stream. It uses the
KinesisClientto retrieve records from the stream. - For each record, it parses the data and extracts the
tootinformation. - It then uses the
ComprehendClientto detect the sentiment of the toot's text. - Finally, it stores the
tootdata and the sentiment analysis results in theDynamoDBtable using theDynamoDBClient.
- This function is triggered by new data arriving in the Kinesis stream. It uses the
4.3 API Handlers Function
Here's the code for the api-handlers-function:
import { APIGatewayProxyEvent, APIGatewayProxyResult, Context } from 'aws-lambda';
import { DynamoDBClient, ExecuteStatementCommand } from '@aws-sdk/client-dynamodb';

const TABLE_NAME = 'SentimentDataTable';
const VALID_SENTIMENTS = ['POSITIVE', 'NEGATIVE', 'NEUTRAL', 'MIXED'];
const dynamoDBClient = new DynamoDBClient({});

export const handler = async (event: APIGatewayProxyEvent): Promise<APIGatewayProxyResult> => {
  const headers = {
    "Access-Control-Allow-Headers" : "Content-Type",
    "Access-Control-Allow-Origin": "*",
    "Access-Control-Allow-Methods": "OPTIONS,POST,GET"
}

  try {
    // 1. Extract relevant data from the API Gateway event
    const { httpMethod, requestContext, queryStringParameters } = event;

    // 2. Determine the requested action based on the path or method
    if (httpMethod === 'GET' && requestContext.resourcePath === '/sentiment/{keyword}') {
        // 3. Validate keyword parameter
        const keyword = event.pathParameters?.keyword;
        if (!keyword) {
            return { statusCode: 400, body: JSON.stringify({ error: 'Missing keyword' }) };
        }

        // 4. Validate sentiment parameter
        const sentiment = (queryStringParameters?.sentiment || '').toUpperCase();
        if (sentiment && !VALID_SENTIMENTS.includes(sentiment)) {
          return { statusCode: 400, body: JSON.stringify({ error: `Invalid sentitment value: allowed values are ${VALID_SENTIMENTS}` }) };
        }

        // 5. Fetch data from DynamoDB based on the request
        const sentimentData = await getSentimentData(keyword, sentiment);

        // 6. Format the response
        return { statusCode: 200, headers, body: JSON.stringify(sentimentData ?? []) };
    }


    return { statusCode: 404, headers, body: JSON.stringify({ error: 'Not found' }) };
  } catch (error) {
    console.error('Error processing request:', error);
    return { statusCode: 500, headers, body: JSON.stringify({ error: 'Internal server error' }) };
  }
};

const getSentimentData = async (keyword: string, sentiment?: string) => {
    let statement = `SELECT * FROM "${TABLE_NAME}" WHERE Sentiment = '${sentiment}' AND contains(Text, '${keyword}')`

    if (!sentiment) {
        statement = `SELECT * FROM "${TABLE_NAME}" WHERE contains(Text, '${keyword}')`
    }

    // Execute the PartiQL statement
    const command = new ExecuteStatementCommand({
        Statement: statement,
    });

    const response = await dynamoDBClient.send(command);

    return response.Items;
};
-
Explanation:
- This function handles requests from external users and is triggered by an API Gateway request.
- It extracts the keyword and sentiment parameters from the request.
- It uses the
DynamoDBClientto query theSentimentDataTableusing aPartiQLSELECT statement. The query filters the data based on the provided keyword and sentiment (optional). - It then returns the data in a JSON format.
- Note, since we are using the
AWS_PROXYMethod Integration type (refer toapi-gateway.yaml), It is important to send theheadersin the response object to prevent CORS errors.
5. Setting up API Gateway with CloudFormation
We'll use CloudFormation to define our API Gateway. Here's the api-gateway.yaml template:
Parameters:
  apiGatewayName:
    Type: String
    Default: SentimentAPI
  apiGatewayStageName:
    Type: String
    AllowedPattern: '[a-z0-9]+'
    Default: dev
  apiGatewayHTTPMethod:
    Type: String
    Default: GET

Resources:
  SentimentAPI:
    Type: AWS::ApiGateway::RestApi
    Properties:
      Name: SentimentAPI
      EndpointConfiguration:
        Types:
          - REGIONAL

  SentimentAPIResource:
    Type: AWS::ApiGateway::Resource
    DependsOn:
      - SentimentAPI
    Properties:
      RestApiId: !Ref SentimentAPI
      ParentId: !GetAtt SentimentAPI.RootResourceId
      PathPart: 'sentiment'

  SentimentKeywordResource:
    Type: AWS::ApiGateway::Resource
    DependsOn:
      - SentimentAPI
    Properties:
      RestApiId: !Ref SentimentAPI
      ParentId: !Ref SentimentAPIResource
      PathPart: '{keyword}'

  SentimentAPIMethod:
    Type: AWS::ApiGateway::Method
    DependsOn:
      - SentimentAPI
      - SentimentAPIResource
    Properties:
      AuthorizationType: NONE
      ApiKeyRequired: false
      HttpMethod: !Ref apiGatewayHTTPMethod
      RequestParameters:
        method.request.path.keyword: true
      MethodResponses:
        - StatusCode: 200
          ResponseModels:
            "application/json": "Empty"
      Integration:
        IntegrationHttpMethod: POST
        Type: AWS_PROXY
        Uri: !Sub
          - arn:aws:apigateway:${AWS::Region}:lambda:path/2015-03-31/functions/${ApiHandlersFunctionArn}/invocations
          - ApiHandlersFunctionArn: !ImportValue ApiHandlersFunctionArn
      RestApiId: !Ref SentimentAPI
      ResourceId: !Ref SentimentKeywordResource

  SentimentAPIDeployment:
    Type: AWS::ApiGateway::Deployment
    DependsOn: SentimentAPIMethod
    Properties:
      RestApiId: !Ref SentimentAPI
      StageName: !Ref apiGatewayStageName

  SentimentAPIPermission:
    Type: AWS::Lambda::Permission
    DependsOn: SentimentAPI
    Properties:
      Action: lambda:InvokeFunction
      FunctionName: !ImportValue ApiHandlersFunctionName
      Principal: apigateway.amazonaws.com
      SourceArn: !Sub arn:aws:execute-api:${AWS::Region}:${AWS::AccountId}:${SentimentAPI.RestApiId}/*/*

Outputs:
  apiGatewayInvokeURL:
    Value: !Sub https://${SentimentAPI}.execute-api.${AWS::Region}.amazonaws.com/${apiGatewayStageName}
-
Explanation:
- This template defines the API Gateway and its resources.
- It creates a REST API named SentimentAPI.
- It defines a resource
/sentiment/{keyword}, where{keyword}is a path parameter. - It creates a
GETmethod for this resource. - The Integration property is crucial:
-
Type: AWS_PROXY: This tells API Gateway to forward the entire request to the ApiHandlersFunction Lambda function. -
Uri: This specifies the ARN of the Lambda function to invoke. The!Subsyntax is used to substitute the actual function ARN, which is obtained from the output value of theapi-handlers-functionCloudFormation stack. -
AWS::Lambda::Permission: This resource grants API Gateway permission to invoke the Lambda function.

6. Tying it All Together with a Main Stack
To simplify deployment, we'll create a "main" CloudFormation stack (main-stack.yaml) that references the other stacks. This helps manage dependencies and ensures resources are created in the correct order.
Parameters:
  BucketName:
    Type: String
    Description: Unique name for the S3 bucket
    Default: {YOUR-UNIQUE-BUCKET-NAME}
  BucketURL:
    Type: String
    Description: S3 bucket URL
    Default: https://{YOUR-UNIQUE-BUCKET-NAME}.s3.amazonaws.com
  EnvVariablesAndCredentials:
    Type: String
    Description: Credentials
    Default: {YOUR-SECRETS-MANAGER-ARN}

Resources:
  KinesisDataStreamStack:
    Type: AWS::CloudFormation::Stack
    Properties:
      TemplateURL: !Sub
        - ${BucketURL}/infrastructure/kinesis-data-stream.yaml
        - BucketURL: !Ref BucketURL

  DataCollectionFunctionStack:
    Type: AWS::CloudFormation::Stack
    Properties:
      TemplateURL: !Sub
        - ${BucketURL}/infrastructure/data-collection-function.yaml
        - BucketURL: !Ref BucketURL
      Parameters:
        BucketName: !Ref BucketName
        EnvVariablesAndCredentials: !Ref EnvVariablesAndCredentials
    DependsOn:
      - KinesisDataStreamStack

  DynamoDBTableStack:
    Type: AWS::CloudFormation::Stack
    Properties:
      TemplateURL: !Sub
        - ${BucketURL}/infrastructure/dynamodb-table.yaml
        - BucketURL: !Ref BucketURL

  SentimentAnalysisFunctionStack:
    Type: AWS::CloudFormation::Stack
    Properties:
      TemplateURL: !Sub
        - ${BucketURL}/infrastructure/sentiment-analysis-function.yaml
        - BucketURL: !Ref BucketURL
      Parameters:
        BucketName: !Ref BucketName
    DependsOn:
      - DynamoDBTableStack
      - KinesisDataStreamStack

  ApiHandlersFunctionStack:
    Type: AWS::CloudFormation::Stack
    DependsOn:
      - DynamoDBTableStack
    Properties:
      TemplateURL: !Sub
        - ${BucketURL}/infrastructure/api-handlers-function.yaml
        - BucketURL: !Ref BucketURL
      Parameters:
        BucketName: !Ref BucketName

  ApiGatewayStack:
    Type: AWS::CloudFormation::Stack
    DependsOn:
      - ApiHandlersFunctionStack
    Properties:
      TemplateURL: !Sub
        - ${BucketURL}/infrastructure/api-gateway.yaml
        - BucketURL: !Ref BucketURL
-
Explanation:
- This template defines the overall application stack.
- It uses
AWS::CloudFormation::Stackresources to reference the other CloudFormation templates (for Kinesis, Data Collection, DynamoDB, Sentiment Analysis, API Handlers, and API Gateway). - The
DependsOnproperty is used to specify dependencies between the stacks, ensuring they are created in the correct order. For example, theSentimentAnalysisFunctionStackdepends on theDynamoDBTableStackandKinesisDataStreamStackbecause the Sentiment Analysis function needs the DynamoDB table and Kinesis stream to be created first. - Parameters like
BucketName,BucketURL, andEnvVariablesAndCredentialsare used to pass configuration values to the nested stacks.
7. Deploying to AWS
We’ll deploy our code to aws via aws-cli.
- Since our lambda code is in typescript and has some external dependencies, we will build and compile our code to javascript. We will use esbuild for this, ensure to install it globally or in your project dependencies.
esbuild ./src/index.ts \--bundle \--minify \--sourcemap \--platform=node \--target=es2020 \--outfile=dist/index.js
- After building the lambda functions, we’ll zip the bundled code.
cd dist && zip \-r {function-name}.zip index.js\*
- Now, we’ll upload our zip files and cloud formation template to s3 Upload zipped files
aws s3 cp ./dist/{function-name}.zip s3://{YOUR-UNIQUE-BUCKET-NAME}.}/{function-name}.zip
Upload Cloud formation templates
aws s3 cp backend/infrastructure/lib/ s3://{YOUR-UNIQUE-BUCKET-NAME}/infrastructure/ \--recursive
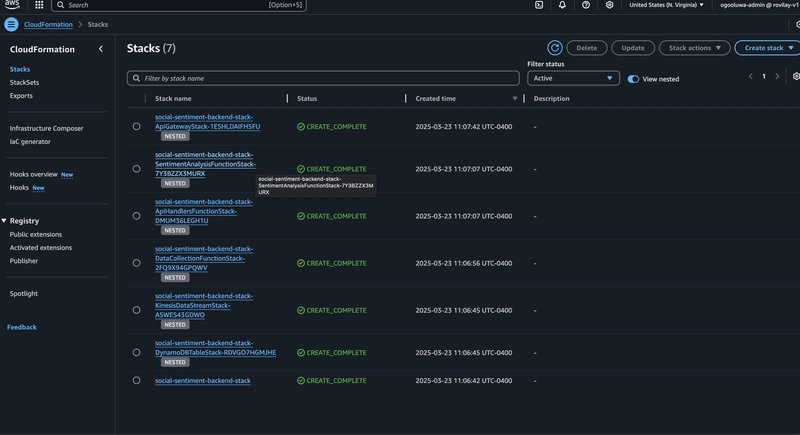
- Finally, we will deploy our stack using aws cloud-formation
   aws cloudformation create-stack \
      --stack-name social-sentiment-backend-stack \
      --template-url https://{YOUR-UNIQUE-BUCKET-NAME}.}.s3.amazonaws.com/infrastructure/main-stack.yaml \
      --capabilities CAPABILITY\_NAMED\_IAM CAPABILITY\_AUTO\_EXPAND
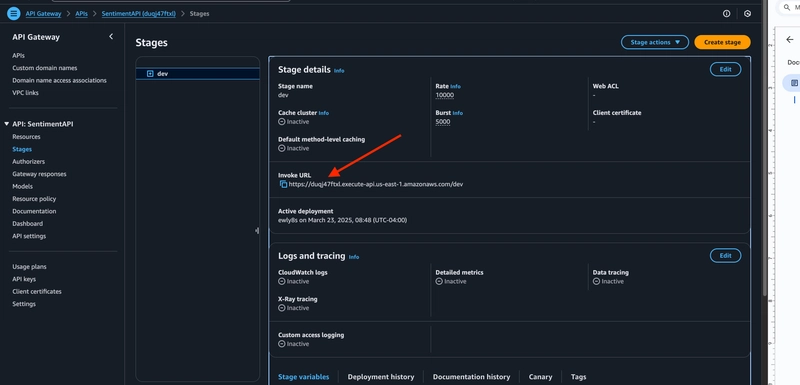
8. Connecting the Frontend
We will create a simple analytics dashboard. This dashboard will retrieve the sentiment data via the sentiment API (api-gateway) url. To connect the frontend to this API, we would use the URL provided in the CloudFormation stack's output (apiGatewayInvokeURL) or we can navigate to the api-gateway console and get the invoke URL. For example, if the URL is https://your-api-gateway-id.execute-api.us-east-1.amazonaws.com/dev, you would make a GET request to https://your-api-gateway-id.execute-api.us-east-1.amazonaws.com/dev/sentiment/keyword?sentiment=POSITIVE to get all positive sentiments for "keyword".
Note: this tutorial only supports the crypto keyword.

9. Clean up:
To avoid unnecessary and unforeseen costs, it is a good practice to clean up your aws resources. We simply just have to delete our stack by running this 👇🏿CLI command.
aws cloudformation delete-stack --stack-name social-sentiment-backend-stack
Then, navigate to your AWS console to delete your project bucket, and your secrets manager for the project.
And there you have it! We've built a serverless backend for a social media sentiment analytics dashboard using AWS Lambda, API Gateway, DynamoDB, Amazon Kinesis, Eventbridge, and CloudFormation. This is just the beginning. You can further enhance it by adding more features, visualizations, and social media integrations.
Share your thoughts and questions in the comments below.

Top comments (0)