
In my last article, I showed how you could create a simple bootloader. In this article, we will extend the bootloader to allow it to print a message in the BIOS. To check out the previous article, Click here!
BIOS allows for simple inputs and outputs, as the name suggests. Using BIOS interrupts, we can output a simple message to the screen to confirm that our code is working. To start, we are going to initialize our registers and stack memory to use in our program. We do this by adding some code to the main label.
We start by moving 0 into ax. We do this because we can’t move immediate data into registers like ds, so the only way to get 0 into them is to put 0 in another register first. Next, we set to the DS, ES, and SS registers to 0. The DS register sets the start address of the data segment, the ES register sets the start point of the extra segment, and the SS register sets the start address of the stack. After initializing these registers, we move 0x7C00 into the stack pointer so it is able to grow below the operating system.
With these registers initialized, we can now start the process of printing data to the screen. To start, here is the full code to print a message from the bootloader:
Let’s discuss each of the added lines of code in detail. At the bottom of our code, we defined the text we want to print to the screen. The variable that contains the text is called os_boot_message. It contains the message Our OS has booted! After the message, we add 0x0D and 0x0A, which are the characters for a new line. Finally, we add a 0, which is used to find the end of the string when we print it. In the main label, we load the os_boot_message variable into the si register. The si register is known as the source index register, and it is generally used for string operations. With the string loaded, we then call the print function.
The print function starts by pushing si, ax, and bx onto the stack to preserve their values. Next, we enter the print_loop label. This loop will first load a byte from the si register using the LODSB instruction. The next OR instruction checks if the value loaded was a 0, indicating the end of the string. The JZ instruction will jump to the done_print label if the value loaded was a 0. If the value was not zero, the value 0x0E is loaded into the ah register. This value tells the BIOS we are trying to print to the screen. Next, 0 is moved into BH. The BH register tells the BIOS the page number. This is generally set to 0 except for cases where you need to do double-buffering to draw to an off-screen page. Finally, we send an interrupt to the BIOS using INT 0x10, which tells the BIOS we want to write a character to the screen.
This print loop continues until a 0 character is reached, at which point ax, si, and bx are popped from the stack and the function returns to the caller.
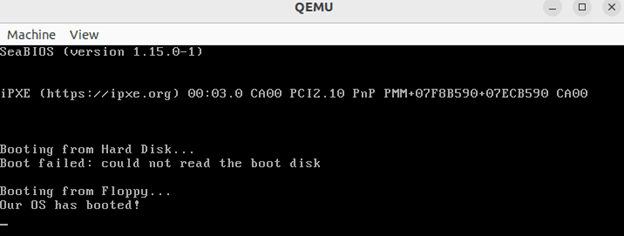
With this complete, you can now build and run your operating system once again. Use make to build the image, then use qemu-system-i386 -fda build/main.img to load it. The result will be something similar to below.
Congratulations! You have create a basic bootloader than can print data onto the screen. With this you are well on your way to creating a functional operating system with x86!

Top comments (0)