
How to Build a Custom Claims Management Application with Openkoda: Step-by-Step Guide
Managing claims efficiently is essential for any insurance or service-based business. Traditionally, setting up a claims management system requires a lot of time, effort, and technical knowledge.
But what if you could build a fully functional claims management application in just a few minutes with minimum coding?
With the Openkoda Insurtech Platform, it’s incredibly easy! In this guide, we’ll walk you through how to set up a custom claims management system, from creating a claims form to setting up filters, validation rules, and even import/export functionalities.
Features of Claims Management System
When developing custom claims management software, it's essential to ensure the solution covers key functionalities that streamline the claims handling process, improve operational efficiency, and enhance customer satisfaction. Below, we list the six most basic yet crucial features that every claims management system should incorporate:
- Automated Claims Processing: Speeds up claims handling by automating data entry, document verification, and workflows, reducing manual errors.
- Real-time Reporting & Analytics: Provides instant access to insightful dashboards and detailed analytics, enhancing decision-making and operational transparency.
- Seamless Integration Capabilities: Easily integrates with existing policy administration systems, CRM, and third-party data sources, improving data accuracy and consistency.
- Customizable Workflows: Allows users to define, modify, and manage claims workflows tailored to specific business requirements, increasing efficiency.
- Customer Self-Service Portal: Offers an intuitive interface where policyholders can submit claims, upload documents, and track claim status, enhancing customer satisfaction.
With Openkoda Claims Management Application Template, you can ensure that your software will meet five core qualities of a well-designed custom claims management software. You can create a system that will last for years and will be flexible enough to accommodate any changes in underlying business logic, integrations and such.
- Customization: Effortlessly add or modify entries in your data model within seconds, tailored to your exact requirements.
- Streamlined claims management: View, edit, and filter claims on a centralized screen.
- Improved data accuracy: Use dropdowns, reference fields, and validation rules to ensure consistent and reliable data entry.
- Efficient process management: Manage documents, import/export data, automate workflows, and integrate with other systems as your business grows.
- Full ownership: Avoid vendor lock-ins while enjoying complete control, unlimited user access, and scalability.
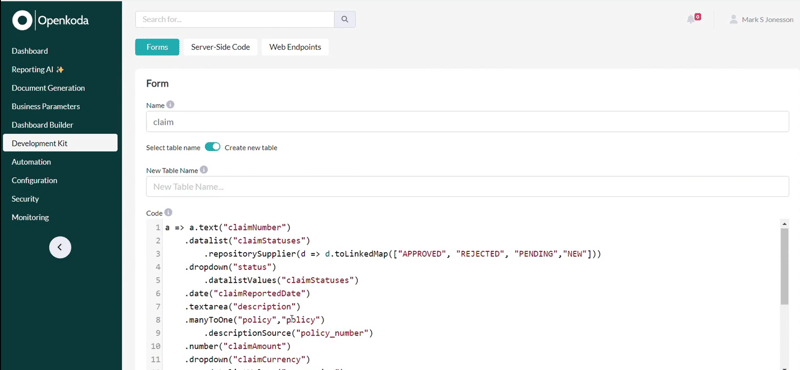
Step 1: Creating a Claims Form
The first step in building our claims management application is to set up a new claims form. This form will capture essential details about each claim. Some of the key fields to include are:
- Claim Number – A unique identifier for each claim.
- Status – The current status of the claim (e.g., Approved, Rejected, Pending, New).
- Description – Where you can input all necessary information about the claim
- Policy Reference – Linking the claim to a specific policy.
With Openkoda you can easily create and organize these fields the way you want, the customization options are endless:
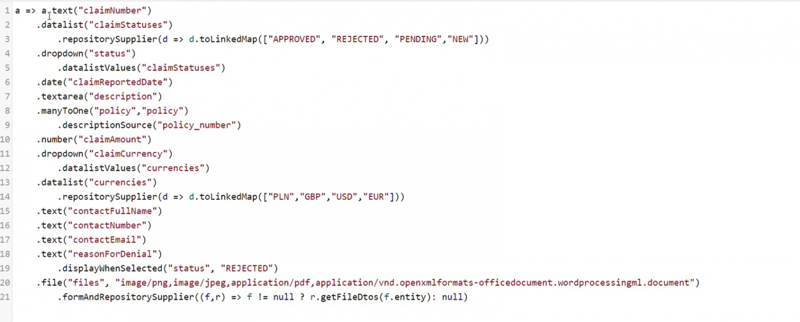
Step 2: Using Dropdowns and Reference Fields
To make data entry more structured, Openkoda supports different field types:
- Text fields – For general input like claim descriptions.
- Numbers – To capture financial details or numerical identifiers.
- Dropdowns – To define a set of predefined choices, like claim statuses.
- Reference Fields – For linking records, such as associating a claim with a policy.

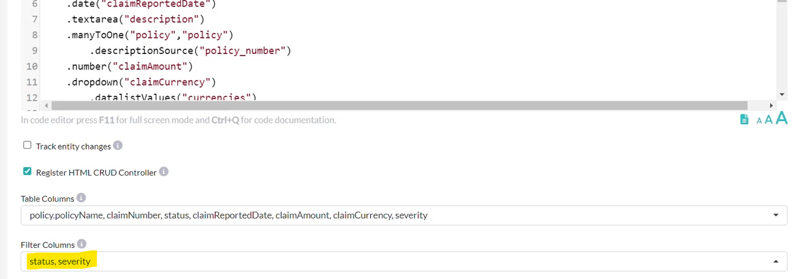
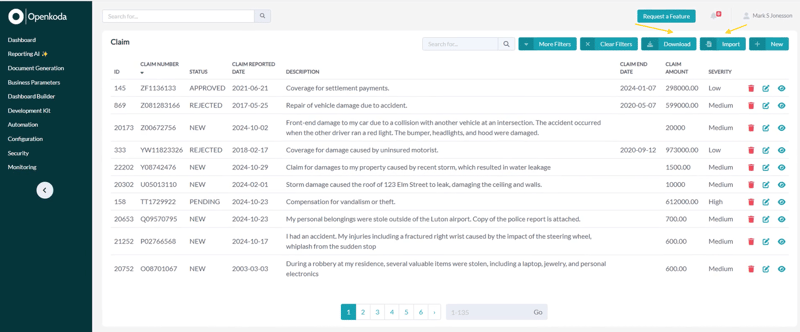
Step 3: Setting Up the Claims Screen
Once the form is created, the next step is selecting which fields should appear in the main claims table.
Openkoda lets you display essential attributes and relational data, ensuring all relevant claim details are easily accessible.
The Claims Screen serves as the main dashboard where users can view, manage, and update claims efficiently.
This is what it looks like when the screen is still blank:
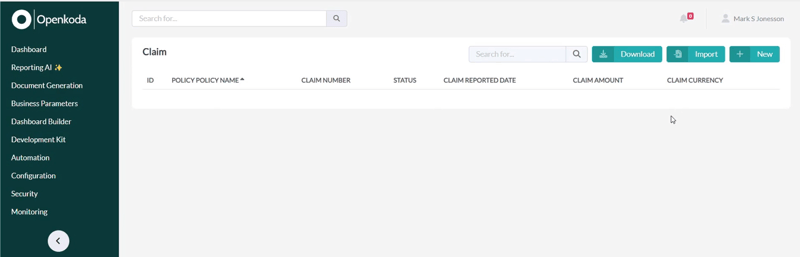
You can see all the fields we have just selected (policy name, claim number, status, claim reported date, claim amount, claim currency).
Step 4: Adding a New Claim Record
Now it’s time to fill it with new claims.
Adding a new claim in Openkoda is straightforward:
- Click on “Add New”
- Fill in the required details using dropdowns, text fields, and date pickers.
- Save the record.
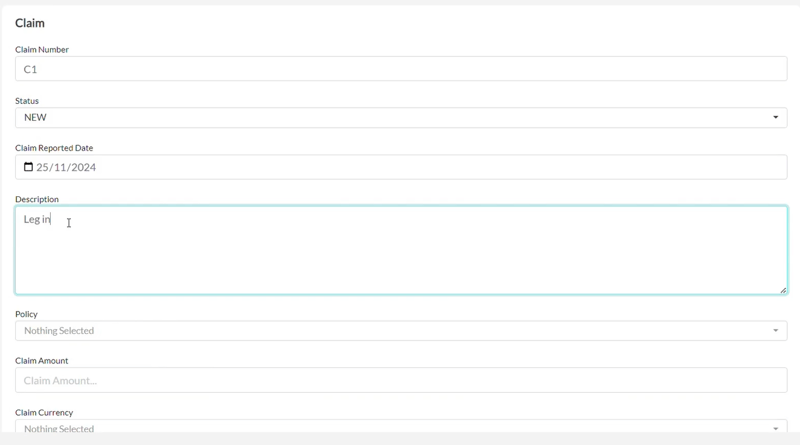
The new claim is now listed in the claims table, making it visible and accessible to authorized users.
Step 5: Managing Claims
Openkoda provides a complete set of CRUD (Create, Read, Update, Delete) actions for managing claims. Each record includes action icons that allow users to:
- View claim details.
- Edit existing claims.
- Delete records (if permitted by user access settings).
These features ensure full control over claim data while maintaining security and ease of use.

Step 6: Customizing Forms with Filters
To enhance usability, you can customize the claims form further by adding filters.
You can add any new field you need and then apply it as a filter. For example, here is a new Severity field that will be used for filtering:
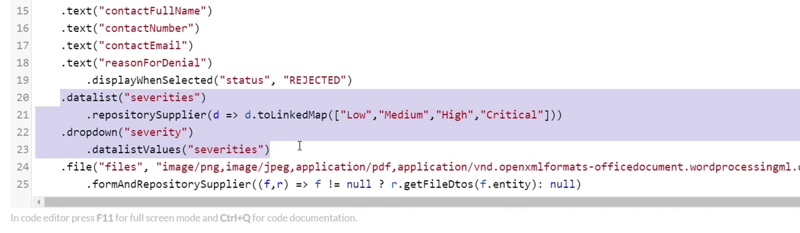
And now apply two fields: Status and Severity.
These filters make it easier for users to find specific claims quickly and efficiently.
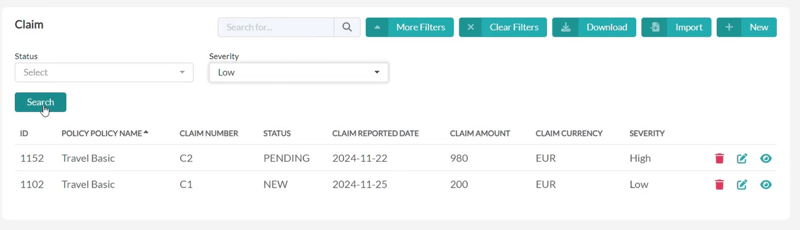
Step 7: Applying Filters on the Claims Screen
Once filters are defined, they can be applied directly to the Claims Screen. This allows users to sort and search claims based on severity, status, or any other criteria you wish.
For instance, if a user wants to see only high-priority claims, they can filter by severity and immediately find relevant cases.
Step 8: Adding Validation Rules
To maintain data integrity, Openkoda allows users to define validation rules. These rules prevent incomplete or incorrect data from being saved.
Example: Making Contact Information Mandatory – Ensures that essential details like a claimant’s phone number or email are always filled in.
This is a simple snippet to insert:
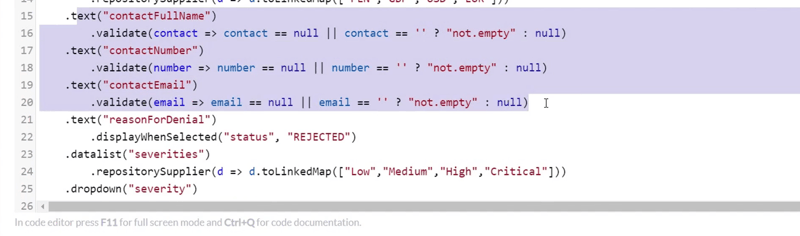
By implementing validation rules, you ensure that claims data is accurate, complete, and reliable.
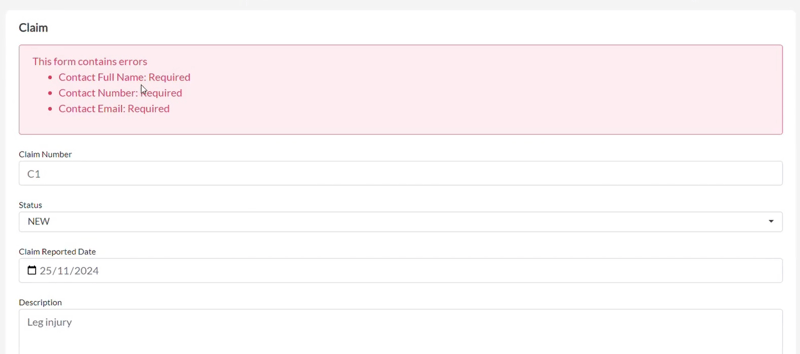
Step 9: Seeing Validation in Action
When a validation rule is in place, users receive real-time alerts if required fields are missing.
This prevents incomplete records from being submitted and helps maintain data quality.
For example, if a user forgets to enter contact information, Openkoda will display an error message and prevent the claim from being saved.
Step 10: Importing and Exporting Claims Data
Managing large amounts of claims data is simple with Openkoda’s import/export functionality. Users can:
- Import claims data from a CSV file, making bulk data entry fast and efficient.
- Export claims records to share or analyze information externally.
This feature is especially useful for businesses handling a high volume of claims and needing a seamless data management process.
Bottom Line: Using Openkoda for Faster Custom Insurance Software Development
In just a few minutes, we’ve built a fully functional claims management application. No complex coding, no expensive development teams. It is a customizable insurtech system that helps businesses manage claims efficiently and effectively.
Openkoda gives you all the tools you need to streamline claims management and keep up with your insurance company needs.
With this powerful insurtech platform, you can turn your insurtech application idea into reality faster and risk-free. Thanks to a set of industry-specific built-in features, the development process is accelerated, and you don’t have to build everything from scratch.
Start with Openkoda’s insurance application foundation and create your own scalable insurance solution – such as embedded insurance or policy management system – that grows with your business and is always ready for further customization.
Want to try it out yourself? Get started with Openkoda today and see how easy it is to build and customize your own insurance applications.

Top comments (0)