The Amazon Elastic Block Store (EBS) is a block storage solution for Amazon EC2 instances. EBS is designed for high durability and high availability (HA), which is achieved through data replication across several Availability Zones (AZs). EBS provides a variety of volume types to meet a variety of workload requirements, ranging from log processing to high-performance applications.
Moreover, AWS offer so-called snapshots which make it simple to back up EBS data, which may then be restored if necessary. EBS is a safe storage option for your cloud environment.
The Elastic Volumes functionality in EBS allows you to resize a volume while it is still in use, making the process much quicker and faster. Elastic Volumes also allows you to alter the volume type fully and adjust its performance without any downtime. You can now alter an existing AWS EBS volume using the AWS web UI instead of creating new volumes to respond to a spike in demand or to adjust to a new workload need.
In this article, we will look at how to do this using the interface and finish what we started — in Linux console.
🔧 0. Initial conditions
🕘 So, how does it happen in real life? Let's say your organization uses an EC2 instance to run a dev or production environment — perhaps a modest application that doesn't require a lot of resources.
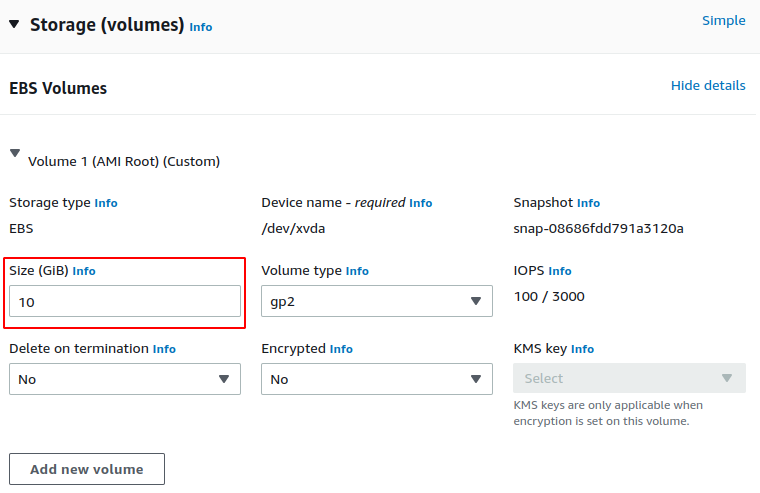
Suppose that at the stage of creating an Amazon Linux based instance, you have specified the size of the disk volume equal to 10 (ten) gigabytes.
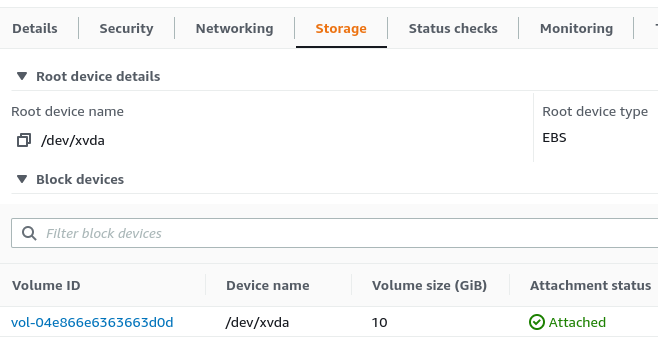
Your machine's root device is attached as /dev/xvda:
Let's see how operating system treats attached volume:
$ lsblk
NAME    MAJ:MIN RM SIZE RO TYPE MOUNTPOINT
xvda    202:0    0  10G  0 disk
└─xvda1 202:1    0  10G  0 part /
$ sudo mount | grep /dev/xvda
/dev/xvda1 on / type xfs (rw,noatime,attr2,inode64,logbufs=8,logbsize=32k,noquota)
$ df -h | grep /dev/xvda
/dev/xvda1       10G  2.0G  8.1G  20% /
🕦 As your demand grows, you'll probably need to add more disk storage, which will necessitate expanding your EBS volume to accommodate more gigabytes of data. You would obviously prefer to do this without any downtime, right?
⚠️ You don't have to stop the instance. If you are worried about the safety of data, you may create a snapshot before increasing. Restoration routines are described here.
Well, now we'll proceed with it in three steps.
🎯 I. Initiating EBS volume resizing process
Click EC2 → Instances → <Instance ID>. Look at storage tab, than click <Volume ID>. Look at upper right corner:
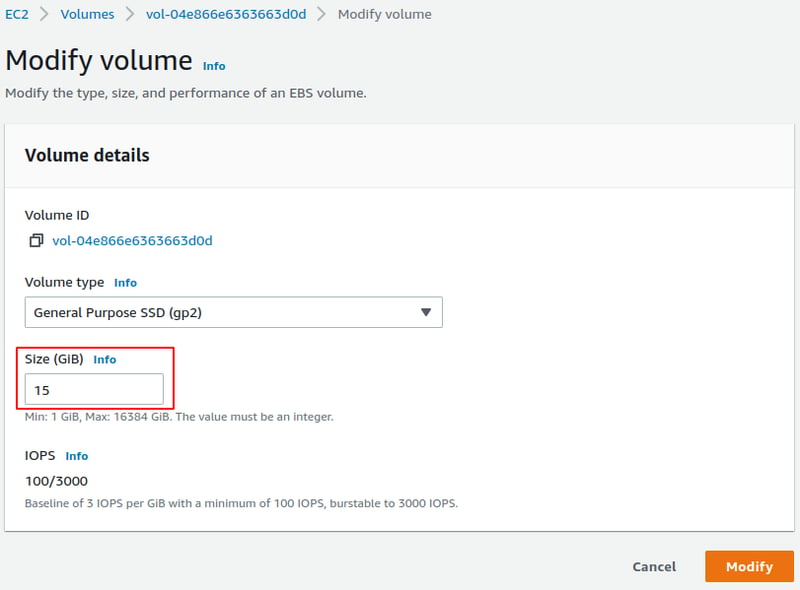
We'll add 5 (five) gigabytes of capacity to the root disk volume.
Observe a following warning and click the orange Modify button. If you are increasing the size of the volume, you must extend the file system to the new size of the volume. You can only do this when the volume enters the optimizing state. The modification process might take a few minutes to complete.
⚠️ You are charged for the new volume configuration after volume modification starts.
The procedure took 5 minutes or a bit more. After it was finished, the volume state color changed back to green, indicating that the resizing was complete.
🎯 II. Tossing instance's partition
Let's see what the OS thinks about our 'post-battle' volume:
$ lsblk
NAME    MAJ:MIN RM SIZE RO TYPE MOUNTPOINT
xvda    202:0    0  15G  0 disk
└─xvda1 202:1    0  10G  0 part /
Volume's size became equal 15 GB, but only at block device level of abstraction at this moment. The volume has been extended; however, the primary partition is still at the volume’s original size!
We need to expand our file system now. First, to expand the partition, use the growpart command.
growpart is one of the utility to extend the last partition of the disk to fill the available free space on the disk. It changes the sector position to the end sector of the disk. It only extends the last partition. It doesn't create or delete any existing partition. A --dry-run test can also be done to check the same.
⚠️ Note that there is a space between /dev/xvda and 1, which refers to the partition number.
$ sudo growpart --dry-run /dev/xvda 1
CHANGE: partition=1 start=4096 old: size=20967391 end=20971487 new: size=31453151 end=31457247
# === old sfdisk -d ===
label: gpt
label-id: 30B4269A-8501-4012-B8AE-5DBF6CBBACA8
device: /dev/xvda
unit: sectors
first-lba: 34

/dev/xvda1 : start=        4096, size=    20967391, type=0FC63DAF-8483-4772-8E79-3D69D8477DE4, uuid=4D1E3134-C9E4-456D-A253-374C91394E99, name="Linux"
/dev/xvda128 : start=        2048, size=        2048, type=21686148-6449-6E6F-744E-656564454649, uuid=C31217AB-49A8-4C94-A774-32A6564A79F5, name="BIOS Boot Partition"
# === new sfdisk -d ===
label: gpt
label-id: 30B4269A-8501-4012-B8AE-5DBF6CBBACA8
device: /dev/xvda
unit: sectors
first-lba: 34

/dev/xvda1 : start=        4096, size=    31453151, type=0FC63DAF-8483-4772-8E79-3D69D8477DE4, uuid=4D1E3134-C9E4-456D-A253-374C91394E99, name="Linux"
/dev/xvda128 : start=        2048, size=        2048, type=21686148-6449-6E6F-744E-656564454649, uuid=C31217AB-49A8-4C94-A774-32A6564A79F5, name="BIOS Boot Partition"
This will suit us just fine. Go!
$ sudo growpart /dev/xvda 1
CHANGED: partition=1 start=4096 old: size=20967391 end=20971487 new: size=31453151 end=31457247
You may see some sector count changes above. Checking out:
$ lsblk
NAME    MAJ:MIN RM SIZE RO TYPE MOUNTPOINT
xvda    202:0    0  15G  0 disk
└─xvda1 202:1    0  15G  0 part /
🎯 III. Expanding a file system itself
⚠️ You might use the fdisk, e2fsck and resize2fs command to extend an Ext4 file system. This is a more tricky case, an AWS competitor may tell you more.
But not ours' one. Our file system is XFS which AWS uses by default on gp* type SSD volumes, so we must use the xfs_growfs utility, which should already be installed on the system.
If not, you can manually install the xfsprogs package.
$ sudo yum install xfsprogs
Loaded plugins: extras_suggestions, langpacks, priorities, update-motd
amzn2-core                                               | 3.7 kB     00:00
Package xfsprogs-4.5.0-18.amzn2.0.1.x86_64 already installed and latest version
Nothing to do
$ sudo xfs_growfs -d /
meta-data=/dev/xvda1             isize=512    agcount=8, agsize=524159 blks
         =                       sectsz=512   attr=2, projid32bit=1
         =                       crc=1        finobt=1 spinodes=0
data     =                       bsize=4096   blocks=3931643, imaxpct=25
         =                       sunit=0      swidth=0 blks
naming   =version 2              bsize=4096   ascii-ci=0 ftype=1
log      =internal               bsize=4096   blocks=2560, version=2
         =                       sectsz=512   sunit=0 blks, lazy-count=1
realtime =none                   extsz=4096   blocks=0, rtextents=0
...
$ sudo df -hT | grep /dev/xvda1
/dev/xvda1     xfs        15G  2.0G   14G  14% /
We're done! The author reminds the most meticulous that EBS volume sizes and configurations still have some constraints (for example, their maximum volume size is 16 TB), due to the physics and arithmetic of block data storage. Additionally, AWS imposes their own limits.
To mount more attached EBS volume on every system reboot, ensure to add an entry for the device to the /etc/fstab file. See details here.
🤔 If you're interesting about how to repair file system using a so called 'temporary instance' approach please read man xfs_repair and Santosh Chituprolu's article.
Anyway, Otomato team wishes peace and quietness to your valuable cloud data! ☁️


Latest comments (1)
check the powershell way of extending EBS volume
Extend Live EBS Volume