What is route 53
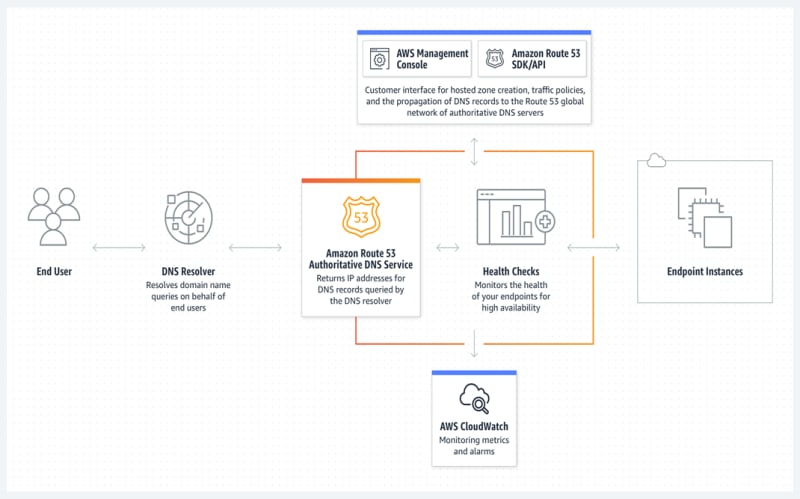
Amazon Web Services (AWS) Route 53 is a scalable and highly available Domain Name System (DNS) web service provided by AWS. It is designed to route internet traffic to resources like EC2 instances, S3 buckets, and load balancers, among others. Route 53 is a crucial component for managing your domain names and ensuring the availability and reliability of your applications and services.
Overview
KEY FEATURES:
1. Domain Registration:
• Domain Registration: Route 53 allows you to register new domain names directly within the AWS Management Console. You can choose from a wide range of top-level domains (TLDs) and seamlessly integrate your domain registration with your AWS resources, simplifying DNS management.
• Transfer Domain: You can transfer existing domain names from other registrars to AWS Route 53, making it easier to consolidate your domain management within the AWS ecosystem.
2. DNS Routing:
• Global DNS Resolution: Route 53 provides a global network of DNS servers strategically located around the world. When a user makes a DNS query, Route 53 responds from the nearest available server, reducing latency and improving the response time.
• Traffic Flow: Route 53 enables you to route traffic based on various routing policies. These policies include simple routing, weighted routing (for load balancing), latency-based routing (for directing traffic to the region with the lowest latency), and geolocation-based routing (for routing based on user location).
• Alias Records: You can create alias records to route traffic to AWS resources directly, such as EC2 instances, S3 buckets configured for static website hosting, CloudFront distributions, and more. This allows for seamless integration with AWS services.
3. Traffic Management:
• Weighted Routing: With weighted routing policies, you can distribute traffic across multiple resources in proportion to their assigned weights. This is useful for load balancing or testing new versions of an application.
• Latency-Based Routing: You can route traffic based on the lowest latency to a specific AWS region, ensuring users are directed to the region with the best performance.
• Geolocation-Based Routing: Route 53 allows you to send traffic to different resources based on the geographic location of the end user, ensuring a localized experience.
• Failover Routing: Route 53 provides automatic failover capabilities. If one resource becomes unhealthy, Route 53 can redirect traffic to a healthy resource, helping to ensure high availability.
4. Health Checks and Failover:
• Health Checks: Route 53 can periodically check the health of your resources, such as EC2 instances or Elastic Load Balancers. If a resource becomes unhealthy, Route 53 can automatically stop directing traffic to it.
• Active-Active and Active-Passive Failover: You can configure failover routing for high availability. In an active-active configuration, multiple resources can receive traffic simultaneously. In an active-passive configuration, one resource is active while the other(s) are passive backups. Failover is automatic when Route 53 detects resource health issues.
• DNS Failover for Non-AWS Resources: You can also use Route 53's failover capabilities for resources outside of AWS by creating health checks using HTTP/HTTPS, TCP, or ICMP protocols.
In summary, Amazon Route 53 is a versatile and scalable DNS service that not only manages domain registration but also excels at routing traffic globally with low latency, traffic management based on various policies, and automated failover for high availability. It plays a crucial role in ensuring the performance, availability, and resilience of your applications and services hosted on AWS and beyond.
Use cases
Amazon Web Services (AWS) Route 53 serves as a versatile DNS and traffic management service that finds applications across various use cases. Here are common use cases for AWS Route 53:
1. Hosting Websites:
• Route 53 is commonly used to route traffic to websites hosted on AWS, whether they are static websites in Amazon S3 buckets or dynamic web applications hosted on EC2 instances or behind load balancers. It allows you to map domain names (e.g., www.example.com) to the appropriate resources.
2. Load Balancing Traffic:
• Route 53 is frequently used for distributing incoming traffic across multiple instances or services, such as Elastic Load Balancers (ELB) or Application Load Balancers (ALB). It supports various routing policies like weighted, latency-based, and geolocation-based routing for effective load balancing.
3. Disaster Recovery:
• For disaster recovery scenarios, Route 53 plays a vital role in DNS failover. In case of resource or region failures, it can automatically redirect traffic to healthy resources or backup sites, ensuring minimal downtime.
4. Global Content Delivery:
• Route 53 enhances the global content delivery of websites and applications by directing users to the nearest AWS edge location through latency-based routing. This ensures faster content delivery and improved user experience.
5. Routing Based on Health Checks:
• Route 53 allows you to configure health checks for your resources. If a resource fails a health check (e.g., an EC2 instance becomes unhealthy), Route 53 can automatically reroute traffic to healthy resources, optimizing resource availability.
6. Managing Domain Names:
• Beyond DNS routing, Route 53 provides domain registration services, allowing you to register and manage domain names through the AWS Management Console. This simplifies the process of associating domains with AWS resources and configuring DNS settings.
7. Hybrid Cloud Configurations:
• In hybrid cloud architectures, Route 53 can be used to route traffic between on-premises resources and AWS resources. This enables seamless integration and traffic management between the two environments.
8. Geolocation-Based Services:
• Route 53 is utilized for region-specific services, such as country-specific versions of websites or applications. It can direct users to region-specific resources based on their geographic location.
9. Multi-Region Deployments:
• For organizations with a global presence, Route 53 supports multi-region deployments by allowing you to route traffic to AWS resources in different regions, providing redundancy and high availability.
10. API Traffic Management:
• API Gateway and other serverless services can be combined with Route 53 to manage and route API traffic effectively. This is valuable for organizations offering API services to third-party developers.
In summary, AWS Route 53 is a versatile and essential component in AWS infrastructure, serving a wide range of use cases related to DNS management, traffic routing, disaster recovery, global content delivery, and domain registration. It enables businesses to ensure high availability, low latency, and efficient traffic management for their applications and services hosted on AWS and beyond.
DNS routing strategies
Amazon Web Services (AWS) Route 53 offers various DNS routing strategies that allow you to control how your DNS requests are routed to your resources. Here's an overview of these routing strategies:
1. Simple Routing:
• Use Case: This is the most basic routing strategy and is typically used when you have a single resource to route traffic to. It maps a domain name to a specific resource (e.g., an EC2 instance, S3 bucket, or Elastic Load Balancer).
• Example: You can use simple routing to direct traffic from www.example.com to a single web server.
2. Weighted Routing:
• Use Case: Weighted routing allows you to distribute traffic across multiple resources in proportion to assigned weights. This is useful for load balancing or testing new versions of an application.
• Example: You can route 80% of your traffic to one resource and 20% to another to perform A/B testing.
3. Latency-Based Routing:
• Use Case: Latency-based routing routes traffic to the AWS region with the lowest latency for the end user. This improves user experience by reducing response times.
• Example: Users in Europe might be directed to resources in a European AWS region, while users in Asia are routed to an Asian AWS region.
4. Geolocation-Based Routing:
• Use Case: Geolocation-based routing routes traffic based on the geographic location of the DNS resolver making the request. This is useful for providing region-specific content or services.
• Example: Users in North America might be directed to a different set of resources than users in South America.
5. Multi-Value Routing:
• Use Case: Multi-Value routing allows you to return multiple IP addresses (or values) for a single DNS query. This can be used for load balancing across multiple resources.
• Example: When users query your domain, they receive multiple IP addresses, and the DNS resolver chooses one of them, distributing traffic across multiple endpoints.
6. Failover Routing:
• Use Case: Failover routing ensures high availability by automatically redirecting traffic from unhealthy resources to healthy resources in the event of resource failures.
• Example: If an EC2 instance becomes unhealthy, Route 53 can automatically route traffic to a standby instance.
Each of these routing strategies provides flexibility in how you manage and optimize the routing of DNS traffic to your resources. You can choose the strategy that best suits your specific use case and requirements, whether it's for load balancing, high availability, global content delivery, or other scenarios.
hosting a static website using s3 and Route 53
To host a personal website on AWS using Amazon S3 and Route 53, you'll need to follow these steps:
Step 1: Prerequisites
Before you begin, make sure you have the following prerequisites:
• An AWS account.
• Your website files (HTML, CSS, JavaScript, images, etc.) ready to be uploaded to Amazon S3.
• A custom domain name purchased through Route 53 or transferred to Route 53 if you already own one.
Step 2: Create an S3 Bucket for Website Hosting
- Log in to your AWS Management Console.
- Navigate to the Amazon S3 service.
- Click "Create bucket."
- Choose a unique, globally-unique name for your bucket, like "your-website-name."
- Choose a region for your bucket (ideally the one closest to your target audience).
- Uncheck "Block all public access" for the bucket.
- Under "Manage public permissions," check "Read" permissions for "Everyone" so that your website is publicly accessible.
- Create the bucket.
Step 3: Upload Your Website Files to S3
- Inside your newly created S3 bucket, click the "Upload" button.
- Upload all your website files (HTML, CSS, JavaScript, images, etc.) to the bucket.
- Make sure to set the permissions of your HTML file to be public by selecting it, clicking on "Actions," and choosing "Make public."
Step 4: Configure the S3 Bucket for Website Hosting
- Go to the Properties tab of your S3 bucket.
- Under "Static website hosting," click "Edit."
- Select "Use this bucket to host a website."
- Specify the index document (e.g., "index.html").
- Optionally, you can specify an error document (e.g., "error.html").
- Save the changes.
Step 5: Configure Route 53 for Your Custom Domain
- Navigate to the Route 53 service in the AWS Management Console.
- Choose "Hosted zones" from the left sidebar.
- Click "Create Hosted Zone."
- Enter your domain name (e.g., "yourdomain.com") and create the hosted zone.
- In the new hosted zone, create a new record set: • Leave the name empty (for the root domain). • Choose "Alias" as the routing policy. • In the Alias Target, select your S3 bucket from the dropdown.
- Save the record set.
Step 6: Update Your Domain Registrar Settings
If you purchased your domain from a registrar outside of AWS Route 53, you'll need to update the DNS settings at your domain registrar to point to the Route 53 name servers. This typically involves replacing the existing name servers with the ones provided by Route 53 in your hosted zone.
Step 7: Test Your Website
Wait for DNS propagation, which may take some time (typically a few hours to a day). After propagation is complete, you should be able to access your website using your custom domain (e.g., "http://www.yourdomain.com").
That's it! Your website is now hosted on AWS S3 and accessible using your custom domain through Route 53.

Top comments (0)