Navigating through all the services in the AWS console is cumbersome, and
generating diagrams manually and keep them updated is a tedious job.
infra-inspector automates these processes, so you can use it in CI/CD
environments to automatically or periodically generate these useful info.
Usage
Generate the inventory
First thing you need to create a configuration to tell the CLI tool which resources to catalog.
Create a file called inventory-config.yml with the following content:
awsAccounts:
  - regions:
      - regionName: us-east-1
        services:
          rdsEnabled: true
          elbEnabled: true
          mskEnabled: true
          elasticacheEnabled: true
          openSearchEnabled: true
          transitGatewayEnabled: true
Now you can use the config above to generate the inventory:
docker run --rm \
  -v ~/.aws/credentials:/root/.aws/credentials:ro \
  -v `pwd`/inventory-config.yml:/opt/infra-inspector/inventory-config.yml:ro \
  -v `pwd`/output:/output \
  ghcr.io/infra-inspector/infra-inspector:latest \
  inventory -c /opt/infra-inspector/inventory-config.yml -o /output/inventory.yml
This command will produce something like this:
accounts:
  "000000000000":
    id: "000000000000"
    name: ""
    regions:
      us-east-1:
        azs:
          us-east-1a: true
          us-east-1b: true
          us-east-1c: true
          us-east-1d: true
          us-east-1e: true
          us-east-1f: true
        internetGateways: []
        name: us-east-1
        transitGateways: {}
        vpcs:
          vpc-0000000000000000:
            id: vpc-0000000000000000
            name: ""
            cidr: 172.31.0.0/16
            dbClusters: {}
            elasticacheClusters: {}
            elbs: {}
            isDefault: true
            mskClusters: {}
            openSearchClusters: {}
            subnets:
              subnet-00000000000000000:
                id: subnet-00000000000000000
                name: ""
                cidr: 172.31.48.0/20
                autoAssignPublicIp: true
                instances: {}
                az: us-east-1d
                natGateways: []
              subnet-00000000000000001:
                id: subnet-00000000000000001
                name: ""
                cidr: 172.31.32.0/20
                autoAssignPublicIp: true
                instances: {}
                az: us-east-1c
                natGateways: []
              subnet-00000000000000002:
                id: subnet-00000000000000002
                name: ""
                cidr: 172.31.0.0/20
                autoAssignPublicIp: true
                instances: {}
                az: us-east-1a
                natGateways: []
              subnet-00000000000000003:
                id: subnet-00000000000000003
                name: ""
                cidr: 172.31.16.0/20
                autoAssignPublicIp: true
                instances: {}
                az: us-east-1b
                natGateways: []
              subnet-00000000000000004:
                id: subnet-00000000000000004
                name: ""
                cidr: 172.31.80.0/20
                autoAssignPublicIp: true
                instances: {}
                az: us-east-1f
                natGateways: []
              subnet-00000000000000005:
                id: subnet-00000000000000005
                name: ""
                cidr: 172.31.64.0/20
                autoAssignPublicIp: true
                instances: {}
                az: us-east-1e
                natGateways: []
            tgwAttachments: {}
The content might be different based on the resources you have deployed in your account(s).
Generate the diagram
From the inventory we generated above we can then create the diagram with:
docker run --rm \
  -v `pwd`/output/inventory.yml:/opt/infra-inspector/inventory.yml:ro \
  -v `pwd`/output:/output \
  ghcr.io/infra-inspector/infra-inspector:latest \
  diagram -f /opt/infra-inspector/inventory.yml -o /output/diagram.drawio
The output can then be opened in Draw.io.
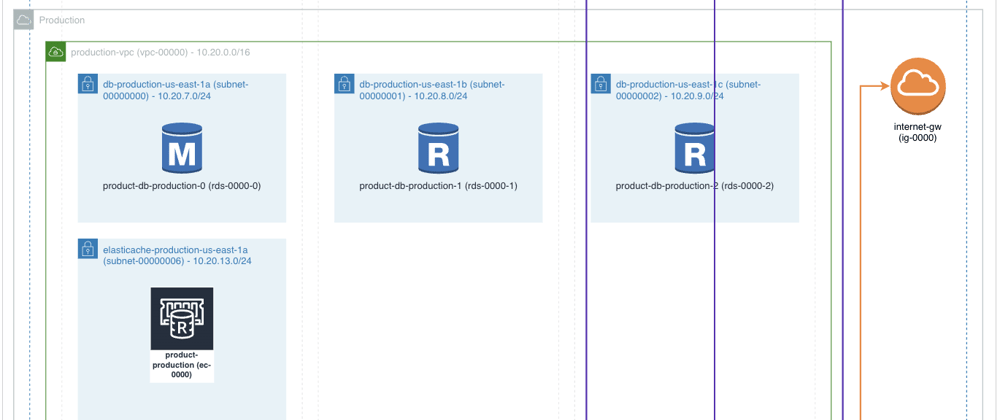
With the inventory above you should get this diagram:
Use in CI pipelines
The above commands can be used in a CI/CD environment as well to automate the process, like for instance update the inventory and the diagram every time the infrastructure is updated, or at specified interval, like once a day.
For instance to automatically generate the inventory and the diagram after an update to the infrastructure is deployed:
name: Infrastructure deployment

on:
  push:
    branch:
      - main

jobs:
  infra-deployment:
    # ...
    # Job to deploy the infrastructure updates, using Terraform, Pulumi or
    # similar
    # ...

  infra-inspector:
    name: Generate inventory
    runs-on: ubuntu-latest
    needs:
      - infra-deployment
    container: ghcr.io/infra-inspector/infra-inspector:latest
    steps:
      - uses: actions/checkout@v4.2.2
      - name: Configure AWS Credentials
        uses: aws-actions/configure-aws-credentials@v4
        with:
          aws-access-key-id: ${{ secrets.AWS_ACCESS_KEY_ID }}
          aws-secret-access-key: ${{ secrets.AWS_SECRET_ACCESS_KEY }}
          aws-region: us-west-2
      - name: Generate inventory
        run: infra-inspector inventory -c inventory-config.yml -o inventory.yml
      - name: Generate diagram
        run: infra-inspector diagram -f inventory.yml -o diagram.drawio
      - name: Archive code coverage results
        uses: actions/upload-artifact@v4
        with:
          name: diagram
          path: diagram.drawio
Here the job infra-inspector will run only after infra-deployment has been successfully completed, and it will checkout the repository where the inventory config is (here we are assuming this is in the repo root, and it's called inventory-config.yml), configure the AWS credentials needed to pull the data, generate the inventory and then the diagram, which is then finally stored as artifact.
Conclusion
Automating the generation of infrastructure diagrams with tools like
infra-inspector offers significant advantages in terms of time savings,
accuracy, and maintaining up-to-date documentation. By integrating this process
into your CI/CD pipelines, you can ensure that your diagrams always reflect the
current state of your AWS environment. This tutorial provides a practical
introduction to using infra-inspector, but there's much more to explore,
including advanced configuration options, support for additional AWS services,
and further customization possibilities.
To get more details about the steps described above, I encourage you to visit the original blog post.

Top comments (0)