
Introduction
Machine learning is the study of computer algorithms that improve automatically through experience. TensorFlow was created by the Google Brain team, and was released for free and open-source under the Apache 2.0 license in 2015. TensorFlow.js lets users develop machine learning models in JavaScript, and use machine learning directly in the browser or in Node.js.
In TensorFlow, tensors are a central unit of data, consisting of an array of one or more dimensions. Tensors have a rank, consisting of its dimensions, shape, consisting of the size of each dimension, and dtype, the data type of the tensor.
We can conduct a number of operations on tensors. Here's an example of a simple square() mathematical operation:
const x = tf.tensor([1, 2, 3, 4]);
const y = x.square();   // equivalent to tf.square(x)
We can also affect how tensors are retained in memory. We can use dispose() to delete a tensor:
const t = tf.tensor([
        [1, 2],
        [3, 4],
      ]);
a.dispose();  //delete tensor
Object Detection
Let's set up tensorflow/tfjs-react-native. First, will explore the object detection package in this machine-learning GitHub repository for tfjs.
First, we set the necessary onload functions and states. Loading TensorFlow is async, and will take a few seconds, so we use await:
  async componentDidMount() {
    await tf.ready(); // preparing TensorFlow
    this.setState({ isTfReady: true });

    // this.model = await mobilenet.load(); // preparing MobileNet model
    this.model = await cocossd.load(); // preparing COCO-SSD model
    this.setState({ isModelReady: true });

    this.getPermissionAsync(); // get permission for accessing camera on mobile device
  }
Request permissions for camera roll access:
  getPermissionAsync = async () => {
    if (Constants.platform.ios) {
      const { status } = await Permissions.askAsync(Permissions.CAMERA_ROLL);
      if (status !== 'granted') {
        alert('Please grant camera roll permission for this project!');
      }
    }
  };
Here we transfer the path to an image found on the phone when a user selects a photo from their camera roll using jpeg.decode:
  imageToTensor(rawImageData) {
    const TO_UINT8ARRAY = true;
    const { width, height, data } = jpeg.decode(rawImageData, TO_UINT8ARRAY);
    // Drop the alpha channel info for mobilenet
    const buffer = new Uint8Array(width * height * 3);
    let offset = 0; // offset into original data
    for (let i = 0; i < buffer.length; i += 3) {
      buffer[i] = data[offset];
      buffer[i + 1] = data[offset + 1];
      buffer[i + 2] = data[offset + 2];
      offset += 4;
    }
    return tf.tensor3d(buffer, [height, width, 3]);
  }
Now, we analyze the image using the COCO-SSD tensor model.
  detectObjects = async () => {
    try {
      const imageAssetPath = Image.resolveAssetSource(this.state.image);
      const response = await fetch(imageAssetPath.uri, {}, { isBinary: true });
      const rawImageData = await response.arrayBuffer();
      const imageTensor = this.imageToTensor(rawImageData);
      const predictions = await this.model.detect(imageTensor);
      this.setState({ predictions: predictions });
      console.log('----------- predictions: ', predictions);
    } catch (error) {
      console.log('Exception Error: ', error);
    }
};
Here we set up the function to open the picture selection screen on the phone:
  selectImage = async () => {
    try {
      let response = await ImagePicker.launchImageLibraryAsync({
        mediaTypes: ImagePicker.MediaTypeOptions.All,
        allowsEditing: true,
        aspect: [4, 3],
      });
      if (!response.cancelled) {
        const source = { uri: response.uri };
        this.setState({ image: source });
        this.detectObjects();
      }
    } catch (error) {
      console.log(error);
    }
  };
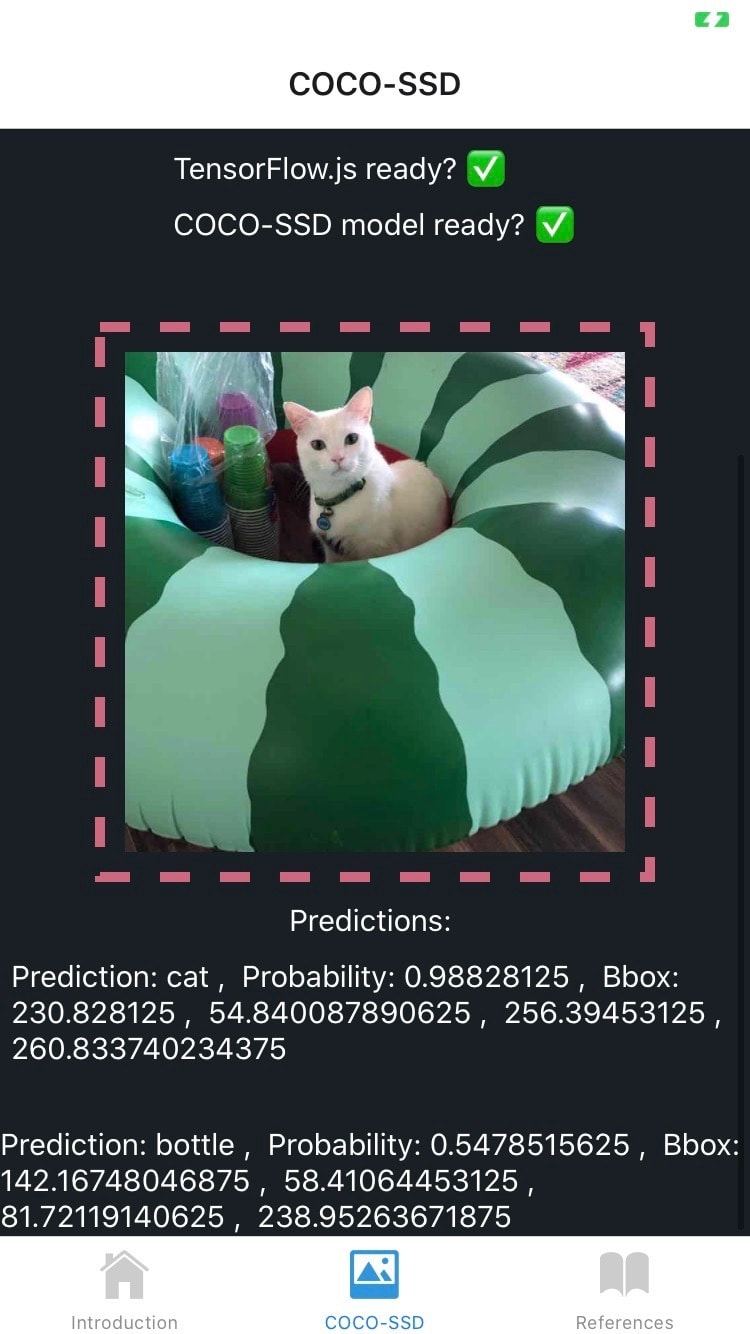
For this image, the COCO-SSD model predicted two objects at different probabilities. The Bbox is also provided, which is the [x, y, width, height] of the detected object. Here we predicted cat as high probability and bottle for medium probability.
Image Classification
With much the same react-native code, we can use MobileNet's model, which has been trained specifically for image classification.

Here we predicted various types of ferrets at low probability and balloon with very low probability.
Conclusion
Tensorflow.js is a powerful asset to add to your react-native toolkit. For more, try out some of the pre-trained models for marchine learning. Or try the Getting Started tutorial for TensorFlow.js.

Top comments (2)
Thank you for your post, Peter.
I'm really into TensorFlow, but I'm a beginner and I'd like to know which modules did you import from TensorFlow.
Thank you.
Hi Peter! Can i use model trained on Teachable Machine? If not, where i can trian? Other thing, where i have to put my model in the project structure?
Since now, thank you so much.