
🚀 Introduction
In the dynamic world of cloud computing, mastering the right tools and technologies is the key to unleashing your full potential. In this journey, we'll explore a comprehensive toolkit of AWS services and other essential tools that every cloud enthusiast and aspiring cloud engineer should be familiar with. Buckle up as we dive into a world of cloud possibilities!


Follow me on:
GitHub Repository 🐙 Link 🔗
Follow Blog on Hashnode 📚 Link 🔗
Objective:
The objective of this post is to bring and spread a knowledge about #aws cloud services, how to ? and where to consume the #aws services to solve the real world business challenges
Description:
🚀 Use Case:
In a real-world scenario, our database team faced the challenge of deploying database services and importing substantial data dumps for a migration project. This project aimed to transfer a large volume of data into a MySQL database before launching a web application.
💡 Solution:
I embraced this challenge and embarked on a mission to efficiently resolve the migration of massive data dumps to an #aws RDS MySQL database. And I did it the smart way - with automation, leveraging the power of Terraform.
Solution Diagram:

Stay tuned for an exciting journey into the world of seamless database migration in the AWS cloud. 🌥️💾💼
The solution:
1. Manual way create AWS RDS MySQL instance
*2. Automated way create AWS RDS instance and import datadump .sql file *
💻Tools & Technologies Covered
Let's take a closer look at the tools and technologies we'll be delving into:
AWS Services
🌐 VPC (Virtual Private Cloud) - Create isolated network environments in the AWS cloud.
🔒 Security Groups - Define and manage inbound/outbound traffic rules to your AWS resources.
💻 EC2 Machine (Elastic Compute Cloud) - Launch scalable virtual servers in the cloud.
🗄️ AWS RDS (Relational Database Service) - MySQL - Manage MySQL databases with ease, handled by AWS.
Other Tools
🔧 Terraform - The Infrastructure as Code tool to automate and manage cloud resources.
🐙 GitHub - Collaborate, store, and version your code effectively.
🖋️ VS Code (Visual Studio Code) - A versatile, free code editor for a seamless development experience.
**1. Manual way create AWS RDS MySQL instance
- Search enter RDS,from AWS Console and click the RDS result under Services:

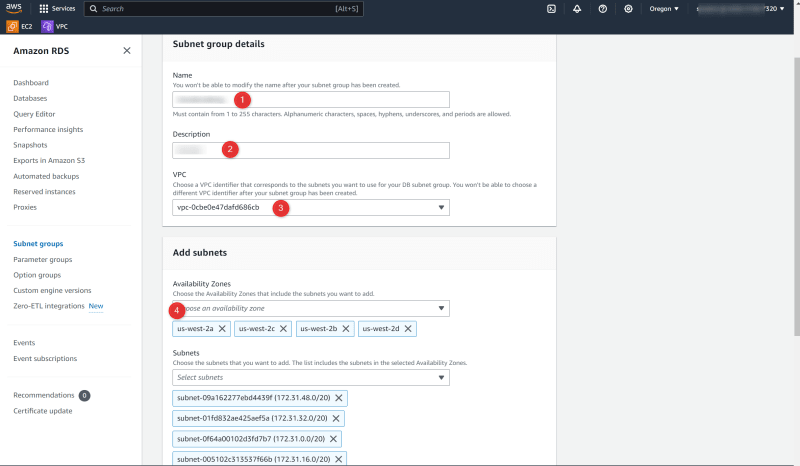
- RDS dashboard, click Subnet Groups from the left-hand menu: Subnet Groups


Create Security Group

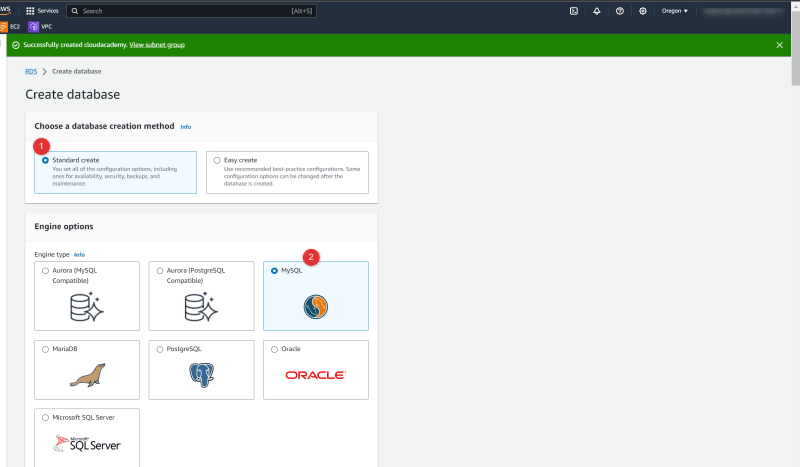
Create Database


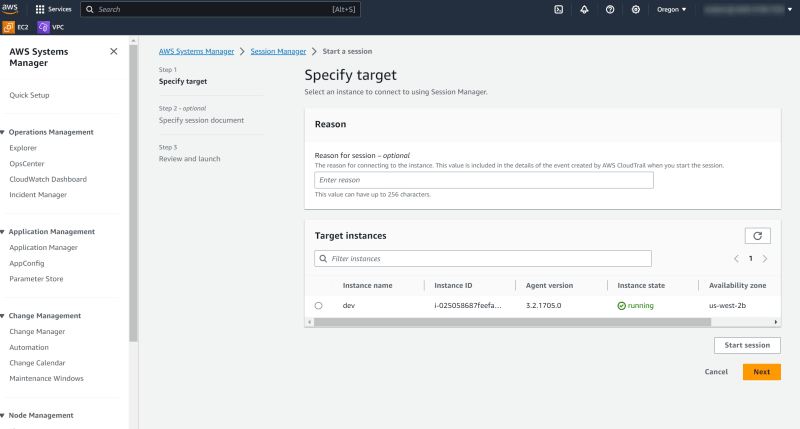
Go to AWS systems manager
Click to Session Manager


Session manager started

Login to session and install mysql client


Go to RDS instance and copy the RDS Endpoint

Login to mysql
mysql -h -u username -p dbname

*Now Let's do it complete automated way How to import database into database using terraform
*
2. Automated way create AWS RDS instance and import datadump .sql file **
Objective:
The objective of this task is to import "obbs" data to AWS RDS automated way.
Step-by-Step Instructions
Follow these steps to automate the deployment of the AWS RDS and the initialization of the database:
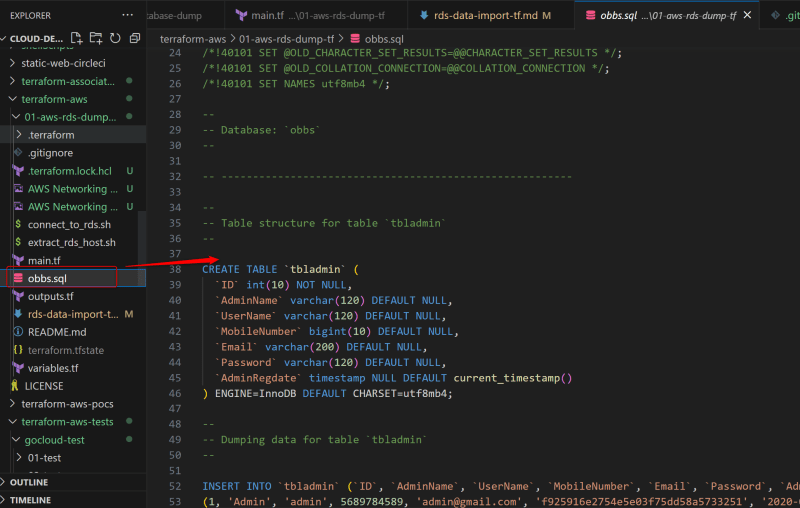
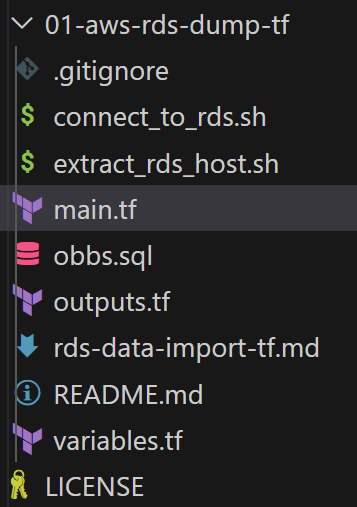
Make sure you have the Terraform configuration files (main.tf, variables.tf, and outputs.tf) in a directory.
Place your obbs.sql file and connect_to_rds.sh script in the same directory.
Open a terminal and navigate to the directory containing your Terraform files and the SQL dump file.
Run terraform init to initialize the working directory.
Run terraform plan to see the execution plan for your infrastructure.
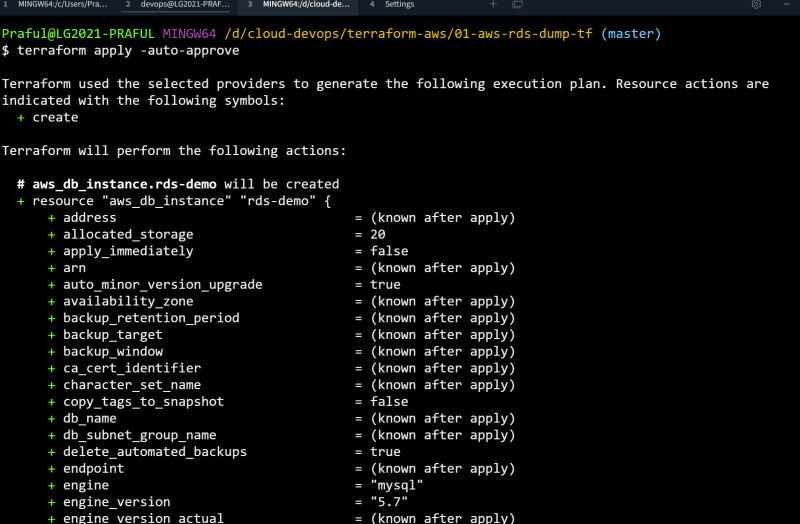
If the plan looks correct, apply the configuration with terraform apply.
Terraform will prompt you to confirm the plan. Enter yes to proceed.
Terraform will provision the RDS instance and the EC2 instance, copy the SQL dump file and script to the EC2 instance, and execute the script to connect to the RDS instance and import the SQL dump.
Once the process is complete, Terraform will output the RDS endpoint.
You have successfully automated the deployment of an AWS RDS database and initialized it with your SQL dump file.
Project Structure:
Implementation:
Step 1: Initializing Terraform
The journey begins with initializing Terraform in your project directory:
terraform init

Step 2: Planning the Deployment
Use Terraform to plan your infrastructure deployment:
terraform plan

Step 3: Executing the Deployment
Now, let's apply the deployment:
terraform apply
Step 4: Verification and Validation
With the deployment complete, it's time to verify and validate that Terraform has automated the process. Here's what you need to do:
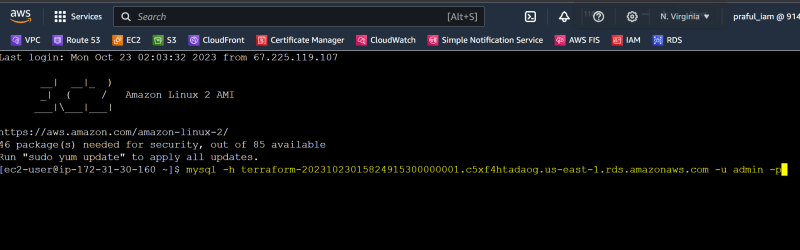
A. Logging into EC2
- Log in to your EC2 instance to establish the connection:
ssh -i <your-key-pair.pem> ec2-user@<your-ec2-public-ip>

B. Accessing RDS Services
- In the AWS Management Console, go to the RDS service and click on "Databases."
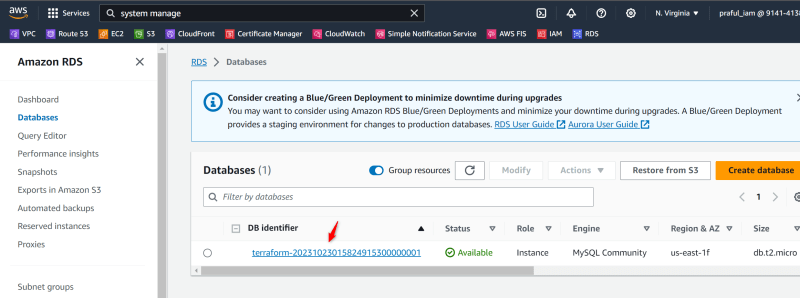
C. Obtaining the RDS Endpoint
- Click on your RDS database and navigate to "Connectivity & Security" to copy the RDS endpoint.

D. Establishing RDS Login
- Go back to your EC2 terminal and provide the login string to access your RDS instance:
mysql -h <rds-endpoint> -u <username> -p
Step 5: Success!
Login to the RDS database is successful. Now, let's verify that the "obbs" database is created automatically using the following MySQL commands:
- Show databases:
show databases;

- Use the "obbs" database:
use obbs;

- Confirm that the data tables have been successfully imported into the "obbs" database:

Deploying an automated data dump import to an AWS RDS MySQL database is a powerful way to streamline your database management. However, like any technical project, this process comes with its fair share of challenges. In this blog post, we'll explore two major hurdles faced during this endeavor and how we successfully overcame them with the help of Terraform and some creative problem-solving.
🚧 Challenge #1: RDS Remote Login Issues
The first obstacle we encountered was related to RDS remote login. The RDS endpoint provided by AWS includes the port in the connection string, which is common and expected for most manual configurations. However, Terraform handles this differently. It assumes the default port (3306) for MySQL, and when you try to use the endpoint with the port in Terraform's automated setup, it results in login failures.
🛠️ Challenge #1 Solved:
To resolve this issue, we devised a simple yet effective solution using a shell script. We created a custom script called connect_to_rds.sh to connect to the RDS database. Inside this script, we extracted the RDS endpoint provided by AWS, removed the port, and used the modified endpoint for the database connection. This quick workaround allowed us to use the RDS endpoint without specifying the port, aligning with Terraform's expectations.
🚧 Challenge #2: Uploading the Initiation File
The second challenge we encountered was the need to upload the rds-db.sql file to the EC2 instance. Manually copying files to the remote server can be a hassle, and Terraform encourages automation. We needed a solution to automate this file transfer.
🛠️ Challenge #2 Solved:
Terraform offers a versatile provisioner called the "file" provisioner, which allows you to copy files to remote machines. By leveraging this provisioner, we were able to automate the upload of the rds-db.sql file to the EC2 instance with ease. This eliminated the need for manual intervention and ensured that the database initialization process was entirely automated.
Conclusion:
Facing and overcoming challenges is an integral part of any technical project. In the case of deploying automated data dump imports to an AWS RDS MySQL database, understanding the intricacies of Terraform, AWS, and their interactions played a crucial role in our success.
By sharing these challenges and their solutions, we hope to assist others who may encounter similar obstacles during their automation journey. With the right tools, creative thinking, and a bit of determination, you can automate your database management processes and enjoy the benefits of efficiency and reliability.
🚀 Follow My Blog: Automated Import of Data Dump and Initialization of an AWS RDS Database
Stay updated with the latest tech insights and tutorials! 📚🔗
Happy automating! 🚀
Let's Stay Connected:
🌐 Website: Visit my website for the latest updates and articles.
💼 LinkedIn: Connect with me on LinkedIn for professional networking and insights.
📎 GitHub: Check out my projects and repositories on GitHub.
🎥 YouTube: Subscribe to my YouTube channel for tech tutorials and more.
📝 Medium: Find my tech articles on Medium.
📰 Dev.to: Explore my developer-focused content on Dev.to.
Let's connect and stay updated with the latest in technology and development! 🚀🔗

Top comments (0)