
Using the Remix
Remix is one of the commonly used development environments for smart contracts on Ethereum. In this doc, dapp developers will learn about how to kick off their deployment of smart contracts. A “Hello World” tutorial is also included.
IDE Setting
Remix version:0.24.1
Open the remix, an online IDE for developing and deploying Solidity contracts.
Solidity is a contract-oriented, high-level programming language created for smart contracts. The language is influenced by C++, Python, and Javascript languages and is designed to run on the Ethereum Virtual Machine (EVM).
If you are using Remix for the first time, follow these steps to activate Remix:
Step 1
- Open remix and select “Solidity” in the featured plugins to activate the editing interface.

Step 2
- Find and click “file explorers” to create a new file or folder for yourself.

Step 3
- Find the “solidity compiler”, click the "compile" button, and the .sol file will be compiled and checked for errors.
Fix all errors, you can proceed to the next step after the compilation is successful.

“Solidity unit testing” is also a good option, if the smart contract in solidity needs to be debugged

Step 4
- To deploy the .sol file on the blockchain as a smart contract, find the "Deploy & Runtransactions" page and click the "Deploy" button.

Remix Instance
- Open remix, find and click on “file explorers”, create a new file or Folder for yourself, and start with the same steps you usually do in other IDEs. Copy the code below, paste it into a file in FILE EXPLORERS and name it “HelloWorld”.
// SPDX-License-Identifier: MIT
pragma solidity >=0.4.22 <0.9.0;

contract HelloWorld {
  // constructor() public {
  // }

  function sayHello() public pure returns (string memory){
    return ("Hello World");
  }
}
-
Note:
- It contains the solidity version number, and the first line indicates that the source file uses a solidity version between 0.4.22 and 0.9.0.
- The constructor class is a class in object-oriented programming languages such as Java and Typescript. It needs to be called when the instance is initial.
- The function returns the string declared with the print method. The visibility is public, which means that everyone in the blockchain can access this string field, representing the data type returned by this function.
Now, compile helloWorld.sol and on success, it will show
![]()
A demo of smart contract deployment on Rangers Protocol
- A more important step is the deployment of the smart contracts on Rangers Protocol. First, it is necessary to connect to the Web3 world; this can be done with any service such as Metamask, Brave, Portis, etc.
- We will use MetaMask as an example. If you don't have a MetaMask wallet account yet, you can refer to the MetaMask wallet setup doc.
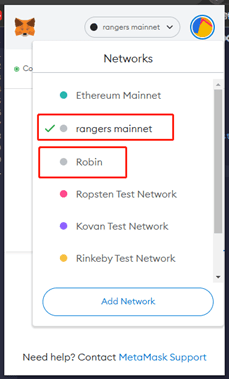
Step 1
- In MetaMask, select the Rangers Protocol network, Rangers mainnet for Rangers mainnet and Robin for Robin testnet.
- If Rangers mainnet or Robin is not present in the networks, please click on “add network”.
Step 2
- There are two methods to help you configure your network information in Metamask.
The first method is automatic: enter Rangers Scan (or Robin-rangers scan), drag to the bottom of the page, then click the button and add Rangers protocol(or Robin) network configuration to MetaMask.

-
The second method is to manually populate the MetaMask network configuration with the following information.
■ Rangers Mainnet
The network name is customized
RPC URL: https://mainnet.rangersprotocol.com/api/jsonrpc
Chain ID: 2025
Currency Symbol: RPG
Browser’s address: https://scan.rangersprotocol.com
■ Robin testnet
The network name is customized
RPC URL: https://robin.rangersprotocol.com/api/jsonrpc
Chain ID: 9527
Currency Symbol: RPG
Browser’s address: https://robin-rangersscan.rangersprotocol.com/

Step 3
- Continue and click “Save”.
- For your contract to execute smoothly on the Rangers Protocol, you will also need to get RPG test tokens from Faucet. You will need this to pay for gas on Rangers Protocol.
Step 4
- Next, we can deploy the smart contract on the Rangers Protocol mainnet.
- In DEPLOY & RUN TRANSACTIONS, select “injected Web3” as the Environment and click Deploy.

Step 5
- After accepting the connection request, a pop-up window will appear with a MetaMask window to confirm the "deployment" of the transaction.

- Once you click on “confirm”, you have successfully deployed the “hello world” smart contract to the Rangers Protocol.
Step 6
- Verify the transaction
- Checking the status
- You can now interact with the smart contract. And you can check the deployment status in the Robin.

Congratulations on completing your first remix deployment of a smart contract!

Top comments (0)