
When coding collaboratively, suggesting changes becomes a regular affair. Creating pull requests and merging them after a review is the best solution to prevent developers from stepping on each other’s toes.
With Merge Pull Request, GitHub allows you (the reviewer) to go through the suggested changes. From here, you can choose to apply them or add comments to make further changes to the code.
It is particularly useful as it helps merge code from different branches and make sure the code that gets deployed to production is bug-free.
By carefully reviewing the suggested changes before applying them, the risk of jeopardizing your code can be greatly minimized.
Now, let’s dive straight in and learn how to Merge Pull Requests.
Before You Begin
We previously saw how to create a new branch.
But before we jump in, let's take a quick recap on what a base branch and a head branch is.

The base branch is the branch you wish to merge the approved pull requests into i.e apply the suggested changes to while the head branch is the branch that contains the suggested changes. Most often, the base? branch will be the master branch.
So, make sure that you thoroughly inspect each pull request, resolve conflicts if any, and only then merge the changes into the master branch.
Because, at the end of the day, the master branch should contain only the up-to-date final version of your code.
You can use these 5 Git workflows to ensure that no conflicts arise while merging.
Merging a Pull Request on GitHub
Follow these simple steps to merge a PR on GitHub:
1 Open the main page of your repository on your GitHub account in your browser and click on the Pull requests tab.
2 Now, you’ll be shown a list of all the pull requests that require reviewing. Click on the pull request of your choice.

3 You will be able to have an overview of the details of the pull request under the Conversation tab.
4 Select the Files Changed tab to view the suggested changes.

5 A. Once you’ve viewed the changes, you can either go back to the Conversation tab to perform Merge Pull Requests by selecting one of the 3 options using the dropdown.
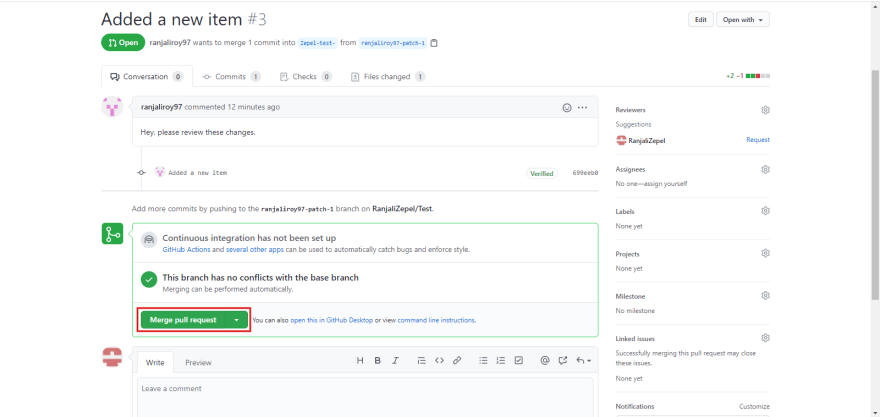
5 B. Or you can click on the Review changes button on the top right corner and you can choose to comment, approve or request further changes.

6 If you disapprove of the pull request, click on the Close pull request button at the bottom of the page.
Tip: Delete the head branch after merging to keep your repository tidy. :)
Selecting the Merge Pull Request options
Let us understand all the 3 options available to perform Merge Pull Requests in GitHub before selecting one:
1 Merge Pull Request
2 Squash and merge
3 Rebase and merge

Merge Pull Request or Create a merge commit
Merge Pull Request option, or the create a merge commit option, is the default option. Clicking this will merge all the commits in the PR, suggested in the head branch, into the base branch.

In this illustration, the head branch gets branched off from the second commit in the base branch. Some changes are suggested as new commits in the head branch and they must now be updated in the base branch. By Merge pull request, the commits get added to the base branch as depicted in the image above.
Note: You need to have the write permissions in the repo.
Squash and merge
Squash and merge combines all the commits in the PR into one single commit and then merges it from the head branch into the base branch. This way, your history can be made more clear and streamlined.

In this illustration, it can be noticed that the head branch gets branched off from the base branch’s second commit. And two new commits are added to the head. By Squash and merge, both these commits get squashed into a single commit and then merged into the base branch as shown in the image above.
Note: You not only require write permissions in the repo but your repo must also allow squash merging.
Rebase and merge
Rebase and merge adds all commits (in the PR) from the head branch individually to the base branch, without merge commit. For all those hotfixes and one-off commits that can’t be merged into other commits, this is your go-to option.
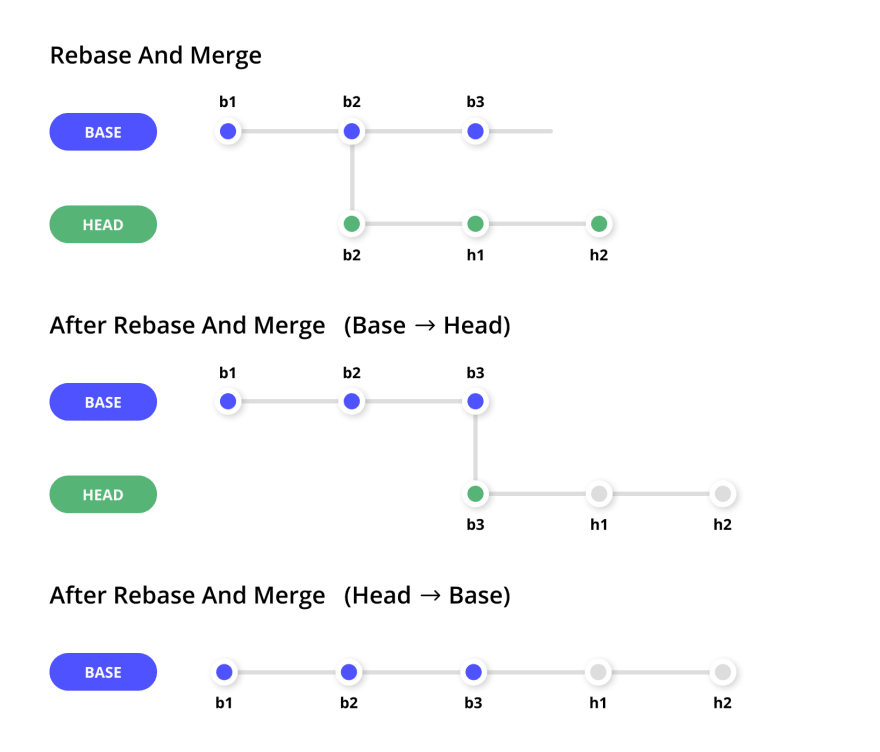
As seen in the illustration, the base branch gets branched off in the second commit to form the head branch. A little while later a new commit gets added to the base branch. Meanwhile, commits are made in the head branch.
By Rebase and merge from base branch to head branch, the base of the head branch gets rebased. That is, now, the head branch gets branched off from the third (new) commit so that the new commit is included in the head branch. And then, the commits in the head branch get applied.
Now, to update the base branch with the latest commits in the head, rebasing is done from head to base as depicted in the image above.
Note: You need write permissions in the repository and your repo must allow rebase merging.
How to Automatically Merge Pull Requests
Auto-merge is a feature offered by GitHub that lets PRs automatically be merged into your base branch if the required criteria set for your branch are met.
To set this up, follow the steps below:
1 Navigate to the Setting tab under the main page of your repository.

2 Under the Options tab, scroll down to find and enable the Allow auto-merge button under the Merge button section.

Note: This auto-merge feature of GitHub is currently in the beta stage and is subject to change.
As a developer, it is essential to have a developer-friendly PM tool to complement your development workflow.
Zepel is one of the most developer-friendly PM tools providing deep integration with GitHub.
Now, you needn’t bother doing the boring routine work of status updates as Zepel will take care of it for you. Instead, you can focus all your time and energy on building state-of-the-art software products.
All you’ve got to do is use Zepel’s suggested branch name when you create a new branch.

And if you want to get real-time notifications of your team’s progress updates, simply connect your Slack with Zepel.

That’s not all. You can even open a PR from within Zepel!
Hate manually updating your progress in your current PM tool? Try Zepel for free and leave this boring grunt work to us while you concentrate on the important stuff and increase your development velocity.
If you're not fully convinced, see how Zepel compares to other agile project management tools and check out why 4000+ teams prefer it over others.

Top comments (0)