
A basic tutorial for those who are looking to connect their custom domain to GitHub Pages. This post assumes you will be getting your domain with Namecheap. But, it should mostly apply to any domain providers.
I first used Namecheap because they offered students free domains. Yup, if you are a student you can get a free Namecheap domain ending with `.me’ free for a year. Check their offer here.
1. Register on Namecheap
Simply go to the Namecheap homepage and register for an account.
2. Select a cool domain
Try to get a .com domain. It is the most general and commonly used domain. But with a ton of websites floating online, you may not be able to find your ideal domain available under .com. If thats the case check out .me domains for a personal website (like mine), the trendy .io for a startup/business, .net. Namecheap offers a wide range of domains to choose from. Some of them are .life, .co, .tech etc.
Choose the domain carefully as you will be sticking with it for some considerable time.
3. Get a GitHub Repository
If you have not yet created a repository, go to GitHub to create one. Name it <your-github-username>.github.io and ensure you have a master branch where you can push your HTML files. I assume you have your HTML, CSS, JavaScript files ready. Push them to this repository on the master branch.
Visit the website <your-github-username>.github.io should allow you to view the expected website.
4. Create a CNAME record in your Repository
Create a file titled CNAME with your domain name. That’s it. For example my CNAME file contains this:
harishv.me.
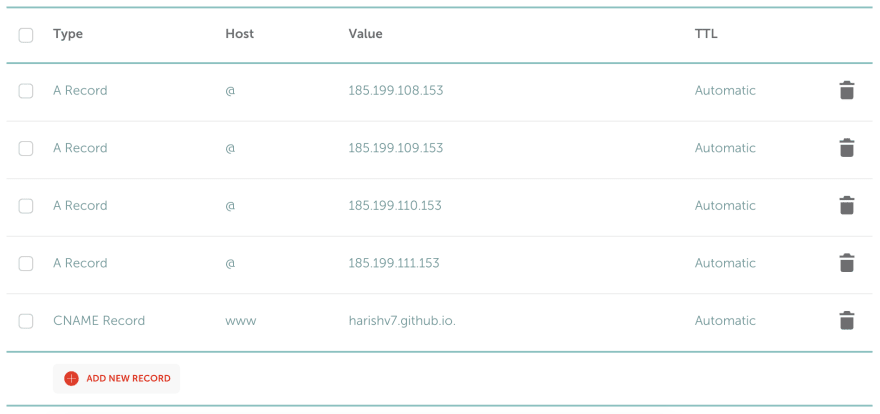
5. Go to Namecheap’s Dashboard
Under the Advanced DNS section, add in the following records. The CNAME record's value follows the GitHub URL you made in step 3. The A records are used to point the domain name to the IP address of the hosting server, which in your case will be GitHub’s.
That’s all folks. Give it a few minutes (or hours) and your site will be live at your newly registered domain.
Looking for Hosting?
- If you want the best Wordpress hosting, I highly recommend Bluehost. Get a great discount when you apply through this link.
- Also, get a massive discount with Hostinger when you apply through this link.
Both services offer great uptime and customer service. Oh did I mention - you get a free domain name with both Bluehost and Hostinger!

Top comments (1)
Thank you very much! this was very useful. All the other sources I found didn't mention creating the CNAME file in the repo. Now it works :D