original post @ Linguine Blog
In a previous article I wrote about how to use React state by building a simple cat application.
When the application is small its relatively easy to maintain React state.
But as the application grows the React state tree gets messier, unmanageable, and more complicated.
And this even more true when your app state starts to hold server responses, cache and UI state data.
UI state data may include routes information, whether to show a loading spinner, pagination, tabs, etc.
At some point your app will have so much going on that you’ve lost control over your app state, and how it works.
Redux is here to solve these problems
Redux is a tiny state management library.
It’s meant to make your state management more predictable, and centralize your React state data, and state logic.
Redux solves these problems by implementing 3 core principals.
Principal 1: Single source of truth
Your entire app state data is in one object tree.
This tree may also be known as a store.
By maintaining a single store it allows you to be debug or inspect your application much easier.
Principal 2: State is read-only
Your store data gets passed down as React props. Which React doesn’t allow you to modify the props object directly.
This will help keep consistency through out the app.
Redux only allows you to update your store data through a functions called dispatch which you must defined the action to trigger.
These actions, describe what will be changing or happening to the store.
Principal 3: Changes are made with pure functions
These function are also known as reducers, which are attached to an action.
The job of a reducer is to get the current state and an action and return the next state.
So when you make a call to an action such as, ADD_CAT.
Redux will take that action request, check if it exists and if it has a reducer attached to it.
It will then execute that reducer function to update the store data.
P.S. Redux doesn’t just run on React, it may be used on any view JavaScript library, and even vanilla JS as well!
Adding Redux to React
For the sake of simplicity, I’m going to modify the cat list application that was built previously to showcase how to use Redux in React.
I know it’s another list app, but it’s simple and it’s easy to follow.
Also if you’d like to follow along with the actual code, scroll to the bottom for the Github source link.
The first step I need to take is to create the package.json file.
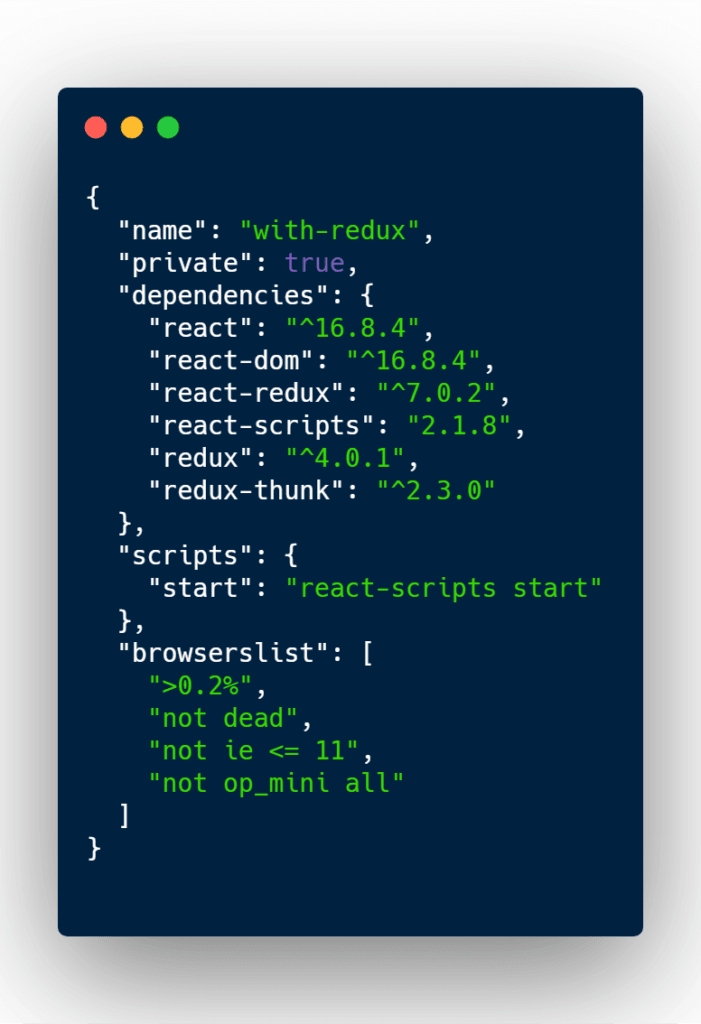
This project is going to require the following React libraries
React – The UI library.
React DOM – The tool that let’s us attache our React app to the DOM.
Redux – The state management library.
React Redux – The Redux React library that let’s us attach the Redux store to the React application.
Redux Thunk – This library is a bit of an overkill for this example but it’s popular, and wanted to demonstrate some of it’s pros.
Redux Thunk let’s us split our reducers in smaller pieces when the application grows to enormous, and it let’s us run dispatch inside our actions.
Once your package.json file is ready, run npm install inside your terminal.
The React app structure
Here is the structure of the application.

As you may see, I have my public directory that holds the initial index.html file.
I also have a src directory that holds a few important files for this application to work.
index.js – It’s responsible for making Redux available in the React application, as well as grabbing the React application and dumping it onto the HTML.
App.js – The main source application file. It allows you add cat names, and display them in a list format.
store.js – Is the glue that grabs the reducers and creates a Redux store out of it.
reducers/cats.js – Responsible for describing what the cat reducer looks like, naming the action, and attaching the action to a function that modifies the cat reducer data.
Now that you know the app structure, let’s start going through the code.
Creating a Redux reducer
First I’ll build my cat reducer file.

The first thing thing I will create is a variable named initialState.
initialState will hold a property named list, which is an array of cat names.
initialState also defines what the initial state looks like for the cat state.
The next variable to create is called actions.
actions is a key value pair object.
The key is the name of the action and the value is the reducer to be executed.
Right below the actions variable, I defined a simple function called addCat.
The name is pretty self explanatory. The function adds the cat name onto the list property in the state.
Creating Redux store file
This file may look scary but it’s not that bad. I’ll go over it step by step.
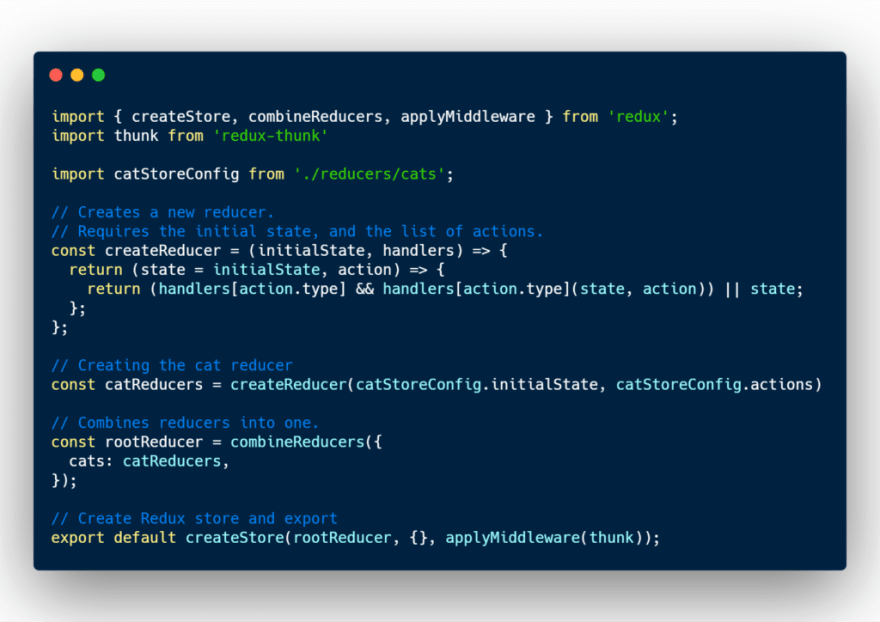
First, I’m importing Redux libraries, and also the cat reducer file that was created above.
Second, I’m creating a function called createReducer, that glues together the initial state, and the actions, thus creating a reducer.
I used it to create my cat reducer, and then inject into a variable called*rootReducer*.
I then export a new store by using the create store function and supplying it the root reducer with some middleware.
Using combineReducers may be another overkill in this app example but it shows you how to split and add reducers to your Redux store.
Creating the cat name list app
The next file to work on is the App.js file. This file will be responsible to display the UI, allow the user to enter a new cat name, and add it to the Redux store.

If you’re not familiar with React hooks, I highly recommend you read this article that teaches you how they work and how they’re used: React useState.
Moving on, this file is huge. Step by step time again.
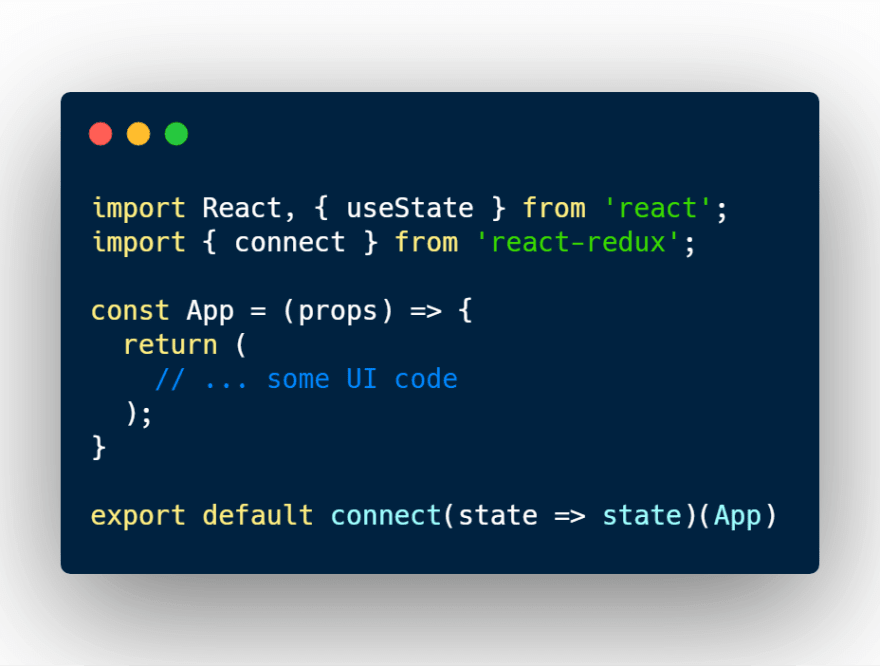
The first step here is to import React useState, and the connect function from React Redux library.
Then I’ll create the React component called App.
I’m then exporting the App React component inside the connect function as a HOC (higher order component).
You might be asking, “what does connect do?”
Good question, the connect function let’s a React component latch itself onto the Redux store.
The connect function does not modify the component, but it creates a new component around to pass any state data from the Redux store, and it provides a function called dispatch.
Here’s a kid illustration to visually see how it works.

Redux connect accepts a handful of parameters but I’ll go over the 2 most important ones.
In the example above I’m passing in only the first parameter which Redux calls, mapStateToProps.
mapStateToProps is a function that allows you to pick and choose what Redux store data you want.

In the App.js file, I decided to get all, but you don’t have to.
If the first parameter is provided, then the wrapper component will subscribe to the Redux store.
It acts like a listener to always provide the latest data to the component you’ve created.
If you’d like your app to not subscribe to the store just pass null or undefined as the first parameter.
The second parameter in Redux connect is mapDispatchToProps.
mapDispatchToProps allows you to create custom dispatch functions and pass them to the React component.
Let’s take a look at the input and button section of the React component.
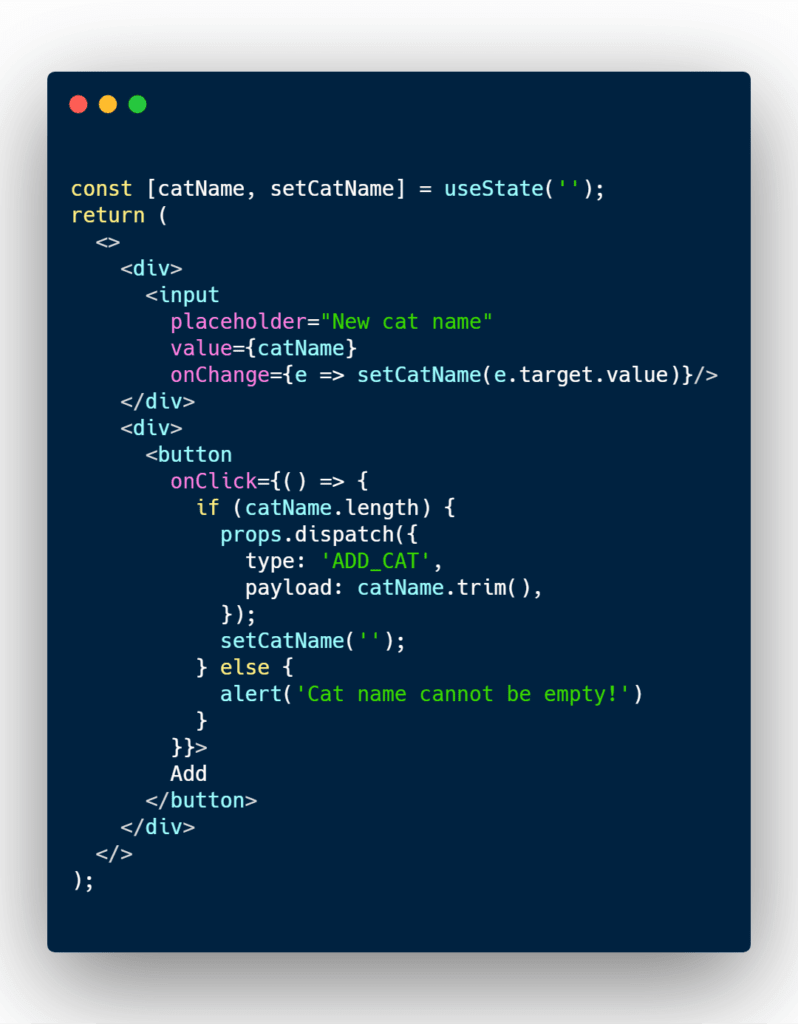
Inside the React component and before the return statement, I’ve create a new useState hook for the cat name.
I’ve also attached setCatName inside the input HTML element for the onChange event.
So whenever a user is typing the new cat name, setCatName will trigger, and update the value of catName.
I’ve also added a button to submit the new cat name on the onClick event.
Inside the onClick event, I’m saying to check if the cat name is empty or not. If it is empty return an alert saying “Cat name cannot be empty!”
If there is a name, I want to trigger the ADD_CAT Redux action by using dispatch, and supply the new cat name value in a property called payload.
payload is a common practice when passing data through dispatch.
It doesn’t have to be called payload, you can call it whatever you want. But the property type, must exist.
Right after the dispatch function, I’m resetting the cat name value to an empty string.
What does dispatch do again??
Yes, dispatch is a function that you only get from Redux connect.
Dispatch allows you trigger actions defined in your reducer files, and it’s the only way to modify the Redux store.
Think of dispatch as the setState of Redux.
The final part to go over in the App.js file is displaying the cat names that I’ve fetch from my Redux store.

Adding Redux store provider component
Finally, the final part to this masterpiece.
In our index.js file I’m going to add the Provider component to the React application, and supply the created store from the store.js file.
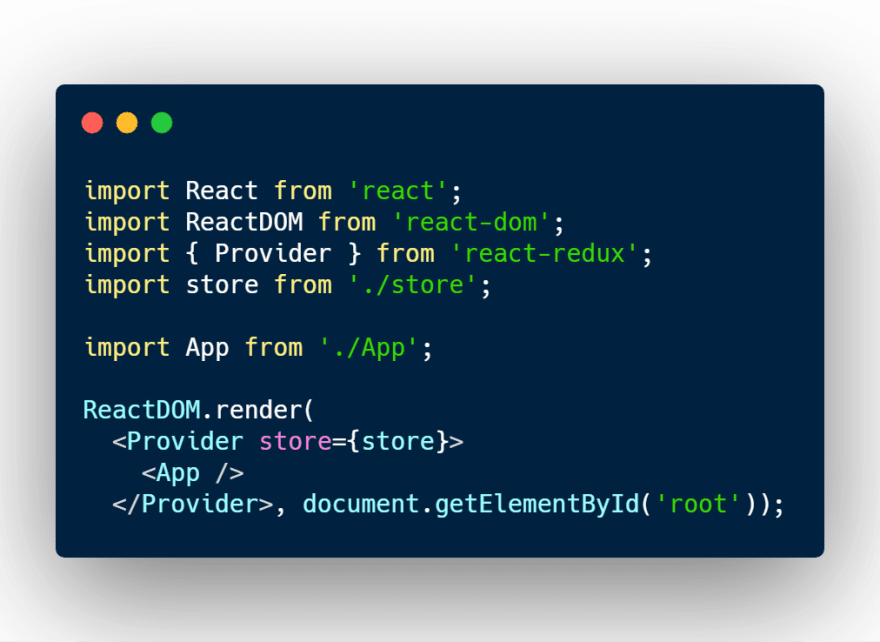
The Provider component makes the Redux store available to any nested components that have been wrapped in the connect function.
It’s good practice to make your Provider at the top level, that way your entire React application has access to the Redux store data.
Conclusion
Redux has a lot of boilerplate and moving parts, but once you start understanding it; it just makes more sense on how this state management tool helps manage large projects.
If you have any questions feel free to ask me on Twitter.

Top comments (6)
Great article, I've been using Redux for a long time but haven't started using it with hooks and functional classes.
Hooks still scare me a bit, but so did React and Redux in the beginning! Hooks are definitely the way to go forward and write less repetitive code.
Do you know if it's possible to mix Redux store with functional and class components? The project I'm working on has a huge number of connected class components 😵😵😵
Sorry for the late response. The answer is yes you can.
P.S. hooks are much easier to learn than Redux.
Here are a couple articles I wrote on hooks:
blog.linguinecode.com/post/getting...
blog.linguinecode.com/post/when-to...
"Redux has a lot of boilerplate..", in fact I just wrote about it here: dev.to/vcapretz/writing-modern-red...
The maintainers are making nice efforts to change it and make it easier to implement Redux while still following the conventions 😁
Great and detailed article btw!
I'm happy to hear that! thank you for notifying me
This is a great article I've bookmarked for future reference. If and when Redux is too much, please take a look at this approach
dev.to/chadsteele/eventmanager-an-...
p.s.
7th graders are geniuses ;)
Hi! Great article. I'd suggest you also see Redux toolkit for new ReactJS projects. It's easier to setup and provides a simple API.