
Welcome to the world of Android testing! In our previous journey, we built a fully functional Reminder App using Jetpack Compose. However, to ensure the completeness and quality of our application, we need to delve into the realm of Android Tests. Here, we explore the compelling benefits of incorporating tests into your app development process. Let's discover how testing can enhance the reliability, stability, and overall user experience of your Android applications.
What we will learn.
- Enhanced Reliability: We can easily validate the functionalities of our app's UI components, ensuring that they work as intended across various scenarios and user interactions. This will help us catch potential bugs, edge cases, and regressions early in the development cycle, resulting in a more reliable and robust application.
- Improved Stability: Android tests will give us an edge during code changes and updates. They will help us identify any unintended side effects or compatibility issues that may arise when modifying existing code or introducing new features. This will help us maintain the stability of our app and mitigate the risk of introducing regressions.
- Enhanced User Experience: Robust Android UI testing helps ensure that our app delivers a seamless and intuitive user experience. By simulating user interactions and validating UI behavior, we can identify and fix usability issues, layout problems, and inconsistencies in the user interface. This ultimately leads to a polished and user-friendly app, enhancing overall satisfaction and engagement.
Nice to have.
- Completion of the previous Reminder App article is recommended as we will build upon the same app in this article.
- Proficiency in building Android apps using Kotlin.
- Familiarity with Jetpack Compose.
- Basic understanding of Android tests is a plus.
- Familiarity with Git.
Let's delve into the juicy part.
In an Android project tree, the (androidTest) and (test) directories serve different purposes:

(androidTest): This directory is specifically designated for instrumented tests, also known as Android tests or UI tests. It contains test code that interacts with the Android framework and runs on an Android device or emulator. Instrumented tests typically simulate user interactions with the app's UI, validate UI behavior, and test functionalities that require a running Android environment. These tests can access and manipulate the app's resources, activities, and components, providing a more comprehensive evaluation of the app's behavior on a device.-
(test): The(test)directory is used for unit tests. These tests are written in isolation and do not require an Android device or emulator to execute. They focus on testing individual units of code, such as classes, functions, or methods, in isolation from the Android framework.Unit tests primarily target business logic, algorithms, and non-UI components of the app. They are typically faster to execute compared to instrumented tests and provide a more targeted and efficient means of verifying the correctness of individual code units.

Unit Tests.
- We will start by testing our
DataSource object classwhich holds our list of plants. Below is our test class setup:
class DataSourceModelTest : TestCase() {

    @Before
    override fun setUp() {

    }
}
- In the context of unit testing using a testing framework like
JUnit, the@Beforeannotation is used to mark a method that should be executed before each individual test method in the test class. - To finalize our
DataSourceModelTesttest case, we will define our expected results and verify them usingAssert.assertEquals(), which is a method used to compare two values and assert their equality.
import com.rocqjones.reminderapp.data.DataSource
import com.rocqjones.reminderapp.models.ComposeRandomItem
import junit.framework.TestCase
import org.junit.Assert
import org.junit.Before
import org.junit.Test

class DataSourceModelTest : TestCase() {

    private val actualPlants = DataSource.plants
    private lateinit var expectedPlant1 : ComposeRandomItem
    private lateinit var expectedPlant2 : ComposeRandomItem

    @Before
    override fun setUp() {
        expectedPlant1 = ComposeRandomItem(
            name = "Aloe Vera",
            schedule = "Monthly",
            type = "Succulent",
            description = "Aloe vera is a succulent plant species of the genus Aloe. It is cultivated for agricultural and medicinal uses."
        )
        expectedPlant2 = ComposeRandomItem(
            name = "Bamboo Palm",
            schedule = "Weekly",
            type = "Palm",
            description = "The Bamboo Palm, also known as the Reed Palm, is a medium-sized palm native to South America. It is a popular houseplant and can grow up to 12 feet tall."
        )
    }

    @Test
    fun testExpectedPlant1() {
        Assert.assertEquals(expectedPlant1, actualPlants[0])
    }

    @Test
    fun testExpectedPlant2() {
        Assert.assertEquals(expectedPlant2, actualPlants[1])
    }
}
- After running the code locally here are the expected results.

- Another way to verify the test cases of our class is through CI/CD.
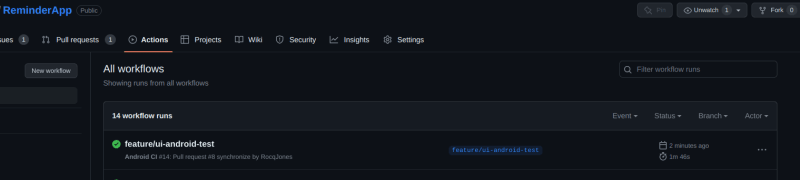
To create a new branch for testing Android tests, use the command
git checkout -b "testing/android-tests". Remember to commit and push your changes. As we have set branch rules, the Android CI will automatically run checks on the branch. If any issues arise, the branch won't be mergeable until we fix our errors. From our GitHub Actions you will find all failed and successful check.
Android Tests.
Tests for this section should go in the
androidTestfolder since they will be interacting with the Android framework.
We will start by writing Android tests for our MainActivity. To get started we will make several changes to our existing code.
- For
fun ListItems(//...)addtestTag("list_items")to themodifierand also update yourListItemscomposable functions to assign unique test tags to eachComposeCard. Updated code should now look like.
@Composable
fun ListItems(
    modifier: Modifier = Modifier,
    data: List<ComposeRandomItem> = DataSource.plants.map { it }
) {
    LazyColumn(modifier = modifier.padding(vertical = 4.dp).testTag("list_items")) {
        itemsIndexed(items = data.toMutableList()) { index, n ->
            ComposeCard(
                name = n.name,
                type = n.type,
                description = n.description,
                modifier = Modifier.testTag("composeCard_$index")
            )
        }
    }
}
- Next we modify our
ComposeCardand remove the redundant opt-in annotation@OptIn(ExperimentalMaterial3Api::class).
@Composable
fun ComposeCard(name: String, type: String, description: String, modifier: Modifier) {
    val dialogState = remember { mutableStateOf(false) }

    Card(
        colors = CardDefaults.cardColors(
            containerColor = MaterialTheme.colorScheme.primary
        ),
        modifier = modifier.padding(vertical = 4.dp, horizontal = 8.dp).clickable {
            dialogState.value = true
        }
    ) {
        CardContent(name, type, description)
    }

    if (dialogState.value) {
        ReminderDialog(name = name, onDismiss = { dialogState.value = false })
    }
}
We are now set to write our Android UI tests, we first set up our MainActivityTest class for UI testing using Jetpack Compose. It initializes the test rule, creates a setup method to prepare the test environment, and specifies the content of the ComposeTestRule to the MainActivity composable function.
@RunWith(AndroidJUnit4::class)
class MainActivityTest {

    @get:Rule
    val composeTestRule = createComposeRule()

    @Before
    fun setUp() {
        // Set up your Compose UI here
        composeTestRule.setContent {
            ReminderAppTheme {
                // A surface container using the 'background' color from the theme
                Surface(
                    modifier = Modifier.fillMaxSize(),
                    color = MaterialTheme.colorScheme.background
                ) {
                    ListItems()
                }
            }
        }
    }
}
- Add the following dependencies.
testImplementation 'junit:junit:4.13.2'
androidTestImplementation 'androidx.test.ext:junit:1.1.5'
androidTestImplementation 'androidx.test.espresso:espresso-core:3.5.1'
androidTestImplementation "androidx.compose.ui:ui-test-junit4:$compose_version"

debugImplementation "androidx.compose.ui:ui-tooling:$compose_version"
debugImplementation "androidx.compose.ui:ui-test-manifest:$compose_version"
implementation 'androidx.test.uiautomator:uiautomator:2.2.0'
- In this
MainActivityTestclass, we use the@RunWithannotation to indicate that we are using theAndroidJUnit4test runner. ThecomposeTestRulerule is created usingcreateComposeRule()and allows us to write UI tests for Compose. - The
setUpmethod is annotated with@Beforeand is run before each test case.
import android.app.NotificationManager
import android.content.Context
import androidx.compose.foundation.layout.fillMaxSize
import androidx.compose.material3.MaterialTheme
import androidx.compose.material3.Surface
import androidx.compose.ui.Modifier
import androidx.compose.ui.test.*
import androidx.compose.ui.test.junit4.createComposeRule
import androidx.test.espresso.matcher.ViewMatchers.*
import androidx.test.ext.junit.runners.AndroidJUnit4
import androidx.test.platform.app.InstrumentationRegistry
import androidx.test.uiautomator.By
import androidx.test.uiautomator.UiDevice
import androidx.test.uiautomator.Until
import com.rocqjones.reminderapp.ui.theme.ReminderAppTheme
import org.junit.Assert
import org.junit.Before
import org.junit.Rule
import org.junit.Test
import org.junit.runner.RunWith
import java.util.concurrent.TimeUnit


@RunWith(AndroidJUnit4::class)
class MainActivityTest {

    @get:Rule
    val composeTestRule = createComposeRule()

    @Before
    fun setUp() {
        // Set up your Compose UI here
        composeTestRule.setContent {
            ReminderAppTheme {
                Surface(
                    modifier = Modifier.fillMaxSize(),
                    color = MaterialTheme.colorScheme.background
                ) {
                    ListItems()
                }
            }
        }
    }

    @Test
    fun testComposableList() {
        composeTestRule.onNodeWithTag("list_items")
    }

    @Test
    fun testComposableCard() {
        composeTestRule.onNodeWithTag("composeCard_0")
    }

    @Test
    fun testOpenReminderDialog() {
        composeTestRule.onNodeWithTag(
            "list_items"
        ).assertExists().onChildren()[0].assertExists().performClick()

        // Verify that the ReminderDialog is displayed
        composeTestRule.onNodeWithTag("reminderDialog").assertExists()

        val schedules = listOf(
            "5 seconds" to 5000L,
            "8 minutes" to 8 * 60 * 1000L,
            "1 day" to 24 * 60 * 60 * 1000L,
            "1 week" to 7 * 24 * 60 * 60 * 1000L
        )

        composeTestRule.onNodeWithTag("reminderDialog")
            .assertExists()

        for ((scheduleText, _) in schedules) {
            composeTestRule.onNodeWithText(scheduleText)
                .assertExists()
        }

        composeTestRule.onNodeWithText("5 seconds").assertExists().performClick()

        // Wait for 5 seconds
        Thread.sleep(TimeUnit.SECONDS.toMillis(5))

        // Check if the notification appears
        val device = UiDevice.getInstance(InstrumentationRegistry.getInstrumentation())
        val notificationExists = device.wait(
            Until.hasObject(By.pkg("com.rocqjones.reminderapp").depth(0)),
            TimeUnit.SECONDS.toMillis(10)
        )
        Assert.assertTrue("Notification should appear", notificationExists != null)

        // Click the notification
        val notification = device.findObject(By.text("Reminder App."))
        notification?.click()

        // Verify that the MainActivity is launched
        val instrumentation = InstrumentationRegistry.getInstrumentation()
        instrumentation.waitForIdleSync()
        val currentActivity = instrumentation.targetContext.packageManager.getLaunchIntentForPackage(
            instrumentation.targetContext.packageName
        )?.component?.className
        Assert.assertEquals(
            "MainActivity should be launched",
            MainActivity::class.java.name,
            currentActivity
        )

        // Clear the notification
        val notificationManager = instrumentation.targetContext.getSystemService(
            Context.NOTIFICATION_SERVICE
        ) as NotificationManager
        notificationManager.cancel(17)
    }
}
- The
testComposableListandtestComposableCardtest cases serve as basic checks to ensure that the UI elements are present. - The
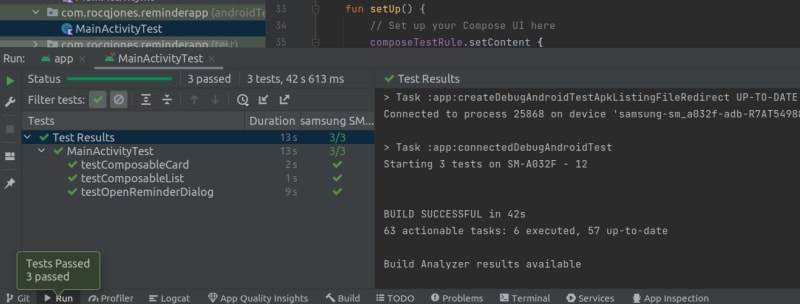
testOpenReminderDialogtest case is the main test case that we simulates opening theReminderDialogand performing various assertions. It clicks on aComposeCardto open the dialog, verifies the presence of the dialog, interacts with its options, waits for the notification to appear, checks if the notification is displayed, clicks the notification to launch theMainActivity, verifies that theMainActivityis launched, and finally clears the notification from the status bar. -
UiDevice.getInstance(InstrumentationRegistry.getInstrumentation())is used to obtain an instance of the UiDevice class. It allows us to simulate touch inputs and in this case accessing device information. Once we have theUiDeviceinstance, we can use its methods to interact with the scheduled notification. - Below is a screenshot of our Android UI test cases.
Workflows References.
Conclusion.
By leveraging tests in your Android app development, you can achieve a higher level of reliability, stability, and user experience, ensuring that your app meets the expectations of your users and stands out in the competitive landscape. Feel free to customize and expand upon this code as needed.
Resources.
For more alluring content about Android Jetpack Compose follow me on Twitter and LinkedIn so that you do not miss any updates about new articles.

Top comments (0)